


 本文介绍如何使用Springfox-Swagger2框架自动生成RESTful API文档。通过在Spring Boot项目中引入Swagger2依赖并配置注解,可实现接口文档的自动化生成及在线测试。
前言
在开发过程中,编写接口文档是开发人员必不可少的工作,但在写文档的时候,总会占用不少时间与精力。使用 springfox-swagger2 框架,并在相应地方加上注解,swagger 就可以帮我们自动在线生成标准的接口文档,并支持接口的测试。
具体实现
1、maven依赖
实际上,前两个依赖是自动生成与测试的框架依赖。com.google.guava 这个依赖是为了解决一个报错,貌似是因为在类中有多函数的时候,如果没有这个依赖,就会报 nullClass,具体没有细研究。
        <!--swagger-->
        <dependency>
            <groupId>io.springfox</groupId>
            <artifactId>springfox-swagger2</artifactId>
            <version>2.6.1</version>
        </dependency>
        <dependency>
            <groupId>io.springfox</groupId>
            <artifactId>springfox-swagger-ui</artifactId>
            <version>2.6.1</version>
        </dependency>
        <dependency>
            <groupId>com.google.guava</groupId>
            <artifactId>guava</artifactId>
            <version>19.0</version>
        </dependency>
2、添加注解
- 配置类
package com.example.demo;

import org.springframework.context.annotation.Bean;
import org.springframework.context.annotation.Configuration;
import springfox.documentation.builders.ApiInfoBuilder;
import springfox.documentation.builders.PathSelectors;
import springfox.documentation.builders.RequestHandlerSelectors;
import springfox.documentation.service.ApiInfo;
import springfox.documentation.spi.DocumentationType;
import springfox.documentation.spring.web.plugins.Docket;
import springfox.documentation.swagger2.annotations.EnableSwagger2;

/**
 * @author amber
 */
@Configuration
@EnableSwagger2
public class Config {
    @Bean
    public Docket docket(){
        return new Docket(DocumentationType.SWAGGER_2)
                .apiInfo(apiInfo())
                .select()
                .apis(RequestHandlerSelectors.basePackage("com.example.demo"))
                .paths(PathSelectors.any())
                .build();
    }

    public ApiInfo apiInfo(){
        return new ApiInfoBuilder()
                .title("利用swagger2构建的API文档")
                .description("用restful风格写接口")
                .termsOfServiceUrl("")
                .version("1.0")
                .build();
    }
}
- 接口类
一般使用 springboot 框架的话,接口都是在 controller 中。其中
@Api
@ApiOperation
@ApiImplicitParams
@ApiImplicitParam
是比较常用的注解。以下是注解里比较常用的参数说明:
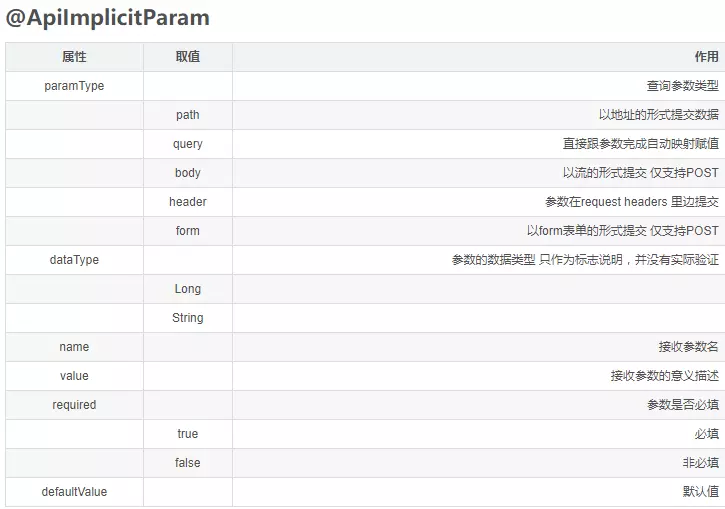
(此从图他站引用,侵删)
package com.example.demo;

import io.swagger.annotations.*;
import org.springframework.web.bind.annotation.RequestMapping;
import org.springframework.web.bind.annotation.RequestParam;
import org.springframework.web.bind.annotation.RestController;

import javax.servlet.http.HttpServletRequest;

@RestController
@RequestMapping("/es/search")
@Api(value = "单词查询类")
public class Controller {

    @RequestMapping("/singleSearchResult")
    @ApiOperation(value = "单词查询" , notes = "查询之后返回数据", httpMethod = "GET")
    @ApiImplicitParams({
            @ApiImplicitParam(paramType = "path", name = "goodsName", value = "商品名称", required = true),
            @ApiImplicitParam(paramType = "path", name = "goodsKind", value = "商品类别", required = false),
            @ApiImplicitParam(paramType = "path", name = "currentPage", value = "当前页码", required = true)
    })
    //注意:返回不能是Object,必须是注解好的回参类,swagger不会向下转型。
    public AjaxResponseBody singleSearchSmart(
            @RequestParam(value = "goodsName", required = false) String goodsName,
            @RequestParam(value = "goodsKind", required = false) String goodsKind,
            @RequestParam(value = "page" , required = false) int currentPage) {
        return "hello";
    }
}
- 回参类
在回参类中,常用的注解有:
@ApiModel
@ApiModelProperty
package com.example.demo;

import io.swagger.annotations.ApiModel;
import io.swagger.annotations.ApiModelProperty;

import java.io.Serializable;

/**
 * @author anlanting
 */
@ApiModel(value = "Ajax接口回参类")
public class AjaxResponseBody implements Serializable {

    /**
     * 200表示成功;304表示权限不足;500表示异常。
     */
    @ApiModelProperty(value = "状态码", example = "200")
    private String status;
    @ApiModelProperty(value = "状态说明", example = "请求成功")
    private String msg;
    @ApiModelProperty(value = "回参类")
    private Object result;
    @ApiModelProperty(value = "token")
    private String jwtToken;

    public AjaxResponseBody() {
    }

    public AjaxResponseBody(String status, String msg, Object result, String jwtToken) {
        this.status = status;
        this.msg = msg;
        this.result = result;
        this.jwtToken = jwtToken;
    }

    public String getStatus() {
        return status;
    }

    public void setStatus(String status) {
        this.status = status;
    }

    public String getMsg() {
        return msg;
    }

    public void setMsg(String msg) {
        this.msg = msg;
    }

    public Object getResult() {
        return result;
    }

    public void setResult(Object result) {
        this.result = result;
    }

    public String getJwtToken() {
        return jwtToken;
    }

    public void setJwtToken(String jwtToken) {
        this.jwtToken = jwtToken;
    }

    public static AjaxResponseBody success(Object result) {
        return new AjaxResponseBody("200", "success", result, null);
    }

    public static AjaxResponseBody success() {
        return new AjaxResponseBody("200", "success", null, null);
    }

    public static AjaxResponseBody fail(String msg) {
        return new AjaxResponseBody("500", msg, null, null);
    }
}
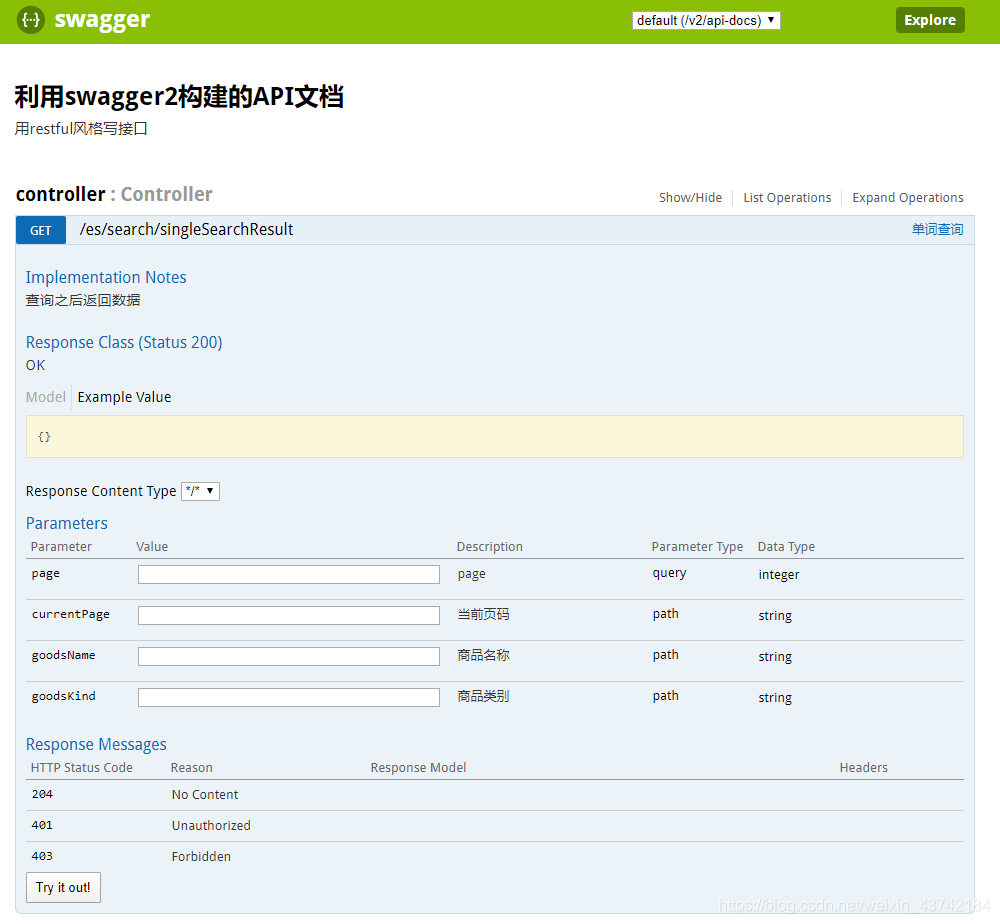
在线生成文档
在做完上述一系列配置之后,将服务部署到本地,之后访问 localhost/swagger-ui.html 就可以看到 swagger 为我们自动生成的文档。
正常来讲,Model 和 Example Value,应该是回参类的说明。但是这个 demo 我没做完,可以留给大家试一下。


 被折叠的 条评论
为什么被折叠?
被折叠的 条评论
为什么被折叠?
 到【灌水乐园】发言


