


 本文详细介绍了JavaScript实现链表数据结构,包括单向链表和双向链表。链表允许在不移动元素的情况下添加或删除节点,具有灵活性。文章讲解了如何创建链表,特别是双向链表的特性,并探讨了在不同位置插入元素的场景,如在链表头部、尾部及中间插入元素的逻辑和步骤。
1. 链表数据结构
链表存储有序的元素集合,但不同于数组,链表中的元素在内存中并不算连续放置的。每个元素由一个存储元素本身的节点和一个指向下一个元素的引用(也称指针或链接)组成。下图展示一个链表结构:

相对于传统的数组,链表的一个好处在于,添加或移除元素的时候不需要移动其他元素。然而,链表需要使用指针,因此实现链表时需要额外注意。在数组中,我们可以直接访问任何位置的任何元素,而想要访问链表中间的一个元素,则需要从起点(表头)开始迭代链表直到找到所需的元素。
可以用火车来说明链表。每节车厢都是链表的元素,车厢间的连接就是指针。
1.1 创建链表
理解了链表是什么之后,现在开始来实现数据结构。以下是LinkedList类的“骨架”和方法。
linked_Node类
要表示链表中的第一个以及其他元素,需要一个助手类,叫作Node。Node类表示我们想要添加到链表中的项。它包含一个element属性,该属性表示要加入链表元素的值;以及一个next属性,该属性是指向链表中下一个元素的指针。
export class Node{
  constructor(element, next) {
    this.element = element;
    this.next = undefined;
  }
}
defaultEquals方法
我们要实现一个名为indexOf的方法,它使我们能够在链表中找到一个特定的元素。要比较链表中的元素是否相等,我们需要使用一个内部调用的函数,名为equalsFn。使用linkedlist类的时候可以自行传入用于比较两个js对象或值是否相等的自定义函数。如果没有传入这个自定义函数,该数据结构将使用默认值的defaultEquals函数。
export default function defaultEquals(a, b) {
  return a === b
}
LinkedList类
对于LinkedList数据结构,从声明count属性开始,它用来存储链表中的元素数量。
将第一个元素的引用使用head元素保存下来。
import defaultEquals from "./defaultEquals.js";
import { Node } from "./linked_Node.js";

export default class LinkedList {
  constructor(equalsFn = defaultEquals) {
    this.equalsFn = equalsFn;
    this.count = 0;
    this.head = undefined;
  }

  // push(element): 向链表尾部添加一个新元素。链表为空,添加的是第一个元素;链表不为空,向其追加元素。
  push(element) {
    // 把element作为值传入,创建Node项
    const node = new Node(element);
    // 保存当前指向链表的变量
    let current;
    // 如果head的指向为undefined或null,直接将head指向该node
    if (this.head == null) {
      this.head = node;
    } else {
      // 第一个元素的引用,即head
      current = this.head;
      // 当current.next的指向不为null时,一直变量链表,直到为null
      while (current.next != null) { //获取最后一项
        current = current.next;
      }
      // 将其next赋为新元素,建立连接
      current.next = node;
    }
    // 添加完元素,增加链表的长度
    this.count++;
  }

  // insert(element, position): 向链表的特定位置插入一个新元素
  insert(element, index) {
    // 检查越界
    if (index >= 0 && index <= this.count) {
      const node = new Node(element);
      if (index === 0) {
        // 在第一个位置添加
        const current = this.head;
        node.next = current;
        this.head = node;
      } else {
        // 获取添加位置的前一项
        const previous = this.getElementAt(index - 1);
        // 获取位置的当前项
        const current = previous.next;
        // 把添加的节点的下一项指向current
        node.next = current;
        // 把previous的下一项指向node
        previous.next = node;
      }
      // 更新链表的长度
      this.count++;
      return true;
    }
    return false;
  }

  // 在链表中我们经常需要迭代整个链表直到到达我们的目标索引index(位置)。
  // 因此,可以将这部分逻辑独立为单独的方法,在不同地方复用
  // getElementAt(index): 返回链表中特定位置的元素。如果链表中不存在这样的元素,则返回undefined
  getElementAt(index) {
    if (index >= 0 && index <= this.count) {
      let node = this.head;
      for (let i = 0; i < index && node != null; i++) {
        node = node.next;
      }
      return node;
    }
    return undefined;
  }

  // remove(element): 从链表中移除一个元素
  remove(element) {
    const index = this.indexOf(element);
    return this.removeAt(index)
  }

  // indexOf(element): 返回元素在链表中的索引。如果链表中中没有该元素则返回-1
  indexOf(element) {
    let current = this.head;
    // 遍历链表
    for (let i = 0; i < this.count && current != null; i++) {
      // 把输入的element和当前遍历到的元素做比较,相等则返回该元素所在的索引值. 不相等遍历下一元素
      if(this.equalsFn(element, current.element)) {
        return i;
      }
      // 取下一元素
      current = current.next;
    }
    // 没有匹配到元素返回-1
    return -1;
  }

  // removeAt(position): 从链表的特定位置移除一个元素
  removeAt(index) {
    // 检查越界
    if (index >= 0 && index < this.count) {
      let current = this.head;
      // 移除第一项
      if (index === 0) {
        this.head = current.next;
      } else {
        let previous;
        // 遍历完后,previous保存的是移除项的前一项,current保存的是移除项
        for (let i = 0; i < index; i++) {
          previous = current;
          current = current.next;
        }
        // 将previous于current的下一项连接起来:跳过current,从而移除它
        previous.next = current.next;
      }
      // 移除完,链表减短1
      this.count--;
      // 返回移除的值
      return current.element;
    }
    return undefined;
  }

  // 重构removeAt方法
  removeAt(index) {
    if (index >= 0 && index < this.count) {
      let current = this.head;
      if (index === 0) {
        this.head = current.next;
      } else {
        const previous = this.getElementAt(index - 1);
        current = previous.next;
        previous.next = current.next;
      }
      this.count--;
      return current.element;
    }
    return undefined;
  }

  // isEmpty(): 如果链表中不包含任何元素,返回true,如果链表长度大于0则返回false
  isEmpty() {
    return this.size() === 0;
  }

  // size(): 返回链表包含的元素个数,与数组中的length属性类似
  size() {
    return this.count;
  }

  getHead() {
    return this.head;
  }

  // toString(): 返回表示整个链表的字符串。由于列表项使用了Node类,就需要重写继承自JavaScript对象默认的toString方法,让其只输出元素的值。
  toString() {
    if (this.head == null) {
      return '';
    }
    let objString = `${this.head.element}`;
    let current = this.head.next;
    for (let i = 1; i < this.size() && current != null; i++) {
      objString = `${objString},${current.element}`;
      current = current.next;
    }
    return objString;
  }

  clear() {
    this.head = undefined;
    this.count = 0;
  }
}

const list = new LinkedList();

console.log('push element 15');
list.push(15);

console.log('list.indexOf(15) => ', list.indexOf(15));

console.log('push element 10');
list.push(10);

console.log('list.toString() => ', list.toString());
console.log('list.indexOf(10) => ', list.indexOf(10));

console.log('push element 13');
list.push(13);

console.log('list.toString() => ', list.toString());
console.log('list.indexOf(13) => ', list.indexOf(13));
console.log('list.indexOf(10) => ', list.indexOf(10));

console.log('push elements 11 and 12');
list.push(11);
list.push(12);

console.log('list.toString() => ', list.toString());
console.log('list.removeAt(1) => ', list.removeAt(1));
console.log('list.toString() => ', list.toString());
console.log('list.removeAt(3) => ', list.removeAt(3));
console.log('list.toString() => ', list.toString());

console.log('push element 14');
list.push(14);

console.log('list.toString() => ', list.toString());
console.log('insert element 16 pos 0 => ', list.insert(16, 0));
console.log('list.toString() => ', list.toString());
console.log('insert element 17 pos 1 => ', list.insert(17, 1));
console.log('list.toString() => ', list.toString());
console.log('insert element 18 pos list.size() => ', list.insert(18, list.size()));
console.log('list.toString() => ', list.toString());
console.log('remove element 16 => ', list.remove(16));
console.log('list.toString() => ', list.toString());
console.log('remove element 11 => ', list.remove(11));
console.log('list.toString() => ', list.toString());
console.log('remove element 18 => ', list.remove(18));
console.log('list.toString() => ', list.toString());
2. 双向链表
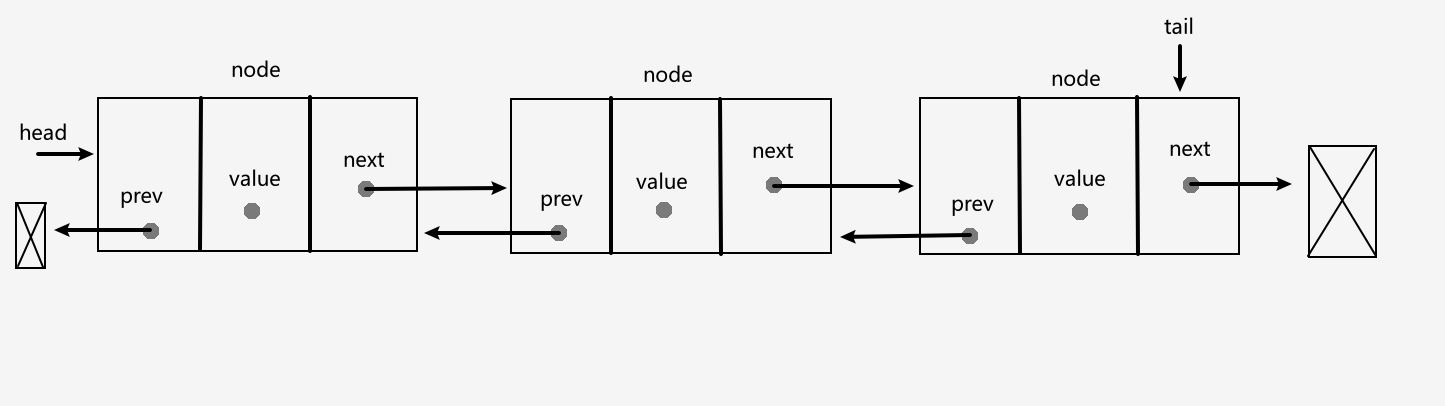
链表有多种不同的类型,这一小节介绍双向链表。双向链表和普通链表的区别在于,在链表中,一个节点只有链向下一个节点的链接;而在双向链表中,链接是双向的:一个链向下一个元素,另一个链向前一个元素,如下图所示:
先从实现DoublyLinkedList类所需的变动开始。
DoublyLinkedList类是一种特殊的LindedList类,需要扩展LinkedList类。这表示DoublyLinkedList类将继承LinkedList类中所有的属性和方法。tail属性用来保存对链表最后一个元素的引用。
双向链表提供了两种迭代的方法:从头到尾,或者从尾到头。我们也可以访问一个特定节点的下一个或前一个元素。为了实现这各个功能,还需要追踪每个节点的前一个节点。所以除了Node类中的element和next属性,DoublyLinkedList会使用一个特殊的节点,这个名为DoublyNode的节点有一个叫prev的属性。DoublyNode继承了Node类。
export class DoublyNode extends Node {
  constructor(element, next, prev) {
    super(element, next);
    this.prev = prev
  }
}
import defaultEquals from "./defaultEquals.js";
import LinkedList from "./LinkedList.js";
import { DoublyNode } from "./linked_Node.js";

export default class DoublyLinkedList extends LinkedList {
  constructor(equalsFn = defaultEquals) {
    super(equalsFn);
    this.tail = undefined;
  }
  // insert方法

  // removeAt方法

}
2.1. 在任意位置插入新元素
向双向链表中插入一个新元素跟(单向)链表非常相似。区别在于,链表只要控制一个next指针,而双向链表则要同时控制next和prev这两个指针。在DoublyLinkedList类中,将重写insert方法。
insert(element, index) {
   if (index >= 0 && index <= this.count) {
     const node = new DoublyNode(element);
     let current = this.head;
     if (index === 0) {
       if (this.head == null) {
         this.head = node;
         this.tail = node;
       } else {
         node.next = this.head;
         current.prev = node;
         this.head = node;
       }
     } else if (index === this.count) { //最后一项
       current = this.tail;
       current.next = node;
       node.prev = current;
       this.tail = node;
     } else {
       const previous = this.getElementAt(index - 1);
       current = previous.next;
       node.next = current;
       previous.next = node;
       current.prev = node;
       node.prev = previous;
     }
     this.count++;
     return true;
   }
   return false;
 }
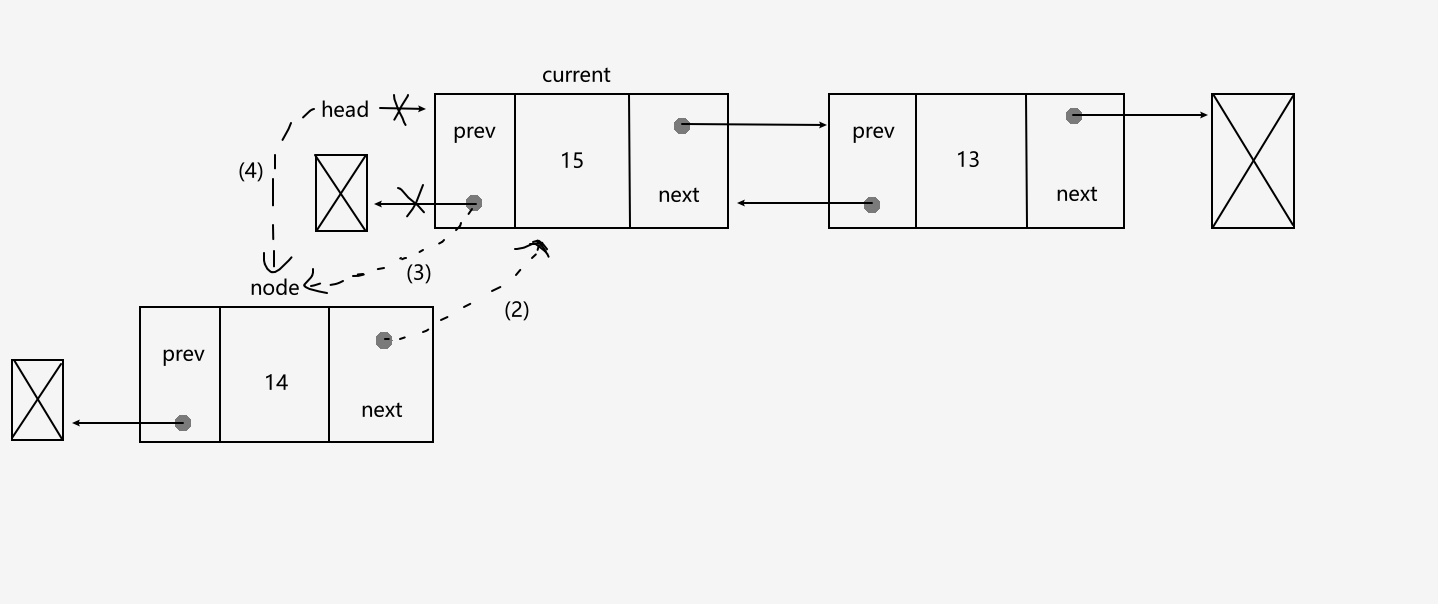
第一种场景:
在双向链表的第一个位置(起点)插入一个新元素。如果双向链表为空,只需要把 head 和 tail 都指向这个新节点。如果不为空,current变量将是该双向链表中的第一个元素的引用。就像在链表中所做的,把 node.next 设为 current({2}),而 head 将指向 node({4}它将成为双向链表中的第一个元素)。不同之处在于,还需要为指向上一个元素的指针设一个值。current.prev 指针将由指向 undefined 变为指向新元素({3})。node.prev 指针已经是 undefined,因此无需更新。下图演示过程:
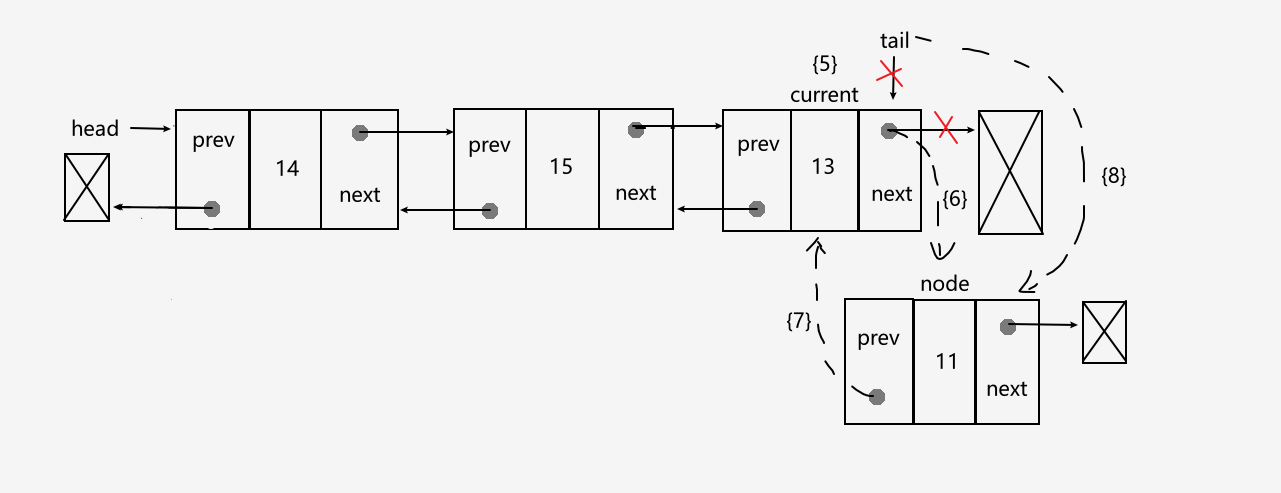
第二种场景:
假设我们要在双向链表最后添加一个新元素。这是一种特殊情况,因为我们还控制着指向最后一个元素的指针。current 变量将引用最后一个元素({5}),然后开始建立链接,current.next 指针(指向undefined)将指向node({6}–基于构造函数,node.next 已经指向了 undefined)。node.prev 将引用 current({7})。最后剩一件事就是更新 tail,它将由指向 current 变为指向 node({8})。
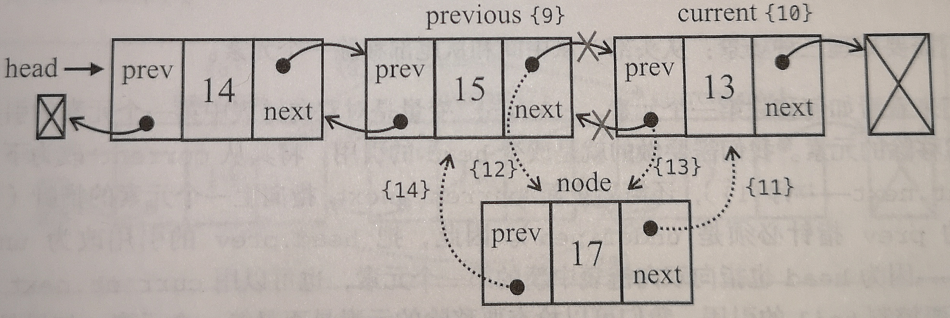
第三种场景:
在双向链表中间插入一个新元素。就像之前的方法中所做的,迭代双向链表,直到要找的位置({9})。getElementAt 方法是从LinkedList类中继承的,不需要重写一遍。我们将在current({10})和 previous 元素之间插入新元素。首先 node.next 将指向 current({11}),而previous.next 将指向node({12}),这样就不会丢失节点之间的链接。然后需要处理所有的链接:current.prev 将指向 node({13}),而 node.prev 将指向 previous({14})。下图展示这一过程:
 removeAt(index) {
   if(index >= 0 && index < this.count) {
     let current = this.head;
     if(index === 0) {
       this.head = current.next;
       // 如果只有一项,更新tail  // 新增的
       if(this.count === 1) {
         this.tail = undefined;
       } else {
         this.head.prev = undefined;
       }
     } else if(index === this.count - 1) { // 最后一项 // 新增的
       current = this.tail;
       this.tail = current.prev;
       this.tail.next = undefined;
     } else {
       current = this.getElementAt(index);
       const previous = current.prev;
       // 将previous与current的下一项连接起来——跳过current
       previous.next = current.next;
       current.next.prev = previous; // 新增
     }
     this.count--;
     return current.element;
   }
   return undefined;
 }


 899
899

 被折叠的 条评论
为什么被折叠?
被折叠的 条评论
为什么被折叠?
 到【灌水乐园】发言


