


 本文深入解析IoC控制反转概念及其在Spring框架中的应用,包括Bean实例化、依赖注入、作用域管理等核心机制,旨在帮助开发者理解并掌握Spring框架的基础知识。
IOC
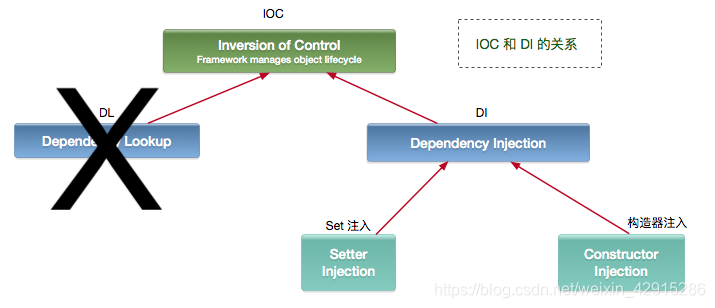
- 提问:控制什么?反转什么?
控制:对象的创建和销毁(生命周期);
反转:将对象的【控制权】交给IoC容器;
(若无控制反转,“被依赖对象”的控制权是在“依赖他的对象”手里,即使用它的时候才能创建)
用了IOC后的总结:
- 1.所有依赖关系被集中统一管理起来,清晰明了;(
@Before里张三依赖于Audi,李四依赖于Buick…) - 2.每个类只需要关注自己的业务逻辑;(张三类中只需要选择一辆车回家,不需要创建车;不需要关心什么牌子的车,他只需要回家)
- 3.修改依赖关系会是一件很容易的事;(Test的Before中,若他想改变一辆车,直接更改参数即可)
———————————
有一个误区需要搞清楚
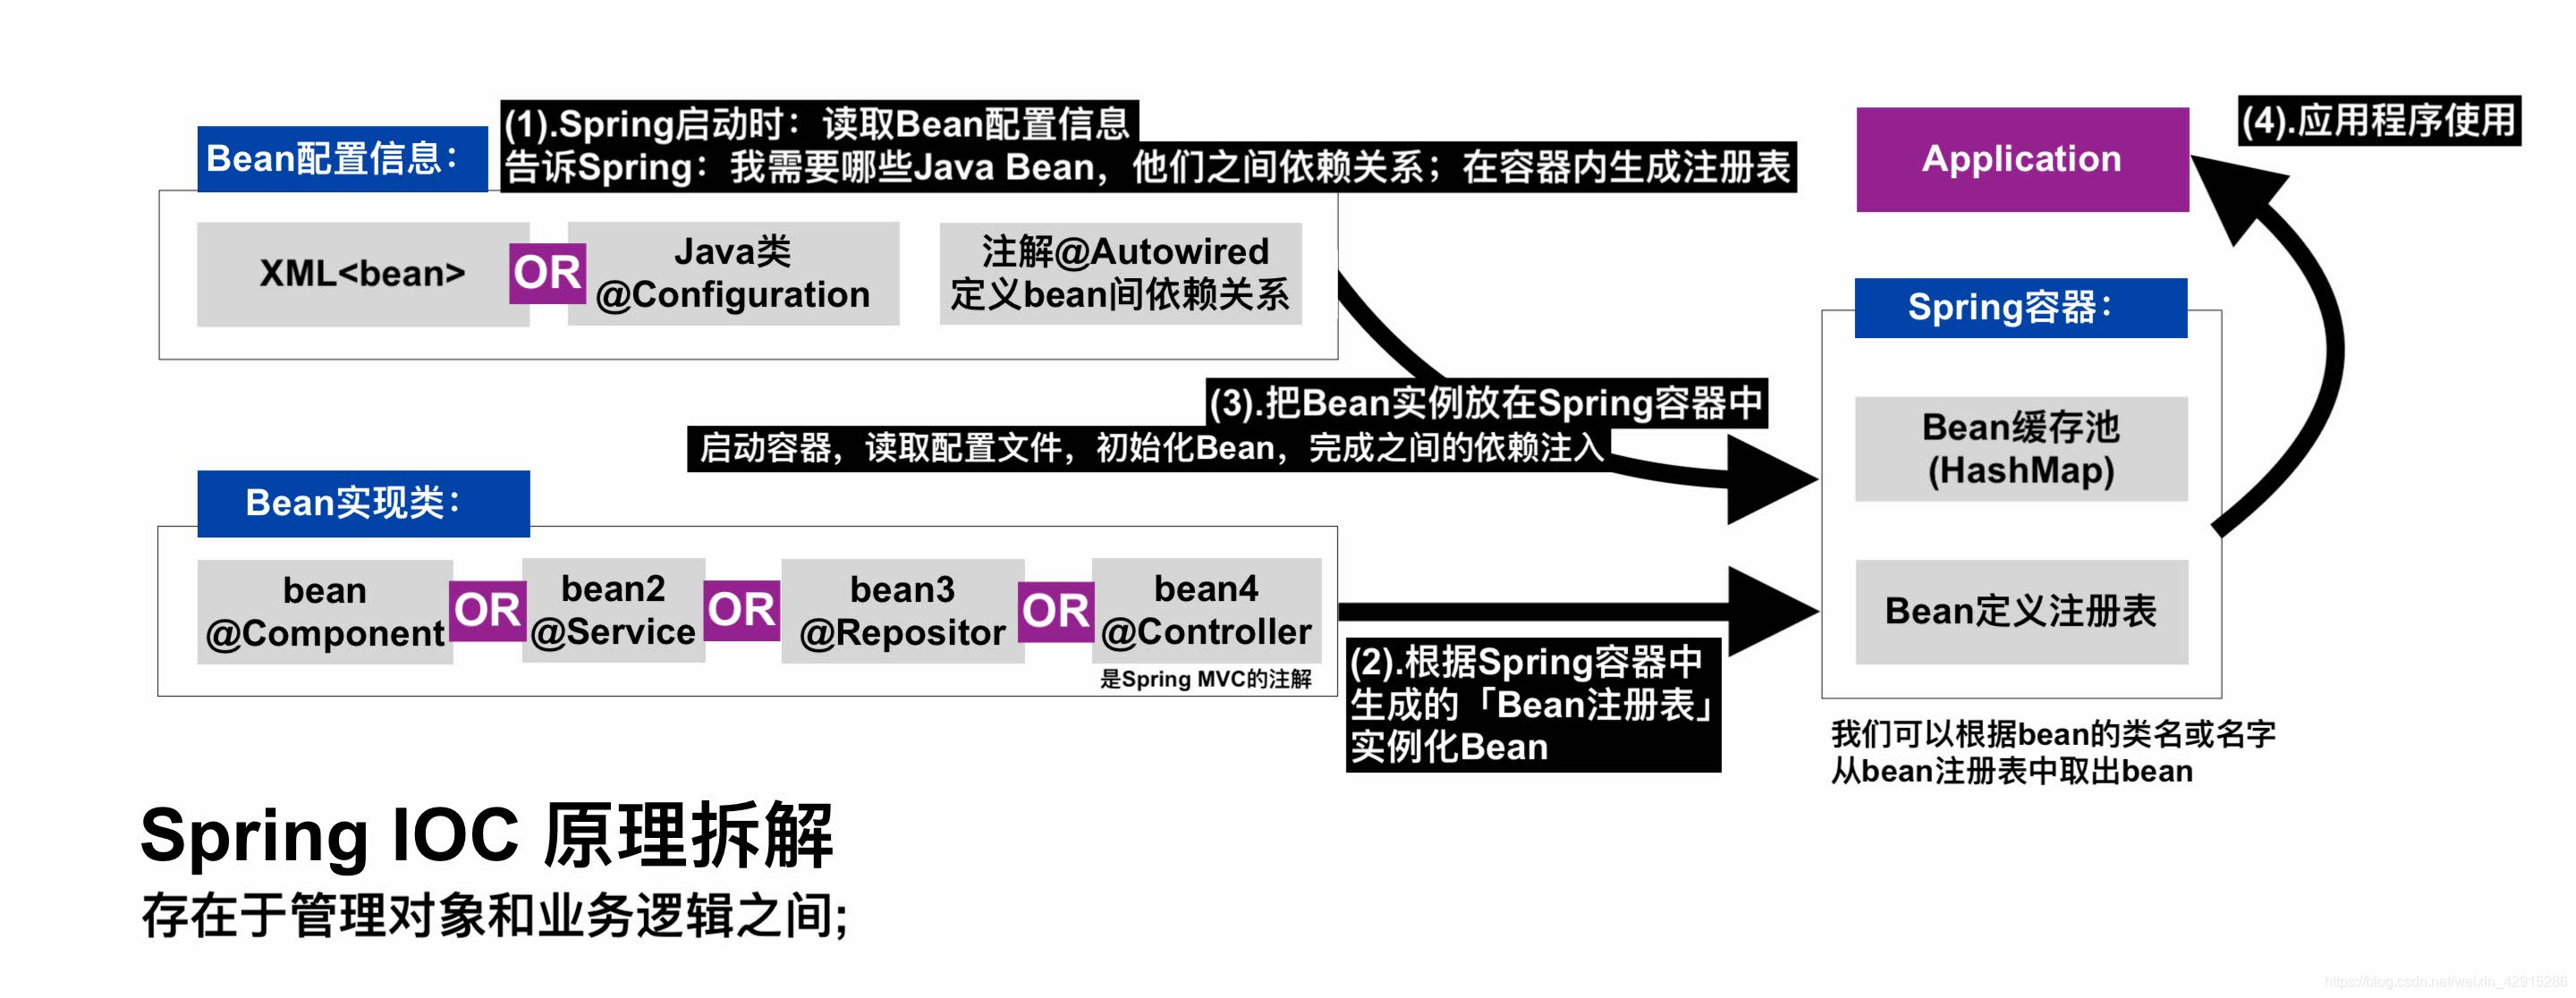
很多人都认为:Spring中什么地方缓存了类对象,那么这个地方就是Spring容器;
这个说法严格上来说是错误的!
Spring容器是一个很宽泛的概念;
比如说Spring中有个Map:singletonObject,这是一个Spring容器,专门存储被实例化的单例Bean;
单例被Spring扫描(@ComponentScan)后,映射成代理对象,放进缓存池内的singletonObejct中;
Key:类名.class Value:bean
所以Spring方法中的getBean方法(AbstractApplicationContext.getBean(KEY))本质上就是map.get();
——————————————————
实例化Bean
1.通过构造方法实例化Bean;
2.通过静态方法实例化Bean;
3.通过实例方法实例化Bean;
4.Bean的别名;
——————————————————
例子:
1.通过构造方法实例化Bean
https://www.imooc.com/video/19049
注意!
spring-beans \ spring-core \ spring-context这三个依赖的版本必须保持一致!!!
否则疯狂报错!
        <dependency>
            <groupId>junit</groupId>
            <artifactId>junit</artifactId>
            <version>4.8.2</version>
            <scope>test</scope>
        </dependency>

        <dependency>
            <groupId>org.springframework</groupId>
            <artifactId>spring-core</artifactId>
            <version>5.0.2.RELEASE</version>
        </dependency>

        <dependency>
            <groupId>org.springframework</groupId>
            <artifactId>spring-context</artifactId>
            <version>5.0.2.RELEASE</version>
        </dependency>

        <dependency>
            <groupId>org.springframework</groupId>
            <artifactId>spring-beans</artifactId>
            <version>5.0.2.RELEASE</version>
        </dependency>
Bean1
public class Bean1 {

    public Bean1() {
        System.out.println("Bean1 here!!!");
    }
}
spring.xml 直接放在resources下
<?xml version="1.0" encoding="UTF-8" ?>
<beans xmlns="http://www.springframework.org/schema/beans"
       xmlns:xsi="http://www.w3.org/2001/XMLSchema-instance"
       xsi:schemaLocation="http://www.springframework.org/schema/beans
       http://www.springframework.org/schema/beans/spring-beans-3.0.xsd">

    <bean id="bean1" class="com.example.springtest.Test.Bean1"/>
    <!--必须告诉IoC要管理哪个类-->
</beans>
BeanTest,要放在Test下,才能用JUnit;
public class BeanTest {

    @Test
    public void test(){
        ApplicationContext context =
                new ClassPathXmlApplicationContext("spring.xml");
        Bean1 bean1 = context.getBean("bean1",Bean1.class);
        System.out.println("bean1 = "+bean1);
    }
}

输出:
Bean1 here!!!
。。。
bean1 = com.example.springtest.Test.Bean1@282003e1
——————————————————
2.通过静态方法实例化Bean
大家可能了解过【工厂模式】;
public class Bean2 {
    public Bean2(){
        System.out.println("Bean2 here!!!");
    }
}
Bean2Factory 要有static修饰
public class Bean2Factory {
    public static Bean2 getBean2(){
        return new Bean2();
    }
}
<?xml version="1.0" encoding="UTF-8" ?>
<beans xmlns="http://www.springframework.org/schema/beans"
       xmlns:xsi="http://www.w3.org/2001/XMLSchema-instance"
       xsi:schemaLocation="http://www.springframework.org/schema/beans
       http://www.springframework.org/schema/beans/spring-beans-3.0.xsd">

    <bean class="com.example.springtest.Test.Bean2Factory"
          factory-method="getBean2" id="bean2"/>
</beans>
public class BeanTest {

    @Test
    public void test() {
    ApplicationContext context =
            new ClassPathXmlApplicationContext("spring.xml");
    Bean2 bean2 = context.getBean("bean2",Bean2.class);
        System.out.println("bean2 = "+bean2);
    }
}
Bean2 here!!!
。。。
bean2 = com.example.springtest.Test.Bean2@12405818
——————————————————
3.通过实例方法实例化Bean
public class Bean3 {
    public Bean3(){
        System.out.println("Bean3 here!!!");
    }
}
Bean3Factory 去掉static修饰
public class Bean3Factory {
    public Bean3 getBean3(){
        return new Bean3();
    }
}
<?xml version="1.0" encoding="UTF-8" ?>
<beans xmlns="http://www.springframework.org/schema/beans"
       xmlns:xsi="http://www.w3.org/2001/XMLSchema-instance"
       xsi:schemaLocation="http://www.springframework.org/schema/beans
       http://www.springframework.org/schema/beans/spring-beans-3.0.xsd">

    <bean class="com.example.springtest.Test.Bean3Factory" id="bean3Factory"/>

    <bean class="com.example.springtest.Test.Bean3" factory-bean="bean3Factory"
          factory-method="getBean3" id="bean3"/>
</beans>
public class BeanTest {

    @Test
    public void test() {
        ApplicationContext context =
            new ClassPathXmlApplicationContext("spring.xml");

        Bean3 bean3 = context.getBean("bean3",Bean3.class);
        System.out.println("bean3 = "+bean3);
    }
}
输出:
Bean3 here!!!
bean3 = com.example.springtest.Test.Bean3@12405818
——————————————————
4.Bean的别名
如果我们已经实例化了Bean1,我们想让他有别名,怎么办?
在spring.xml中添加语句,有两种方式:
    <bean id="bean1" name="bean1_haha,bean1_lolo" class="com.example.springtest.Test.Bean1"/>
    <alias name="bean1" alias="bean1_jaja"/>
1.在原语句中添加 name="名字1 , 名字2"(支持逗号添加多个别名)
2.下面添加一条alias语句,前提是需要指明bean原名,只支持添加一个别名;
public class BeanTest {

    @Test
    public void test(){
        ApplicationContext context =
                new ClassPathXmlApplicationContext("spring.xml");
        Bean1 bean1 = context.getBean("bean1",Bean1.class);
        System.out.println("bean1 = "+bean1);

        Bean1 bean1_haha = context.getBean("bean1_haha",Bean1.class);
        System.out.println("bean1_haha = "+bean1_haha);

        Bean1 bean1_lolo = context.getBean("bean1_lolo",Bean1.class);
        System.out.println("bean1_lolo = "+bean1_lolo);

        Bean1 bean1_jaja = context.getBean("bean1_jaja",Bean1.class);
        System.out.println("bean1_jaja = "+bean1_jaja);
    }
}
输出:
bean1 = com.example.springtest.Test.Bean1@71a794e5
instance of singleton bean 'bean1'
bean1_haha = com.example.springtest.Test.Bean1@71a794e5
instance of singleton bean 'bean1'
bean1_lolo = com.example.springtest.Test.Bean1@71a794e5
instance of singleton bean 'bean1'
bean1_jaja = com.example.springtest.Test.Bean1@71a794e5
这些别名都被实例化了;
然而看得出来,他们指向的仍然是同一个Bean
——————————————————
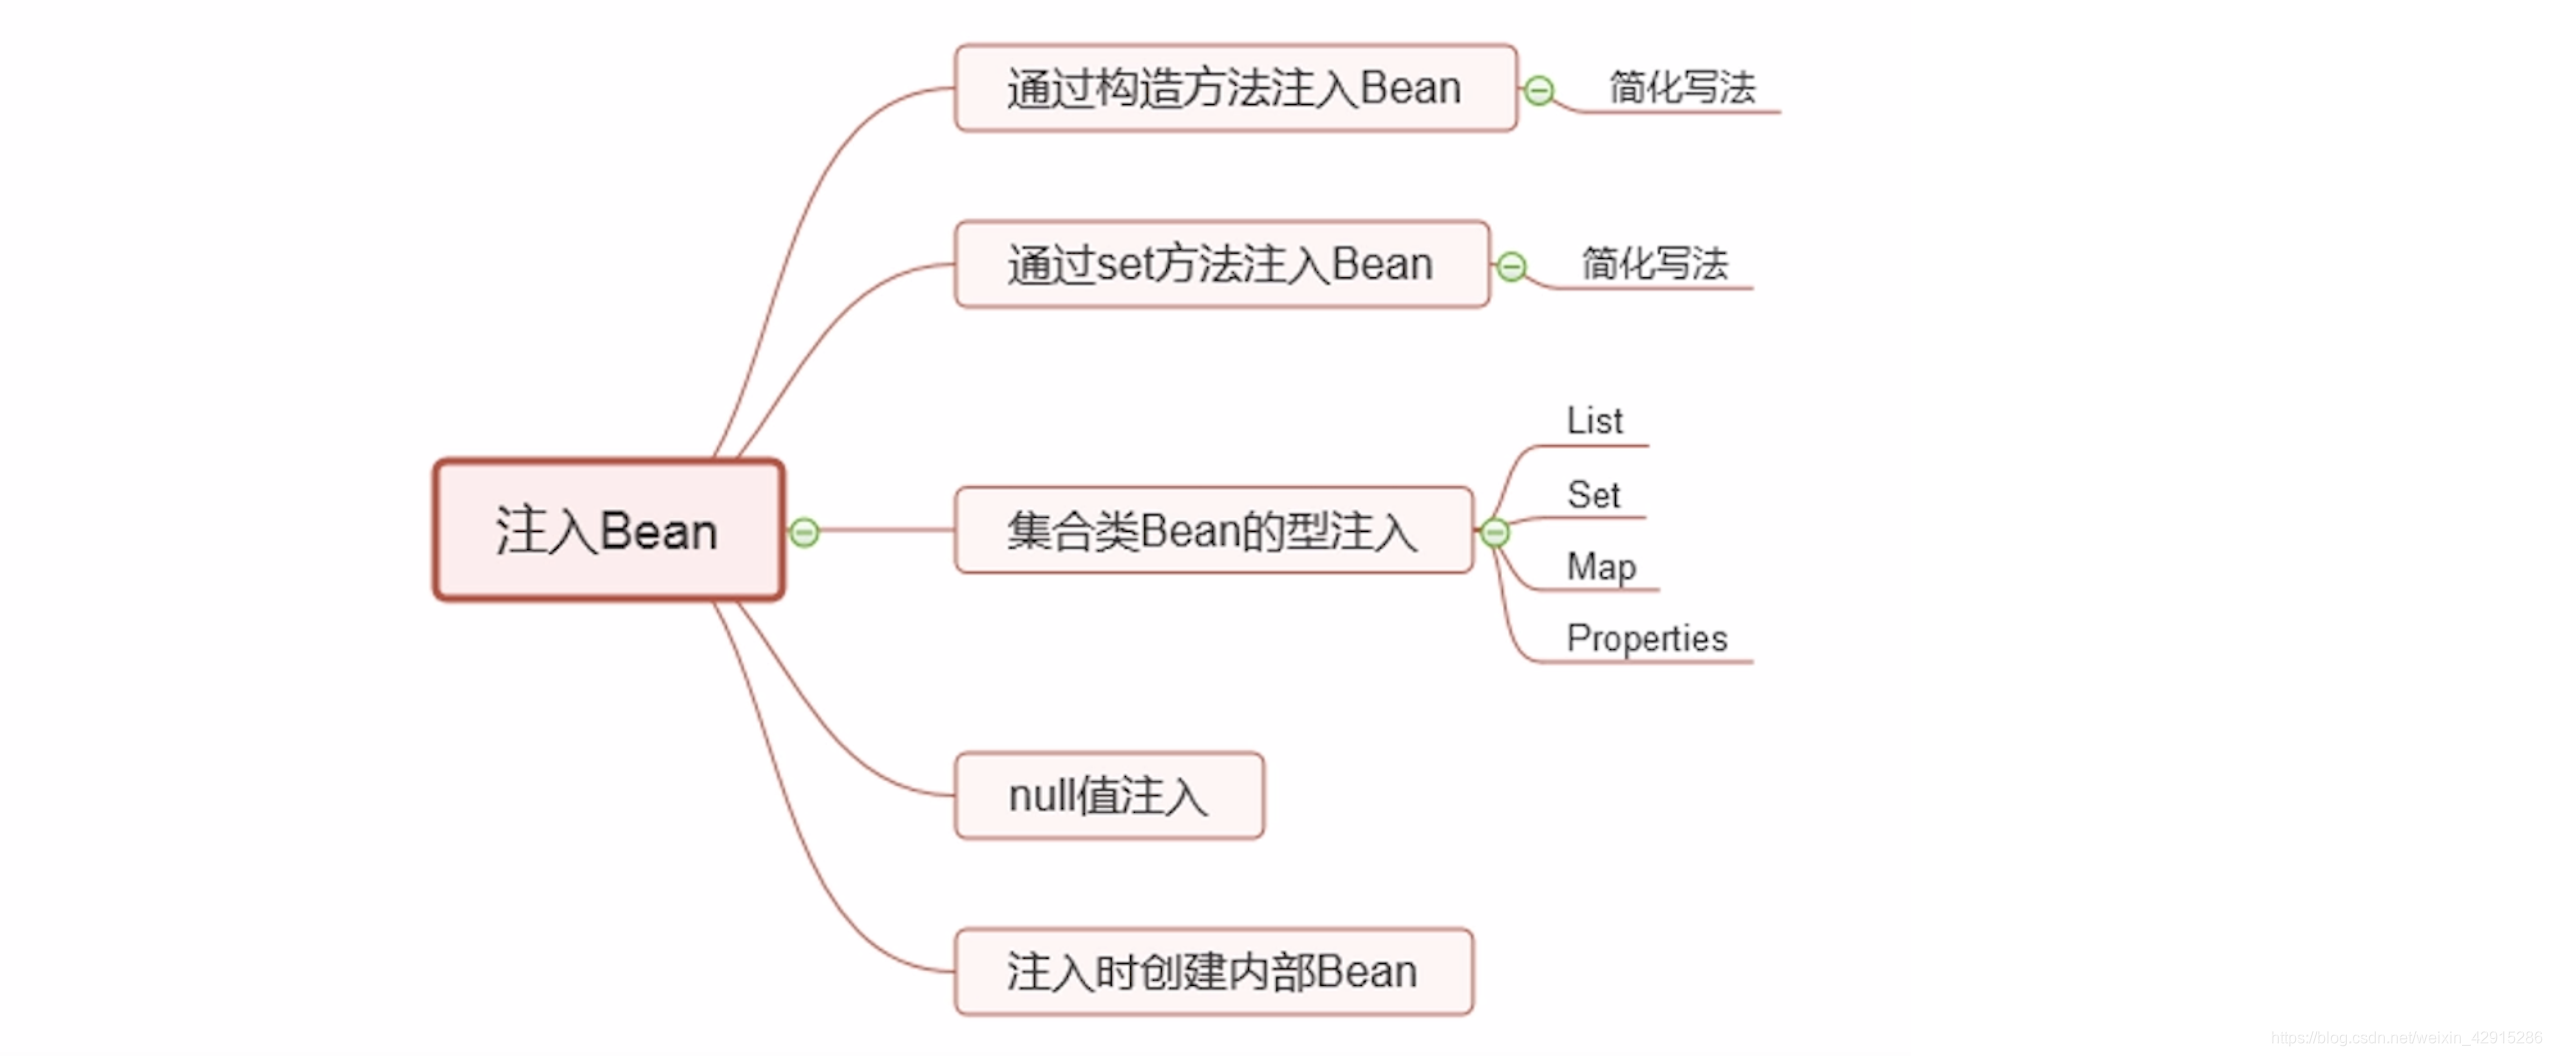
注入Bean
以上的章节都没有定义属性;
而属性是非常重要的!
——————————————————
构造方法 注入Bean
在使用IDEA编写Spring时, 使用@Autowired时,遇到warning : Field injection is not recommended.
BEFORE:

AFTER:

为什么不推荐Field Injection呢?
通常依赖注入方式有三种:
- 1.Constructor
为了【强制依赖】,或者为了易变性,使用构造方法注入; - 2.getter & setter
为了可选的或者可变的依赖,使用setter注入; - 3.属性注入:通过反射直接注入到fields(@Autowired / @Resource)
尽量避免使用直接在属性上注入;
属性注入的坏处:
1.不能构建不可变对象;
2.类和依赖容器强耦合,不能在容器外使用。、;
3.类不能绕过反射(例如单元测试的时候)实例化,必须通过依赖容器才能实例化。
4.实际的依赖被隐藏在外面,未在构造方法或其它方法里面反射的。
5.一个类经常会有超过10个的依赖;如果使用构造方法的方式注入的话,构造方法会有10个参数,明显有点蠢,若使用属性注入就无这样的限制;但一个类有很多的依赖,是一个危险的标志,因为很有可能这个类完成了超过一件事,违背了单一职责原则;
public class Bean {

    private AnotherBean anotherBean;
    private String string;

    // 1.构造方法注入Bean;当然要构造器+参数

    public Bean(AnotherBean anotherBean, String string) {
        this.anotherBean = anotherBean;
        this.string = string;
    }

    public AnotherBean getAnotherBean() {
        return anotherBean;
    }

    public void setAnotherBean(AnotherBean anotherBean) {
        this.anotherBean = anotherBean;
    }

    public String getString() {
        return string;
    }

    public void setString(String string) {
        this.string = string;
    }

    @Override
    public String toString() {
        return "Bean{" +
                "anotherBean=" + anotherBean +
                ", string='" + string + '\'' +
                '}';
    }
}
public class AnotherBean {}
<?xml version="1.0" encoding="UTF-8" ?>
<beans xmlns="http://www.springframework.org/schema/beans"
xmlns:xsi="http://www.w3.org/2001/XMLSchema-instance"
xsi:schemaLocation="http://www.springframework.org/schema/beans
http://www.springframework.org/schema/beans/spring-beans-3.0.xsd">
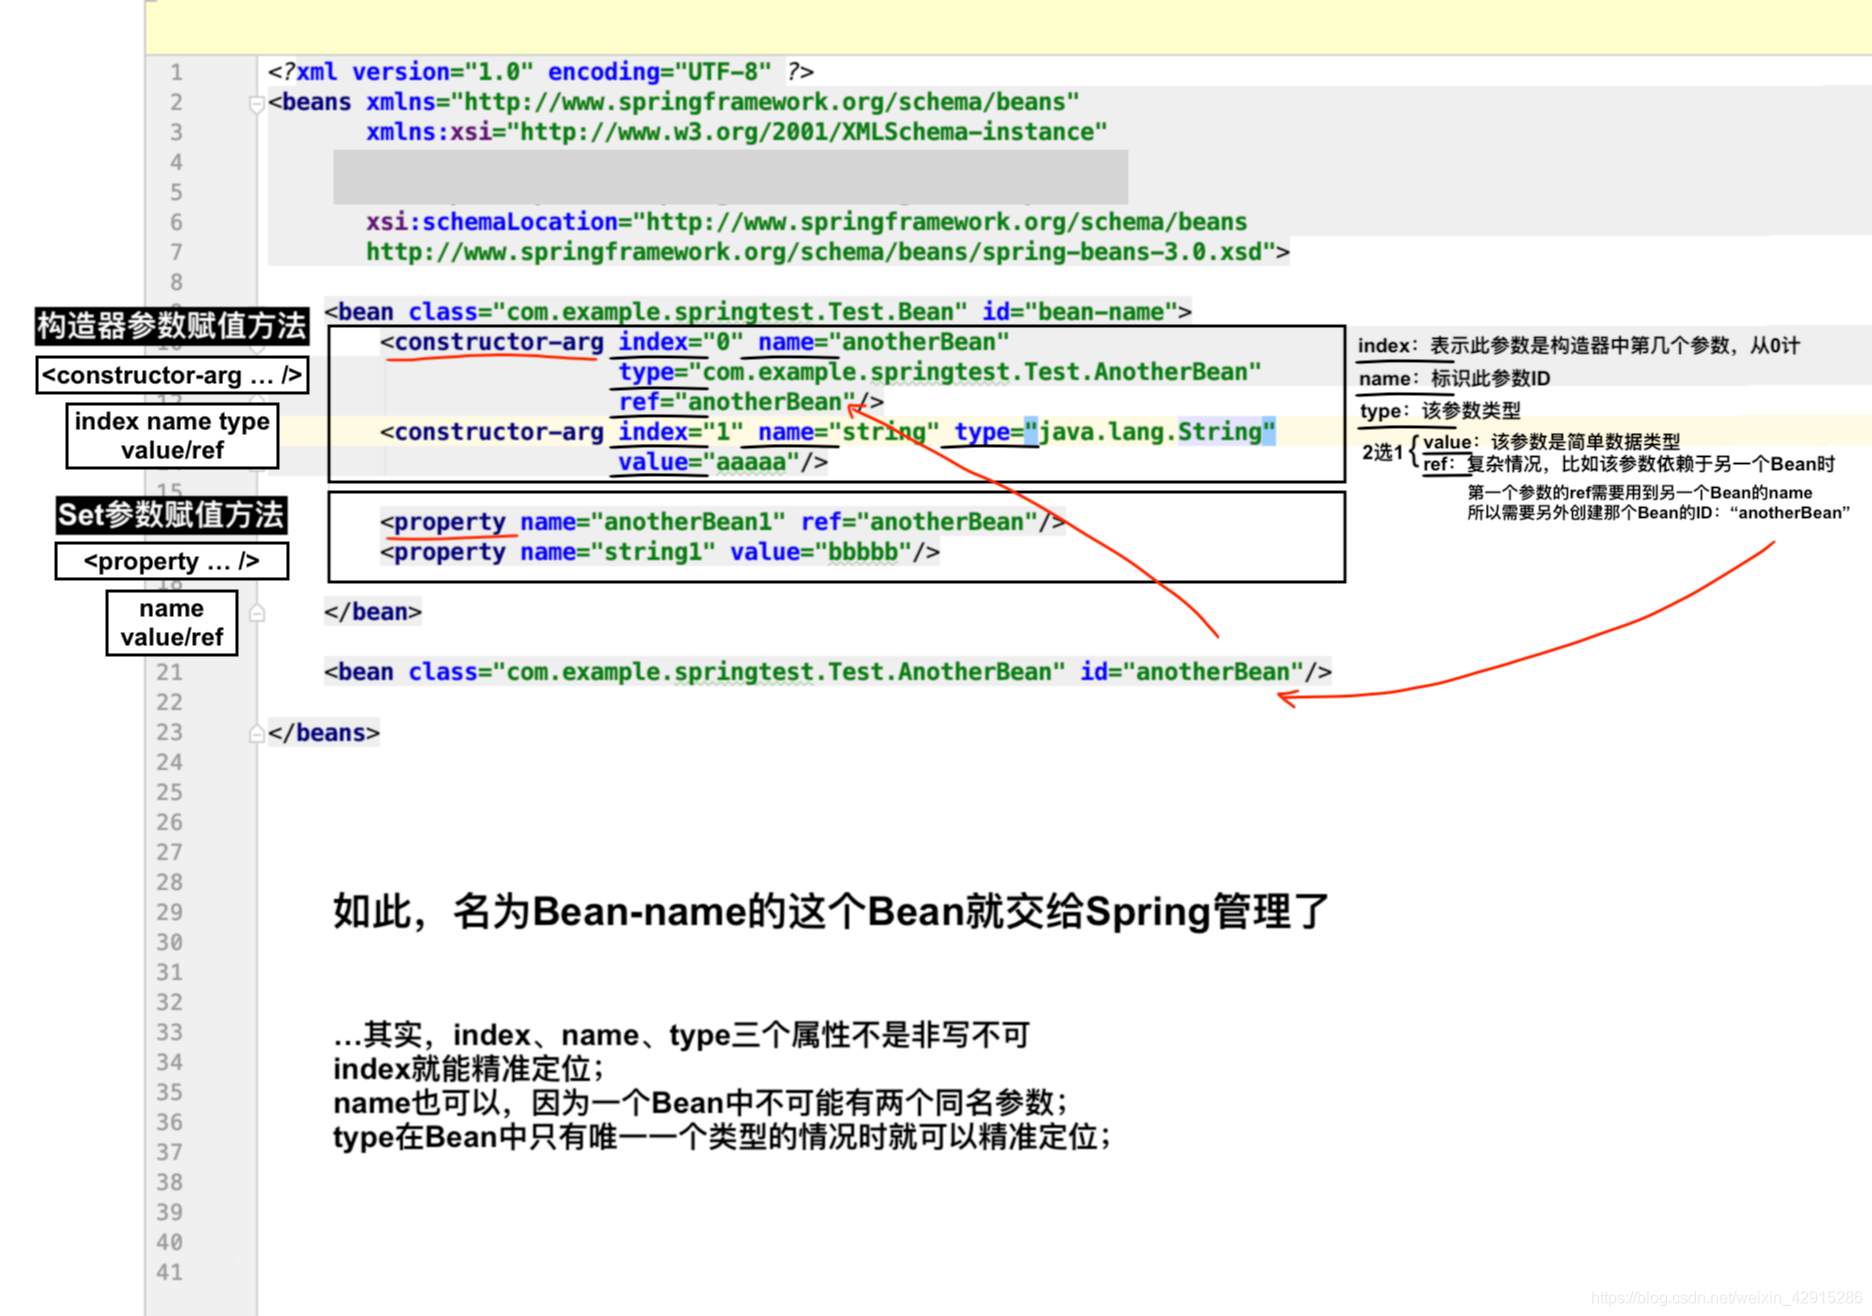
<bean class="com.example.springtest.Test.Bean" id="bean-name">
<constructor-arg name="anotherBean" ref="anotherBean"/>
<constructor-arg name="string" value="aaaaa"/>
<property name="anotherBean1" ref="anotherBean"/>
<property name="string1" value="bbbbb"/>
</bean>
<bean class="com.example.springtest.Test.AnotherBean" id="anotherBean"/>
</beans>
(此图中构造器方法中多了参数:index、type,这些不是必须的)
public class BeanTest {

    @Test
    public void test(){
        ApplicationContext context =
                new ClassPathXmlApplicationContext("spring.xml");
        Bean bean = context.getBean("bean-name",Bean.class);
        System.out.println("bean = "+bean);
    }
}
输出:
bean = Bean{anotherBean=com.example.springtest.Test.AnotherBean@77e4c80f, string='aaaaa'}
——————————————————
SET方法 注入Bean
在添加两个参数,两个新参数用set方法注入
既然用set方法,自然要补全setter&getter
public class Bean {

    private AnotherBean anotherBean;
    private String string;
    private AnotherBean anotherBean1;
    private String string1;

    // 2.set方法注入Bean;当然要写全 setter&getter

    public Bean(AnotherBean anotherBean, String string) {
        this.anotherBean = anotherBean;
        this.string = string;
    }

    public AnotherBean getAnotherBean() {
        return anotherBean;
    }

    public void setAnotherBean(AnotherBean anotherBean) {
        this.anotherBean = anotherBean;
    }

    public String getString() {
        return string;
    }

    public void setString(String string) {
        this.string = string;
    }

    public AnotherBean getAnotherBean1() {
        return anotherBean1;
    }

    public void setAnotherBean1(AnotherBean anotherBean1) {
        this.anotherBean1 = anotherBean1;
    }

    public String getString1() {
        return string1;
    }

    public void setString1(String string1) {
        this.string1 = string1;
    }

    @Override
    public String toString() {
        return "Bean{" +
                "anotherBean=" + anotherBean +
                ", string='" + string + '\'' +
                ", anotherBean1=" + anotherBean1 +
                ", string1='" + string1 + '\'' +
                '}';
    }
}
// 这里的name中写的值一定要Bean中定义了getter setter后才能对应上!
。。。。。。
    <bean class="com.example.springtest.Test.Bean" id="bean-name">
        <constructor-arg index="0" name="anotherBean"
                         type="com.example.springtest.Test.AnotherBean"
                         ref="anotherBean"/>
        <constructor-arg index="1" name="string" type="java.lang.String"
                         value="aaaaa"/>

        <property name="anotherBean1" ref="anotherBean"/>  // 新增
        <property name="string1" value="bbbbb"/>  // 新增

    </bean>

    <bean class="com.example.springtest.Test.AnotherBean" id="anotherBean"/>

</beans>
BeanTest类不用改变;
输出:
bean = Bean{anotherBean=com.example.springtest.Test.AnotherBean@44a664f2, string='aaaaa',
anotherBean1=com.example.springtest.Test.AnotherBean@44a664f2, string1='bbbbb'}
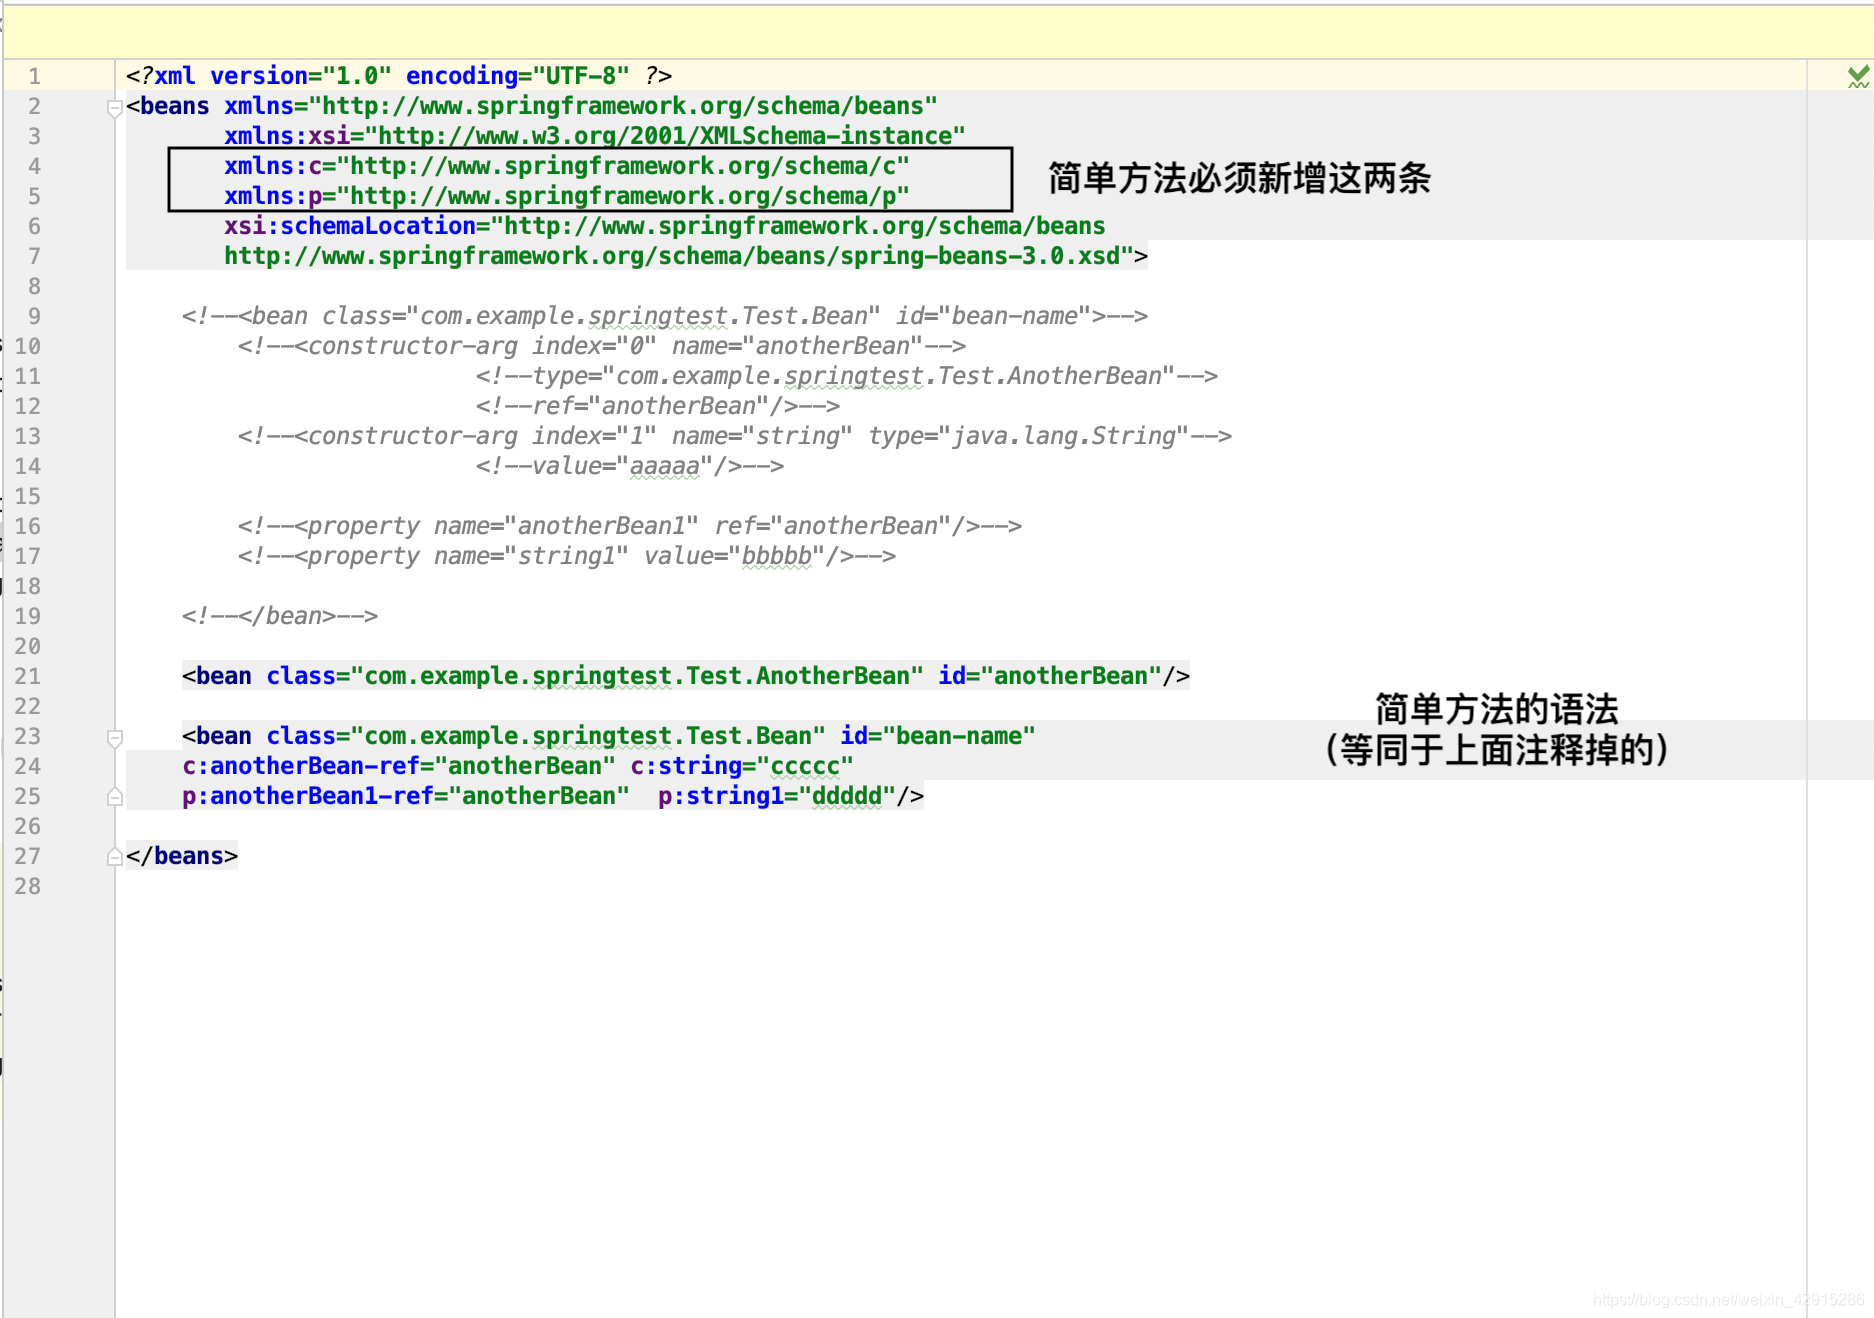
简单写法!
- 1.先调整XML消息头,新增语句
xmlns:c="http://www.springframework.org/schema/c"
xmlns:p="http://www.springframework.org/schema/p"
    <bean class="com.example.springtest.Test.AnotherBean" id="anotherBean"/>

    <bean class="com.example.springtest.Test.Bean" id="bean-name"
    c:anotherBean-ref="anotherBean" c:string="ccccc"
    p:anotherBean1-ref="anotherBean"  p:string1="ddddd"/>
——————————————————
集合类Bean注入
List
Set
Map
Properties
public class Bean {

    private List<String> stringList;
    private List<AnotherBean> anotherBeanList;

    private Set<String> stringSet;
    private Set<AnotherBean> anotherBeanSet;

    private Map<String,String> stringMap;
    private Map<AnotherBean,AnotherBean> anotherBeanMap;

    private Properties properties;

    public List<String> getStringList() {
        return stringList;
    }

    public void setStringList(List<String> stringList) {
        this.stringList = stringList;
    }

    public List<AnotherBean> getAnotherBeanList() {
        return anotherBeanList;
    }

    public void setAnotherBeanList(List<AnotherBean> anotherBeanList) {
        this.anotherBeanList = anotherBeanList;
    }

    public Set<String> getStringSet() {
        return stringSet;
    }

    public void setStringSet(Set<String> stringSet) {
        this.stringSet = stringSet;
    }

    public Set<AnotherBean> getAnotherBeanSet() {
        return anotherBeanSet;
    }

    public void setAnotherBeanSet(Set<AnotherBean> anotherBeanSet) {
        this.anotherBeanSet = anotherBeanSet;
    }

    public Map<String, String> getStringMap() {
        return stringMap;
    }

    public void setStringMap(Map<String, String> stringMap) {
        this.stringMap = stringMap;
    }

    public Map<AnotherBean, AnotherBean> getAnotherBeanMap() {
        return anotherBeanMap;
    }

    public void setAnotherBeanMap(Map<AnotherBean, AnotherBean> anotherBeanMap) {
        this.anotherBeanMap = anotherBeanMap;
    }

    public Properties getProperties() {
        return properties;
    }

    public void setProperties(Properties properties) {
        this.properties = properties;
    }
...
// toString
<?xml version="1.0" encoding="UTF-8" ?>
<beans xmlns="http://www.springframework.org/schema/beans"
       xmlns:xsi="http://www.w3.org/2001/XMLSchema-instance"
       xsi:schemaLocation="http://www.springframework.org/schema/beans
       http://www.springframework.org/schema/beans/spring-beans-3.0.xsd">

    <bean class="com.example.springtest.Test.Bean" id="bean-name">
        <constructor-arg name="anotherBean" ref="anotherBean"/>
        <constructor-arg name="string" value="aaaaa"/>

        <property name="anotherBean1" ref="anotherBean"/>
        <property name="string1" value="bbbbb"/>

        <property name="stringList" >
            <list>
                <value>aaaaa</value>
                <value>bbbbb</value>
            </list>
        </property>

        <property name="anotherBeanList">
            <list>
                <ref bean="anotherBean"/>
                <ref bean="anotherBean"/>
            </list>
        </property>

        <property name="stringSet" >
            <set>
                <value>aaaaa</value>
                <value>bbbbb</value>
            </set>
        </property>

        <property name="anotherBeanSet">
            <set>
                <ref bean="anotherBean"/>
                <ref bean="anotherBean"/>
            </set>
        </property>

        <property name="stringMap">
            <map>
                <entry key="ccccc" value="ddddd"/>
                <entry key="eeeee" value="fffff"/>
            </map>
        </property>

        <property name="anotherBeanMap">
            <map>
                <entry key-ref="anotherBean" value-ref="anotherBean"/>
            </map>
        </property>

        <property name="properties">
            <props>
                <prop key="aaaaa">bbbbb</prop>
            </props>
        </property>

    </bean>

    <bean class="com.example.springtest.Test.AnotherBean" id="anotherBean"/>

</beans>
public class BeanTest {

    @Test
    public void test(){
        ApplicationContext context =
                new ClassPathXmlApplicationContext("spring.xml");
        Bean bean = context.getBean("bean-name",Bean.class);
        //System.out.println("bean = "+bean);
        System.out.println("bean.getStringList() = "+bean.getStringList());
        System.out.println("bean.getStringSet() = "+bean.getStringSet());
        System.out.println("bean.getStringMap() = "+bean.getStringMap());
        System.out.println("bean.getAnotherBeanList() = "+bean.getAnotherBeanList());
        System.out.println("bean.getAnotherBeanSet() = "+bean.getAnotherBeanSet());
        System.out.println("bean.getAnotherBeanMap() = "+bean.getAnotherBeanMap());
        System.out.println("bean.getProperties() = "+bean.getProperties());
    }
}
输出:
bean.getStringList() = [aaaaa, bbbbb]
bean.getStringSet() = [aaaaa, bbbbb]
bean.getStringMap() = {ccccc=ddddd, eeeee=fffff}
bean.getAnotherBeanList() = [com.example.springtest.Test.AnotherBean@41ee392b, com.example.springtest.Test.AnotherBean@41ee392b]
bean.getAnotherBeanSet() = [com.example.springtest.Test.AnotherBean@41ee392b]
bean.getAnotherBeanMap() = {com.example.springtest.Test.AnotherBean@41ee392b=com.example.springtest.Test.AnotherBean@41ee392b}
bean.getProperties() = {aaaaa=bbbbb}
——————————————————
NULL值注入
public class Bean {

    private AnotherBean anotherBean2;

    public AnotherBean getAnotherBean2() {
        return anotherBean2;
    }

    public void setAnotherBean2(AnotherBean anotherBean2) {
        this.anotherBean2 = anotherBean2;
    }
......
        <property name="anotherBean2">
            <null/>
        </property>
System.out.println("bean.getAnotherBean2() = "+bean.getAnotherBean2());
输出:
bean.getAnotherBean2() = null
——————————————————
注入时 创建 内部Bean
什么意思?
看回构造方法 注入Bean章节中的截图;
里面说到:第一个参数需要用到另外一个Bean:AnotherBean的ref,于是单独声明了AnotherBean的bean语句块;
本章节的意思是:当我们不想单独创建这条语句块的时候,应该怎么做?
原代码:
<bean class="com.example.springtest.Test.AnotherBean" id="anotherBean"/>

<property name="anotherBean1" ref="anotherBean"/>
删去第一行,第二行改成:
<property name="anotherBean1">
            <bean class = "com.example.springtest.Test.AnotherBean"/>
</property>
——————————————————
Bean作用域
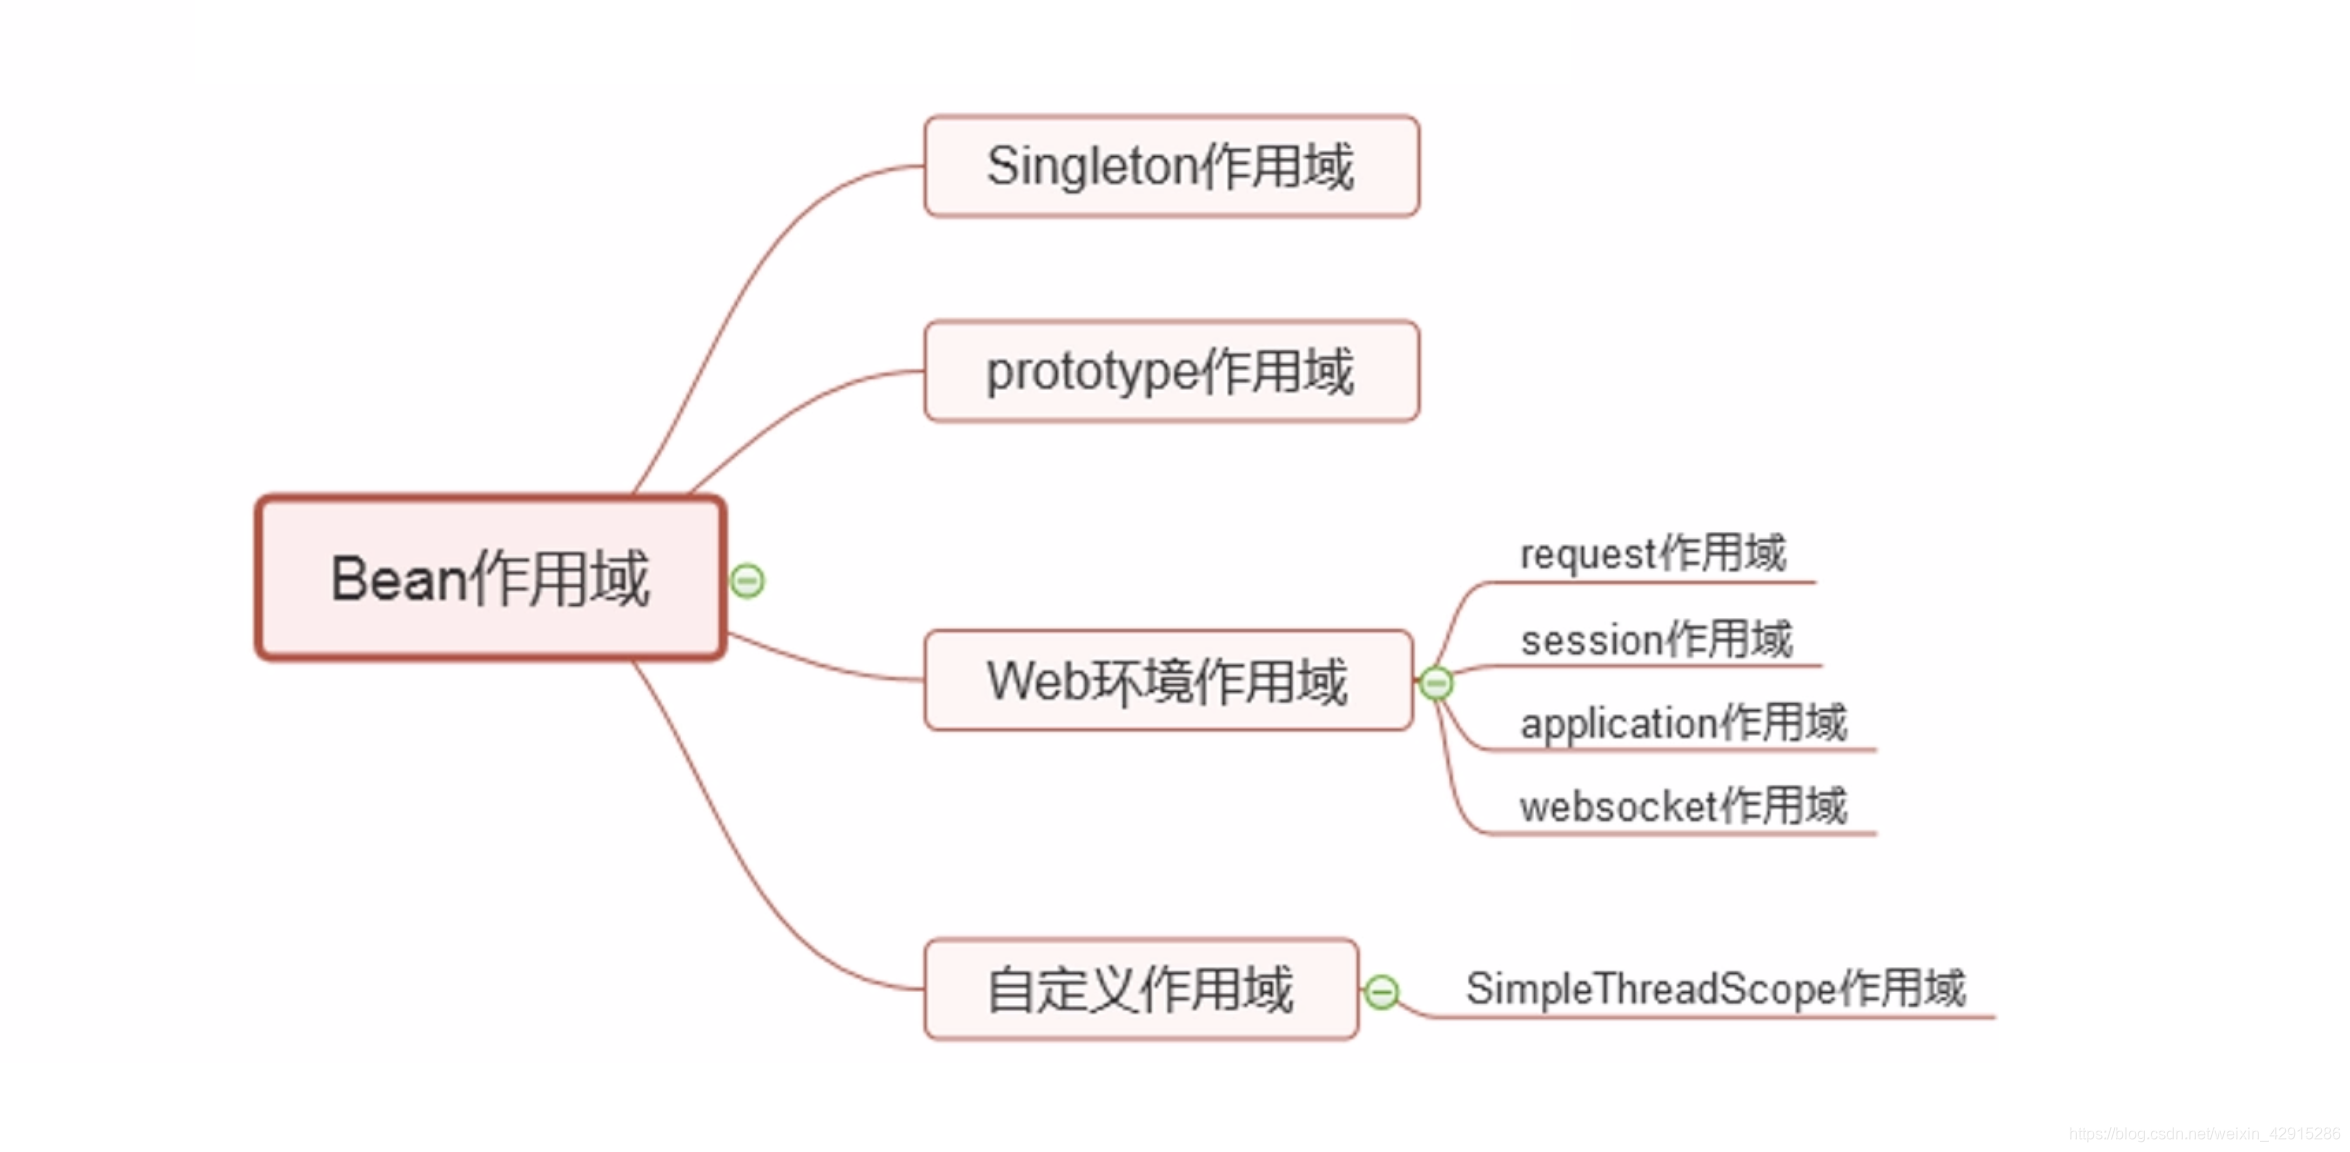
最常用的当然就是Singleton和Prototype作用域;
——————————————————
Singleton 作用域
即Spring容器实现单例模式;
【Spring的单例模式有局限性,只在同个上下文环境中才保证单例!】

【Spring的单例模式有局限性,只在同个上下文环境中才保证单例!】
public class Bean1 {

    private Bean2 bean2;

    public Bean2 getBean2() {
        return bean2;
    }

    public void setBean2(Bean2 bean2) {
        this.bean2 = bean2;
    }

    @Override
    public String toString() {
        return "Bean1{" +
                "bean2=" + bean2 +
                '}';
    }
}
public class Bean2 {}
<?xml version="1.0" encoding="UTF-8" ?>
<beans xmlns="http://www.springframework.org/schema/beans"
       xmlns:xsi="http://www.w3.org/2001/XMLSchema-instance"
       xsi:schemaLocation="http://www.springframework.org/schema/beans
       http://www.springframework.org/schema/beans/spring-beans-3.0.xsd">

    <bean class="com.example.springtest.Test.Bean1" id="bean1">
        <property name="bean2" ref="bean2"/>
    </bean>

    <bean class="com.example.springtest.Test.Bean2" id="bean2" scope="singleton"/>

</beans>
public class BeanTest {

    @Test
    public void test(){
        ApplicationContext context =
                new ClassPathXmlApplicationContext("spring.xml");
        Bean2 bean2_1 = context.getBean("bean2",Bean2.class);
        Bean2 bean2_2 = context.getBean("bean2",Bean2.class);
        Bean1 bean1 = context.getBean("bean1",Bean1.class);

        System.out.println("bean2_1 = "+bean2_1);
        System.out.println("bean2_2 = "+bean2_2);
        System.out.println("bean1 = "+bean1);
    }
}
输出:
bean2_1 = com.example.springtest.Test.Bean2@551bdc27
bean2_2 = com.example.springtest.Test.Bean2@551bdc27
bean1 = Bean1{bean2=com.example.springtest.Test.Bean2@551bdc27}
可见:
单例模式下,两个bean2的实例都是相同的;
bean1中包含一个bean2实例,这个实例和那两个bean2也是相同的;
或者说,Spring上下文生命周期中,只存在一个实例;
单例模式生效了;
——————————————————
但是这仅仅是在一个上下文环境中;
如果在多个上下文环境中?
即多个context实例;
public class BeanTest {

    @Test
    public void test(){
        ApplicationContext context =
                new ClassPathXmlApplicationContext("spring.xml");
        Bean2 bean2_1 = context.getBean("bean2",Bean2.class);
        Bean2 bean2_2 = context.getBean("bean2",Bean2.class);

        System.out.println("bean2_1 = "+bean2_1);
        System.out.println("bean2_2 = "+bean2_2);

        ApplicationContext context1 =
                new ClassPathXmlApplicationContext("spring.xml");
        Bean2 bean2_3 = context1.getBean("bean2",Bean2.class);
        Bean2 bean2_4 = context1.getBean("bean2",Bean2.class);

        System.out.println("bean2_3 = "+bean2_3);
        System.out.println("bean2_4 = "+bean2_4);
    }
}
输出:
bean2_1 = com.example.springtest.Test.Bean2@551bdc27
bean2_2 = com.example.springtest.Test.Bean2@551bdc27
bean2_3 = com.example.springtest.Test.Bean2@255b53dc
bean2_4 = com.example.springtest.Test.Bean2@255b53dc
同一个上下文环境中,单例模式生效;
但另一个上下文环境中,单例模式失效了!
结论:
【Spring的单例模式有局限性,只在同个上下文环境中才保证单例!】
——————————————————
Prototype 作用域
多例模式
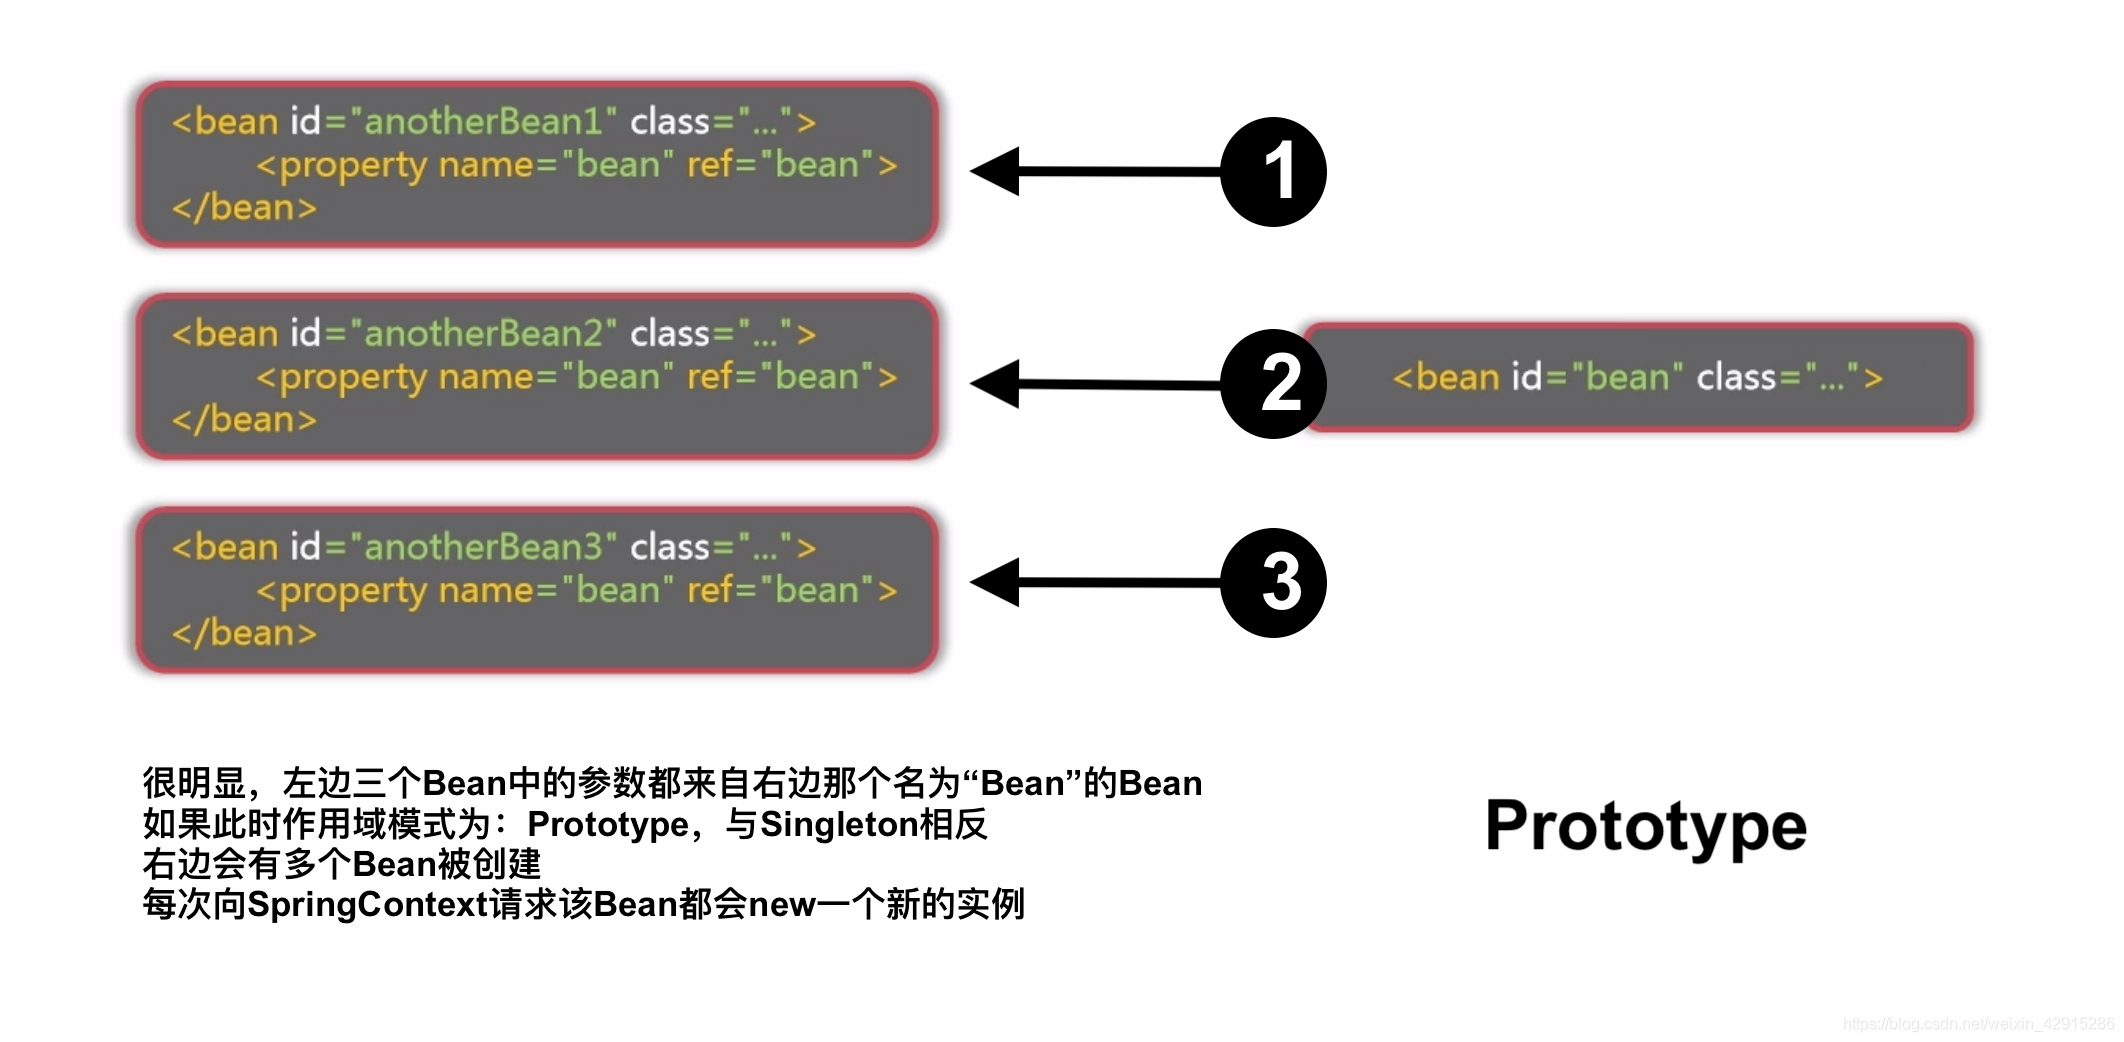
把xml中的scope改成prototype即可;
输出:
bean2_1 = com.example.springtest.Test.Bean2@551bdc27
bean2_2 = com.example.springtest.Test.Bean2@58fdd99
bean1 = Bean1{bean2=com.example.springtest.Test.Bean2@6b1274d2}
bean2_3 = com.example.springtest.Test.Bean2@1dd92fe2
bean2_4 = com.example.springtest.Test.Bean2@6b53e23f
——————————————————
下面研究一点更复杂的东西;
bean2是prototype,bean1没写scope,于是默认singleton;
如果bean1和bean2的scope不同,会如何?
(Bean1也创建两个实例)
——————————
bean2:Singleton;bean1:Singleton;
        System.out.println("bean1_1 = "+bean1_1);
        System.out.println("bean1_2 = "+bean1_2);
        System.out.println("(bean1_1 == bean1_2) = "+(bean1_1 == bean1_2));
输出:
bean1_1 = Bean1{bean2=com.example.springtest.Test.Bean2@551bdc27}
bean1_2 = Bean1{bean2=com.example.springtest.Test.Bean2@551bdc27}
(bean1_1 == bean1_2) = true
——————————
bean2:Prototype;bean1:Singleton;
输出:
bean1_1 = Bean1{bean2=com.example.springtest.Test.Bean2@551bdc27}
bean1_2 = Bean1{bean2=com.example.springtest.Test.Bean2@551bdc27}
(bean1_1 == bean1_2) = true
因为Bean1是单例模式,所以Spring只为Bean1实例化了唯一一个实例;
当两个Bean1中需要两个Bean2时,(尽管Bean2多例,但Bean1单例,所以Bean2只会被实例化一次)
所以,Spring只实例化了一个Bean2;
——————————
bean2:Singleton;bean1:Prototype;
输出:
bean1_1 = Bean1{bean2=com.example.springtest.Test.Bean2@551bdc27}
bean1_2 = Bean1{bean2=com.example.springtest.Test.Bean2@551bdc27}
(bean1_1 == bean1_2) = false
因为Bean1多例模式,所以返回的不相同;
因为Bean2单例,所以Bean1中的Bean2都是相同的;
——————————
bean2:Prototype;bean1:Prototype;
很明显,都不相同;
——————————
总结: 若Bean1中包括Bean2(即,Bean1依赖于Bean2);
只要Bean1是单例,那么Bean1的实例都相同;
只要Bean1是多例,那么Bean1的实例都不相同;
若Bean1是单例,Bean2是多例,因为Bean1只实例化一次,所以Bean2实例化一次就结束了,内部的Bean2也始终相同;
若Bean1是多例,Bean2是单例,很明显内部的Bean2一直会相同(尽管Bean1的实例们是不同的);
——————————————————
Web环境 作用域
做Web开发就要涉及这一部分;
request 作用域
session 作用域
application 作用域
websocket 作用域(少用)
——————————————————
——————————————————
——————————————————
——————————————————
——————————————————
自定义作用域 SimpleThreadScope
SimpleThreadScope 是Spring帮我们内置好的作用域;
——————————————————
——————————————————
——————————————————
——————————————————
——————————————————
——————————————————
——————————————————
IoC 控制反转:
控制权的转移,应用程序本身不负责依赖对象的创建和维护,而是由外部容器负责创建和维护;
讲白话,比如若想要有个房居住,通常不会自己建,而是选择向第三方:房地产 购买房产来居住;
把依赖对象的创建和维护的控制权,由应用程序转移到外部容器或第三工厂;
获得依赖对象的过程被反转了,他由自身管理变成了由IoC容器主动注入;
IoC不是什么技术,它是一种设计模式;
IoC目的:
降低应用程序之间依赖对象的耦合度
————————————————————————————————
Spring注入:
指启动Spring容器加载bean配置时,完成对变量的赋值行为;
常用两种注入方式:设值注入;构造注入;


 915
915

 被折叠的 条评论
为什么被折叠?
被折叠的 条评论
为什么被折叠?
 到【灌水乐园】发言


