


 本文深入探讨线程同步机制,详细讲解临界区和互斥量的使用方法,以及如何利用C++标准库提供的RAII语法简化互斥量的管理,确保多线程环境下共享资源的安全访问。
线程同步
1、临界区
临界区(Critical Section)是一段独占对某些共享资源访问的代码,在任意时刻只允许一个线程对共享资源进行访问。如果有多个线程试图同时访问临界区,那么在有一个线程进入后其他所有试图访问此临界区的线程将被挂起,并一直持续到进入临界区的线程离开。临界区在被释放后,其他线程可以继续抢占,并以此达到用原子方式操作共享资源的目的。
临界区在使用时以CRITICAL_SECTION结构对象保护共享资源,并分别用EnterCriticalSection()和LeaveCriticalSection()函数去标识和释放一个临界区。所用到的CRITICAL_SECTION结构对象必须经过InitializeCriticalSection()的初始化后才能使用,而且必须确保所有线程中的任何试图访问此共享资源的代码都处在此临界区的保护之下。否则临界区将不会起到应有的作用,共享资源依然有被破坏的可能。
代码示例:
#include "stdafx.h"
#include<windows.h>
#include<iostream>
using namespace std;

int number = 1; //定义全局变量
CRITICAL_SECTION Critical;      //定义临界区句柄

unsigned long __stdcall ThreadProc1(void* lp) {
    while (number < 100) {
        EnterCriticalSection(&Critical);
        cout << "thread 1 :"<<number << endl;
        ++number;
        _sleep(100);
        LeaveCriticalSection(&Critical);
    }
    return 0;
}

unsigned long __stdcall ThreadProc2(void* lp) {
    while (number < 100) {
        EnterCriticalSection(&Critical);
        cout << "thread 2 :"<<number << endl;
        ++number;
        _sleep(100);
        LeaveCriticalSection(&Critical);
    }
    return 0;
}

int main() {
    InitializeCriticalSection(&Critical);   //初始化临界区对象

    CreateThread(NULL, 0, ThreadProc1, NULL, 0, NULL);
    CreateThread(NULL, 0, ThreadProc2, NULL, 0, NULL);

    Sleep(10*1000);
    system("pause");
    return 0;
}
2、互斥量
C++中通过实例化mutex创建互斥量,通过调用成员函数lock()进行上锁,unlock()进行解锁。不过,不推荐实践中直接去调用成员函数,因为调用成员函数就意味着,必须记住在每个函数出口都要去调用unlock(),也包括异常的情况。C++标准库为互斥量提供了一个RAII语法的模板类,从而保证了一个已锁的互斥量总是会被正确解锁。例子如下:
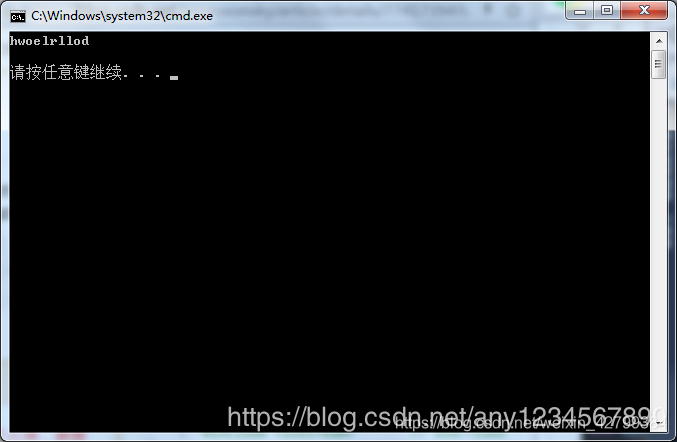
在多任务操作系统中,同时运行的多个任务可能都需要使用同一资源。例如有一个人正在使用打印机打印东西的同时(还没有打印结束),另一个人刚好也在此刻使用打印机打印东西,如果 不做任何处理的话,打印出来的东西肯定是错乱的。
#include <iostream>
#include <thread>
using namespace std;

void printer(const char *str)
{
	while (*str!='\0')	{
		cout << *str++;
		this_thread::sleep_for(chrono::seconds(1));
	}
	cout << endl;
}

//线程1
void func1() {
	const char *str = "hello";
	printer(str);
}

//线程2
void func2() {
	const char *str = "world";
	printer(str);
}

int main() {
	thread t1(func1);
	thread t2(func2);
	t1.join();
	t2.join();
	return 0;
}
运行结果:
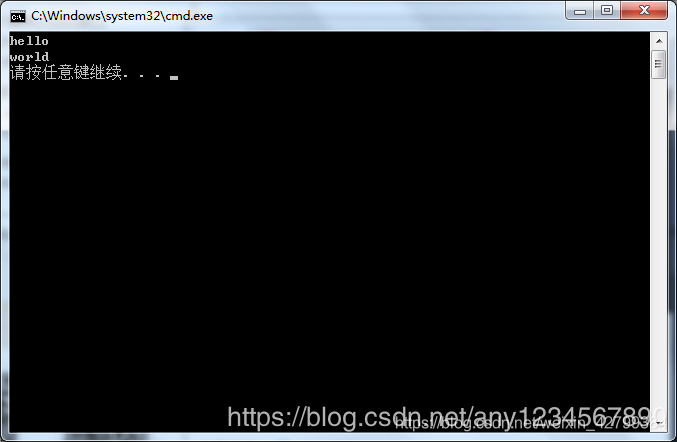
独占互斥量 mutex
互斥量的基本接口很相似,一般用法是通过lock()方法来阻塞线程,直至获得互斥量的所有权为止。在线程获得互斥量并完成任务之后,就必须使用unlock()来解除对互斥量的占有,lock()和unlock()必须成对出现。try_lock()尝试锁定互斥量,如果成功则返回true,如果失败则返回false,它是非阻塞的。
#include <iostream>
#include <thread>
#include <mutex>
using namespace std;

mutex g_lock;//全局互斥锁对象,头文件#include <mutex>
void printer(const char *str) {
	g_lock.lock();//上锁
	while (*str!='\0') {
		cout << *str++;
		this_thread::sleep_for(chrono::seconds(1));
	}
	cout << endl;
	g_lock.unlock();//解锁
}

//线程1
void func1() {
	const char *str = "hello";
	printer(str);
}

//线程2
void func2() {
	const char *str = "world";
	printer(str);
}

int main() {
	thread t1(func1);
	thread t2(func2);
	t1.join();
	t2.join();
	return 0;
}
运行结果:
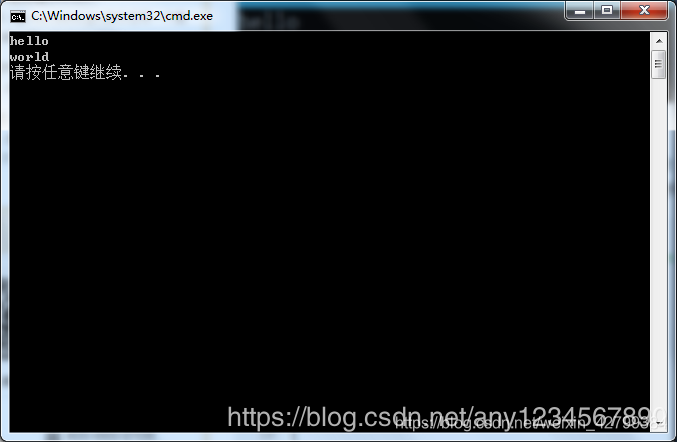
lock_guard 简化 lock/unlock 的写法
使用lock_guard可以简化lock/unlock 的写法,同时也更安全,因为lock_guard在构造时会自动锁住互斥量,而在退出作用域后进行析构时就会自动解锁,从而避免忘了unlock操作。
#include <iostream>
#include <thread>
#include <mutex>
using namespace std;

mutex g_lock;//全局互斥锁对象,头文件#include <mutex>
void printer(const char *str) {
	//g_lock.lock();//上锁
	lock_guard<mutex> locker(g_lock);//这里lock_guard代替了lock/unlock
	while (*str!='\0') {
		cout << *str++;
		this_thread::sleep_for(chrono::seconds(1));
	}
	cout << endl;
	//g_lock.unlock();//解锁
}
//线程1
void func1() {
	const char *str = "hello";
	printer(str);
}

//线程2
void func2() {
	const char *str = "world";
	printer(str);
}

int main() {
	thread t1(func1);
	thread t2(func2);
	t1.join();
	t2.join();
	return 0;
}
运行结果:


 1401
1401

 被折叠的 条评论
为什么被折叠?
被折叠的 条评论
为什么被折叠?
 到【灌水乐园】发言


