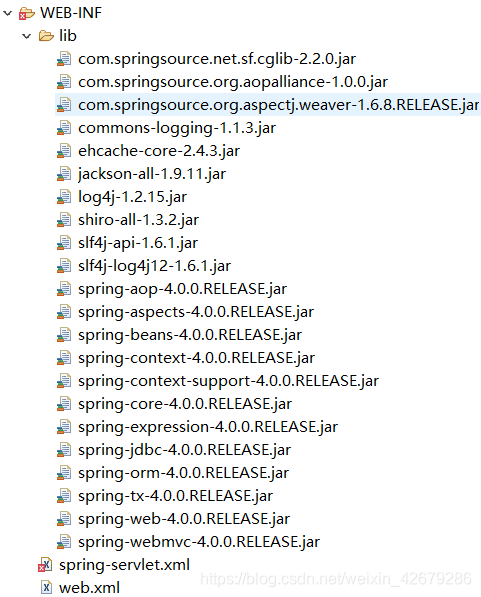
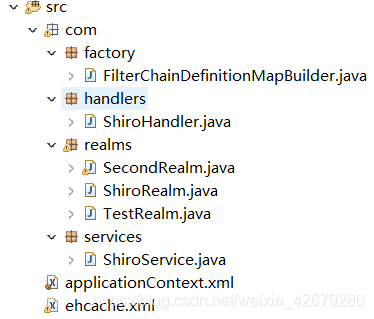
创建web项目
1.配置在web.xml
<context-param>
	<param-name>contextConfigLocation</param-name>
	<param-value>classpath:applicationContext.xml</param-value>
</context-param>
<listener>
	<listener-class>org.springframework.web.context.ContextLoaderListener</listener-class>
</listener>
<servlet>
	<servlet-name>spring</servlet-name>
	<servlet-class>org.springframework.web.servlet.DispatcherServlet</servlet-class>
	<load-on-startup>1</load-on-startup>
</servlet>

<!-- 将所有请求映射到DispatcherServlet以进行处理 -->
<servlet-mapping>
	<servlet-name>spring</servlet-name>
	<url-pattern>/</url-pattern>
</servlet-mapping>

<!-- 拦截所有對象
1. 配置  Shiro 的 shiroFilter.
2. DelegatingFilterProxy 实际上是 Filter 的一个代理对象. 默认情况下, Spring 会到 IOC 容器中查找和
<filter-name> 对应的 filter bean. 也可以通过 targetBeanName 的初始化参数来配置 filter bean 的 id.
-->
<filter>
	<filter-name>shiroFilter</filter-name>
	<filter-class>org.springframework.web.filter.DelegatingFilterProxy</filter-class>
	<init-param>
		<param-name>targetFilterLifecycle</param-name>
		<param-value>true</param-value>
	</init-param>
</filter>
<filter-mapping>
	<filter-name>shiroFilter</filter-name>
	<url-pattern>/*</url-pattern>
</filter-mapping>
2.与web.xml相同路基下配置spring-servlet.xml
<beans xmlns="http://www.springframework.org/schema/beans"
	xmlns:xsi="http://www.w3.org/2001/XMLSchema-instance"
	xmlns:mvc="http://www.springframework.org/schema/mvc"
	xmlns:context="http://www.springframework.org/schema/context"
	xsi:schemaLocation="http://www.springframework.org/schema/mvc http://www.springframework.org/schema/mvc/spring-mvc-4.0.xsd
		http://www.springframework.org/schema/beans http://www.springframework.org/schema/beans/spring-beans.xsd
		http://www.springframework.org/schema/context http://www.springframework.org/schema/context/spring-context-4.0.xsd">
	<context:component-scan base-package="com"></context:component-scan>
	<bean class="org.springframework.web.servlet.view.InternalResourceViewResolver">
		<property name="prefix" value="/"></property>
		<property name="suffix" value=".jsp"></property>
	</bean>
	<mvc:annotation-driven></mvc:annotation-driven>
	<mvc:default-servlet-handler/>
</beans>
3.在项目根路径下配置applicationContext.xml 和 ehcache.xml文件
applicationContext.xml文件
<?xml version="1.0" encoding="UTF-8"?>
<beans xmlns="http://www.springframework.org/schema/beans"
	xmlns:xsi="http://www.w3.org/2001/XMLSchema-instance"
	xsi:schemaLocation="http://www.springframework.org/schema/beans http://www.springframework.org/schema/beans/spring-beans.xsd">

    <!--  1. 配置 SecurityManager! -->
    <bean id="securityManager" class="org.apache.shiro.web.mgt.DefaultWebSecurityManager">
        <property name="cacheManager" ref="cacheManager"/>
        <property name="authenticator" ref="authenticator"></property>

        <property name="realms">
        	<list>
    			<ref bean="jdbcRealm"/>
    			<ref bean="secondRealm"/>
    		</list>
        </property>
        <property name="rememberMeManager.cookie.maxAge" value="10"></property>
    </bean>

    <!-- 让我们使用一些企业缓存支持来获得更好的性能。你可以用任何企业来代替它。
                您喜欢的缓存框架实现(Terracotta+ehcache、Coherence、Gigaspace等) -->
    <!--
    2. 配置 CacheManager.
    2.1 需要加入 ehcache 的 jar 包及配置文件.
    -->
    <bean id="cacheManager" class="org.apache.shiro.cache.ehcache.EhCacheManager">
        <!-- 如果已经有net.sf.ehcache.cachemanager实例,请在此处设置一个。
                       如果没有,就换一个新的,默认配置创建:
             <property name="cacheManager" ref="ehCacheManager"/> -->
        <!-- 如果没有要插入的预构建net.sf.ehcache.cachemanager实例,但需要使用的特定ehcache配置,请在此处指定。
                       如果没有,默认的将被使用 -->
        <property name="cacheManagerConfigFile" value="classpath:ehcache.xml"/>
    </bean>
    <!-- 配置认证策略 -->
    <bean id="authenticator"
    	class="org.apache.shiro.authc.pam.ModularRealmAuthenticator">
    	<property name="authenticationStrategy">
    	 <!-- 一个成功即可 -->
    		<bean class="org.apache.shiro.authc.pam.AtLeastOneSuccessfulStrategy"></bean>
         <!--  全部成功才通过 <bean class="org.apache.shiro.authc.pam.AllSuccessfulStrategy"></bean>  -->
    	</property>
    </bean>
    <!-- 由SecurityManager用于访问安全数据(用户、角色等)。也可以使用许多其他领域实现propertiesrealm,LdapRealm等。  -->
    <!--3. 配置 Realm
    	3.1 直接配置实现了 org.apache.shiro.realm.Realm 接口的 bean -->
    <!-- 指定MD5加密 -->
    <bean id="jdbcRealm" class="com.realms.ShiroRealm">
    	<property name="credentialsMatcher">
    		<bean class="org.apache.shiro.authc.credential.HashedCredentialsMatcher">
    			<property name="hashAlgorithmName" value="MD5"></property>
    			<property name="hashIterations" value="1024"></property>
    		</bean>
    	</property>
    </bean>
    <!-- SHA1加密 -->
    <bean id="secondRealm" class="com.realms.SecondRealm">
    	<property name="credentialsMatcher">
    		<bean class="org.apache.shiro.authc.credential.HashedCredentialsMatcher">
    			<property name="hashAlgorithmName" value="SHA1"></property>
    			<property name="hashIterations" value="1024"></property>
    		</bean>
    	</property>
    </bean>
    <!--4. 配置 LifecycleBeanPostProcessor. 可以自定的来调用配置在 Spring IOC 容器中 shiro bean 的生命周期方法。-->
    <bean id="lifecycleBeanPostProcessor" class="org.apache.shiro.spring.LifecycleBeanPostProcessor"/>
    <!--5. 启用 IOC 容器中使用 shiro 的注解. 但必须在配置了 LifecycleBeanPostProcessor 之后才可以使用。-->
    <bean class="org.springframework.aop.framework.autoproxy.DefaultAdvisorAutoProxyCreator"
          depends-on="lifecycleBeanPostProcessor"/>
    <bean class="org.apache.shiro.spring.security.interceptor.AuthorizationAttributeSourceAdvisor">
        <property name="securityManager" ref="securityManager"/>
    </bean>

    <!-- 在这里定义shiro过滤器(作为factrybean),而不是直接在web.xml中定义-web.xml使用delegingfilterproxy访问这个bean。-->
    <!--
    6. 配置 ShiroFilter.
    6.1 id 必须和 web.xml 文件中配置的 DelegatingFilterProxy 的 <filter-name> 一致.
                   若不一致, 则会抛出: NoSuchBeanDefinitionException. 因为 Shiro 会来 IOC 容器中查找和 <filter-name> 名字对应的 filter bean.
    -->
    <bean id="shiroFilter" class="org.apache.shiro.spring.web.ShiroFilterFactoryBean">
        <property name="securityManager" ref="securityManager"/>
        <property name="loginUrl" value="/login.jsp"/>
        <property name="successUrl" value="/list.jsp"/>
        <property name="unauthorizedUrl" value="/unauthorized.jsp"/>
        <property name="filterChainDefinitionMap" ref="filterChainDefinitionMap"></property>
        <!--
        	配置哪些页面需要受保护.
        	以及访问这些页面需要的权限.
        	1). anon 可以被匿名访问
        	2). authc 必须认证(即登录)后才可能访问的页面.
        	3). logout 登出.
        	4). roles 角色过滤器
        -->
        <!--
        <property name="filterChainDefinitions">
            <value>
                /login.jsp = anon
                /shiro/login = anon
                /shiro/logout = logout
                /user.jsp = roles[user]
                /admin.jsp = roles[admin]
                # everything else requires authentication:
                /** = authc
            </value>
        </property>
        -->
    </bean>
    <!-- 配置一个 bean, 该 bean 实际上是一个 Map. 通过实例工厂方法的方式 -->
    <bean id="filterChainDefinitionMap"
    	factory-bean="filterChainDefinitionMapBuilder" factory-method="buildFilterChainDefinitionMap"></bean>
    <bean id="filterChainDefinitionMapBuilder"
    	class="com.factory.FilterChainDefinitionMapBuilder"></bean>
    <!-- 注解设置权限 -->
    <bean id="shiroService" class="com.services.ShiroService"></bean>
</beans>
ehcache.xml文件
<ehcache>
    <!-- 设置创建cache.data文件的目录的路径。
                如果路径是Java系统属性,则替换为它在正在运行的虚拟机中的值。
                转换以下属性:
    user.home-用户的主目录
    user.dir-用户的当前工作目录
    java.io.tmpdir-默认临时文件路径 -->
    <diskStore path="java.io.tmpdir"/>
    <cache name="authorizationCache"
           eternal="false"
           timeToIdleSeconds="3600"
           timeToLiveSeconds="0"
           overflowToDisk="false"
           statistics="true">
    </cache>
    <cache name="authenticationCache"
           eternal="false"
           timeToIdleSeconds="3600"
           timeToLiveSeconds="0"
           overflowToDisk="false"
           statistics="true">
    </cache>
    <cache name="shiro-activeSessionCache"
           eternal="false"
           timeToIdleSeconds="3600"
           timeToLiveSeconds="0"
           overflowToDisk="false"
           statistics="true">
    </cache>

    <!--
		默认缓存需要以下属性:
		maximemory-设置将在内存中创建的最大对象数   ,永恒-设定元素是否永恒。如果是永恒的,则忽略超时和元素 ,永不过期。
		TimeToIdleSeconds-设置元素在过期之前的空闲时间。仅用于 ,如果元素不是永恒的。空闲时间现在是-上次访问时间
		TimeToLiveSeconds-设置元素在过期之前的生存时间。仅用于如果元素不是永恒的。TTL现在是-创建时间
		overflowTodisk-设置在内存缓存中元素是否可以溢出到磁盘 已达到最大内存限制。 -->
    <defaultCache
        maxElementsInMemory="10000"
        eternal="false"
        timeToIdleSeconds="120"
        timeToLiveSeconds="120"
        overflowToDisk="true"
        />

    <!--预定义的缓存。在此处添加缓存配置设置。
		如果您没有缓存的配置,当缓存管理器启动
		默认缓存需要以下属性:
		name-设置缓存的名称。这用于标识缓存。它必须是独一无二的。
		maximemory-设置将在内存中创建的最大对象数
		eternal-设定元素是否永恒。如果是永恒的,则忽略超时和元素永不过期。
		TimeToIdleSeconds-设置元素在过期之前的空闲时间。仅用于如果元素不是永恒的。空闲时间现在是-上次访问时间
		TimeToLiveSeconds-设置元素在过期之前的生存时间。仅用于如果元素不是永恒的。TTL is now-创建时间
		overflowTodisk-设置在内存缓存中元素是否可以溢出到磁盘已达到最大内存限制。-->
    <!-- 名为samplecache1的示例缓存,此缓存最多包含10000个元素的内存,将过期闲置时间超过5分钟且寿命超过10分钟。
         如果元素超过10000个,它将溢出到磁盘缓存,在这个配置中,它将转到java.io.tmp所在的任何位置。 -->
    <cache name="sampleCache1"
        maxElementsInMemory="10000"
        eternal="false"
        timeToIdleSeconds="300"
        timeToLiveSeconds="600"
        overflowToDisk="true"
        />
    <!-- 名为samplecache2的示例缓存,此缓存包含1000个元素。元素将始终保存在内存中。它们没有过期。  -->
    <cache name="sampleCache2"
        maxElementsInMemory="1000"
        eternal="true"
        timeToIdleSeconds="0"
        timeToLiveSeconds="0"
        overflowToDisk="false"
        /> -->
</ehcache>
4.在lib下加入相应架包

5.根路径下穿件com文件夹并创相应文件

ShiroHandler
@Controller
@RequestMapping("/shiro")
public class ShiroHandler {
	@Autowired
	private ShiroService shiroService;
	@RequestMapping("/testShiroAnnotation")
	public String testShiroAnnotation(HttpSession session){
		session.setAttribute("key", "value12345");
		shiroService.testMethod();
		return "redirect:/list.jsp";
	}
	@RequestMapping("/login")
	public String login(@RequestParam("username") String username,
			@RequestParam("password") String password){
		Subject currentUser = SecurityUtils.getSubject();
		//调动 Subject 的 isAuthenticated()测试当前的用户是否已经被认证,即是否已经登录。
		if (!currentUser.isAuthenticated()) {
			// 把用户名和密码封装为 UsernamePasswordToken 对象
            UsernamePasswordToken token = new UsernamePasswordToken(username, password);
            // rememberme
            token.setRememberMe(true);
            try {
            	System.out.println("1. " + token.hashCode());
            	// 执行登录。
                currentUser.login(token);
            }
            // ... catch more exceptions here (maybe custom ones specific to your application?
            // 所有认证时异常的父类.
            catch (AuthenticationException ae) {
                //unexpected condition?  error?
            	System.out.println("登录失败: " + ae.getMessage());
            }
        }
	    //重定向
	    return "redirect:/list.jsp";
	}
}
ShiroRealm
	@Override
	protected AuthenticationInfo doGetAuthenticationInfo(
			AuthenticationToken token) throws AuthenticationException {
		System.out.println("[FirstRealm] doGetAuthenticationInfo");
		//1. 把 AuthenticationToken 转换为 UsernamePasswordToken
		UsernamePasswordToken upToken = (UsernamePasswordToken) token;
		//2. 从 UsernamePasswordToken 中来获取 username
		String username = upToken.getUsername();
		char[] password = upToken.getPassword();
		//3. 调用数据库的方法, 从数据库中查询 username 对应的用户记录
		System.out.println("从数据库中获取 username: " + username + " 所对应的用户信息.1");
		System.out.println("从数据库中获取 password: " + password.toString() + " 所对应的用户信息.1");
		//4. 若用户不存在, 则可以抛出 UnknownAccountException 异常
		if("unknown".equals(username)){
			 System.out.println("*******用户不存在!1");
			throw new UnknownAccountException("用户不存在!1");
		}
		//5. 根据用户信息的情况, 决定是否需要抛出其他的 AuthenticationException 异常.
		if("monster".equals(username)){
			System.out.println("*************用户被锁定1");
			throw new LockedAccountException("用户被锁定1");
		}
		//6. 根据用户的情况, 来构建 AuthenticationInfo 对象并返回. 通常使用的实现类为: SimpleAuthenticationInfo
		//以下信息是从数据库中获取的.
		//1). principal: 认证的实体信息. 可以是 username, 也可以是数据表对应的用户的实体类对象.
		Object principal = username;
		//2). credentials: 密码.
		Object credentials = "098d2c478e9c11555ce2823231e02ec1"; //"fc1709d0a95a6be30bc5926fdb7f22f4";
		if("admin".equals(username)){
			credentials = "038bdaf98f2037b31f1e75b5b4c9b26e";
		}else if("user".equals(username)){
			credentials = "098d2c478e9c11555ce2823231e02ec1";
		}
		//3). realmName: 当前 realm 对象的 name. 调用父类的 getName() 方法即可
		String realmName = getName();
		//4). 盐值.
		ByteSource credentialsSalt = ByteSource.Util.bytes(username);
		SimpleAuthenticationInfo info = null;
		info = new SimpleAuthenticationInfo(principal, credentials, credentialsSalt, realmName);
		return info;
	}
	public static void main(String[] args) {
		String hashAlgorithmName = "MD5";
		Object credentials = "123456";
		Object salt = ByteSource.Util.bytes("user");;
		int hashIterations = 1024;
		Object result = new SimpleHash(hashAlgorithmName, credentials, salt, hashIterations);
		System.out.println(result);
	}
	//授权会被 shiro 回调的方法
	@Override
	protected AuthorizationInfo doGetAuthorizationInfo(
			PrincipalCollection principals) {
		//1. 从 PrincipalCollection 中来获取登录用户的信息
		Object principal = principals.getPrimaryPrincipal();
		//2. 利用登录的用户的信息来用户当前用户的角色或权限(可能需要查询数据库)
		Set<String> roles = new HashSet<>();
		roles.add("user");
		if("admin".equals(principal)){
			roles.add("admin");
		}
		//3. 创建 SimpleAuthorizationInfo, 并设置其 reles 属性.
		SimpleAuthorizationInfo info = new SimpleAuthorizationInfo(roles);
		//4. 返回 SimpleAuthorizationInfo 对象.
		return info;
	}
}
SecondRealm
package com.realms;

import org.apache.shiro.authc.AuthenticationException;
import org.apache.shiro.authc.AuthenticationInfo;
import org.apache.shiro.authc.AuthenticationToken;
import org.apache.shiro.authc.LockedAccountException;
import org.apache.shiro.authc.SimpleAuthenticationInfo;
import org.apache.shiro.authc.UnknownAccountException;
import org.apache.shiro.authc.UsernamePasswordToken;
import org.apache.shiro.crypto.hash.SimpleHash;
import org.apache.shiro.realm.AuthenticatingRealm;
import org.apache.shiro.util.ByteSource;

public class SecondRealm extends AuthenticatingRealm {
	@Override
	protected AuthenticationInfo doGetAuthenticationInfo(
			AuthenticationToken token) throws AuthenticationException {
		System.out.println("[SecondReaml] doGetAuthenticationInfo");
		//1. 把 AuthenticationToken 转换为 UsernamePasswordToken
		UsernamePasswordToken upToken = (UsernamePasswordToken) token;
		//2. 从 UsernamePasswordToken 中来获取 username
		String username = upToken.getUsername();
		//3. 调用数据库的方法, 从数据库中查询 username 对应的用户记录
		System.out.println("从数据库中获取 username2: " + username + " 所对应的用户信息.2");

		//4. 若用户不存在, 则可以抛出 UnknownAccountException 异常
		if("unknown".equals(username)){
			throw new UnknownAccountException("用户不存在2!");
		}
		//5. 根据用户信息的情况, 决定是否需要抛出其他的 AuthenticationException 异常.
		if("monster".equals(username)){
			throw new LockedAccountException("用户被锁定2");
		}
		//6. 根据用户的情况, 来构建 AuthenticationInfo 对象并返回. 通常使用的实现类为: SimpleAuthenticationInfo
		//以下信息是从数据库中获取的.
		//1). principal: 认证的实体信息. 可以是 username, 也可以是数据表对应的用户的实体类对象.
		Object principal = username;
		//2). credentials: 密码.
		Object credentials = "098d2c478e9c11555ce2823231e02ec1"; //"fc1709d0a95a6be30bc5926fdb7f22f4";
	    if("admin".equals(username)){
			credentials = "ce2f6417c7e1d32c1d81a797ee0b499f87c5de06";
		}else if("user".equals(username)){
			credentials = "073d4c3ae812935f23cb3f2a71943f49e082a718";
		}
		//3). realmName: 当前 realm 对象的 name. 调用父类的 getName() 方法即可
		String realmName = getName();
		//4). 盐值.
		ByteSource credentialsSalt = ByteSource.Util.bytes(username);
		SimpleAuthenticationInfo info = null; //new SimpleAuthenticationInfo(principal, credentials, realmName);
		info = new SimpleAuthenticationInfo("secondRealmName", credentials, credentialsSalt, realmName);
		return info;
	}
	public static void main(String[] args) {
		String hashAlgorithmName = "SHA1";
		Object credentials = "123456";
		Object salt = ByteSource.Util.bytes("admin");;
		int hashIterations = 1024;
		Object result = new SimpleHash(hashAlgorithmName, credentials, salt, hashIterations);
		System.out.println(result);
	}
}
TestRealm
public class TestRealm extends AuthorizingRealm {

	//用于授权的方法.
	@Override
	protected AuthorizationInfo doGetAuthorizationInfo(
			PrincipalCollection principals) {
		// TODO Auto-generated method stub
		return null;
	}

	//用于认证的方法
	@Override
	protected AuthenticationInfo doGetAuthenticationInfo(
			AuthenticationToken token) throws AuthenticationException {
		// TODO Auto-generated method stub
		return null;
	}

}
FilterChainDefinitionMapBuilder
public class FilterChainDefinitionMapBuilder {

	public LinkedHashMap<String, String> buildFilterChainDefinitionMap(){
		LinkedHashMap<String, String> map = new LinkedHashMap<>();
		map.put("/login.jsp", "anon");
		map.put("/shiro/login", "anon");
		map.put("/shiro/logout", "logout");
		map.put("/user.jsp", "authc,roles[user]");
		map.put("/admin.jsp", "authc,roles[admin]");
		map.put("/list.jsp", "user");
		map.put("/**", "authc");
		return map;
	}
}


 563
563

 被折叠的 条评论
为什么被折叠?


