


今天是第一天学习Swagger在线文档,赶紧做笔记,以防之后又忘记了
使用Swagger的几个步骤
- 导入相对应的Jar包
- 创建一个特定的工具类,定义一些信息=
- 在指定类上面进行描述
一、导包
在spring项目中。使用Swagger,有两个必须的包,分别是:
       <dependency>
            <groupId>io.springfox</groupId>
            <artifactId>springfox-swagger2</artifactId>
            <version>2.2.2</version>
        </dependency>
        <dependency>
            <groupId>io.springfox</groupId>
            <artifactId>springfox-swagger-ui</artifactId>
            <version>2.2.2</version>
        </dependency>
中间的version版本可以自定,但是现在一般都是Swagger2版本之后了。
二、创建工具类
import org.springframework.context.annotation.Bean;
import org.springframework.context.annotation.Configuration;
import springfox.documentation.builders.ApiInfoBuilder;
import springfox.documentation.builders.PathSelectors;
import springfox.documentation.builders.RequestHandlerSelectors;
import springfox.documentation.service.ApiInfo;
import springfox.documentation.spi.DocumentationType;
import springfox.documentation.spring.web.plugins.Docket;
import springfox.documentation.swagger2.annotations.EnableSwagger2;
@Configuration
@EnableSwagger2
public class Swagger2 {
/**
* 创建API应用
* apiInfo() 增加API相关信息
* 通过select()函数返回一个ApiSelectorBuilder实例,用来控制哪些接口暴露给Swagger来展现,
* 本例采用指定扫描的包路径来定义指定要建立API的目录。
*
* @return
*/
@Bean
public Docket createRestApi() {
return new Docket(DocumentationType.SWAGGER_2)
.apiInfo(apiInfo())
.select()
.apis(RequestHandlerSelectors.basePackage("com.example.demo.demo.controller"))
.paths(PathSelectors.any())
.build();
}
/**
* 创建该API的基本信息(这些基本信息会展现在文档页面中)
* 访问地址:http://项目实际地址/swagger-ui.html
* @return
*/
private ApiInfo apiInfo() {
return new ApiInfoBuilder()
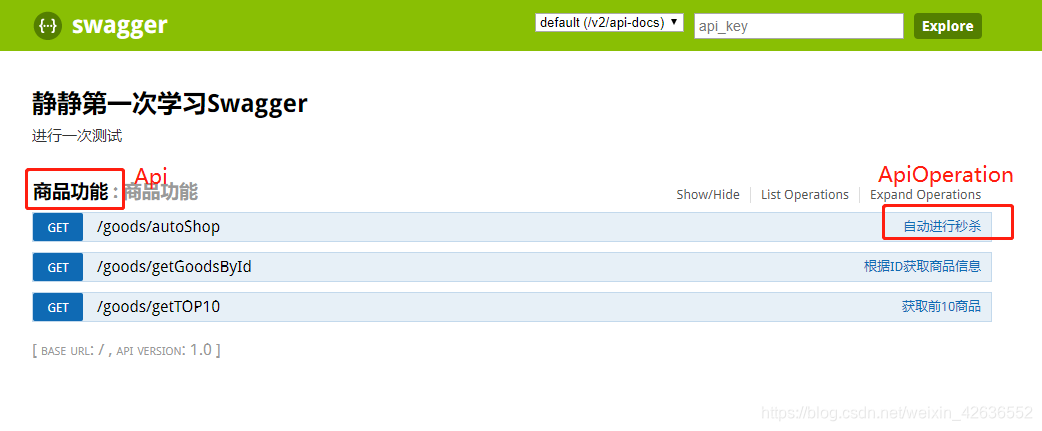
.title("静静第一次学习Swagger")
.description("进行一次测试")
.version("1.0")
.build();
}
}
apiInfo方法中ApiInfoBuilder对象有一个重要的属性:
title为整个接口文档的名称,一般和项目功能相关;
description为名称的一个结束,类似于文章摘要的东西;
version为接口文档版本,自己的微服务小demo可以不写这个,想一些迭代率很高的项目,一般都需要有这个
展示的最后样式为:

三、直接在特定类中使用
一般直接在Controller层。
Swagger使用的注解及其说明:
@Api:用在类上,说明该类的用途
@ApiOperation:注解来给API增加方法说明。
@ApiImplicitParams : 用在方法上包含一组参数说明。
@ApiImplicitParam:用来注解来给方法入参增加说明。
@ApiResponses:用于表示一组响应
@ApiResponse:用在@ApiResponses中,一般用于表达一个错误的响应信息
l code:数字,例如400
l message:信息,例如"请求参数没填好"
l response:抛出异常的类
@ApiModel:描述一个Model的信息(一般用在请求参数无法使用@ApiImplicitParam注解进行描述的时候)
l @ApiModelProperty:描述一个model的属性
展示出来的效果如:
注意:
如果在方法中没有指定请求类型,Swagger里面会直接默认有7种不同的请求方式,可供选择。
THE END
GOOD LUNCK


 1302
1302

 被折叠的 条评论
为什么被折叠?
被折叠的 条评论
为什么被折叠?
 到【灌水乐园】发言


