上次给大家介绍了转换函数、缓动函数,这次给大家介绍图形函数、滤镜函数、其他函数中常用的函数进行解读。一、图形函数1.circle()circle()函数用于定义一个圆形 circle(radius at X Y) 参数1:半径 参数2:水平中心点位置(X轴) 参数3:垂直中心点位置(Y轴)1.1用法
2.ellipse()ellipse()函数用于定义一个椭圆形ellipse(radiusX radiusY at X Y) 参数1:水平半径(X轴半径) 参数2:垂直半径(Y轴半径) 参数3:水平中心点位置(X轴) 参数4:垂直中心点位置(Y轴)2.1用法
3.inset()inset()函数指定一个inset类型的矩形 未指定round四个参数分别为inset(top right bottom left) 参数1:上边向内距离 参数2:右边向内距离 参数3:下边向内距离 参数4:左边向内距离 指定round参数为inset(top right bottom left round top right bottom left) 参数1:上边向内距离 参数2:右边向内距离 参数3:下边向内距离 参数4:左边向内距离 参数5:指定圆角 参数6:上边圆角度数 参数7:右边圆角度数 参数8:下边圆角度数 参数9:左边圆角度数3.1用法
4.polygon()polygon()函数用于定义一个多边形 polygon(x1 y1, x2 y2, x3 y3,...) 参数1:第一个点的X轴Y轴位置 参数2:第二个点的X轴Y轴位置 参数3:第三个点的X轴Y轴位置4.1用法
二、滤镜函数1.blur()blur()属性定义了元素(通常是图片)的可视效果1.1用法
2.brightness()brightness()给图片应用一种线性乘法,使其看起来更亮或更暗,值越小越暗,值越大越亮(0为最暗黑色,1为正常)2.1用法
3.contrast()contrast()调整图像的对比度,值越小越暗,值越大越亮(0为最暗,1为正常)3.1用法
4.drop-shadow()drop-shadow()给图像设置一个阴影效果 drop-shadow(h-shadow v-shadow blur spread color) 参数1:水平方向偏移 参数2:垂直方向偏移 参数3:阴影模糊度 参数4:阴影大小(不分浏览器不支持) 参数5:阴影颜色4.1用法
5.grayscale()grayscale()将图像转换为灰度图像。值定义转换的比例。值为100%则完全转为灰度图像,值为0%图像无变化。值在0%到100%之间,则是效果的线性乘子。若未设置,值默认是0;5.1用法
6.hue-rotate()hue-rotate()给图像应用色相旋转6.1用法
7.invert()invert()反转输入图像7.1用法
8.opacity()opacity()转化图像的透明程度8.1用法
9.saturate()saturate()转换图像饱和度9.1用法
10.sepia()sepia()将图像转换为深褐色10.1用法
三、其他函数1.counter()counter()插入计数器,counter()只能被使用在content属性上,通常与counter-reset属性、counter-increment属性一并使用counter-reset属性:创建或重置一个或多个计数器counter-increment属性:递增一个或多个计数器值1.1用法
2.counters()counters()嵌套计数器,返回表示指定计数器当前值的连接字符串2.1用法
3.var()var()用于插入自定义的属性值,类似js中的var3.1用法
常用的css函数就讲解这些,三部分的讲解就到此结束了。你们会用了吗往期回顾: CSS函数(一) CSS函数(二)
<html lang="en"><head> <meta charset="UTF-8"> <meta name="viewport" content="width=device-width, initial-scale=1.0"> <title>Documenttitle> <style> .test-div, .test-div-item { margin-bottom: 10px; width: 200px; height: 200px; line-height: 40px; color: #fff; background-color: red; } .test-div-item { background-color: green; } .div1 { clip-path: circle(50px at 100px 100px); } .div2 { clip-path: circle(100px at 50px 50px); } .div3 { clip-path: circle(100px at 120px 120px); }style>head><body> <div class="test-div"> <div class="test-div-item div1">clip-path: circle(50px at 100px 100px);div> div> <div class="test-div"> <div class="test-div-item div2">clip-path: circle(100px at 50px 50px);div> div> <div class="test-div"> <div class="test-div-item div3">clip-path: circle(100px at 120px 120px);div> div>body>html>
1.2浏览器支持
| 函数 |  |  |  |  |  |
| circle() | 53.0 | 14.0 | 49.0 | 10.0 | 40.0 |
<html lang="en"><head> <meta charset="UTF-8"> <meta name="viewport" content="width=device-width, initial-scale=1.0"> <title>Documenttitle> <style> .test-div, .test-div-item { margin-bottom: 10px; width: 200px; height: 200px; line-height: 40px; color: #fff; background-color: red; } .test-div-item { background-color: green; } .div1 { clip-path: ellipse(50px 80px at 100px 100px); } .div2 { clip-path: ellipse(100px 80px at 50px 50px); } .div3 { clip-path: ellipse(100px 80px at 120px 120px); }style>head><body> <div class="test-div"> <div class="test-div-item div1">clip-path: ellipse(50px 80px at 100px 100px);div> div> <div class="test-div"> <div class="test-div-item div2">clip-path: ellipse(100px 80px at 50px 50px);div> div> <div class="test-div"> <div class="test-div-item div3">clip-path: ellipse(100px 80px at 120px 120px);div> div>body>html>
| 函数 |  |  |  |  |  |
| ellipse() | 53.0 | 14.0 | 49.0 | 10.0 | 40.0 |
<html lang="en"><head> <meta charset="UTF-8"> <meta name="viewport" content="width=device-width, initial-scale=1.0"> <title>Documenttitle> <style> .test-div, .test-div-item { margin-bottom: 10px; width: 200px; height: 200px; line-height: 40px; color: #fff; background-color: red; } .test-div-item { background-color: green; } .div1 { clip-path: inset(20px 40px round 10px); } .div2 { clip-path: inset(10px 20px 40px 60px); } .div3 { clip-path: inset(20px round 10px 30px); }style>head><body> <div class="test-div"> <div class="test-div-item div1">clip-path: inset(20px 40px round 10px);div> div> <div class="test-div"> <div class="test-div-item div2">clip-path: inset(10px 20px 40px 60px);div> div> <div class="test-div"> <div class="test-div-item div3">clip-path: inset(20px round 10px 30px);div> div>body>html>
| 函数 |  |  |  |  |  |
| inset() | 53.0 | 14.0 | 49.0 | 10.0 | 40.0 |
<html lang="en"><head> <meta charset="UTF-8"> <meta name="viewport" content="width=device-width, initial-scale=1.0"> <title>Documenttitle> <style> .test-div, .test-div-item { margin-bottom: 10px; width: 200px; height: 200px; line-height: 40px; color: #fff; background-color: red; } .test-div-item { background-color: green; } .div1 { clip-path: polygon(0 0, 100% 100%, 0 100%); } .div2 { clip-path: polygon(50px 0px, 100px 100px, 0px 100px); } .div3 { clip-path: polygon(50px 50px, 100px 100px, 0px 150px); }style>head><body> <div class="test-div"> <div class="test-div-item div1">clip-path: polygon(0 0, 100% 100%, 0 100%);div> div> <div class="test-div"> <div class="test-div-item div2">clip-path: polygon(50px 0px, 100px 100px, 0px 100px);div> div> <div class="test-div"> <div class="test-div-item div3">clip-path: polygon(50px 50px, 100px 100px, 0px 150px);div> div>body>html>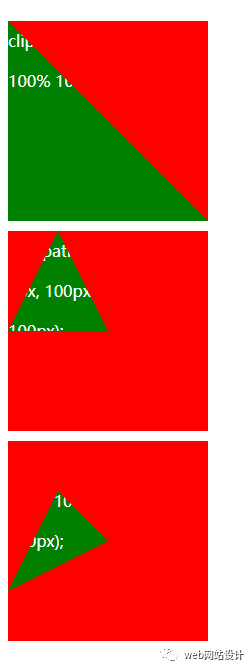
| 函数 |  |  |  |  |  |
| polygon() | 53.0 | 14.0 | 49.0 | 10.0 | 40.0 |
<html lang="en"><head> <meta charset="UTF-8"> <meta name="viewport" content="width=device-width, initial-scale=1.0"> <title>Documenttitle> <style> .test-div, .test-div-item { margin-bottom: 10px; width: 200px; height: 200px; line-height: 40px; color: #fff; /* background-color: red; */ } .test-div-item { background-color: green; background: url('./qrcode_3x.jpg') center; } .div1 { filter: blur(5px); } .div2 { filter: blur(10px); } .div3 { filter: blur(15px); }style>head><body> <div class="test-div"> <div class="test-div-item div1">filter: blur(5px);div> div> <div class="test-div"> <div class="test-div-item div2">filter: blur(10px);div> div> <div class="test-div"> <div class="test-div-item div3">filter: blur(15px);div> div>body>html>
| 函数 |  |  |  |  |  |
| blur() | 18.0 | - | 35.0 | 6.0 | 15.0 |
<html lang="en"><head> <meta charset="UTF-8"> <meta name="viewport" content="width=device-width, initial-scale=1.0"> <title>Documenttitle> <style> .test-div, .test-div-item { margin-bottom: 10px; width: 200px; height: 200px; line-height: 40px; color: #fff; } .test-div-item { background-color: green; background: url('./qrcode_3x.jpg') center; } .div1 { filter: brightness(1); } .div2 { filter: brightness(2); } .div3 { filter: brightness(0); }style>head><body> <div class="test-div"> <div class="test-div-item div1">filter: brightness(1);div> div> <div class="test-div"> <div class="test-div-item div2">filter: brightness(2);div> div> <div class="test-div"> <div class="test-div-item div3">filter: brightness(0);div> div>body>html>
| 函数 |  |  |  |  |  |
| brightness() | 18.0 | - | 35.0 | 6.0 | 15.0 |
<html lang="en"><head> <meta charset="UTF-8"> <meta name="viewport" content="width=device-width, initial-scale=1.0"> <title>Documenttitle> <style> .test-div, .test-div-item { margin-bottom: 10px; width: 200px; height: 200px; line-height: 40px; color: #fff; } .test-div-item { background-color: green; background: url('./qrcode_3x.jpg') center; } .div1 { filter: contrast(1); } .div2 { filter: contrast(5); } .div3 { filter: contrast(0); }style>head><body> <div class="test-div"> <div class="test-div-item div1">filter: contrast(1);div> div> <div class="test-div"> <div class="test-div-item div2">filter: contrast(5);div> div> <div class="test-div"> <div class="test-div-item div3">filter: contrast(0);div> div>body>html>
| 函数 |  |  |  |  |  |
| contrast() | 18.0 | - | 35.0 | 6.0 | 15.0 |
<html lang="en"><head> <meta charset="UTF-8"> <meta name="viewport" content="width=device-width, initial-scale=1.0"> <title>Documenttitle> <style> .test-div, .test-div-item { margin-bottom: 10px; width: 200px; height: 200px; line-height: 40px; color: #fff; } .test-div-item { background-color: green; background: url('./qrcode_3x.jpg') center; } .div1 { filter: drop-shadow(10px 20px 10px rgb(140, 211, 8)); } .div2 { filter: drop-shadow(10px 20px 10px rgb(148, 34, 34)); } .div3 { filter: drop-shadow(10px 20px 10px rgb(40, 7, 228)); }style>head><body> <div class="test-div"> <div class="test-div-item div1">filter: drop-shadow(10px 20px 10px #ddd);div> div> <div class="test-div"> <div class="test-div-item div2">filter: drop-shadow(10px 20px 10px #ddd);div> div> <div class="test-div"> <div class="test-div-item div3">filter: drop-shadow(10px 20px 10px #ddd);div> div>body>html>
| 函数 |  |  |  |  |  |
| drop-shadow() | 18.0 | - | 35.0 | 6.0 | 15.0 |
<html lang="en"><head> <meta charset="UTF-8"> <meta name="viewport" content="width=device-width, initial-scale=1.0"> <title>Documenttitle> <style> .test-div, .test-div-item { margin-bottom: 10px; width: 200px; height: 200px; line-height: 40px; color: #fff; } .test-div-item { background-color: green; background: url('./qrcode_3x.jpg') center; } .div1 { filter: grayscale(0); } .div2 { filter: grayscale(5); } .div3 { filter: grayscale(10); }style>head><body> <div class="test-div"> <div class="test-div-item div1">filter: grayscale(0);div> div> <div class="test-div"> <div class="test-div-item div2">filter: grayscale(5);div> div> <div class="test-div"> <div class="test-div-item div3">filter: grayscale(10);div> div>body>html>
| 函数 |  |  |  |  |  |
| grayscale() | 18.0 | - | 35.0 | 6.0 | 15.0 |
<html lang="en"><head> <meta charset="UTF-8"> <meta name="viewport" content="width=device-width, initial-scale=1.0"> <title>Documenttitle> <style> .test-div, .test-div-item { margin-bottom: 10px; width: 200px; height: 200px; line-height: 40px; color: #fff; } .test-div-item { background-color: green; background: url('./qrcode_3x.jpg') center; } .div1 { filter: hue-rotate(0); } .div2 { filter: hue-rotate(50deg); } .div3 { filter: hue-rotate(100deg); }style>head><body> <div class="test-div"> <div class="test-div-item div1">filter: hue-rotate(0);div> div> <div class="test-div"> <div class="test-div-item div2">filter: hue-rotate(50deg);div> div> <div class="test-div"> <div class="test-div-item div3">filter: hue-rotate(100deg);div> div>body>html>
| 函数 |  |  |  |  |  |
| hue-rotate() | 18.0 | - | 35.0 | 6.0 | 15.0 |
<html lang="en"><head> <meta charset="UTF-8"> <meta name="viewport" content="width=device-width, initial-scale=1.0"> <title>Documenttitle> <style> .test-div, .test-div-item { margin-bottom: 10px; width: 200px; height: 200px; line-height: 40px; color: #fff; } .test-div-item { background-color: green; background: url('./qrcode_3x.jpg') center; } .div1 { filter: invert(0); } .div2 { filter: invert(40%); } .div3 { filter: invert(100%); }style>head><body> <div class="test-div"> <div class="test-div-item div1">filter: invert(0);div> div> <div class="test-div"> <div class="test-div-item div2">filter: invert(40%);div> div> <div class="test-div"> <div class="test-div-item div3">filter: invert(100%);div> div>body>html>
| 函数 |  |  |  |  |  |
| invert() | 18.0 | - | 35.0 | 6.0 | 15.0 |
<html lang="en"><head> <meta charset="UTF-8"> <meta name="viewport" content="width=device-width, initial-scale=1.0"> <title>Documenttitle> <style> .test-div, .test-div-item { margin-bottom: 10px; width: 200px; height: 200px; line-height: 40px; color: #fff; } .test-div-item { background-color: green; background: url('./qrcode_3x.jpg') center; } .div1 { filter: opacity(0); } .div2 { filter: opacity(40%); } .div3 { filter: opacity(100%); }style>head><body> <div class="test-div"> <div class="test-div-item div1">filter: opacity(0);div> div> <div class="test-div"> <div class="test-div-item div2">filter: opacity(40%);div> div> <div class="test-div"> <div class="test-div-item div3">filter: opacity(100%);div> div>body>html>
| 函数 |  |  |  |  |  |
| opacity() | 18.0 | - | 35.0 | 6.0 | 15.0 |
<html lang="en"><head> <meta charset="UTF-8"> <meta name="viewport" content="width=device-width, initial-scale=1.0"> <title>Documenttitle> <style> .test-div, .test-div-item { margin-bottom: 10px; width: 200px; height: 200px; line-height: 40px; color: #fff; } .test-div-item { background-color: green; background: url('./qrcode_3x.jpg') center; } .div1 { filter: saturate(0); } .div2 { filter: saturate(40%); } .div3 { filter: saturate(100%); }style>head><body> <div class="test-div"> <div class="test-div-item div1">filter: saturate(0);div> div> <div class="test-div"> <div class="test-div-item div2">filter: saturate(40%);div> div> <div class="test-div"> <div class="test-div-item div3">filter: saturate(100%);div> div>body>html>
| 函数 |  |  |  |  |  |
| saturate() | 18.0 | - | 35.0 | 6.0 | 15.0 |
<html lang="en"><head> <meta charset="UTF-8"> <meta name="viewport" content="width=device-width, initial-scale=1.0"> <title>Documenttitle> <style> .test-div, .test-div-item { margin-bottom: 10px; width: 200px; height: 200px; line-height: 40px; color: #fff; } .test-div-item { background-color: green; background: url('./qrcode_3x.jpg') center; } .div1 { filter: sepia(0); } .div2 { filter: sepia(40%); } .div3 { filter: sepia(100%); }style>head><body> <div class="test-div"> <div class="test-div-item div1">filter: sepia(0);div> div> <div class="test-div"> <div class="test-div-item div2">filter: sepia(40%);div> div> <div class="test-div"> <div class="test-div-item div3">filter: sepia(100%);div> div>body>html>
| 函数 |  |  |  |  |  |
| sepia() | 18.0 | - | 35.0 | 6.0 | 15.0 |
<html lang="en"><head> <meta charset="UTF-8"> <meta name="viewport" content="width=device-width, initial-scale=1.0"> <title>Documenttitle> <style> body { counter-reset: item; } .test-div, .test-div-item { margin-bottom: 10px; line-height: 40px; } .test-div::before { counter-increment: item; content: counter(item)'.'; }style>head><body> <div class="test-div">div1div> <div class="test-div">div2div> <div class="test-div">div3div>body>html>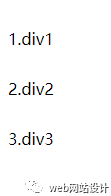
| 函数 |  |  |  |  |  |
| counter() | 4.0 | 8.0 | 4.0 | 4.0 | 15.0 |
<html lang="en"><head> <meta charset="UTF-8"> <meta name="viewport" content="width=device-width, initial-scale=1.0"> <title>Documenttitle> <style> ol { counter-reset: listCounter; } li { counter-increment: listCounter; } li::before { content: counters(listCounter, '.', upper-roman) ') '; } li::after { content: counters(listCounter, "+") " == "counters(listCounter, "-", lower-roman); }style>head><body> <ol> <li> <ol> <li>li> <li>li> <li>li> ol> li> <li>li> <li>li> <li> <ol> <li>li> <li> <ol> <li>li> <li>li> <li>li> ol> li> ol> li> ol>body>html>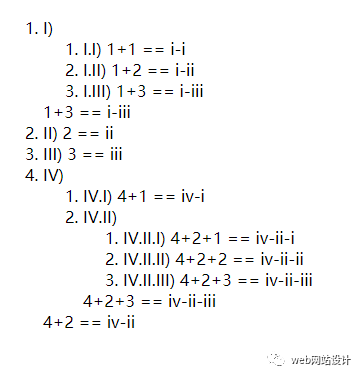
| 函数 |  |  |  |  |  |
| counters() | 4.0 | 8.0 | 4.0 | 4.0 | 15.0 |
<html lang="en"><head> <meta charset="UTF-8"> <meta name="viewport" content="width=device-width, initial-scale=1.0"> <title>Documenttitle> <style> body { --font-color: red } .test-div { margin-bottom: 10px; line-height: 40px; color: green; } .div1 { color: var(--font-color); } .div3 { color: var(--font-color); }style>head><body> <div class="test-div div1">div1div> <div class="test-div div2">div2div> <div class="test-div div3">div3div>body>html>
| 函数 |  |  |  |  |  |
| var() | 18.0 | - | 35.0 | 6.0 | 15.0 |


 本文主要探讨C语言中的color函数用法,并结合CSS中的颜色函数进行对比分析,讲解它们在不同环境下的应用和浏览器支持情况。


 2104
2104

 被折叠的 条评论
为什么被折叠?


