


 本文详细介绍了如何在Android应用中实现网络定位功能,包括设置权限、创建LocationSvc服务、接收定位更新并显示城市信息。通过实例展示了从代码到实际效果的全过程。
本文实例为大家分享了Android使用网络获取定位的具体代码,供大家参考,具体内容如下
目标效果:
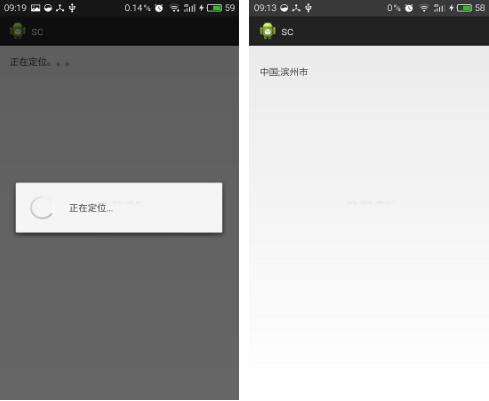
程序运行弹出权限选择,选择运行网络定位后会查询位置,然后在TextView上显示当前国家和城市。
1.activity_main.xml页面定义TextView显示城市名。
activity_main.xml页面:
xmlns:tools="http://schemas.android.com/tools"
android:layout_width="match_parent"
android:layout_height="match_parent"
android:paddingBottom="@dimen/activity_vertical_margin"
android:paddingLeft="@dimen/activity_horizontal_margin"
android:paddingRight="@dimen/activity_horizontal_margin"
android:paddingTop="@dimen/activity_vertical_margin"
tools:context=".MainActivity" >
android:id="@+id/text"
android:layout_width="wrap_content"
android:layout_height="wrap_content"
android:text="正在定位。。。" />
2.新建Common.java页面,设置公共常量。
Common.java页面:
package com.sc.demo.common;
/**
* 公共常量
* @author wxy
*
*/
public class Common {
public static final String LOCATION = "location";
public static final String LOCATION_ACTION = "locationAction";
}
3.新建LocationSvc.java页面作为服务进行定位。
LocationSvc.java页面:
package com.sc.demo.locate;
import com.sc.demo.common.Common;
import android.app.Service;
import android.content.Intent;
import android.location.Location;
import android.location.LocationListener;
import android.location.LocationManager;
import android.os.Bundle;
import android.os.IBinder;
import android.util.Log;
import android.widget.Toast;
/**
* 定位服务
* @author wxy
*
*/
public class LocationSvc extends Service implements LocationListener {
private LocationManager locationManager;
@Override
public IBinder onBind(Intent intent) {
return null;
}
@Override
public void onCreate() {
locationManager = (LocationManager) getSystemService(LOCATION_SERVICE);
}
@Override
public void onStart(Intent intent, int startId) {
if (locationManager.getProvider(LocationManager.NETWORK_PROVIDER) != null) locationManager
.requestLocationUpdates(LocationManager.NETWORK_PROVIDER, 0, 0,
this);
else if (locationManager.getProvider(LocationManager.GPS_PROVIDER) != null) locationManager
.requestLocationUpdates(LocationManager.GPS_PROVIDER, 0, 0,
this);
else Toast.makeText(this, "无法定位", Toast.LENGTH_SHORT).show();
}
@Override
public boolean stopService(Intent name) {
return super.stopService(name);
}
@Override
public void onLocationChanged(Location location) {
//通知Activity
Intent intent = new Intent();
intent.setAction(Common.LOCATION_ACTION);
intent.putExtra(Common.LOCATION, location.toString());
sendBroadcast(intent);
// 如果只是需要定位一次,这里就移除监听,停掉服务。如果要进行实时定位,可以在退出应用或者其他时刻停掉定位服务。
locationManager.removeUpdates(this);
stopSelf();
}
@Override
public void onProviderDisabled(String provider) {
}
@Override
public void onProviderEnabled(String provider) {
}
@Override
public void onStatusChanged(String provider, int status, Bundle extras) {
}
}
4.MainActivity.java页面获取经纬度,然后根据经纬度获取城市名。
MainActivity.java页面:
package com.sc.demo;
import java.io.IOException;
import java.util.List;
import com.sc.demo.common.Common;
import com.sc.demo.locate.LocationSvc;
import android.location.Address;
import android.location.Geocoder;
import android.os.Bundle;
import android.util.Log;
import android.widget.TextView;
import android.app.Activity;
import android.app.ProgressDialog;
import android.content.BroadcastReceiver;
import android.content.Context;
import android.content.Intent;
import android.content.IntentFilter;
public class MainActivity extends Activity {
private TextView text;
private ProgressDialog dialog;
@Override
protected void onCreate(Bundle savedInstanceState) {
super.onCreate(savedInstanceState);
setContentView(R.layout.activity_main);
text = (TextView) findViewById(R.id.text);
// 注册广播
IntentFilter filter = new IntentFilter();
filter.addAction(Common.LOCATION_ACTION);
this.registerReceiver(new LocationBroadcastReceiver(), filter);
// 启动服务
Intent intent = new Intent();
intent.setClass(this, LocationSvc.class);
startService(intent);
// 等待提示
dialog = new ProgressDialog(this);
dialog.setMessage("正在定位...");
dialog.setCancelable(true);
dialog.show();
}
private class LocationBroadcastReceiver extends BroadcastReceiver {
@Override
public void onReceive(Context context, Intent intent) {
if (!intent.getAction().equals(Common.LOCATION_ACTION))
return;
String locationInfo = intent.getStringExtra(Common.LOCATION);
double latitude = Double //截取经纬度转换为double型
.parseDouble(locationInfo.substring(17, 26));
double longitude = Double.parseDouble(locationInfo
.substring(27, 37));
text.setText(getaddress(latitude, longitude));
dialog.dismiss();
MainActivity.this.unregisterReceiver(this);// 不需要时注销
}
public String getaddress(double latitude, double longitude) {
String cityName = "";
List
addList = null;Geocoder ge = new Geocoder(MainActivity.this);
try {
addList = ge.getFromLocation(latitude, longitude, 1);
} catch (IOException e) {
e.printStackTrace();
}
if (addList != null && addList.size() > 0) {
for (int i = 0; i < addList.size(); i++) {
Address ad = addList.get(i);
cityName += ad.getCountryName() + ";" + ad.getLocality();
}
}
Log.i("wxy", "city:" + cityName);
return cityName;
}
}
}
5.AndroidManifest.xml页面添加权限并声明服务。
AndroidManifest.xml页面:
package="com.sc.demo"
android:versionCode="1"
android:versionName="1.0" >
android:minSdkVersion="8"
android:targetSdkVersion="18" />
android:allowBackup="true"
android:icon="@drawable/ic_launcher"
android:label="@string/app_name"
android:theme="@style/AppTheme" >
android:name="com.sc.demo.MainActivity"
android:label="@string/app_name" >
6.运行就能显示目标效果了。
以上就是本文的全部内容,希望对大家的学习有所帮助,也希望大家多多支持脚本之家。


 1万+
1万+

 被折叠的 条评论
为什么被折叠?
被折叠的 条评论
为什么被折叠?
 到【灌水乐园】发言


