


 本文详细介绍了Spring、SpringMVC和MyBatis三大框架的整合过程,包括数据库搭建、实体类生成、配置文件设定、事务管理及前端控制器配置,直至最终的Controller层测试。
个人博客网:https://wushaopei.github.io/ (你想要这里多有)
一、测试数据库
- 框架的搭建是很麻烦的,也复杂,各种问题都可能出现,所以最好一步一测。
drop database if exists ssm;
create database ssm;
use ssm;
##创建图书表
create table t_book(
`id` int(11) primary key auto_increment, ## 主键
`name` varchar(50) not null, ## 书名
`author` varchar(50) not null, ## 作者
`price` decimal(11,2) not null, ## 价格
`sales` int(11) not null, ## 销量
`stock` int(11) ## 库存
);
## 插入初始化测试数据
insert into t_book(`id` , `name` , `author` , `price` , `sales` , `stock`)
values(null , 'java从入门到放弃' , '国哥' , 80 , 9999 , 9 );
insert into t_book(`id` , `name` , `author` , `price` , `sales` , `stock`)
values(null , '数据结构与算法' , '严敏君' , 78.5 , 6 , 13 );
insert into t_book(`id` , `name` , `author` , `price` , `sales` , `stock`)
values(null , '怎样拐跑别人的媳妇' , '龙伍' , 68, 99999 , 52 );
insert into t_book(`id` , `name` , `author` , `price` , `sales` , `stock`)
values(null , '木虚肉盖饭' , '小胖' , 16, 1000 , 50 );
insert into t_book(`id` , `name` , `author` , `price` , `sales` , `stock`)
values(null , 'C++编程思想' , '刚哥' , 45.5 , 14 , 95 );
insert into t_book(`id` , `name` , `author` , `price` , `sales` , `stock`)
values(null , '蛋炒饭' , '周星星' , 9.9, 12 , 53 );
insert into t_book(`id` , `name` , `author` , `price` , `sales` , `stock`)
values(null , '赌神' , '龙伍' , 66.5, 125 , 535 );
insert into t_book(`id` , `name` , `author` , `price` , `sales` , `stock`)
values(null , 'Java编程思想' , '阳哥' , 99.5 , 47 , 36 );
insert into t_book(`id` , `name` , `author` , `price` , `sales` , `stock`)
values(null , 'JavaScript从入门到精通' , '婷姐' , 9.9 , 85 , 95 );
insert into t_book(`id` , `name` , `author` , `price` , `sales` , `stock`)
values(null , 'cocos2d-x游戏编程入门' , '国哥' , 49, 52 , 62 );
insert into t_book(`id` , `name` , `author` , `price` , `sales` , `stock`)
values(null , 'C语言程序设计' , '谭浩强' , 28 , 52 , 74 );
insert into t_book(`id` , `name` , `author` , `price` , `sales` , `stock`)
values(null , 'Lua语言程序设计' , '雷丰阳' , 51.5 , 48 , 82 );
insert into t_book(`id` , `name` , `author` , `price` , `sales` , `stock`)
values(null , '西游记' , '罗贯中' , 12, 19 , 9999 );
insert into t_book(`id` , `name` , `author` , `price` , `sales` , `stock`)
values(null , '水浒传' , '华仔' , 33.05 , 22 , 88 );
insert into t_book(`id` , `name` , `author` , `price` , `sales` , `stock`)
values(null , '操作系统原理' , '刘优' , 133.05 , 122 , 188 );
insert into t_book(`id` , `name` , `author` , `price` , `sales` , `stock`)
values(null , '数据结构 java版' , '封大神' , 173.15 , 21 , 81 );
insert into t_book(`id` , `name` , `author` , `price` , `sales` , `stock`)
values(null , 'UNIX高级环境编程' , '乐天' , 99.15 , 210 , 810 );
insert into t_book(`id` , `name` , `author` , `price` , `sales` , `stock`)
values(null , 'javaScript高级编程' , '国哥' , 69.15 , 210 , 810 );
insert into t_book(`id` , `name` , `author` , `price` , `sales` , `stock`)
values(null , '大话设计模式' , '国哥' , 89.15 , 20 , 10 );
insert into t_book(`id` , `name` , `author` , `price` , `sales` , `stock`)
values(null , '人月神话' , '刚哥' , 88.15 , 20 , 80 );
## 查看表内容
select id,name,author,price,sales,stock from t_book;
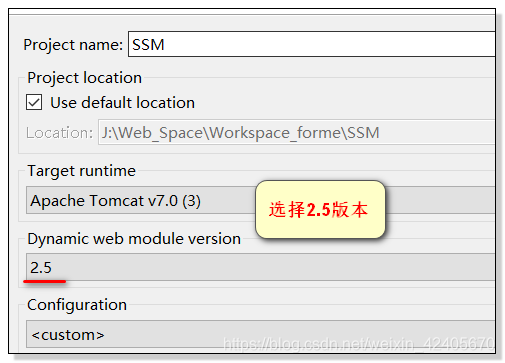
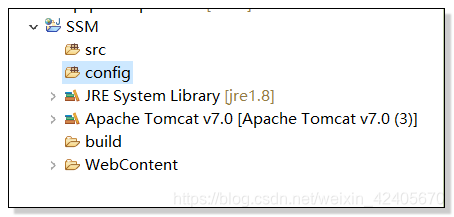
二、创建一个动态Web工程
逆向工程生成测试数据库 t_book对应的实体类
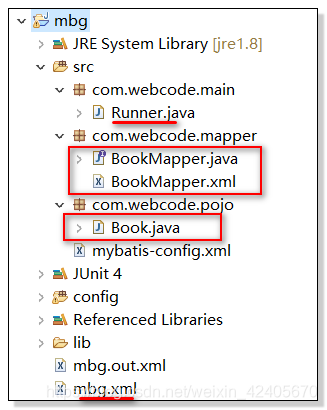
修改mbg.xml中对应数据库和实体类名称,以及执行Runner.java中的main方法,生成 .java和 .mapper文件
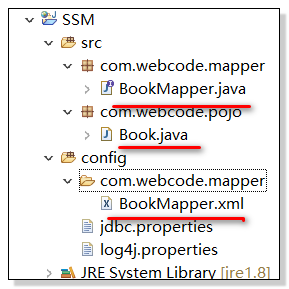
将 .java 和 .mapper 文件复制到SSM整合工程中去。
三、导入整合Spring + SpringMVC + Mybatis 的所有 jar 包
将下列所有 jar 包,添加到 WebContent目录下的WEB-INFO 下的 lib 包中:
Spring的核心包
spring-beans-4.0.0.RELEASE.jar
spring-context-4.0.0.RELEASE.jar
spring-core-4.0.0.RELEASE.jar
spring-expression-4.0.0.RELEASE.jar
commons-logging-1.1.3.jar
Spring的切面包
com.springsource.org.aopalliance-1.0.0.jar
com.springsource.org.aspectj.weaver-1.6.8.RELEASE.jar
spring-aop-4.0.0.RELEASE.jar
spring-aspects-4.0.0.RELEASE.jar
log4j日记包
log4j-1.2.17.jar
mysql驱动和数据库连接池包
c3p0-0.9.1.2.jar
mysql-connector-java-5.1.37-bin.jar
Spring的数据库及事务包
spring-jdbc-4.0.0.RELEASE.jar
spring-orm-4.0.0.RELEASE.jar
spring-tx-4.0.0.RELEASE.jar
SpringMVC的包
spring-web-4.0.0.RELEASE.jar
spring-webmvc-4.0.0.RELEASE.jar
Spring的Hiberante验证包
hibernate-validator-annotation-processor-5.0.0.CR2.jar
hibernate-validator-5.0.0.CR2.jar
validation-api-1.1.0.CR1.jar
jboss-logging-3.1.1.GA.jar
classmate-0.8.0.jar
文件上传包
commons-fileupload-1.2.1.jar
commons-io-1.4.jar
Spring中的Json处理包
jackson-annotations-2.1.5.jar
jackson-core-2.1.5.jar
jackson-databind-2.1.5.jar
MyBatis以及整合包
mybatis-3.4.1.jar
mybatis-spring-1.3.0.jar
JSTL标签库
taglibs-standard-impl-1.2.1.jar
taglibs-standard-spec-1.2.1.jar
依赖包地址:
链接:https://pan.baidu.com/s/1cOU6GDkj6VSDOU0V7njiqw
提取码:ody8
四、 各种配置文件
1. log4j.properties 日记配置文件
# Global logging configuration
log4j.rootLogger=INFO, stdout
# Console output...
log4j.appender.stdout=org.apache.log4j.ConsoleAppender
log4j.appender.stdout.layout=org.apache.log4j.PatternLayout
log4j.appender.stdout.layout.ConversionPattern=%5p [%t] - %m%n
2. jdbcproperties 属性配置文件
jdbc.user=root
jdbc.password=root
jdbc.url=jdbc:mysql://localhost:3306/ssm
jdbc.driver=com.mysql.jdbc.Driver
3.Mybatis 核心配置文件
在 mybatis-config.xml 中
- 开启二级缓存,
- 同时加载mapper.xml文件
<?xml version="1.0" encoding="UTF-8" ?>
<!DOCTYPE configuration
  PUBLIC "-//mybatis.org//DTD Config 3.0//EN"
  "http://mybatis.org/dtd/mybatis-3-config.dtd">
<configuration>
	 <!-- 配置 -->
	 <settings>
	 	<!-- 开启二级缓存 -->
	 	<setting name="cacheEnabled" value="true"/>
	 </settings>

	 <!-- 配置扫描加载Mapper.xml配置文件 -->
	 <mappers>
	 	<package name="com.webcode.mapper"/>
	 </mappers>
</configuration>
4、 Spring 需要的配置文件 applicationContext.xml
- 添加配置
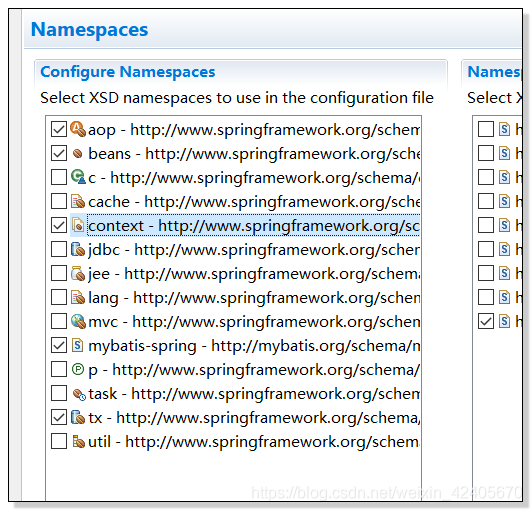
配置 加载 jdbc.properties 属性文件 + 配置数据库连接池对象
	<!-- 加载 jdbc.properties 属性配置文件 -->
	<context:property-placeholder location= "classpath:jdbc.properties"/>

	<!-- 配置数据库连接池对象 -->
	<bean id = "dataSource" class="com.mchange.v2.c3p0.ComboPooledDataSource">
		<property name="user" value="${jdbc.user}"></property>
		<property name="password" value="${jdbc.password}"></property>
		<property name="jdbcUrl" value="${jdbc.url}"></property>
		<property name="driverClass" value="${jdbc.driverClass}"></property>
	</bean>
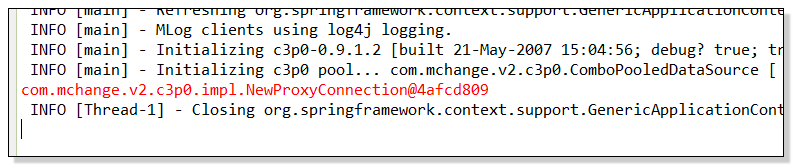
测试: 测试是否连接上数据库:
//配置Spring的配置文件路径
@ContextConfiguration(locations = "classpath:applicationContext.xml")
@RunWith(SpringJUnit4ClassRunner.class)
public class SpringTest {

	@Autowired
	DataSource dataSource;

	@Test
	public void testDataSource() throws SQLException {
		System.err.println(dataSource.getConnection());
	}

}
test测试获取执行结果:
五、 创建 测 试 service 业务层 及其 实现类
Service接口类:
package com.webcode.service;

import java.util.List;

import com.webcode.pojo.Book;

public interface BookService {


	int removeById(Integer BookId);

	int save(Book record);

	Book getById(Integer BookId);

	List<Book> getAll();

	int updateById(Book record);

}
ServiceImpl 实现类:
package com.webcode.service.impl;
import java.util.List;
import org.springframework.beans.factory.annotation.Autowired;
import org.springframework.stereotype.Service;
import com.webcode.mapper.BookMapper;
import com.webcode.pojo.Book;
import com.webcode.service.BookService;
@Service
public class BookServiceImpl implements BookService{
@Autowired
BookMapper bookMapper;
@Override
public int removeById(Integer BookId) {
// TODO Auto-generated method stub
return bookMapper.deleteByPrimaryKey(BookId);
}
@Override
public int save(Book record) {
// TODO Auto-generated method stub
return bookMapper.insert(record);
}
@Override
public Book getById(Integer BookId) {
// TODO Auto-generated method stub
return bookMapper.selectByPrimaryKey(BookId);
}
@Override
public List<Book> getAll() {
// TODO Auto-generated method stub
return bookMapper.selectAll();
}
@Override
public int updateById(Book record) {
// TODO Auto-generated method stub
return bookMapper.updateByPrimaryKey(record);
}
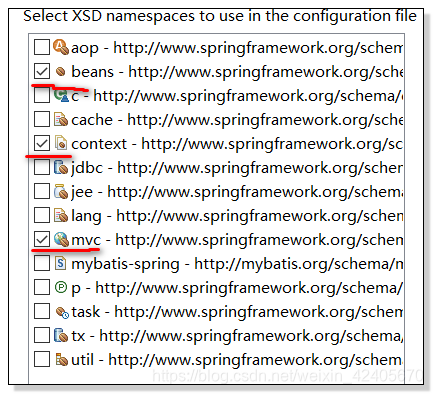
}六 、 继续设置配置文件 :
1、applicationContext.xml中添加包扫描
<!-- 配置包扫描
			只扫描 Dao层和Service。
			不能扫描SpringMVC的组件:@Controller控制器、@ControllerAdvice
	 -->
	<context:component-scan base-package="com.webcode">
		<context:exclude-filter type="annotation" expression="org.springframework.stereotype.Controller"/>
		<context:exclude-filter type="annotation" expression="org.springframework.web.bind.annotation.ControllerAdvice"/>
	</context:component-scan>
2、配置一个SqlSessionFactory 对象
<!-- Mybatis整合Spring的核心配置之一 -->
	<bean id="sqlSessionFactory" class="org.mybatis.spring.SqlSessionFactoryBean">
		<property name="dataSource" ref="dataSource"></property>
		<property name="configLocation" value="classpath:mybatis-config.xml"></property>
		<property name="mapperLocations" value="classpath:com/webcode/dao/*.xml" ></property>
	</bean>
3、 配置扫描Mapper接口实现到SpringIOC容器中
<!-- Mybatis整合Spring的核心配置之二 扫描并将Mapper接口注入到SpringIOC容器中 -->
	<mybatis-spring:scan base-package="com.webcode.dao"/>
测试 dao层是否连接成功,
@Test
	public void testBookService()throws SQLException {
		bookService.save(new Book(null,"生活ch","奕hc君",new BigDecimal(1),1,1));

	}
4、 配置事务
<!-- 代理+事务管理器+事务属性 -->
	<bean id= "transactionManager" class="org.springframework.jdbc.datasource.DataSourceTransactionManager">
		<!-- 事务管理器中的数据库连接池,必须跟前面配置的和mybatis中使用的是同一个事数据库连接池 -->
		<property name="dataSource" ref="dataSource"></property>
	</bean>

	<!-- 配置事务的属性 -->
	<tx:advice id="tx_advice" transaction-manager="transactionManager">
		<tx:attributes>
			<!--
				<tx:method name="save*" propagation="REQUIRED"/>
					name属性配置哪些方法,的属性
					propagation="REQUIRED"表示必须有事务运行
			 -->
			 <tx:method name="save*" propagation="REQUIRED"/>
			 <tx:method name="delete*" propagation="REQUIRED"/>
			 <tx:method name="update*" propagation="REQUIRED"/>
			 <!--  * 表示剩下的方法,read-only="true" 会做一些优化处理 -->
			 <tx:method name="*" read-only="true"/>
		</tx:attributes>
	</tx:advice>

	<!-- 事务代理 -->
	<aop:config>
		<aop:advisor advice-ref="tx_advice" pointcut="execution(public * com.webcode.service..*Service*.*(..))"/>
	</aop:config>
事务测试:
当前service存在异常,将其加入事务中,
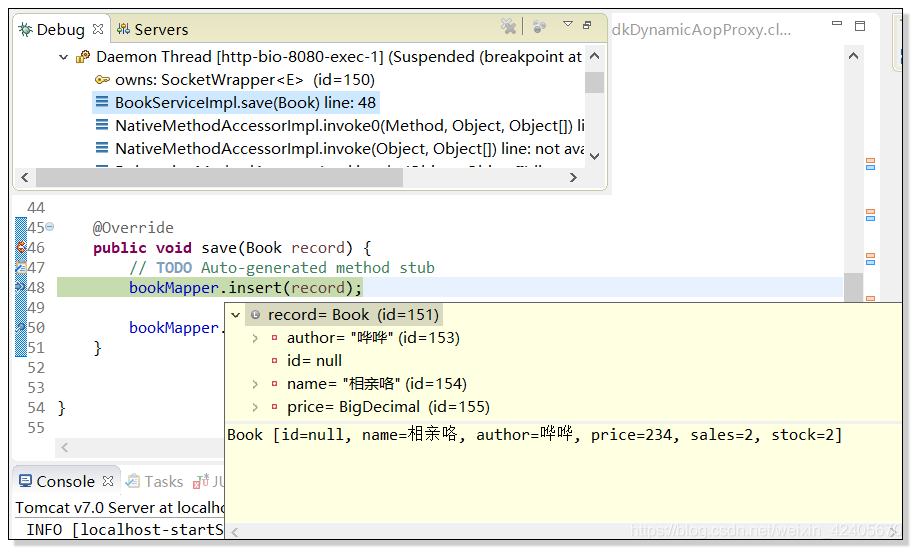
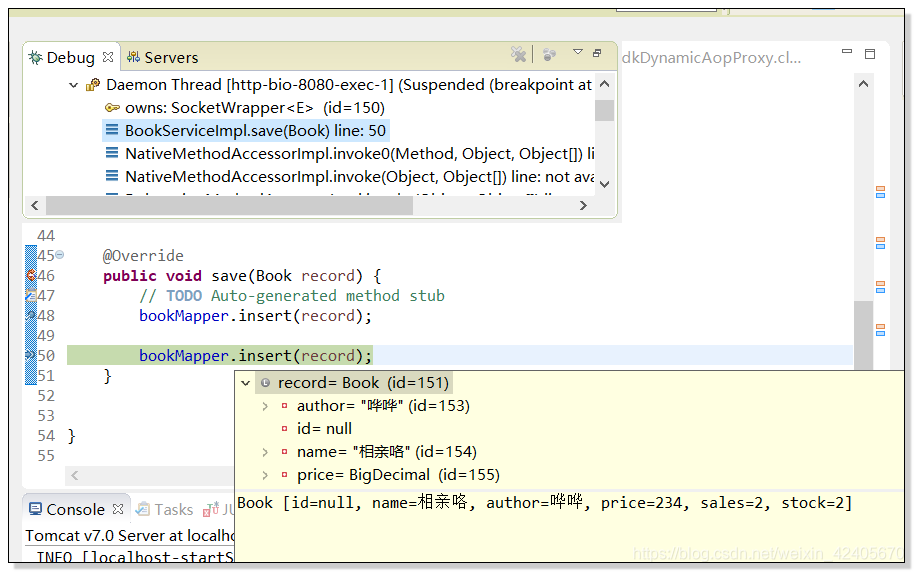
@Override
public void save(Book record) {
// TODO Auto-generated method stub
bookMapper.insert(record);
int i = 12 / 0;
bookMapper.insert(record);
}
执行
bookService.save(new Book(null,"生活ch","奕hc君",new BigDecimal(1),1,1))
执行返回失败。
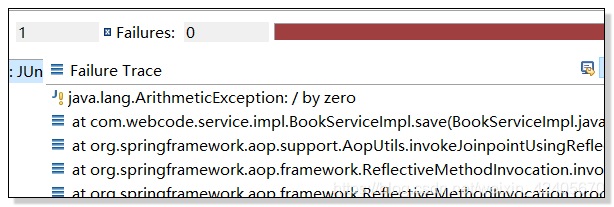
数据库数据量不变,还是20条,说明当前事务管理已生效,在 int i =12/0; 前的插入操作事务没有被提交。

5、在 web.xml 中创建 前端控制器 和 配置 Spring整合Web 、字符过滤器
注意: 字符过滤器一定要放在前端控制器之前。
作用:用于解决乱码的问题
<!-- Spring整合Web -->
  <!-- needed for ContextLoaderListener -->
	<context-param>
		<param-name>contextConfigLocation</param-name>
		<!-- Spring配置文件 -->
		<param-value>classpath:applicationContext.xml</param-value>
	</context-param>

	<!-- Bootstraps the root web application context before servlet initialization -->
	<listener>
		<listener-class>org.springframework.web.context.ContextLoaderListener</listener-class>
	</listener>


<filter>
		<filter-name>CharacterEncodingFilter</filter-name>
		<filter-class>org.springframework.web.filter.CharacterEncodingFilter</filter-class>
		<init-param>
			<param-name>encoding</param-name>
			<param-value>UTF-8</param-value>
		</init-param>
		<init-param>
			<param-name>forceRequestEncoding</param-name>
			<param-value>true</param-value>
		</init-param>
		<init-param>
			<param-name>forceResponseEncoding</param-name>
			<param-value>true</param-value>
		</init-param>
	</filter>
	<filter-mapping>
		<filter-name>CharacterEncodingFilter</filter-name>
		<url-pattern>/*</url-pattern>
	</filter-mapping>


  <!-- 前端控制器 -->
  <!-- The front controller of this Spring Web application, responsible for handling all application requests -->
	<servlet>
		<servlet-name>springDispatcherServlet</servlet-name>
		<servlet-class>org.springframework.web.servlet.DispatcherServlet</servlet-class>
		<init-param>
			<param-name>contextConfigLocation</param-name>
			<!-- SpringMVC配置文件 -->
			<param-value>classpath:springmvc.xml</param-value>
		</init-param>
		<load-on-startup>1</load-on-startup>
	</servlet>

	<!-- Map all requests to the DispatcherServlet for handling -->
	<servlet-mapping>
		<servlet-name>springDispatcherServlet</servlet-name>
		<url-pattern>/</url-pattern>
	</servlet-mapping>
6、创建 springmvc.xml 配置文件
添加的配置:
配置SpringMVC的包扫描,以及SpringMVC的标配。
注意: 在SSM框架中,SpringMVC和Spring的包扫描是要区分开来的,Spring主要扫描Service、Mapper等,
而SpringMVC则是对Controller进行扫描。
<!--
	SpringMVC也要包扫描
			SpringMVC包扫描的时候,只把SpringMVC的组件(web层的组件 )扫描进来
				@Controller控制器
				@ControllerAdvice
	-->
	<context:component-scan base-package="com.webcode" use-default-filters="false">
		<context:include-filter type="annotation" expression="org.springframework.stereotype.Controller"/>
		<context:include-filter type="annotation" expression="org.springframework.web.bind.annotation.ControllerAdvice"/>
	</context:component-scan>

	<!-- Spring标配 -->
	<mvc:default-servlet-handler/>
	<mvc:annotation-driven></mvc:annotation-driven>
七 、 Controller 最终整合成功测试
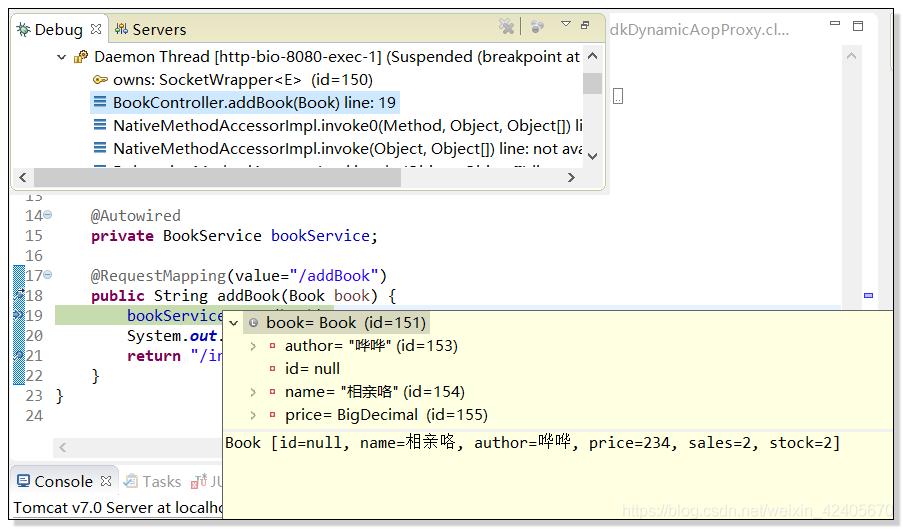
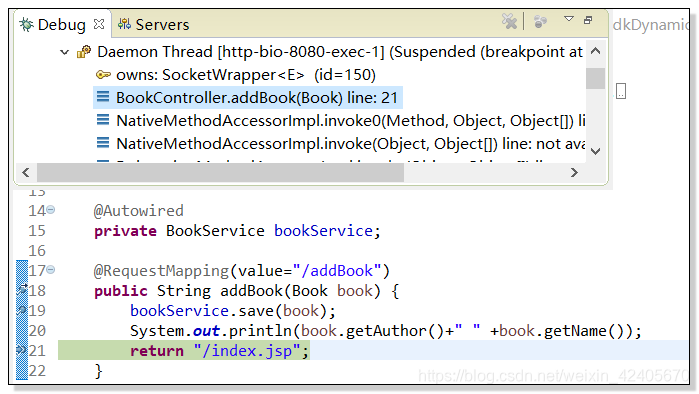
@RequestMapping(value="/addBook")
	public String addBook(Book book) {
		bookService.save(book);
		System.out.println(book.getAuthor()+" " +book.getName());
		return "/index.jsp";
	}
创建 index.jsp 页面
<%@ page language="java" contentType="text/html; charset=UTF-8"
    pageEncoding="UTF-8"%>
<!DOCTYPE html PUBLIC "-//W3C//DTD HTML 4.01 Transitional//EN" "http://www.w3.org/TR/html4/loose.dtd">
<html>
	<head>
		<meta http-equiv="Content-Type" content="text/html; charset=UTF-8">
		<title>Insert title here</title>
	</head>
	<body>
		<form action="${pageContext.request.contextPath }/addBook" method="post">
			name<input name="name"> <br/>
			author<input name="author"> <br/>
			price<input name="price"> <br/>
			sales<input name="sales"> <br/>
			stock<input name="stock"> <br/>
			<input type="submit">
		</form>
	</body>
</html>
DEBUG 执行跟踪:
参数传入:
Spring代理注入参数
代理二:
插入完毕,执行跳转:
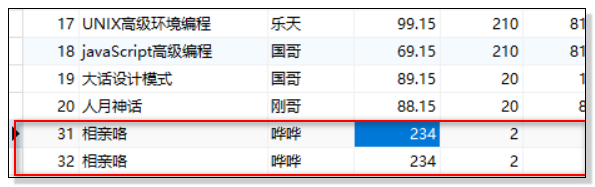
查看数据库变化:
红框中的为刚插入的数据
到这里,SSM三大框架整合完毕。
源码地址:
链接:https://pan.baidu.com/s/1eNNjDTg-FOXWoAwrGm0DaA
提取码:jg6u


 64万+
64万+

 被折叠的 条评论
为什么被折叠?
被折叠的 条评论
为什么被折叠?
 到【灌水乐园】发言


