


 本文介绍了使用Spring Boot搭建Swagger API接口文档的详细步骤,包括导入依赖、新建配置类、配置接口扫描过滤、忽略请求参数、是否启动Swagger、API分组以及实体配置等内容,还提及了动态配置Swagger显示和实体注解的作用。
springboot搭建Swagger API接口文档
1.导入如下依赖
<dependency>
    <groupId>io.springfox</groupId>
    <artifactId>springfox-swagger2</artifactId>
    <version>2.9.2</version>
</dependency>
<dependency>
    <groupId>io.springfox</groupId>
    <artifactId>springfox-swagger-ui</artifactId>
    <version>2.9.2</version>
</dependency>
2.新建一个类作为配置类
package com.tuanzi.config;

import org.springframework.context.annotation.Bean;
import org.springframework.stereotype.Component;
import springfox.documentation.builders.RequestHandlerSelectors;
import springfox.documentation.service.ApiInfo;
import springfox.documentation.service.Contact;
import springfox.documentation.spi.DocumentationType;
import springfox.documentation.spring.web.plugins.Docket;
import springfox.documentation.swagger2.annotations.EnableSwagger2;

import java.util.ArrayList;

@Component
//开启Swagger2的自动配置
@EnableSwagger2
public class SwaggerConfig {

    //配置docket以配置Swagger具体参数
    @Bean
    public Docket docket(){
        return new Docket(DocumentationType.SWAGGER_2).apiInfo(apiInfo())
                // 通过.select()方法,去配置扫描接口
                .select()
                // RequestHandlerSelectors配置如何扫描接口
                .apis(RequestHandlerSelectors.any())
                /*
                 * any() // 扫描所有,项目中的所有接口都会被扫描到
                none() // 不扫描接口
                withMethodAnnotation(final Class<? extends Annotation> annotation)// 通过方法上的注解扫描,如withMethodAnnotation(GetMapping.class)只扫描get请求
                withClassAnnotation(final Class<? extends Annotation> annotation) // 通过类上的注解扫描,如.withClassAnnotation(Controller.class)只扫描有controller注解的类中的接口
                basePackage(final String basePackage) // 根据包路径扫描接口

                 */
                .build();
    }


    private ApiInfo apiInfo(){
        Contact contact = new Contact("团子","https://www.youkuaiyun.com/","174@qq.com");

        // public ApiInfo(String title, String description, String version, String termsOfServiceUrl, Contact contact, String ", String licenseUrl, Collection<VendorExtension> vendorExtensions) {

        return new ApiInfo("Swagger学习",//标题
                "学习演示如何配置Swagger",//描述
                "v1.0",//版本
                "https://www.youkuaiyun.com/",//组织链接
                contact,//联系人信息
                "Apach 2.0 许可",//许可
                "许可链接",//许可链接
                new ArrayList<>());//扩展

    }

}
启动如图
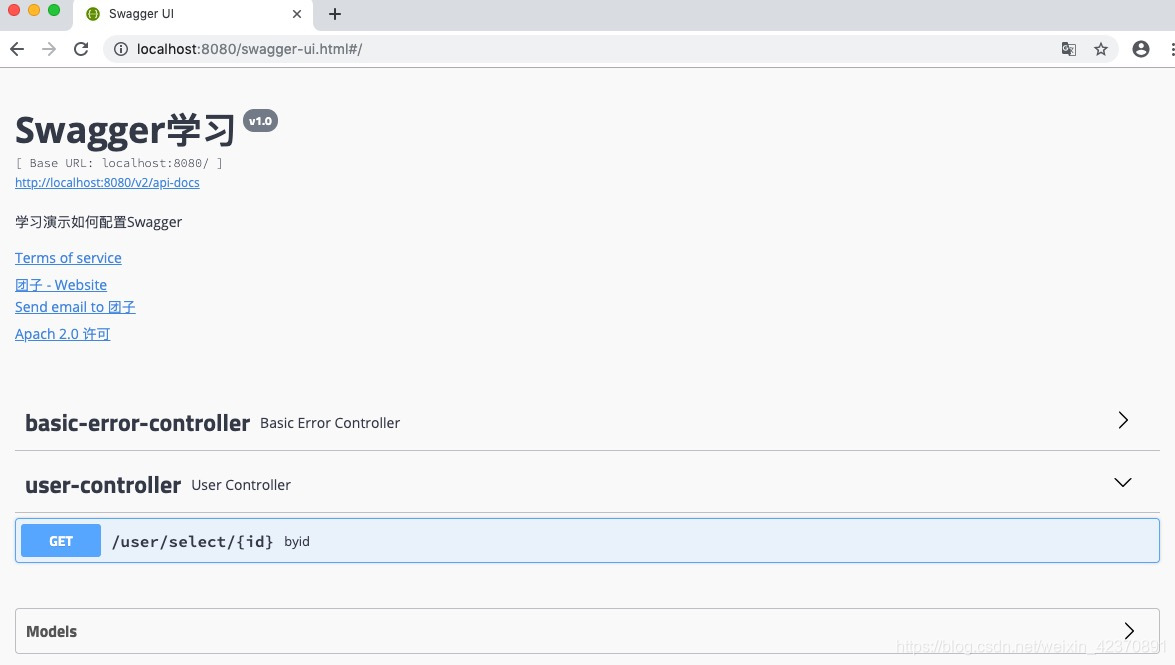
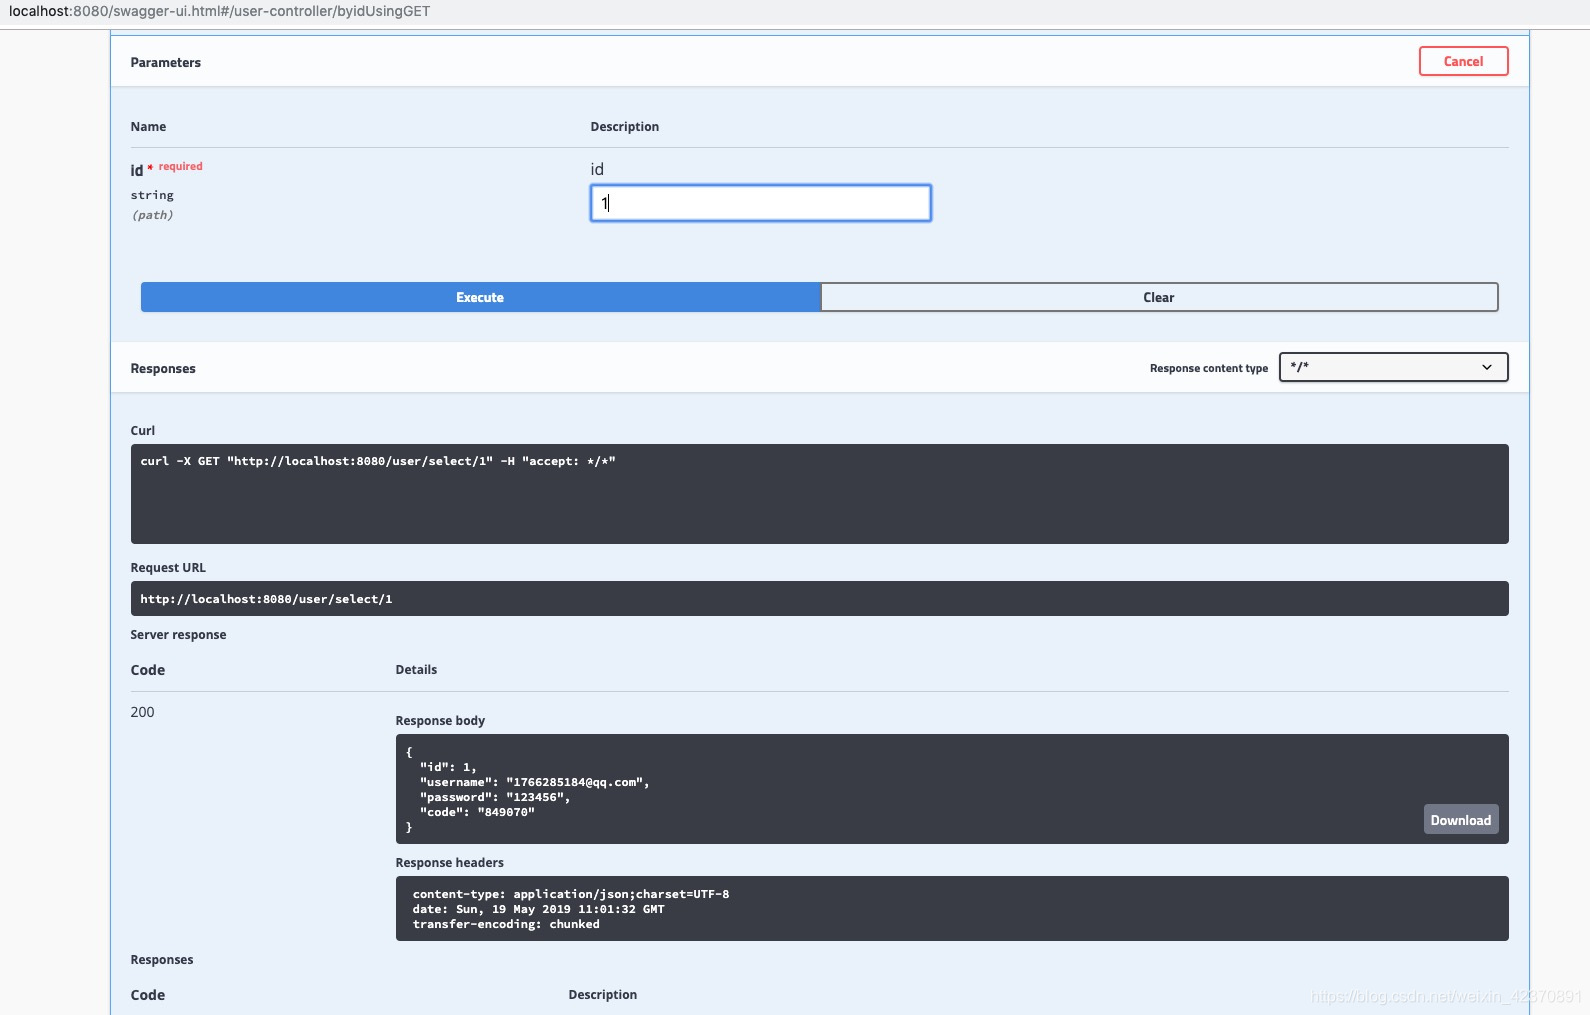
这里自己只写了一个controller用来测试
直接输入就能在页面进行测试接口
3.配置接口扫描过滤
eturn new Docket(DocumentationType.SWAGGER_2).apiInfo(apiInfo())
                .select()
                .apis(RequestHandlerSelectors.basePackage("com.example.swaggerexample.controller"))
                // 配置如何通过 path过滤 即这里只扫描 请求以 /user开头的接口
    		   .paths(PathSelectors.ant("/user/**"))
                .build();
这里的可选值还有:
any() // 任何请求都扫描
none() // 任何请求都不扫描
regex(final String pathRegex) // 通过正则表达式控制,返回true扫描,false不扫描
ant(final String antPattern) // 通过ant()表达式控制,返回true扫描,false不扫描
4.配置要忽略的请求参数
// 配置docket以配置Swagger具体参数
    @Bean
    public Docket docket() {
        return new Docket(DocumentationType.SWAGGER_2).apiInfo(apiInfo())
            // 配置要忽略的参数
                .ignoredParameterTypes(HttpServletRequest.class)
                .select()
       .apis(RequestHandlerSelectors.basePackage("com.example.swaggerexample.controller")).build();
    }
5.配置是否启动Swagger
@Bean
    public Docket docket() {
        return new Docket(DocumentationType.SWAGGER_2).apiInfo(apiInfo())
                .ignoredParameterTypes(HttpServletRequest.class)
                .enable(false) // 配置是否启用Swagger,如果是false,在浏览器将无法访问
                .select()
                .apis(RequestHandlerSelectors.basePackage("com.example.swaggerexample.controller")).build();
    }
如何动态配置当项目处于test、dev环境时显示swagger,处于prod时不显示?
@Bean
    public Docket docket(Environment environment) {
        // 设置要显示swagger的环境
        Profiles of = Profiles.of("dev", "test");
        // 判断当前是处于该环境,通过 enable() 接收此参数判断是否要显示
        boolean b = environment.acceptsProfiles(of);

        return new Docket(DocumentationType.SWAGGER_2).apiInfo(apiInfo())
                .ignoredParameterTypes(HttpServletRequest.class)
                .enable(b) // 配置是否启用Swagger,如果是false,在浏览器将无法访问
                .select()
                .apis(RequestHandlerSelectors.basePackage("com.example.swaggerexample.controller")).build();
    }
6.配置API分组
如果没有配置分组,默认是default。通过groupName()方法即可配置分组:
 @Bean
public Docket docket(Environment environment) {
    return new Docket(DocumentationType.SWAGGER_2).apiInfo(apiInfo())
        .groupName("user") // 配置分组
        // 省略配置....
}
*配置多个分组只需要配置多个docket即可
7.实体配置
package com.tuanzi.user.entity;

import com.baomidou.mybatisplus.annotation.IdType;
import com.baomidou.mybatisplus.annotation.TableId;
import com.baomidou.mybatisplus.extension.activerecord.Model;
import java.io.Serializable;

import io.swagger.annotations.ApiModel;
import io.swagger.annotations.ApiModelProperty;
import lombok.Data;
import lombok.EqualsAndHashCode;
import lombok.experimental.Accessors;

/**
 * <p>
 *
 * </p>
 *
 * @author 团子
 * @since 2019-05-19
 */
@Data
@EqualsAndHashCode(callSuper = false)
@Accessors(chain = true)
@ApiModel("用户实体")
public class User extends Model<User> {

    private static final long serialVersionUID = 1L;

    @TableId(type = IdType.AUTO)
    private Integer id;

    @ApiModelProperty("用户名")
    private String username;

    @ApiModelProperty("密码")
    private String password;

    @ApiModelProperty("码")
    private String code;


    @Override
    protected Serializable pkVal() {
        return null;
    }

}
*只要这个实体在请求接口的返回值上(即使是泛型),都能映射到实体项中。
这里注意:并不是因为@ApiModel这个注解让实体显示在这里了,而是只要出现在接口方法的返回值上的实体都会显示在这里,而@ApiModel和@ApiModelProperty这两个注解只是为实体添加注释的。
@ApiModel为类添加注释
@ApiModelProperty为类属性添加注释


 1424
1424

 被折叠的 条评论
为什么被折叠?
被折叠的 条评论
为什么被折叠?
 到【灌水乐园】发言


