Android Version
基于 AOSP 9.0 分析。
开机流程
开机大致会经历如下几个过程:
(1)uboot 在引导 os 启动,然后加载 kernel;
(2)当 kernel 加载完成后,进入 init 进程,fork 出 zygote,然后由 zygote 去启动 SystemServer;
(3)SystemServer 会启动系统运行所需的众多核心服务和普通服务,以及初始化和加载一些应用;
(4)之后就进入到锁屏或者 Launcher,开机过程就基本结束了。
SystemUI 启动就是从 SystemServer 开始的。
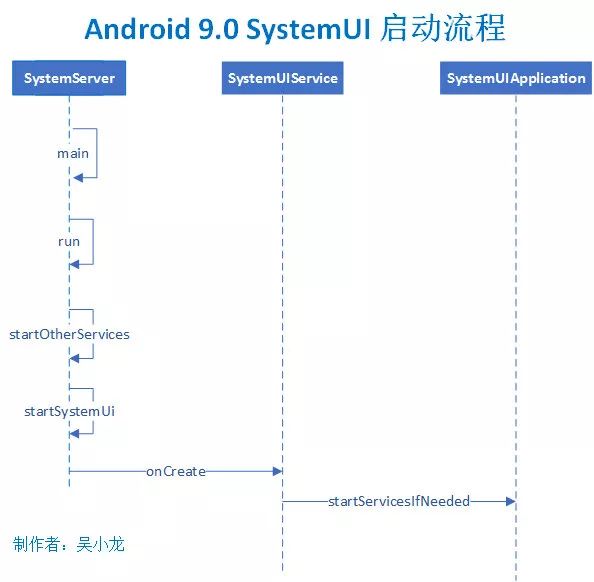
序列图

SystemServer#main
SystemServer 名为系统服务进程,负责启动 Android 系统的关键服务,其入口是 SystemServer.main():public static void main(String[] args){
new SystemServer().run();
}
可以看到 main() 中生成了 SystemServer 对象并执行了 run 方法:private void run(){
//省略部分代码
// Start services.
try {
traceBeginAndSlog("StartServices");
startBootstrapServices();
startCoreServices();
startOtherServices();
SystemServerInitThreadPool.shutdown();
} catch (Throwable ex) {
Slog.e("System", "******************************************");
Slog.e("System", "************ Failure starting system services", ex);
throw ex;
} finally {
traceEnd();
}
//省略部分代码
}
查看 startOtherServices():private void startOtherServices(){
//省略部分代码
traceBeginAndSlog("StartSystemUI");
try {
startSystemUi(context, windowManagerF);
} catch (Throwable e) {
reportWtf("starting System UI", e);
}
traceEnd();
//省略部分代码
}
static final void startSystemUi(Context context, WindowManagerService windowManager){
Intent intent = new Intent();
intent.setComponent(new ComponentName("com.android.systemui",
"com.android.systemui.SystemUIService"));
intent.addFlags(Intent.FLAG_DEBUG_TRIAGED_MISSING);
//Slog.d(TAG, "Starting service: " + intent);
context.startServiceAsUser(intent, UserHandle.SYSTEM);
windowManager.onSystemUiStarted();
}
通过intent.setComponent(new ComponentName("com.android.systemui", "com.android.systemui.SystemUIService"))启动了服务 SystemUIService,进入 SystemUIService。
SystemUIService#onCreatepublic class SystemUIService extends Service{
@Override
public void onCreate(){
super.onCreate();
((SystemUIApplication) getApplication()).startServicesIfNeeded();
//省略其他代码
onCreate 方法中获得 SystemUIApplication 对象并调用其 startServicesIfNeeded 方法。
SystemUIApplication#startServicesIfNeededpublic void startServicesIfNeeded(){
String[] names = getResources().getStringArray(R.array.config_systemUIServiceComponents);
startServicesIfNeeded(names);
}
其中 config_systemUIServiceComponents 值在
AOSP/frameworks/base/packages/SystemUI/res/values/config.xml 里:
com.android.systemui.Dependency
com.android.systemui.util.NotificationChannels
com.android.systemui.statusbar.CommandQueue$CommandQueueStart
com.android.systemui.keyguard.KeyguardViewMediator
com.android.systemui.recents.Recents
com.android.systemui.volume.VolumeUI
com.android.systemui.stackdivider.Divider
com.android.systemui.SystemBars
com.android.systemui.usb.StorageNotification
com.android.systemui.power.PowerUI
com.android.systemui.media.RingtonePlayer
com.android.systemui.keyboard.KeyboardUI
com.android.systemui.pip.PipUI
com.android.systemui.shortcut.ShortcutKeyDispatcher
@string/config_systemUIVendorServiceComponent
com.android.systemui.util.leak.GarbageMonitor$Service
com.android.systemui.LatencyTester
com.android.systemui.globalactions.GlobalActionsComponent
com.android.systemui.ScreenDecorations
com.android.systemui.fingerprint.FingerprintDialogImpl
com.android.systemui.SliceBroadcastRelayHandler
SystemUIApplication#startServicesIfNeeded
继续看 startServicesIfNeeded 方法:private void startServicesIfNeeded(String[] services){
if (mServicesStarted) {
return;
}
mServices = new SystemUI[services.length];
if (!mBootCompleted) {
// check to see if maybe it was already completed long before we began
// see ActivityManagerService.finishBooting()
if ("1".equals(SystemProperties.get("sys.boot_completed"))) {
mBootCompleted = true;
if (DEBUG) Log.v(TAG, "BOOT_COMPLETED was already sent");
}
}
Log.v(TAG, "Starting SystemUI services for user " +
Process.myUserHandle().getIdentifier() + ".");
TimingsTraceLog log = new TimingsTraceLog("SystemUIBootTiming",
Trace.TRACE_TAG_APP);
log.traceBegin("StartServices");
final int N = services.length;
for (int i = 0; i
String clsName = services[i];
if (DEBUG) Log.d(TAG, "loading: " + clsName);
log.traceBegin("StartServices" + clsName);
long ti = System.currentTimeMillis();
Class cls;
try {
cls = Class.forName(clsName);
mServices[i] = (SystemUI) cls.newInstance();
} catch(ClassNotFoundException ex){
throw new RuntimeException(ex);
} catch (IllegalAccessException ex) {
throw new RuntimeException(ex);
} catch (InstantiationException ex) {
throw new RuntimeException(ex);
}
mServices[i].mContext = this;
mServices[i].mComponents = mComponents;
if (DEBUG) Log.d(TAG, "running: " + mServices[i]);
mServices[i].start();
log.traceEnd();
//省略其他代码
}
}
可以看到 startServicesIfNeeded() 循环 start 了config_systemUIServiceComponents 里的 Service,这里的 Service 都是继承了 SystemUI 类的子服务,后续将一一分析这些 Service。这样,SystemUI 启动流程分析完毕。


 本文详细解析了Android系统开机流程,重点介绍了SystemServer如何启动SystemUI服务。从SystemServer.main()开始,通过一系列步骤启动SystemUIService,并在SystemUIService.onCreate()中启动配置的服务组件。这些组件包括各种系统UI相关的服务,如通知管理、锁屏、音量控制等。通过对启动流程的分析,深入理解Android系统的内核服务启动机制。


 被折叠的 条评论
为什么被折叠?


