


 本文详细介绍如何在CentOS 7/8上安装并配置TigerVNC Server和Viewer,实现远程桌面连接。涵盖GNOME桌面环境安装、VNC服务启动及管理、多用户登录配置与开机自启设置。

測試環境為 CentOS 7 / CentOS 8 .測試環境建議可以先關閉 firewall 與 selinux http://benjr.tw/95368
TigerVNC Server – IP : 192.168.111.167
TigerVNC Viewer – IP : 192.168.111.175
TigerVNC Server – IP : 192.168.111.167
先來討論一下 Minimal Install 可以使用 VNC 嗎?
我們得先了解 X-Window 的運作方式, X Server 負責顯示介面與繪圖,並將使用者的輸入行為告知 X Client,而 X client application 則是負責產生繪圖的數據並回傳給 X Server,通常我們的 display server 和 client application 都是在同一台電腦上面.
如果是使用最小安裝 (Minimal Install) 第一步需要幫 CentOS 安裝 GNOME 桌面系統 (GNOME Desktop),不可能一個一個套件安裝,可以直接透過 group install 即可.關於 group install 可以參考 http://benjr.tw/96155
CentOS 7
[root@localhost ~]# yum groups install "GNOME Desktop"
Loaded plugins: fastestmirror
There is no installed groups file.
Maybe run: yum groups mark convert (see man yum)
Loading mirror speeds from cached hostfile
* base: centos.cs.nctu.edu.tw
* extras: centos.cs.nctu.edu.tw
* updates: centos.cs.nctu.edu.tw
Resolving Dependencies
--> Running transaction check
---> Package ModemManager.x86_64 0:1.1.0-8.git20130913.el7 will be installed
--> Processing Dependency: ModemManager-glib(x86-64) = 1.1.0-8.git20130913.el7 for package: ModemManager-1.1.0-
....
CentOS 8
[root@localhost ~]# yum groups install "Server with GUI"
[root@localhost ~]# reboot
再來安裝 CentOS 7 /8 所使用的 TigerVNC.這跟之前使用的 VNC http://benjr.tw/715 不太一樣.
[root@localhost ~]# yum install tigervnc-server tigervnc-server-module -y
設定 VNC 的使用者可以登入(帳號同系統使用者,但密碼需額外設定,沒設定時在啟動 VNCServer 時會要求設定,可以先用 #vncpasswd 來設定),並啟動服務.
[root@localhost ~]# vncserver
perl: warning: Setting locale failed.
perl: warning: Please check that your locale settings:
LANGUAGE = (unset),
LC_ALL = (unset),
LANG = "zh_TW.UTF-8"
are supported and installed on your system.
perl: warning: Falling back to the standard locale ("C").
You will require a password to access your desktops.
Password:
Verify:
Would you like to enter a view-only password (y/n)? n
A view-only password is not used
xauth: file /root/.Xauthority does not exist
New 'localhost.localdomain:1 (root)' desktop is localhost.localdomain:1
Creating default startup script /root/.vnc/xstartup
Creating default config /root/.vnc/config
Starting applications specified in /root/.vnc/xstartup
Log file is /root/.vnc/localhost.localdomain:1.log
透過 netstat 或是 ss 來觀察一下 VNC 的狀態.
[root@localhost ~]# netstat -tlnp |grep -i 59
tcp 0 0 0.0.0.0:5901 0.0.0.0:* LISTEN 2729/Xvnc
tcp6 0 0 :::5901 :::* LISTEN 2729/Xvnc
[root@localhost ~]# ss -tlnp |grep -i 59
LISTEN 0 5 0.0.0.0:5901 0.0.0.0:* users:(("Xvnc",pid=2729,fd=6))
LISTEN 0 5 [::]:5901 [::]:* users:(("Xvnc",pid=2729,fd=7))
的確在 0.0.0.0:5901 (VNC port 5900+1 即 5901 ) 已經開啟 VNC ,這時候就可以透過 vncviewer 去與遠端連線了.
當那一個使用者開啟時,遠端 VNCViewer 預設就會使用該帳號登入(需輸入該帳號密碼)
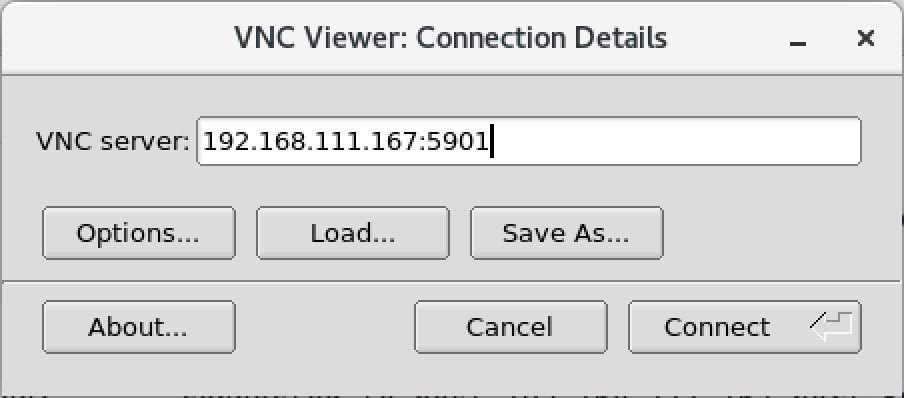
TigerVNC Viewer – IP : 192.168.111.175
安裝遠端程式 vncviewer
[root@localhost ~]# yum install tigervnc -y
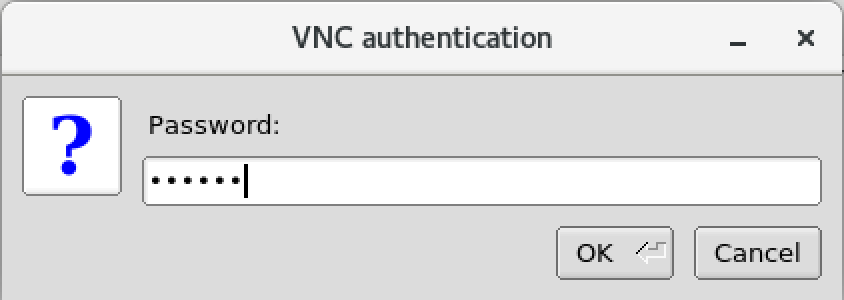
[root@localhost ~]# vncviewer
與剛剛 ben 使用者的密碼.
如果要在 Windows 系統下連接,可以去 https://www.tightvnc.com/download.php 下載 Windows 版本的 VNCViewer .
TigerVNC Server – IP : 192.168.111.167
停用直接 kill 掉即可.
[root@localhost ~]# ps -aux | grep -i vnc
ben 4944 0.0 0.9 208512 37492 pts/1 Sl 23:31 0:00 /bin/Xvnc :1 -auth /home/ben/.Xauthority -desktop localhost.localdomain:1 (ben) -fp catalogue:/etc/X11/fontpath.d -geometry 1024x768 -pn -rfbauth /home/ben/.vn/passwd -rfbport 5901 -rfbwait 30000
ben 4951 0.0 0.0 113184 1188 pts/1 S 23:31 0:00 /bin/sh /home/ben/.vnc/xstartup
root 5885 0.0 0.0 9092 664 pts/1 R+ 23:38 0:00 grep --color=auto -i vnc
[root@localhost ~]# kill 4944
[root@localhost ~]# ps -aux | grep -i vnc
root 5904 0.0 0.0 9092 668 pts/1 S+ 23:38 0:00 grep --color=auto -i vnc
[root@localhost ~]# netstat -tlnp |grep -i 59
試試使用其他使用者(需先新增該使用者與密碼 ,指令 adduser , passwd).
[root@localhost ~]# sudo su - ben
Last login: Thu Dec 12 23:13:42 CST 2019 on pts/1
[ben@localhost ~]$ vncpasswd
Password:
Verify:
Would you like to enter a view-only password (y/n)? n
A view-only password is not used
[ben@localhost ~]$ vncserver
New 'localhost.localdomain:1 (ben)' desktop is localhost.localdomain:1
Starting applications specified in /home/ben/.vnc/xstartup
Log file is /home/ben/.vnc/localhost.localdomain:1.log
透過 netstat 或是 ss 來觀察一下 VNC 的狀態.
[ben@localhost ~]$ netstat -tlnp |grep -i 59
(Not all processes could be identified, non-owned process info
will not be shown, you would have to be root to see it all.)
tcp 0 0 0.0.0.0:5901 0.0.0.0:* LISTEN 3320/Xvnc
tcp6 0 0 :::5901 :::* LISTEN 3320/Xvnc
[ben@localhost ~]$ ss -tlnp |grep -i 59
LISTEN 0 5 *:5901 *:* users:(("Xvnc",pid=3320,fd=9))
LISTEN 0 5 [::]:5901 [::]:* users:(("Xvnc",pid=3320,fd=10))
[ben@localhost ~]$ exit
的確在 0.0.0.0:5901 (VNC port 5900+1 即 5901 ) 已經開啟 VNC ,這時候就可以透過 vncviewer 去與遠端連線了.
SystemD
如果要讓 VNC 在開機的時候就啟動可以透過下面的方式.
編輯 SystemD 服務所需檔案,可以複製預設的 vncserver 檔案 /usr/lib/systemd/system/vncserver@.service
[root@localhost ~]# cp /usr/lib/systemd/system/vncserver@.service /etc/systemd/system/vncserver@:1.service
CentOS7
這邊使用 ben 這個使用者.需指令 WorkingDirectory , User 與 Group .
[root@localhost ~]# vim /etc/systemd/system/vncserver@:1.service
[Unit]
Description=Remote Desktop VNC Service
After=syslog.target network.target
[Service]
Type=forking
WorkingDirectory=/home/ben
User=ben
Group=ben
ExecStartPre=/bin/sh -c '/usr/bin/vncserver -kill %i > /dev/null 2>&1 || :'
ExecStart=/usr/bin/vncserver -autokill %i
ExecStop=/usr/bin/vncserver -kill %i
[Install]
WantedBy=multi-user.target
CentOS8
ExecStart 設定需依據你的使用者,這邊使用 root 這個使用者.
[root@localhost ~]# vim /etc/systemd/system/vncserver@:1.service
[Unit]
Description=Remote desktop service (VNC)
After=syslog.target network.target
[Service]
Type=simple
# Clean any existing files in /tmp/.X11-unix environment
ExecStartPre=/bin/sh -c '/usr/bin/vncserver -kill %i > /dev/null 2>&1 || :'
ExecStart=/usr/bin/vncserver_wrapper root %i
ExecStop=/bin/sh -c '/usr/bin/vncserver -kill %i > /dev/null 2>&1 || :'
[Install]
WantedBy=multi-user.target
如果要提供多個 VNC 連線,需編輯多個設定檔,其 VNC port 為 5900+N (N 從 1 開始,即 5901) ,
[root@localhost ~]# cp /etc/systemd/system/vncserver@:1.service /etc/systemd/system/vncserver@:2.service
設定檔同前面,下面使用 CentOS 8 ,使用者為 ben .
[root@localhost ~]# vim /etc/systemd/system/vncserver@:2.service
[Unit]
Description=Remote desktop service (VNC)
After=syslog.target network.target
[Service]
Type=simple
# Clean any existing files in /tmp/.X11-unix environment
ExecStartPre=/bin/sh -c '/usr/bin/vncserver -kill %i > /dev/null 2>&1 || :'
ExecStart=/usr/bin/vncserver_wrapper ben %i
ExecStop=/bin/sh -c '/usr/bin/vncserver -kill %i > /dev/null 2>&1 || :'
[Install]
WantedBy=multi-user.target
Enable (開機後起動服務) 與 start (立即起動服務)
[root@localhost ~]# systemctl daemon-reload
[root@localhost ~]# systemctl enable vncserver@:1.service
Created symlink from /etc/systemd/system/multi-user.target.wants/vncserver@:1.service to /etc/systemd/system/vncserver@:1.service.
[root@localhost ~]# systemctl enable vncserver@:2.service
Created symlink from /etc/systemd/system/multi-user.target.wants/vncserver@:2.service to /etc/systemd/system/vncserver@:2.service.
[root@localhost ~]# systemctl start vncserver@:1.service
[root@localhost ~]# systemctl start vncserver@:2.service
[root@localhost ~]# ss -tlnp |grep -i 59
LISTEN 0 5 *:5901 *:* users:(("Xvnc",pid=2404,fd=9))
LISTEN 0 5 *:5902 *:* users:(("Xvnc",pid=2775,fd=9))
LISTEN 0 5 [::]:5901 [::]:* users:(("Xvnc",pid=2404,fd=10))
LISTEN 0 5 [::]:5902 [::]:* users:(("Xvnc",pid=2775,fd=10))
如果只是想要單純把 Linux X-window 的程式執行畫面傳過來,其實透過 SSH + X11 forwarding – http://benjr.tw/3285 就可以了.
沒有解決問題,試試搜尋本站其他內容


 2040
2040

 被折叠的 条评论
为什么被折叠?
被折叠的 条评论
为什么被折叠?
 到【灌水乐园】发言


