


出处
这两天在查看 GitHub 上的一个比较火的开源库 BaseRecyclerViewAdapterHelper 的 demo 过程中,学到了一项新的技能。这里整理出来,与大家分享一下。
实现的功能
我们在写项目的过程中,几乎每个 Activity 中 都是有一个 标题栏的。我的常规写法就是:每创建一个新的 Activity , 都会在布局文件中添加一个 toolbar (可以是自定义的,或者是系统的 ToolBar)。 那么这次 GET 到的新技能,就是一次性帮你解决 每个 Activity 都要重复添加 toolbar 的问题。
相关实现代码
我们在项目初期,都会有一个 BaseActivity 来做一些统一性的操作,然后所有 Activity 统一继承于 这次我们也是在 BaseActivity 中去进行实现的。
那么我们来看一下 BaseActivity主要代码: public class BaseActivity extends FragmentActivity {
private LinearLayout root_layout;
private View toolbar_layout;
private TextView tv_left_back;
private TextView tv_title;
@Override
protected void onCreate(@Nullable Bundle savedInstanceState) {
super.onCreate(savedInstanceState);
// 重点
super.setContentView(R.layout.layout_root);
initToolbar();
}
@Override
public void setContentView(@LayoutRes int layoutResID) {
setContentView(View.inflate(this, layoutResID, null));
}
@Override
public void setContentView(View view) {
root_layout = (LinearLayout) findViewById(R.id.root_layout);
if (root_layout != null) {
root_layout.addView(view, new ViewGroup.LayoutParams(ViewGroup.LayoutParams.MATCH_PARENT, ViewGroup.LayoutParams.MATCH_PARENT));
initToolbar();
}
}
/**
* 初始化 toolbar 内容布局
*/
private void initToolbar() {
tv_left_back = f(R.id.tv_back);
tv_title = f(R.id.tv_title);
toolbar_layout = f(R.id.ll_toolbar);
}
/**
* 设置返回按钮
*/
protected void setBack() {
if (tv_left_back != null) {
tv_left_back.setVisibility(View.VISIBLE);
tv_left_back.setOnClickListener(new View.OnClickListener() {
@Override
public void onClick(View v) {
finish();
}
});
}
}
/**
* 设置当前 Activity 标题
*
*@param title
*/
protected void setTitle(String title) {
if (tv_title != null) {
tv_title.setVisibility(View.VISIBLE);
tv_title.setText(title);
}
}
/**
* 隐藏头部标题栏
*/
protected void hideToolbar() {
if (toolbar_layout != null) {
toolbar_layout.setVisibility(View.GONE);
}
}
protected T f(int id) {
return (T) findViewById(id);
}
}
复制代码
上面代码需要注意的就是要搞清楚 几个 setContentView 的走向。 Activity(extends BaseActivity) setContentView(int layoutResId)
--> Base setContentView(View view) --> super.setContentView(int layoutResId)复制代码
从这个流程我们就能看出来了,Activity 的布局是被作为子布局添加上去的。每次 setContentView 的最终布局都是 layout_root 。这样就实现了每个界面都有 toolbar 的效果。我们可以在 BaseActivity 根据自己的需要去添加方法。
下面是相关的几个布局
layout_root: <?xml version="1.0" encoding="utf-8"?>
android:id="@+id/root_layout"
android:layout_width="match_parent"
android:layout_height="match_parent"
android:fitsSystemWindows="true"
android:orientation="vertical">
layout="@layout/layout_toolbar" />
复制代码layout_toolbar <?xml version="1.0" encoding="utf-8"?>
android:layout_width="match_parent"
android:layout_height="45dp"
android:background="@color/colorPrimary"
android:gravity="center_vertical"
android:orientation="horizontal">
android:layout_width="wrap_content"
android:layout_height="match_parent"
android:drawableLeft="@drawable/back"
android:drawablePadding="5dp"
android:gravity="center_vertical"
android:padding="10dp"
android:text="返回"
android:textColor="#fff"
android:visibility="gone" />
android:layout_width="wrap_content"
android:layout_height="wrap_content"
android:layout_centerInParent="true"
android:textColor="#fff"
android:textSize="15sp"
android:visibility="gone" />
复制代码哈哈,东西也就这么多,下面我把演示界面代码贴出来。
这里我就只以一个简单的界面来作为演示。
- 演示界面效果
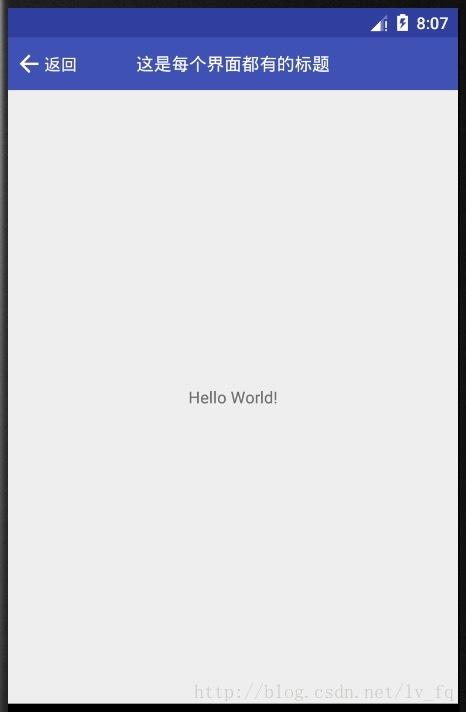
界面的代码: public class MainActivity extends BaseActivity {
@Override
protected void onCreate(Bundle savedInstanceState) {
super.onCreate(savedInstanceState);
setContentView(R.layout.activity_main);
setBack();
setTitle("这是每个界面都有的标题");
}
}复制代码
activity_main 布局: <?xml version="1.0" encoding="utf-8"?>
android:layout_width="match_parent"
android:layout_height="match_parent">
android:layout_height="wrap_content"
android:layout_centerInParent="true"
android:text="Hello World!" />
复制代码主要代码就在 BaseActivity 中,也没什么多说的。这里就不传Demo了。


 2916
2916

 被折叠的 条评论
为什么被折叠?
被折叠的 条评论
为什么被折叠?
 到【灌水乐园】发言


