


 本文介绍使用Processing编程环境模拟细胞分裂的过程,并结合粒子系统增强视觉效果。通过代码实现细胞的分裂、移动及颜色变异,粒子系统则为细胞分裂过程增添细节,如烟雾效果,提升了整体的动态感和真实感。
基于processing实现
效果演示

Processing实现
细胞分裂
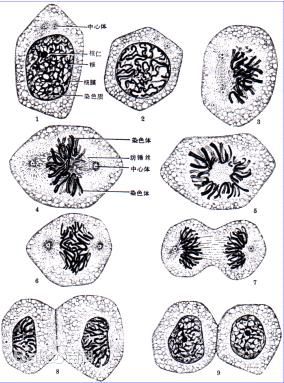
生物学视角
细胞分裂参考了自然界中的细胞常常一分为二的这一特点,细胞在刚分裂完后体积总和仍然不变,因此在这里我使新分裂出的两个细胞体积变小。
代码模拟
class Cell {
  PVector pos;
  float r;
  color c;

  Cell(PVector pos, float r, color c) {
    this.pos = pos.copy();
    this.r = r;
    this.c = c;
  }

  Cell() {
    this.pos  = new PVector(random(width), random(height));
    this.r = 60;
    this.c =  color(random(100, 255), random(100, 255), random(100, 255), 100);
  }


  boolean clicked(int x, int y) {
    float d = dist(this.pos.x, this.pos.y, x, y);
    if (d < this.r) {
      return true;
    } else {
      return false;
    }
  }

  Cell mitosis() {
    Cell cell = new Cell(this.pos, this.r*0.8, this.c);
    return cell;
  }

  void move() {
    PVector vel = PVector.random2D();
    this.pos.add(vel);
  }

  void show() {
    noStroke();
    fill(this.c);
    ellipse(this.pos.x, this.pos.y, this.r, this.r);
  }
}
效果
改进
为了使分裂的效果更明显,在这里参考变异,使每次分裂后颜色都随机发生变化
Cell mitosis() {
    color cc = color(random(100, 255), random(100, 255), random(100, 255), 100);
    Cell cell = new Cell(this.pos, this.r*0.8, cc);

    return cell;
  }
粒子系统
粒子系统就是一系列独立对象的集合, 这些对象通常用简单的图形或者点来表示。 为什么我们要学习粒子系统呢? 毫无疑问, 粒子系统可以用于模拟各种自然现象( 比如爆炸) 。 实际上, 它的作用不局限于此。如果我们要用代码对自然界的各种事物建模, 要接触的系统肯定并不是由单个物体组成的, 系统内部会有很多物体, 而粒子系统非常适合对复数系统进行建模。 比如一堆弹球的弹跳运动、 鸟群的繁殖, 以及生态系统的演化, 这些研究对象都是由复数组成的系统。本书的后续章节都会涉及对一组对象的处理。 在前面向量和力的示例程序中, 我们简单地用数组表示一组对象, 但从本章开始, 我们要用一种更强大的方式表示它们。首先, 列表中物体的数量应该是可变的: 可能没有物体, 可能只有1个物体, 也可能有10个物体或成千上万的物体。 其次, 除了定义粒子类, 我们还会定义一个类表示粒子的集合——也就是粒子系统( ParticleSystem) 类, 在实现过程中, 我们会更深入地使用面向对象方法。 最后的主程序看起来会是这样:
ParticleSystem ps; 这样的主程序是不是显得非常简洁优雅?
void setup() {
	size(200,200);
	ps = new ParticleSystem();
}
void draw() {
	background(255);
	ps.run();
}
单个粒子
我们要先实现一个类, 这个类用于表示单个粒子。 好消息是: 我们已经在前面做过这件事情,创意编程——随机 中的Walker类就是一个很好的模板。 粒子就是在屏幕中移动的对象, 它有位置、 速度和加速度变量, 有构造函数用于内部变量的初始化, 有display()函数用于绘制自身, 还有update()函数用于更新位置。
class Particle {
	PVector location; Particle对象是Mover对象的别名, 它有位置、 速度和加速度
	PVector velocity;
	PVector acceleration;
	Particle(PVector l) {
		location = l.get();
		acceleration = new PVector();
		velocity = new PVector();
	}
	void update() {
		velocity.add(acceleration);
		location.add(velocity);
	}
	void display() {
		stroke(0);
		fill(175);
		ellipse(location.x,location.y,8,8);
	}
}
这是一个很简单的粒子, 我们可以继续完善这个粒子类: 可以在类中加入applyForce()函数用于影响粒子的行为( 后面的例子会实现这一特性) ; 可以加入其他变量用于描述粒子的色彩和形状, 或是用PImage对象绘制粒子。 但现在, 我们只想在类中加入一个额外的变量: 生存期( lifespan) 。典型的粒子系统中都有一个发射器, 发射器是粒子的源头, 它控制粒子的初始属性,包括位置、 速度等。 发射器发射的粒子可能是一股粒子, 也可能是连续的粒子流, 或是同时包含这两种发射方式。 有一点非常关键: 在一个典型的粒子系统中, 粒子在发射器中诞生, 但并不会永远存在。 假设粒子永不消亡, 系统中的粒子将越积越多,Sketch的运行速度也会越来越慢, 最后程序会挂起。 新的粒子不断产生, 与此同时,旧的粒子应该不断消亡, 只有这样, 程序的性能才不会受到影响。 决定粒子何时消亡的方法很多, 比如, 粒子可以和另一个粒子结合在一起, 或在离开屏幕时消亡。 这是本章的第一个粒子类( Particle) , 我希望它尽可能简单, 因此用一个lifespan变量代表粒子的生存期, 这个变量从255开始, 逐步递减, 递减到0时粒子消亡。 加入生存期后的粒子类如下所示:
class Particle {
  PVector location;
  PVector velocity;
  PVector acceleration;
  float lifespan;
  color c;

  Particle(PVector l,color co) {
    c = co;
    acceleration = new PVector(0,0.05);
    velocity = new PVector(random(-1,1),random(-2,0));
    location = l.get();
    lifespan = 255.0;
  }

  void run() {
    update();
    display();
  }

  // Method to update location
  void update() {
    velocity.add(acceleration);
    location.add(velocity);
    lifespan -= 2.0;
  }

  // Method to display
  void display() {
    stroke(0,lifespan);
    strokeWeight(0);
    fill(c,lifespan);
    ellipse(location.x,location.y,12,12);
  }

  // Is the particle still useful?
  boolean isDead() {
    if (lifespan < 0.0) {
      return true;
    } else {
      return false;
    }
  }
}
粒子系统类
使用ArrayList完成,用它管理粒子对象列表。
我们还可以在粒子系统中加入一些新特性。 比如, 加入一个粒子的原点, 也就是粒子创建的初始位置, 即粒子的发射点, 这恰好符合粒子系统“发射器”的概念。 这个原点必须在粒子系统的构造函数中初始化。
import java.util.*;

class ParticleSystem {

  ArrayList<Particle> particles;    // An arraylist for all the particles
  PVector origin;        // An origin point for where particles are birthed

  ParticleSystem(int num, PVector v) {
    particles = new ArrayList<Particle>();   // Initialize the arraylist
    origin = v.get();                        // Store the origin point
    for (int i = 0; i < num; i++) {
      particles.add(new Particle(origin,12));    // Add "num" amount of particles to the arraylist
    }
  }

  void run() {
    // Using the Iterator b/c we are deleting from list while iterating
    Iterator<Particle> it = particles.iterator();
    while (it.hasNext()) {
      Particle p = it.next();
      p.run();
      if (p.isDead()) {
        it.remove();
      }
    }
  }

  void addParticle(color c) {
    particles.add(new Particle(origin,c));
  }

  void addParticle(Particle p) {
    particles.add(p);
  }

  // A method to test if the particle system still has particles
  boolean dead() {
    if (particles.isEmpty()) {
      return true;
    } else {
      return false;
    }
  }

}
效果

结合
在每个细胞上添加一个粒子效果:
class Cell {
  PVector pos;
  float r;
  color c;
  ParticleSystem P;
  //SmokeSystem S;

  Cell(PVector pos, float r, color c) {
    this.pos = pos.copy();
    this.r = r;
    this.c = c;
    P = new ParticleSystem(1,this.pos);
    //S = new SmokeSystem(1,this.pos);
  }

  Cell() {
    this.pos  = new PVector(random(width), random(height));
    this.r = 60;
    this.c =  color(random(100, 255), random(100, 255), random(100, 255), 100);
    P = new ParticleSystem(1,this.pos);
    //S = new SmokeSystem(1,this.pos);
  }


  boolean clicked(int x, int y) {
    float d = dist(this.pos.x, this.pos.y, x, y);
    if (d < this.r) {
      return true;
    } else {
      return false;
    }
  }

  Cell mitosis() {
    color cc = color(random(100, 255), random(100, 255), random(100, 255), 100);
    Cell cell = new Cell(this.pos, this.r*0.8, cc);

    //Cell cell = new Cell(this.pos, this.r*0.8, this.c);
    return cell;
  }

  void move() {
    PVector vel = PVector.random2D();
    float stepsize = montecarlo()*50;
    vel.x *= stepsize;
    vel.y *= stepsize;
    this.pos.add(vel);
  }

  void show() {
    noStroke();
    fill(this.c);
    ellipse(this.pos.x, this.pos.y, this.r, this.r);
    P.origin = this.pos;
    P.run();
    P.addParticle(this.c);

  //  S.run();
  //  for (int i = 0; i < 10; i++) {
  //    S.addParticle();
  //}
  }
}

float montecarlo() {
  while (true) {

    float r1 = random(1);
    float probability = pow(1.0 - r1,8);

    float r2 = random(1);
    if (r2 < probability) {
      return r1;
    }
  }
}


 967
967

 被折叠的 条评论
为什么被折叠?
被折叠的 条评论
为什么被折叠?
 到【灌水乐园】发言


