 深浅克隆与原型模式


 本文详细解析了Java中浅克隆与深克隆的区别,通过实例展示了如何实现深克隆,包括重写clone方法和使用序列化反序列化方式。同时,对比了new与clone创建对象的效率,强调了原型模式在快速创建大量对象场景下的优势。
原型模式的实现
实现 Cloneable接口和clone方法
浅克隆存在的问题
被赋值的对象与原来的对象指向的地方是同一个
深克隆如何实现
将指向的对象一起拷贝,你有你的对象,我有我的对象
基本数据类型和String能够自动实现深度克隆,值的复制)
原型模式 prototype应用场景
原型模式一般很少出现,一般是和工厂方法模式一起出现,通过clone方法创建一个对象,然后由工厂方法提供给调用者。
spring中bean的创建实际就是两种:单例模式和原型模式。(原型需要和工厂模式搭配起来)
浅克隆
创建Sheet类
public class Sheep implements Cloneable,Serializable {
	private String sname;
	Date birthday;

	public String getSname() {
		return sname;
	}

	public Sheep(String sname, Date birthday) {
		super();
		this.sname = sname;
		this.birthday = birthday;
	}

	public void setSname(String sname) {
		this.sname = sname;
	}

	public Date getBirthday() {
		return birthday;
	}

	public void setBirthday(Date birthday) {
		this.birthday = birthday;
	}

	public Sheep() {

	}

	@Override
	protected Object clone() throws CloneNotSupportedException {
		Object obj = super.clone();// 直接调用Object对象中的clone方法
		return obj;
	}

}
测试一
public class Client1 {
public static void main(String[] args) throws CloneNotSupportedException {
Date date=new Date(123112312312L);
Sheep s1 = new Sheep("多利", date);
System.out.println(s1);
System.out.println("s1Sname:"+s1.getSname());
System.out.println("s1Birthday:"+s1.getBirthday());
// 开始克隆
Sheep s2 = (Sheep) s1.clone();
System.out.println(s2);
System.out.println("s2Sname:"+s2.getSname());
System.out.println("s2Birthday:"+s2.getBirthday());
System.out.println("*********************************");
/*
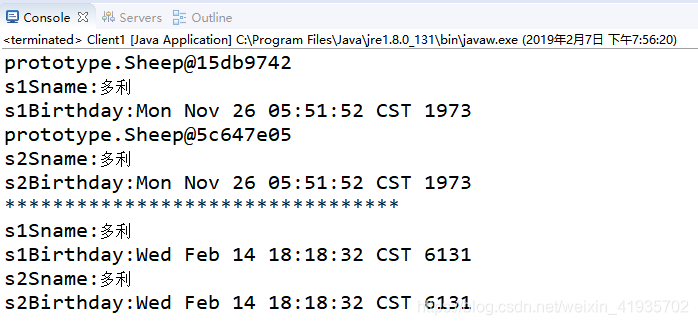
* 这里的s1 和 s2的内容全部都是一样的,之所以说是浅克隆是因为在内存中他们的指向是同一个地方,修改date,两个变量的date都改变
*/
date.setTime(131312312312312L);
s2=(Sheep) s1.clone();
System.out.println("s1Sname:"+s1.getSname());
System.out.println("s1Birthday:"+s1.getBirthday());
System.out.println("s2Sname:"+s2.getSname());
System.out.println("s2Birthday:"+s2.getBirthday());
}
}
测试一运行结果
图解:

深克隆
将Sheet稍微修改一下,重写Clone方法
public class Sheep2 implements Cloneable {
	private String sname;
	private Date birthday;

	public String getSname() {
		return sname;
	}

	public Sheep2(String sname, Date birthday) {
		super();
		this.sname = sname;
		this.birthday = birthday;
	}

	public void setSname(String sname) {
		this.sname = sname;
	}

	public Date getBirthday() {
		return birthday;
	}

	public void setBirthday(Date birthday) {
		this.birthday = birthday;
	}

	public Sheep2() {

	}

	@Override
	protected Object clone() throws CloneNotSupportedException {
		Object obj = super.clone();// 直接调用Object对象中的clone方法
		// 添加一下代码实现深复制
		Sheep2 s = (Sheep2) obj;
		s.birthday = (Date) this.birthday.clone();// 把属性也进行克隆
		return obj;
	}

}
测试二
public class Client2 {
	public static void main(String[] args) throws CloneNotSupportedException {
		Date date=new Date(123112312312L);
		Sheep2 s1 = new Sheep2("多利", date);
		System.out.println(s1);
		System.out.println("s1Sname:"+s1.getSname());
		System.out.println("s1Birthday:"+s1.getBirthday());
		// 开始克隆
		Sheep2 s2 = (Sheep2) s1.clone();
		System.out.println("*********************************");
		/*
		 * 修改date,s2的值不变,说面date也被克隆过去了,有两个date对象
		 */
		date.setTime(131312312312312L);
		System.out.println("s1Sname:"+s1.getSname());
		System.out.println("s1Birthday:"+s1.getBirthday());
		System.out.println("s2Sname:"+s2.getSname());
		System.out.println("s2Birthday:"+s2.getBirthday());

	}
}
测试二运行结果:
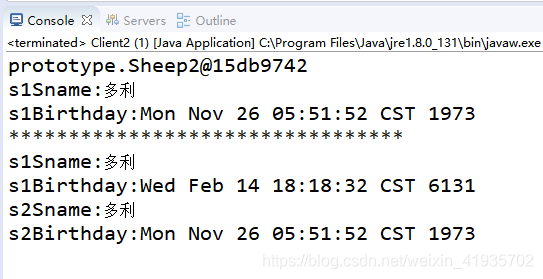
在这里可以看到s1和s2 都分别有自己的date对象,修改s1的date 的时候不会对s2影响
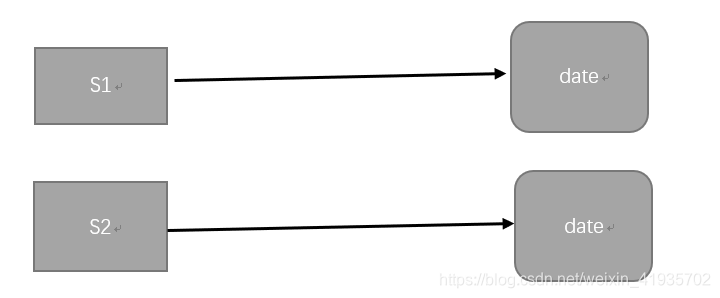
图解:
使用序列化和反序列化实现深克隆
public class Client3 {
public static void main(String[] args) throws CloneNotSupportedException, Exception {
Date date=new Date(123112312312L);
Sheep s1 = new Sheep("多利", date);
System.out.println(s1);
System.out.println("s1Sname:"+s1.getSname());
System.out.println("s1Birthday:"+s1.getBirthday());
// 使用序列化和反序列化实现深复制
ByteArrayOutputStream bos=new ByteArrayOutputStream();
ObjectOutputStream oos=new ObjectOutputStream(bos);
oos.writeObject(s1);
byte[] bytes=bos.toByteArray();
ByteArrayInputStream bis=new ByteArrayInputStream(bytes);
ObjectInputStream ois=new ObjectInputStream(bis);
Sheep s2=(Sheep) ois.readObject();//克隆好的对象
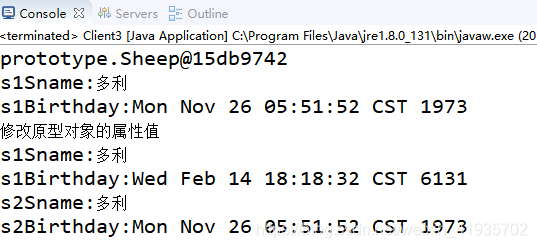
System.out.println("修改原型对象的属性值");
date.setTime(131312312312312L);
System.out.println("s1Sname:"+s1.getSname());
System.out.println("s1Birthday:"+s1.getBirthday());
System.out.println("s2Sname:"+s2.getSname());
System.out.println("s2Birthday:"+s2.getBirthday());
}
}
测试三运行结果
对比new方式创建对象和clone方式创建对象的效率差异
public class Client4 {
	public static void testNew(int size) {
		long start = System.currentTimeMillis();
		for (int i = 0; i < size; i++) {
			Laptop t = new Laptop();
		}
		long end = System.currentTimeMillis();
		System.out.println("new的方式创建耗时:" + (end - start));
	}

	public static void testClone(int size) throws Exception {
		long start = System.currentTimeMillis();
		Laptop t = new Laptop();
		for (int i = 0; i < size; i++) {
			Laptop temp = (Laptop) t.clone();
		}
		long end = System.currentTimeMillis();
		System.out.println("Clone的方式创建耗时:" + (end - start));
	}

	public static void main(String[] args) throws Exception {
		testNew(1000);
		testClone(1000);
	}

}

class Laptop implements Cloneable {// 笔记本电脑
	public Laptop() {
		try {
			Thread.sleep(10);// 模拟创建对象消耗时间的过程
		} catch (Exception e) {
			e.printStackTrace();
		}
	}

	@Override
	protected Object clone() throws CloneNotSupportedException {
		Object obj = super.clone();// 直接调用Object对象中的clone方法
		return obj;
	}
}
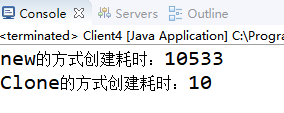
可以看得出来,如果需要短时间创建大量对象,并且new的过程比较消耗时间,则可以考虑使用原型模式!
总结
1.如果创建新的对象比较复杂时,可以利用原型简化对象的创建过程,提高效率。但是需要注意的是要为每一个类配备一个克隆方法,如果是对已有的类进行改造的话,就需要去修改源代码,违背了“开闭原则”。(注意克隆分为浅克隆和深克隆)


 1224
1224

 被折叠的 条评论
为什么被折叠?
被折叠的 条评论
为什么被折叠?
 到【灌水乐园】发言


