


 本文深入探讨了Vue.js中的列表过渡和动态过渡。在列表过渡部分,重点讲解了<transition-group>元素的使用,包括其对key属性的需求、v-for渲染和定位变化。而在动态过渡部分,介绍了通过name属性结合CSS实现不同效果,以及如何根据props值的改变来动态调整过渡效果。
一、列表过渡

重点:
1. 使用元素 <transition-group>
2. 过渡模式不可用 (mode="in-out/out-in")
3. 需要有 key 属性值
4. 可用于 v-for 渲染的列表
5. 可用 v-move 特性 改变元素定位
<style>
.list-item {
  display: inline-block;
  margin-right: 10px;
}

.change-enter-active{
color:#FF0000;
opacity: 0;
transition: 2s;
transform: translateX(30px) translateY(30px);
}

.change-enter-to{
color:#FF0000;
transform: translateX(0px) translateY(0px);
opacity:1;
}

.change-leave-to{
transition: all 1s;
opacity: 0;
transform: translateY(30px);
}

</style>

<body>
<div id="demo">
	<button v-on:click="shuffle">shuffle</button>
	<button v-on:click="add">add</button>
	<button v-on:click="remove">remove</button>
<br/>
 <transition-group name="change">
	<span v-for="list in lists" v-bind:key="list" class="list-item" >
			{{list}}
	</span>
</transition-group>
</div>

<script>
new Vue({
el:"#demo",
data:{
	lists:[0,1,2,3,4,5,6,7,8,9],
	nextNum:"10",
	randomIndex:""
	},
methods:{
	add:function(){
		var len=this.lists.length
		var ranNum=Math.floor(Math.random()*10)
		this.randomIndex=Math.floor(Math.random()*len)

		this.lists.splice(this.randomIndex,0,this.nextNum)
		this.nextNum++
	},
	remove:function(){
		var len=this.lists.length
		this.randomIndex=Math.floor(Math.random()*len)
		this.lists.splice(this.randomIndex,1)
		this.nextNum++
		},
	shuffle: function () {
    	this.lists = _.shuffle(this.lists)
    }
 }
})
</script>
例子解析:
要点 :
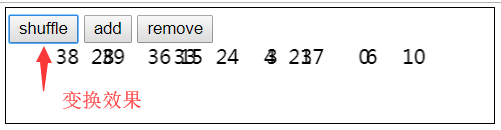
1. v-move 特性:css 中设置了 .change-move 类(transition: transform 1s), 实现列表元素的变换效果(点击shuffle , 元素变换时实现效果)
2. CSS3 中的 transform 特效 transform: translateX(30px) translateY(30px); ( 要先设置元素的类 display: inline-block ( 定位条件,后面的 X Y 轴位置变换才能生效 ) )
1. 进入 enter 效果:点击 add ,新增元素
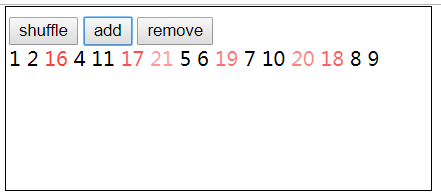
2. 离开 leave 效果:点击 remove ,移除元素
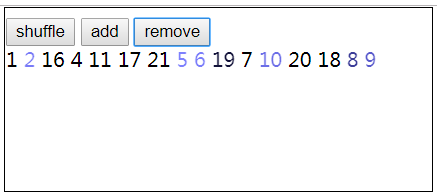
3. 变换 shuffle 效果:点击 shuffle ,列表元素打乱后重新排列组合 (CSS 中设置的 v-move 类中的效果)
二、动态过渡
1. Name + CSS:name 特性绑定动态值。随着name 值改变,对应不同 css 的类,实现不同的效果
<transition v-bind:name="transitionName">
  <!-- ... -->
</transition>
例子解析:
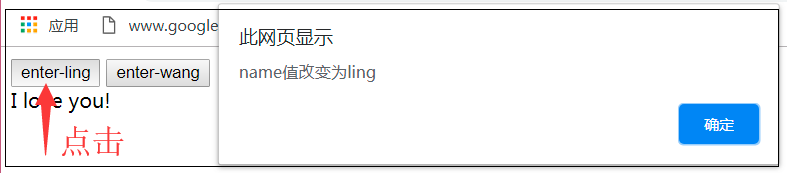
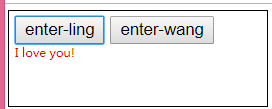
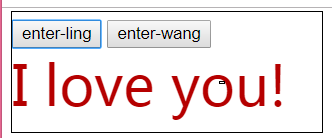
点击改变改变name 值,使 name 切换为 "wang" 或者 "ling",响应不同的 css 效果(wang-enter-to 和 ling-enter-to )
<style>
.ling-enter-to{
	color:red;
	font-size:60px;
	transition:2s;
}

.wang-enter-to{
	color:blue;
	font-size:58px;
	transition:5s;
}

</style>
</head>

<body>

<div id="demo">
		<button v-on:click="toLing">enter-ling</button>
		<button v-on:click="toWang">enter-wang</button>
	<transition v-bind:name="transitionName">
	<div v-show="show">
{{mes}}</div>
</transition>
</div>

<script>
new Vue({
el:"#demo",
data:{
	show:true,
	mes:"I love you!",
	transitionName:"wang"
},
methods:{
	toLing:function(){
		this.show=!this.show
		if(this.transitionName=="wang")
			{this.transitionName="ling"
			alert("name值改变为"+this.transitionName)}
		},
	toWang:function(){
		this.show=!this.show
		if(this.transitionName=="ling")
			{this.transitionName="wang"
			alert("name值改变为"+this.transitionName)}
		}
	}
})
</script>
渲染效果:
1. 点击,弹窗,改变元素的 name 特性值为 "ling"
2. show 值改变为 false,网页显示 leave 效果
3. show值改变为 true,网页显示enter 效果
2. 通过绑定 props 的值,随着 props 动态值的改变
例子说明:
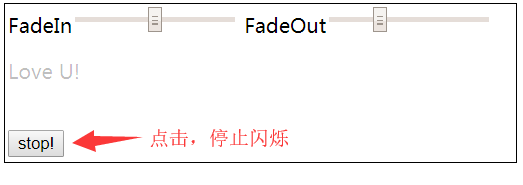
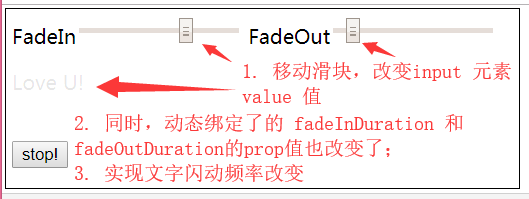
1. 动态绑定:用 v-model 动态绑定表单值 input type="range" 的值,控制文字闪动的频率。
2. show 控制 <button>
<script src="https://unpkg.com/vue/dist/vue.js"></script>
<script src="https://cdnjs.cloudflare.com/ajax/libs/velocity/1.2.3/velocity.min.js"></script>

<body>
<div id="demo">
FadeIn<input type="range" min="1" max="2000" v-model="fadeInDuration">
FadeOut<input type="range" min="1" max="2000"  v-model="fadeOutDuration">
<br/>
	<transition
	    v-show="showMes"
	    v-on:enter="enter"
    	v-on:leave="leave"
    	v-bind:css="false">
	<p v-show="showMes">
		{{mes}}
	</p>
	</transition>
<br/>
<button v-show="show" v-on:click="toShin">shinning</button>
<button v-show="stop" v-on:click="toStop" >stop!</button>
</div>

<script>
new Vue({
el:"#demo",
data:{
	show:false,
	stop:true,
	showMes:true,
	mes:"Love U!",
	fadeInDuration:1000,
	fadeOutDuration:600
	},
mounted:function(el){
		this.showMes=false},
methods:{
	enter:function(el,done){
		var vm=this
		 Velocity(el,
		 	{opacity:1},
			{duration:vm.fadeInDuration,
			complete:function(){done()
			if(vm.stop)vm.showMes=false
							}
			}
			)
	},
	leave:function(el,done){
		var vm=this
		 Velocity(el,
		 	{opacity:0},
			{duration:vm.fadeOutDuration,
			complete:function(){done()
			vm.showMes=true
			}
			})
	},
	toShin:function(){
		this.show=!this.show
		this.stop=!this.stop
		this.showMes=!this.showMes
		},
	toStop:function(){
		this.show=!this.show
		this.stop=!this.stop
		this.showMe=false
		}
	}
})
</script>
例子解析:
1. 通过设置 props 值 fadeInDuration 和 fadeOutDuration,并和 <input type="range"> 元素绑定一起(v-model 动态获取这个元素的value 值)


 673
673

 被折叠的 条评论
为什么被折叠?
被折叠的 条评论
为什么被折叠?
 到【灌水乐园】发言


