


1.引入相关的依赖
implementation 'io.reactivex:rxandroid:1.2.1'
implementation 'io.reactivex:rxjava:1.1.6'

implementation 'com.google.code.gson:gson:2.8.0'

implementation 'com.squareup.retrofit2:retrofit:2.1.0'
implementation 'com.squareup.retrofit2:converter-gson:2.1.0'
implementation 'com.squareup.retrofit2:adapter-rxjava:2.1.0'
2.创建服务器返回格式Bean
服务器返回的json格式
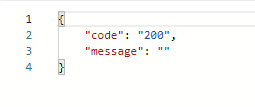
通过GsonFormat转换成Bean
public class ResponseCommon {

    /**
     * code : 200
     * message :
     */

    private String code;
    private String message;

    public String getCode() {
        return code;
    }

    public void setCode(String code) {
        this.code = code;
    }

    public String getMessage() {
        return message;
    }

    public void setMessage(String message) {
        this.message = message;
    }
}
3.创建接口NetInterface
import com.zhang.fileupload3.Beans.ResponseCommon;
import java.util.List;
import okhttp3.MultipartBody;
import retrofit2.http.Multipart;
import retrofit2.http.POST;
import retrofit2.http.Part;
import rx.Observable;

public interface NetInterface {
    @Multipart      //以多块的格式开上传文件
    @POST("/testFileUpload")
    Observable<ResponseCommon> upload(@Part List<MultipartBody.Part> filesList);
}
4.编写提交请求的代码
private void dataCommit(){
        MultipartBody.Builder builder = new MultipartBody.Builder().setType(MultipartBody.FORM);//表单类型
        String path1 = "/sdcard/image/test1.jpg";
        String path2 = "/sdcard/image/test2.jpg";
        String path3 = "/sdcard/image/test3.jpg";

        File f1 = new File(path1);
        File f2 = new File(path2);
        File f3 = new File(path3);

        RequestBody requestBody1 = RequestBody.create(MediaType.parse("multipart/form-data"), f1);
        RequestBody requestBody2 = RequestBody.create(MediaType.parse("multipart/form-data"), f2);
        RequestBody requestBody3 = RequestBody.create(MediaType.parse("multipart/form-data"), f3);

        builder.addFormDataPart("images", f1.getName(), requestBody1);
        builder.addFormDataPart("images", f2.getName(), requestBody2);
        builder.addFormDataPart("images", f3.getName(), requestBody3);

        List<MultipartBody.Part> parts = builder.build().parts();


        NetWork.getRetrofit(MainActivity.this).create(NetInterface.class).upload(parts)
                .subscribeOn(Schedulers.io())
                .observeOn(AndroidSchedulers.mainThread())
                .subscribe(new Action1<ResponseCommon>() {
                               @Override
                               public void call(ResponseCommon bean) {
                                   //请求成功
                                   Log.i("状态码",bean.getCode());
                               }
                           }, new Action1<Throwable>() {
                               @Override
                               public void call(Throwable throwable) {
                                   //请求失败
                                   Log.i("错误","请求失败!"+throwable.toString());
                               }
                           }
                );
    }
5.后端接受上传的图片
使用的是spring+springmvc+mybatis框架的后台,要接收前端上传的文件,必须要先在dispatcherServlet-servlet.xml文件中配置文件上传的组件(CommonsMultipartResolver)
<!-- 上传文件 -->
    <bean id="multipartResolver" class="org.springframework.web.multipart.commons.CommonsMultipartResolver">
    <property name="defaultEncoding" value="utf-8"/>
    <!-- 最大内存大小 -->
    <property name="maxInMemorySize" value="10240"/>
    <!-- 最大文件大小,-1为不限制大小 -->
    <property name="maxUploadSize" value="-1"/>
    </bean>
接下来开发请求接口,接收上传的文件
@RequestMapping(value="/testFileUpload",produces = {"application/json;charset=UTF-8"})
@ResponseBody//表示返回的是JSON字符串
public String testFileUpload(@RequestParam(value = "images", required = false) List<MultipartFile>
listFile) {
JSONObject jsonObject = new JSONObject();
int i = 0;
if(listFile != null) {
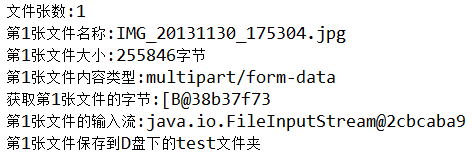
logger.info("文件张数:"+listFile.size());
for(MultipartFile file:listFile) {
i++;
logger.info("第"+i+"张文件名称:"+file.getOriginalFilename());
logger.info("第"+i+"张文件大小:"+file.getSize()+"字节");
logger.info("第"+i+"张文件内容类型:"+file.getContentType());
try {
logger.info("获取第"+i+"张文件的字节:"+file.getBytes().toString());
logger.info("第"+i+"张文件的输入流:"+file.getInputStream().toString());
}catch(Exception e) {e.printStackTrace();}
logger.info("第"+i+"张文件保存到D盘下的test文件夹");
try {
file.transferTo(new File("D://test//"+file.getOriginalFilename()));
}
catch(Exception e) {
e.printStackTrace();
}
}
}
jsonObject.put("code", CodeState.SUCCESS_CODE);
jsonObject.put("message", "");
return jsonObject.toString();
}
}
查看下控制台的输出
这样,整个文件上传过程就完结了,感谢收看。


 747
747

 被折叠的 条评论
为什么被折叠?
被折叠的 条评论
为什么被折叠?
 到【灌水乐园】发言


