


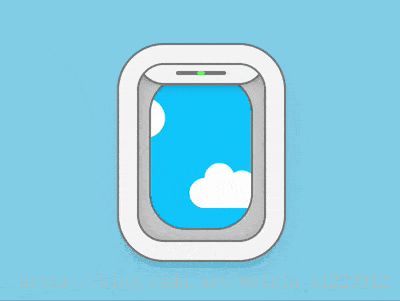
 本文介绍了一个使用纯HTML和CSS创建的飞机舷窗动画教程。通过跟随前端每日挑战专栏,作者分享了如何使用CSS3实现一个可点击并带有开合动画的飞机舷窗,包括窗盖的开合和灯光颜色变化,以及窗外云朵的动态效果。
内容摘要
在segmentFault上看到有前端每日专栏,觉得不错,正好css基础还不够巩固决定跟着该专栏每天跟着学习一些有趣的纯html+css制作的效果,动画出处:https://segmentfault.com/a/1190000016688955
最终效果预览:https://codepen.io/comehope/pen/jeaOrw
内容学习
画css动画需要很多css3.0的属性,可以很好的巩固自己css3的能力,很多人都对js研究的比较深,但最基础的部分html+css却掌握不足。这次学习的是可点击的动画效果,点击窗体窗盖部分就能实现打开窗盖的动画,很简单。代码中改了少部分内容和原来的代码有些许不同,但总体效果几乎一致。
代码
<!DOCTYPE html>
<html lang="en">
<head>
    <meta charset="UTF-8">
    <title>飞机舷窗</title>
    <style>
        body{
            /*居中显示*/
            margin:0;
            height: 100vh;
            align-items: center;
            /*设置盒子的对齐方式*/
            display: flex;
            justify-content: center;
            background-color: skyblue;
        }
        /*:root 选择器匹配文档根元素 这里为html元素*/
        :root{
            --font-size: 10px;
        }
        .window{
            position: relative;
            /*设置为ie盒子模型,以边框指定宽度高度*/
            -webkit-box-sizing: border-box;
            -moz-box-sizing: border-box;
            box-sizing: border-box;
            width: 25em;
            height: 35em;
            font-size: var(--font-size);
            background-color: #d9d9d9;
            /*画出窗框*/
            border-radius: 5em;
            box-shadow:
             inset 0 0 8em rgba(0,0,0,0.2),0 0 0 0.4em #808080,0 0 0 4em whitesmoke,0 0 0 4.4em #808080,0 2em 4em 4em rgba(0,0,0,0.1);
        }
        .window .curtain{
            position: absolute;
            width: inherit;
            height: inherit;
            border-radius:5em;
            box-shadow: 0 0 0 0.5em #808080,0 0 3em rgba(0,0,0,0.4);
            background-color: whitesmoke;
            left: 0;
            top: -5%;
        }
        .window .curtain::before{
            content: "";
            position: absolute;
            width: 40%;
            height: 0.8em;
            background-color: #808080;
            left: 30%;
            bottom: 1.6em;
            border-radius:0.4em;
        }
        .window .curtain::after{
            content: "";
            position: absolute;
            width: 1.6em;
            height: 0.8em;
            /*渐变色处理*/
            background-image: radial-gradient(orange,orangered);
            bottom: 1.6em;
            -webkit-border-radius: 0.4em;
            -moz-border-radius: 0.4em;
            border-radius: 0.4em;
            /*1.6em来自于自身的宽度*/
            left: calc((100% - 1.6em)/2);
        }
        .toggle{
            position: absolute;
            filter: Opacity(0);
            width: 35em;
            height: 52em;
            top: 1em;
            font-size: var(--font-size);
            cursor:pointer;
            z-index: 3;
            left: calc((100% - 35em)/2);
        }
        /*动画制作*/
        .window .curtain{
            transition: 0.5s ease;
            /*为了让窗体盖住景色*/
            z-index: 1;
        }
        .toggle:checked ~ .window .curtain{
            top:-90%;
        }
        /*灯变成绿光*/
        .toggle:checked ~ .window .curtain::after{
            background-image: radial-gradient(lightgreen,limegreen);
        }
        .window{
            /*超出窗体部分隐藏*/
            overflow: hidden;
        }

        /*接下来绘制窗外的景色*/
        .window .clouds{
            position: relative;
            width: 20em;
            height: 30em;
            background-color: deepskyblue;
            -webkit-box-shadow: 0 0 0 0.4em #808080;
            -moz-box-shadow: 0 0 0 0.4em #808080;
            box-shadow: 0 0 0 0.4em #808080;
            left: calc((100% - 20em)/2);
            top: calc((100% - 30em)/2);
            border-radius: 7em;
        }
        .clouds span{
            position: absolute;
            width: 10em;
            height: 4em;
            background-color: white;
            border-radius: 50%;
        }
        .clouds span::before, .clouds span::after{
            content: "";
            position: absolute;
            width: 4em;
            height: 4em;
            background-color: white;
            border-radius: 50%;
        }
        .clouds span::before{
            top:-2em;
            left: 2em;
        }
        .clouds span::after{
            top: -1em;
            right: 1em;
        }

        .window .clouds{
            overflow: hidden;
            /*z-index: 0;*/
        }

    /*云朵的飘动效果*/
        .clouds span{
            /*{animation-name animation-duration(动画所花费时间)
            animation-timing-function(速度曲线 linear为全程等速)
            animation-iteration-count(播放次数 infinite无限次)
           */
            -webkit-animation: move 4s linear infinite;
            -o-animation: move 4s linear infinite;
            animation: move 4s linear infinite;
        }
        @keyframes move {
            from{
                left: -150%;
            }to{
            left: 150%;
                         }
        }
        .clouds span:nth-child(2){
            top: 40%;
            animation-delay: -1s;
        }
        .clouds span:nth-child(3){
            top: 60%;
            animation-delay: -0.5s;
        }
        .clouds span:nth-child(4){
            top: 20%;
            /*缩放 放大两倍*/
            transform: scale(2);
            animation-delay: -1.5s;
        }
        .clouds span:nth-child(2){
            top: 70%;
            transform: scale(1.5);
            animation-delay: -3s;
        }
        /*搞定!~*/
    </style>
</head>
<body>
    <!--window代表窗台-->s
    <input type="checkbox" class="toggle">
    <input type="checkbox" class="toggle2">
    <figure class = "window">
        <!--curtain代表窗帘-->
        <div class="curtain"></div>
        <!--云朵的表示层-->
        <div class="clouds">
            <span></span>
            <span></span>
            <span></span>
            <span></span>
            <span></span>
        </div>
    </figure>
</body>
</html>


 190
190

 被折叠的 条评论
为什么被折叠?
被折叠的 条评论
为什么被折叠?
 到【灌水乐园】发言


