


 博客介绍了TopBar(标题栏)的实现步骤,包括在res-->values中新建xml文件,定义类继承RelativeLayout,定义xml的drawable文件,在布局文件中调用view,最后在mainactivity中实现。
TopBar(标题栏)
在 res-->values中新建一个xml文件
<?xml version="1.0" encoding="utf-8"?>
<resources>
    <declare-styleable name="MyTopBar">
        <!---定义标题栏的属性-->
        <attr name="title" format="string" />
        <attr name="titleTextSize" format="dimension" />
        <attr name="titleTextColor" format="color" />

        <!--左边按钮的属性-->
        <attr name="leftTextColor" format="color"/>
        <attr name="leftBackground" format="reference|color"/>
        <attr name="leftText" format="string" />

        <!--右边按钮的属性-->
        <attr name="rightTextColor" format="color"/>
        <attr name="rightBackground" format="reference|color"/>
        <attr name="rightText" format="string" />


    </declare-styleable>
</resources>
定义一个类继承 RelativeLayout
package com.yifei.myapplication;

import android.content.Context;
import android.content.res.TypedArray;
import android.graphics.Color;
import android.graphics.drawable.Drawable;
import android.util.AttributeSet;
import android.util.Log;
import android.view.View;
import android.widget.Button;
import android.widget.RelativeLayout;
import android.widget.TextView;

public class MyTopBar extends RelativeLayout {
    //包含ToaBar上的元素
    //左边按钮
    private Button leftButton;
    //标题
    private TextView title;
    //右边按钮
    private Button rightButton;

    //左边按钮的属性
    private int leftTextColor;
    private Drawable leftBackground;
    private String leftText;

    //右边按钮的属性
    private int rightTextColor;
    private Drawable rightBackground;
    private String rightText;

    //标题的属性
    private int titleTextColor;
    private int titleTextSize;
    private String titleText;

    private LayoutParams leftParams, titleParams, rightParams;//布局属性,用来控制ViewGroup容器中的位置T

    private TopbarClickLinstener mListener;

    public MyTopBar(Context context, AttributeSet attrs) {
        super(context, attrs);

        //设置TopBar的背背景颜色
        setBackgroundColor(Color.YELLOW);
        //通过这个方法,将在attrs.xml中定义declare-styleable的所有属性的值存储到 ta这个了TypedArray中
        TypedArray ta = context.obtainStyledAttributes(attrs, R.styleable.TopBar);

        //左边按钮
        leftTextColor = ta.getColor(R.styleable.TopBar_leftTextColor, 0);
        leftBackground = ta.getDrawable(R.styleable.TopBar_leftBackground);
        leftText = ta.getString(R.styleable.TopBar_leftText);

        //右边按钮
        rightBackground = ta.getDrawable(R.styleable.TopBar_rightBackground);
        rightTextColor = ta.getColor(R.styleable.TopBar_rightTextColor, 0);
        rightText = ta.getString(R.styleable.TopBar_rightText);

        //标题
        titleText = ta.getString(R.styleable.TopBar_title);
        titleTextColor = ta.getColor(R.styleable.TopBar_titleTextColor, 0);
        titleTextSize = (int) ta.getDimension(R.styleable.TopBar_titleTextSize, 10);

        ta.recycle();//避免重复调用出错 获取完TypedArray的值后 调用recyle();

        leftButton = new Button(context);
        title = new TextView(context);
        rightButton = new Button(context);

        //为创建的组件元素赋值 指的来源在我们引用的xml文件中
        //左边
        leftButton.setBackground(leftBackground);
        leftButton.setText(leftText);
        leftButton.setTextColor(leftTextColor);

        //右边
        rightButton.setBackground(rightBackground);
        rightButton.setTextColor(rightTextColor);
        rightButton.setText(rightText);

        //标题
        title.setText(titleText);
        title.setTextColor(titleTextColor);
        title.setTextSize(titleTextSize);

        //为组件元素设置相应的布局元素
        leftParams = new LayoutParams(LayoutParams.WRAP_CONTENT, LayoutParams.MATCH_PARENT);
        leftParams.addRule(RelativeLayout.ALIGN_PARENT_LEFT, TRUE);
        //添加到容器ViewGroup中
        addView(leftButton, leftParams);

        titleParams = new LayoutParams(LayoutParams.WRAP_CONTENT, LayoutParams.MATCH_PARENT);
        //title 居中放在容器中
        titleParams.addRule(RelativeLayout.CENTER_IN_PARENT, TRUE);
        addView(title, titleParams);


        rightParams = new LayoutParams(LayoutParams.WRAP_CONTENT, LayoutParams.MATCH_PARENT);
        rightParams.addRule(RelativeLayout.ALIGN_PARENT_RIGHT, TRUE);
        //添加到容器ViewGroup中
        addView(rightButton, rightParams);

        //添加监听事件
        leftButton.setOnClickListener(new OnClickListener() {
            @Override
            public void onClick(View view) {

               mListener.leftClick();
            }
        });

        rightButton.setOnClickListener(new OnClickListener() {
            @Override
            public void onClick(View view) {

               mListener.rightClick();
            }
        });
    }
    public void setOnTopBarClickListener(TopbarClickLinstener mListener){
        this.mListener = mListener;
    }

    //接口对象,实现回调机制,在回调方法中,通过影射的接口对象调用接口对象中的方法
    //不用去考虑如何实现具体的细节有调用者去实现
    public interface TopbarClickLinstener{
        void leftClick(); //左边按钮的点击事件
        void rightClick(); //右边按钮的点击事件
    }
    //设置按钮的显示与否
    //通过id 来区分
    // flag区分是否显示
    public void setButtonVisible(int id,boolean flag){
        //flag ==true显示
        //flag = false 不显示
        if(flag){ //id
            if(id==0){//id ==0显示左边
                leftButton.setVisibility(VISIBLE);
            }else if(id == 1){ //id ==1 显示右边
                rightButton.setVisibility(VISIBLE);
            }
        }else {
            if(id==0){//隐藏左边
                leftButton.setVisibility(GONE);
            }else if(id ==1){//隐藏右边
                rightButton.setVisibility(GONE);
            }
        }
    }
}
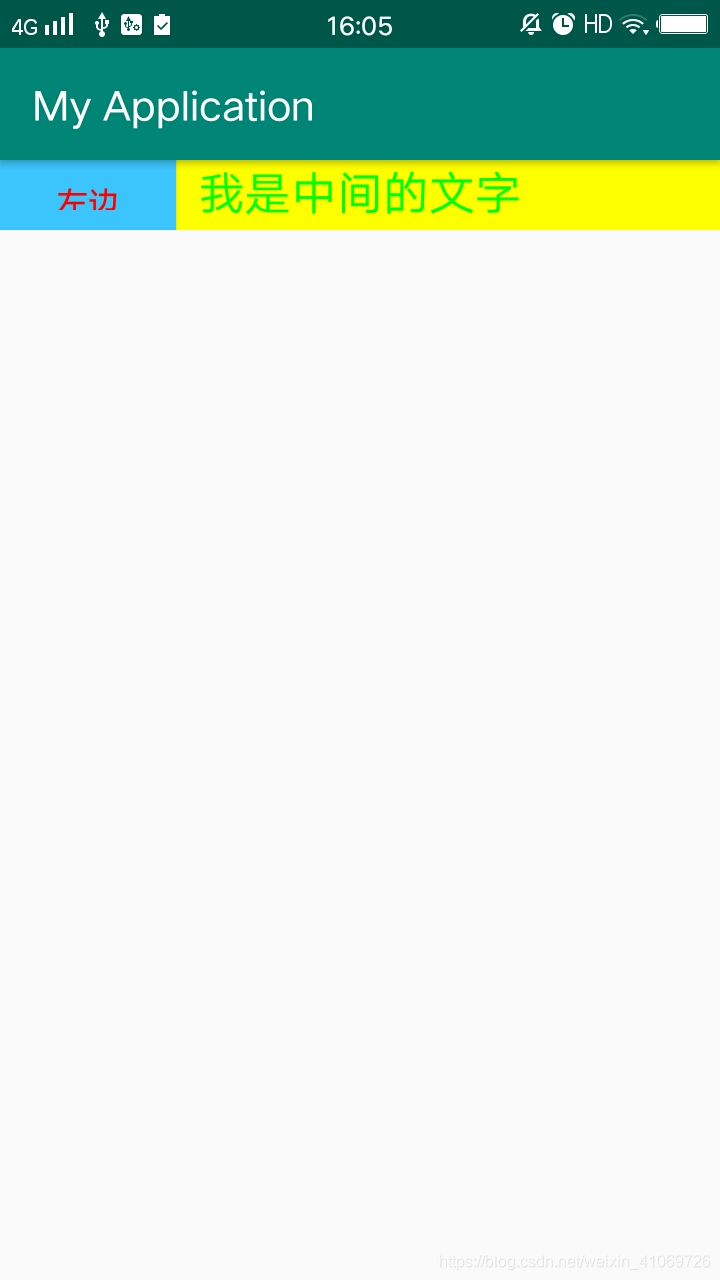 最终结果
最终结果
定义一个xml的drawable文件
<?xml version="1.0" encoding="utf-8"?>
<selector xmlns:android="http://schemas.android.com/apk/res/android">
    <item android:state_focused="true">
        <shape android:shape="rectangle">
            <!---填充的颜色-->
            <solid android:color="@color/colorPrimary" />
        </shape>
    </item>
    <item android:state_focused="false">
        <shape android:shape="rectangle">
            <!---填充的颜色-->
            <solid android:color="#3ec5ff" />
        </shape>
    </item>
</selector>
布局文件中调用这个view
<com.yifei.myapplication.MyTopBar
    android:id="@+id/topbar"
    android:layout_width="match_parent"
    android:layout_height="35dp"
    custom:leftBackground="@drawable/button_dw"
    custom:leftTextColor ="#ff0000"
    custom:leftText="左边"

    custom:rightTextColor="#ff1"
    custom:rightBackground="@drawable/button_dw"
    custom:rightText="右边"

    custom:title ="我是中间的文字"
    custom:titleTextSize="10dp"
    custom:titleTextColor="#00ff00"
    />
在mainactivity中实现
package com.yifei.myapplication;

import android.support.v7.widget.RecyclerView;
import android.support.v7.app.AppCompatActivity;
import android.os.Bundle;
import android.util.Log;

public class MainActivity extends AppCompatActivity {

    private MyTopBar myTopBar;//找到这个自定义的view
    @Override
    protected void onCreate(Bundle savedInstanceState) {
        super.onCreate(savedInstanceState);
        setContentView(R.layout.activity_main);
        myTopBar = findViewById(R.id.topbar);
//实现回调方法
        myTopBar.setOnTopBarClickListener(new MyTopBar.TopbarClickLinstener() {
            @Override
            public void leftClick() {
                Log.d("leftButton", "onClick: leftButton");
            }

            @Override
            public void rightClick() {
                Log.d("rightButton", "onClick: rightButton");
            }
        });
//设置式左边的按钮显示,还是右边的按钮显示
        myTopBar.setButtonVisible(1,false);

    }
}


 671
671

 被折叠的 条评论
为什么被折叠?
被折叠的 条评论
为什么被折叠?
 到【灌水乐园】发言


