


 本文介绍了如何通过更新Jenkins构建的displayName和description变量,来提供更清晰的构建信息。通过在初始化阶段设置这些变量,可以确保构建名称和描述包含环境、服务器组和部署的构件版本,从而简化了查看部署详情的过程,提高作业的可读性和效率。
How to update the current build name and description.

Jenkins is a famous and mostly used CI tool and we are also using it for build and release and other automated jobs. We also have a deployment job that deploys the selected artifact version to selected server groups (similar to autoscaling groups in AWS) in the selected environment. The job is working as expected. By default, Jenkins set the build name as the build number (see the red color box in the below snapshot). what if somebody wants to know to which environment and server group 3rd or 4th build jobs deployed? In that case, we have to open the job details and needs to check.
Jenkins 是一个著名的、最常用的 CI 工具,我们也用它来构建和发布以及其他自动化工作。我们还有一个部署作业,可将所选构件版本部署到所选环境中的选定服务器组(类似于 AWS 中的自动扩展组)。作业按预期工作。默认情况下,Jenkins 将构建名称设置为内部版本号(请参阅下面快照中的红色框)。如果有人想知道部署了哪个环境和服务器组的第 3 个或第 4 个生成作业,该怎么办?在这种情况下,我们必须打开作业详细信息并需要检查。
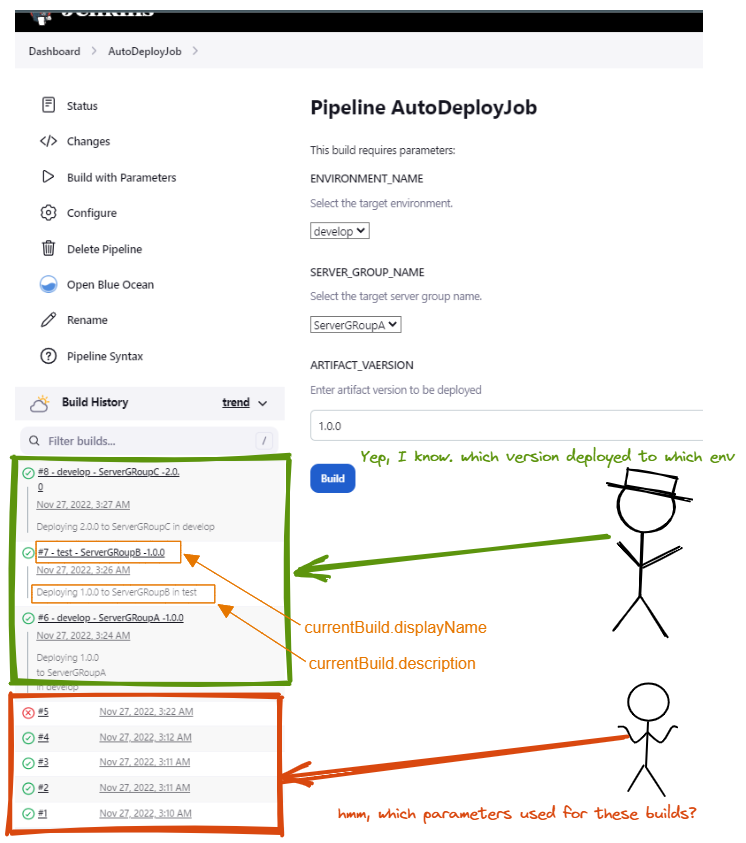
But for the 6th,7th, and 8th builds, by seeing the build details themselves without opening, we can get all the important details. This can be achieved by updating the currentBuild.displayName and currentBuild.description variables.
但是对于第 6、7 和 8 个构建,通过不打开即可查看构建细节本身,我们可以获得所有重要细节。这可以通过更新currentBuild.displayName和currentBuild.description变量来实现。
Sample template 示例模板:
pipeline {
    agent any

    parameters {
        choice choices: ['develop', 'test', 'state', 'prod'], description: 'Select the target environment.', name: 'ENVIRONMENT_NAME'
        choice choices: ['ServerGRoupA', 'ServerGRoupB', 'ServerGRoupC'], description: 'Select the target server group name.', name: 'SERVER_GROUP_NAME'
        string defaultValue: '1.0.0',description: 'Enter artifact version to be deployed', name: 'ARTIFACT_VAERSION'
    }
    stages {
        stage('Initilization') {
            steps {
                echo 'Initilizating'
                script{
                    currentBuild.displayName = "#${BUILD_NUMBER} - ${params.ENVIRONMENT_NAME} - ${params.SERVER_GROUP_NAME} -${params.ARTIFACT_VAERSION}"
                    currentBuild.description = "Deploying ${params.ARTIFACT_VAERSION} to ${params.SERVER_GROUP_NAME} in ${params.ENVIRONMENT_NAME}"
                }
            }
        }
        stage('Download Atrifacts') {
            steps {
                echo "Downloading ${params.ARTIFACT_VAERSION} Atrifacts"
            }
        }
        stage('Deploy Atrifacts') {
            steps {
                echo "Deploying ${params.ARTIFACT_VAERSION} Atrifacts to ${params.SERVER_GROUP_NAME} in ${params.ENVIRONMENT_NAME}"
            }
        }
    }
}
I Hope, You liked this article. More articles related to DevOps tools, Linux and AWS on the way so please follow me for getting notifications. Bye for now 😀.
我希望,你喜欢这篇文章。更多与DevOps工具,Linux和AWS相关的文章即将发布,因此请关注我以获取通知。暂时😀再见.
DevOps云学堂,一个盛满新技术实践的学习平台。技术开放交流,技术实践实施分享。目前课程正在进一步覆盖DevOps全流程!


 438
438

 被折叠的 条评论
为什么被折叠?
被折叠的 条评论
为什么被折叠?
 到【灌水乐园】发言


