


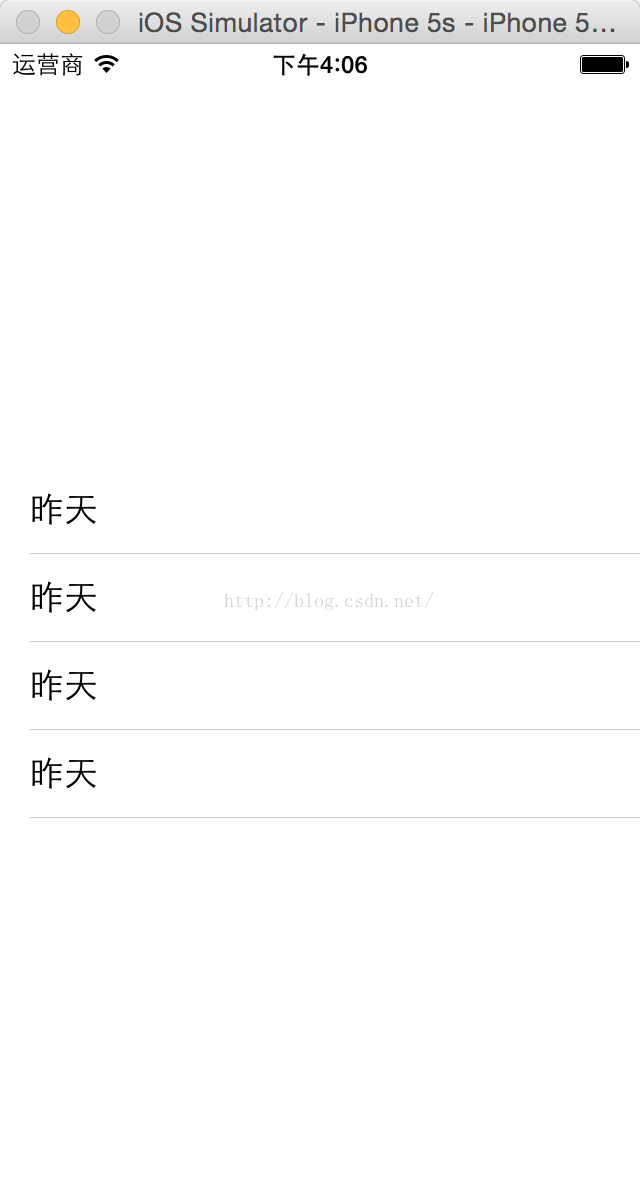
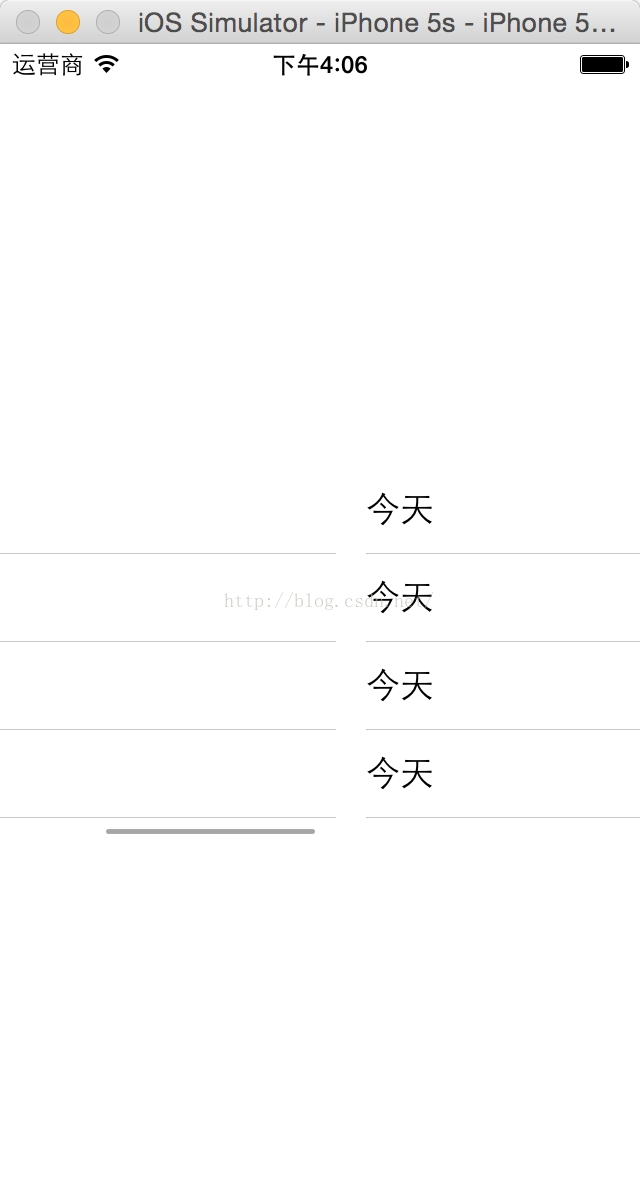
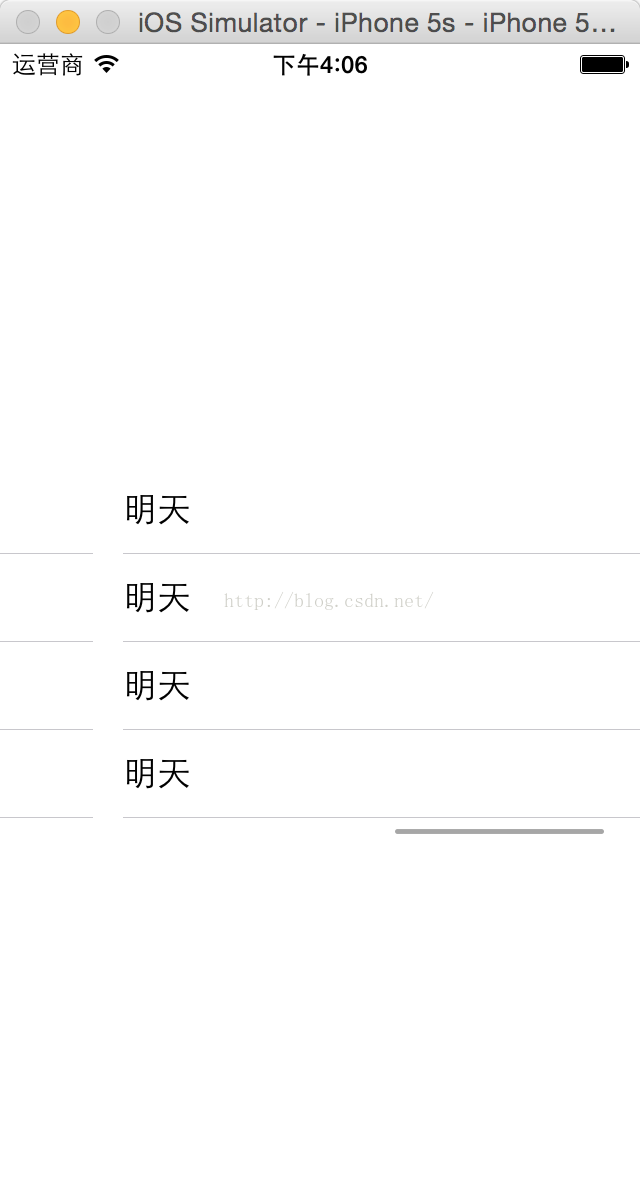
在Android中我们常常使用ListView来表示列表,来显示类似的呈现列表样式的结果。来到iOS中,这种控件称之为TableView。这里我们将会通过使用ScrollView和TableView结合的方式来实现可以侧滑显示的列表,这将会大大提高用户体验。先看一下实现效果:
 。
。
 。
。
 。
。
具体实现步骤如下:
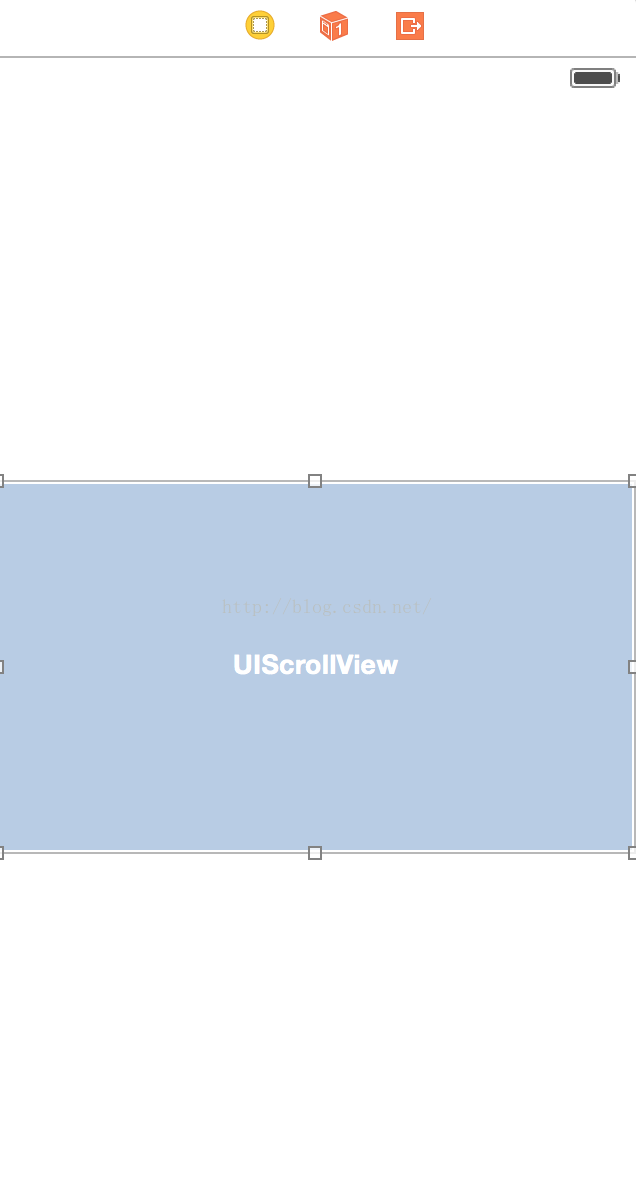
(1)创建一个iOS项目,Language选择Swift,然后在Main.storyboard中拖入一个ScrollView,即滚动控件,界面设计如图:
 。
。
(2)然后拖动控件绑定到代码中:
@IBOutlet weak var dynamicScrollView: UIScrollView!
(3)我将会在一个ScrollView中实现三个TableView,三个列表可以通过手指的左右滑动进行切换,一些变量定义如下:
var tableView11:UITableView = UITableView()
var tableView22:UITableView = UITableView()
var tableView33:UITableView = UITableView()
var cell1 = UITableViewCell()
var cell2 = UITableViewCell()
var cell3 = UITableViewCell()
(4)然后在viewDidLoad()中设置委托和数据源,同时该类要实现以下接口:UIScrollViewDelegate,UITableViewDelegate,UITableViewDataSource
override func viewDidLoad() {
super.viewDidLoad()
tableView11.delegate = self
tableView11.dataSource = self
tableView22.delegate = self
tableView22.dataSource = self
tableView33.delegate = self
tableView33.dataSource = self
dynamicScroll()
initCustomTableView()
}
(5)实现dynamicScroll()方法,该方法是对ScrollView控件的滚动进行控制,同时把三个TableView加入到ScrollView中:
func dynamicScroll(){ //动态信息的滚动;
let tableW:CGFloat = self.dynamicScrollView.frame.size.width;
let tableH:CGFloat = self.dynamicScrollView.frame.size.height;
var tableY:CGFloat = 0;
var totalCount:NSInteger = 3;//只有三列;
var tableView1:UITableView = UITableView();
var tableView2:UITableView = UITableView();
var tableView3:UITableView = UITableView();
tableView11.frame = CGRectMake(CGFloat(0) * tableW, tableY, tableW, tableH);
tableView22.frame = CGRectMake(CGFloat(1) * tableW, tableY, tableW, tableH);
tableView33.frame = CGRectMake(CGFloat(2) * tableW, tableY, tableW, tableH);
dynamicScrollView.addSubview(tableView11);
dynamicScrollView.addSubview(tableView22);
dynamicScrollView.addSubview(tableView33);
let contentW:CGFloat = tableW * CGFloat(totalCount);//这个表示整个ScrollView的长度;
dynamicScrollView.contentSize = CGSizeMake(contentW, 0);
dynamicScrollView.pagingEnabled = true;
dynamicScrollView.delegate = self;
}
(6)实现initCustomTableView()方法,该方法是对TableView的中的Cell设置ID号,用来标识不同的TableView :
func initCustomTableView(){ //初始化动态信息中的TableView
tableView11.registerClass(UITableViewCell.self, forCellReuseIdentifier:"cell1")
tableView22.registerClass(UITableViewCell.self, forCellReuseIdentifier:"cell2")
tableView33.registerClass(UITableViewCell.self, forCellReuseIdentifier:"cell3")
}
(7)最后实现UITableViewDataSource中的两个必须实现的方法,是对三个TableView的数据源将进行设置:需要显示的内容可以在这里进行添加:
func tableView(tableView: UITableView, numberOfRowsInSection section: Int) -> Int{
return 5 //返回TableView的Cell数量,可以动态设置;
}
func tableView(tableView: UITableView, cellForRowAtIndexPath indexPath: NSIndexPath) -> UITableViewCell{
var cell = UITableViewCell()
switch tableView {
case tableView11:
cell1 = tableView11.dequeueReusableCellWithIdentifier("cell1") as! UITableViewCell
cell1.textLabel!.text = String(format:"昨天")
cell = cell1
break
case tableView22:
cell2 = tableView22.dequeueReusableCellWithIdentifier("cell2") as! UITableViewCell
cell2.textLabel!.text = String(format:"今天")
cell = cell2
break
case tableView33:
cell3 = tableView33.dequeueReusableCellWithIdentifier("cell3") as! UITableViewCell
cell3.textLabel!.text = String(format:"明天")
cell = cell3
break
default:
break
}
return cell
}
(8)最后运行程序,就可以实现本文开头的多个TableView在ScrollView中通过侧滑就可以切换的效果,虽然屏幕大小有限,我们可以通过视图的切换显示丰富的内容。
在iOS的开发中,TableView和ScrollView是两个最为常用,使用最为灵活的控件,必须要好好掌握。
以上就是本文的全部内容,希望对大家的学习有所帮助,也希望大家多多支持脚本之家。


 5673
5673

 被折叠的 条评论
为什么被折叠?
被折叠的 条评论
为什么被折叠?
 到【灌水乐园】发言


