


Introduction
While many are familiar with OpenGL, using WebGL is a little less familiar. However, many of the concepts and format of OpenGL also apply to WebGL.
This article is a test to see how difficult programming something in WebGL would be. It took me less than 6 hours to make this, being a newbie at WebGL and with very
little experience in OpenGL. There are many protien viewers available in either pre-packaged Java applets or C++ programs. This project attempts to see how
difficult it would be to make one using JavaScript and WebGL. Surprisingly, it was fairy simple!
Background
WebGL is a JavaScript browser implementation of graphics processing code that allows browsers to utilize the GPU.
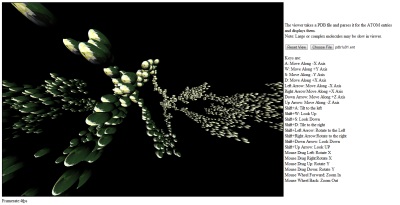
Using the Code
Install the code on a web server, either a local web server or a remote one. Go to index.html, click on the Choose File button, select a local PDB for your computer,
and see the molecule.
Keys are as follows:
Copy Code
A: Move Along -X Axis
W: Move Along +Y Axis
S: Move Along -Y Axis
D: Move Along +X Axis
Left Arrow: Move Along -X Axis
Right Arrow:Move Along +X Axis
Down Arrow: Move Along +Z Axis
Up Arrow: Move Along -Z Axis
Shift+A: Tilt to the left
Shift+W: Look Up
Shift+S: Look Down
Shift+D: Tile to the right
Shift+Left Arrow: Rotate to the Left
Shift+Right Arrow:Rotate to the right
Shift+Down Arrow: Look Down
Shift+Up Arrow: Look UP
Mouse Drag Left: Rotate X
Mouse Drag Right:Rotate X
Mouse Drag Up: Rotate Y
Mouse Drag Down: Rotate Y
Mouse Wheel Forward: Zoom In
Mouse Wheel Back: Zoom Out
A sample PDB File:
Copy Code
COMPND PROPANE
AUTHOR DAVE WOODCOCK 95 12 18
ATOM 1 C 1 1.241 0.444 0.349 1.00 0.00
ATOM 2 C 1 -0.011 -0.441 0.333 1.00 0.00
ATOM 3 C 1 -1.176 0.296 -0.332 1.00 0.00
ATOM 4 H 1 1.516 0.699 -0.675 1.00 0.00
ATOM 5 H 1 2.058 -0.099 0.827 1.00 0.00
ATOM 6 H 1 1.035 1.354 0.913 1.00 0.00
ATOM 7 H 1 -0.283 -0.691 1.359 1.00 0.00
ATOM 8 H 1 0.204 -1.354 -0.225 1.00 0.00
ATOM 9 H 1 -0.914 0.551 -1.359 1.00 0.00
ATOM 10 H 1 -1.396 1.211 0.219 1.00 0.00
ATOM 11 H 1 -2.058 -0.345 -0.332 1.00 0.00
TER 12 1
END
The first step is to select a file and parse the file for the ATOM entries. We select a file using the onclick operator of the file input button.
Next we set up a FileReader object and parse the file. Once we have the file contents, we call var lines = contents.split("\n"); to split
the file into lines. Next we have to go through the lines and split them using spaces into an array. Then we create an array to hold our ATOM objects, and fill it
with the line entries. There are blank array entries when we separate the line, so we have to loop through the line and only copy the values we want. Also some lines
have more spaces then others, so we cannot use a set position. Therefore we just copy all non-null values. The process looks like this:
C#
Copy Code
for (y = 0; y < singleLine.length; y++)//loop through the line
{
if (singleLine[y]!="" && singleLine[y]!=",")//is this a value or empty?
objects[object_count][counter++] = singleLine[y];//has a value so lets copy it
}
The next step is to loop through our array of objects and find the atoms and draw them. Notice that we did not already set the atoms apart,
we copied all non-empty values instead. So now we need to find the ATOM structures we want to draw. Looking at the file format above, we can see that the x, y, z coordinates
for each atom are in the 5th, 6th, 7th columns, respectively. The code looks like this:
C#
Copy Code
for (i = 0; i < object_count; ++i) {
if (objects[i][0] == "ATOM")
{
if (setcamera != true)
//have we set the camera to focus
//on an atom yet? if not pick the first one
{
//look at the 0,0,zPosition of the atom
g.perspectiveMatrix.lookat(0, 0, objects[i][7], 0, 0, 0, 0, 1, 0);
setcamera = true;
}
//draw one molecule
drawOne(ctx, 30,
objects[i][5],//x coord
objects[i][6],//y coord
objects[i][7],//z coord
0.75,
molTexture);//our texture
}
}
Next, we need to set the camera and object in the right position. To do this, we use a model-view matrix and set it to translate and rotate by the camera,
then translate again by the atom we are drawing. It looks like this:
C#
Copy Code
//Add in camera controller's position and rotation
var pos = controller.getPosition();//get the camera position
mvMatrix.translate(pos[0],pos[1],pos[2]);//translate by the camera position if needed
mvMatrix.rotate(controller.getRoll(), 1, 0, 0);//rotate if needed
mvMatrix.rotate(controller.getYaw(), 0, 1, 0);//rotate if needed
mvMatrix.rotate(controller.getPitch(), 0, 0, 1);//rotate if needed
mvMatrix.translate(-x,-y,-z);//set the object in the proper place in view
Okay, so we have our matrix of where to draw the atom, now we draw the atom after any final projections:
C#
Copy Code
ctx.bindTexture(ctx.TEXTURE_2D, texture);
ctx.drawElements(ctx.TRIANGLES, g.sphere.numIndices, ctx.UNSIGNED_SHORT, 0);
All that is left is to move our camera using keys:
JavaScript
Copy Code
function keyCamera(event){//a key is released
var cam = controller;
if(event.shiftKey) {
switch(event.keyCode) {//determine the key pressed
case 65://a key
cam.roll(-Math.PI * 0.25);//tilt to the left
break;
case 37://left arrow
cam.yaw(Math.PI * 0.25);//rotate to the left
break;
case 68://d key
cam.roll(Math.PI * 0.25);//tilt to the right
break;
case 39://right arrow
cam.yaw(-Math.PI * 0.25);//rotate to the right
break;
case 83://s key
case 40://down arrow
cam.pitch(Math.PI * 0.25);//look down
break;
case 87://w key
case 38://up arrow
cam.pitch(-Math.PI * 0.25);//look up
break;
}
}
else {
var pos = cam.getPosition();
//alert(pos);
switch(event.keyCode) {//deterime the key pressed
case 65://a key
case 37://left arrow
cam.setPosition(pos[0]-0.5,pos[1],pos[2]);//move - along the X axis
break;
case 68://d key
case 39://right arrow
cam.setPosition(pos[0]+0.5,pos[1],pos[2]);//more + along the X axis
break;
case 83://s key
cam.setPosition(pos[0],pos[1]-0.5,pos[2]);//move - along the Y axis (down)
break;
case 40://down arrow
cam.setPosition(pos[0],pos[1],pos[2]+0.5);//move + on the Z axis
break;
case 87://w key
cam.setPosition(pos[0],pos[1]+0.50,pos[2]);//move + on the Y axis (up)
break;
case 38://up arrow
cam.setPosition(pos[0],pos[1],pos[2]-0.5);//move - on the Z axis
break;
}
}
}
To initialize the WebGL, we use something like this:
JavaScript
Copy Code
var gl = initWebGL("molview");
if (!gl) {
return;
}
var c = document.getElementById("molview");//canvas where we will draw
c.addEventListener('webglcontextlost', handleContextLost, false);
c.addEventListener('webglcontextrestored', handleContextRestored, false);
g.program = simpleSetup(gl, "vshader", "fshader",
[ "vNormal", "vTexCoord", "vPosition"],
[ 0, 0, 0, 1 ], 10000);
gl.uniform3f(gl.getUniformLocation(g.program, "lightDir"), 0, 0, 1);
gl.uniform1i(gl.getUniformLocation(g.program, "sampler2d"), 0);
if (g.program) {
g.u_normalMatrixLoc = gl.getUniformLocation(g.program, "u_normalMatrix");
g.u_modelViewProjMatrixLoc = gl.getUniformLocation(g.program, "u_modelViewProjMatrix");
}
g.sphere = makeSphere(gl, 1, 30, 30);
//get the images
molTexture = loadImageTexture(gl, "./h1.jpg");
And finally the camera, we just implement something to keep track of our position and rotation and then we are good to go. There is too much code in the camera to post,
so I will leave it up to interested parties to look at the source code attached. I have left out some of the functionality on an effort to keeping it brief.
The attached code has everything needed and a couple of PDB file samples.
Points of Interest
I learned how relatively easy it is program using WebGL. Nice little introduction to creating something visible in a short amount of time. WebGL and HTML5 are both
things I look forward to using in the future.
History
version 0.1: Basic ATOM viewer implemented for PDB files.
References


 被折叠的 条评论
为什么被折叠?
被折叠的 条评论
为什么被折叠?
 到【灌水乐园】发言


