


 本文深入解析了Vuex的使用方法,包括状态管理、数据双向绑定及子模块管理等核心功能,并详细介绍了如何通过Vue实例实现对Vuex状态的访问。
VUEX的使用,就不用说了,具体的看文档,分state、getter、mutation、actions、map[state| getter| mutation| action] 五个细节,来实现一个我们几个的vuex。
vuex-state
new Vuex.Store({}) // vuex 中存在 store ,

// 在 vuex  index.js中
export class Store {
  constructor(){}
}
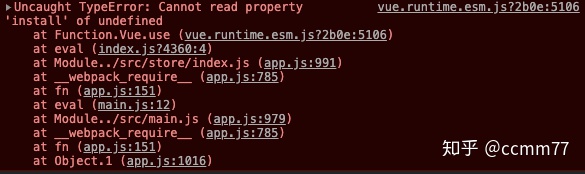
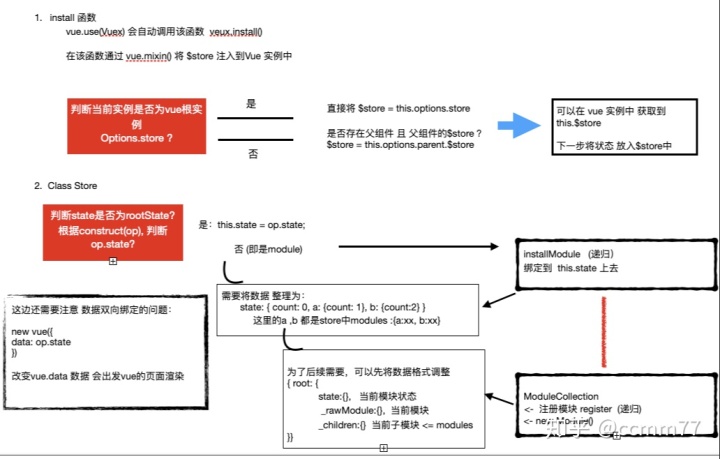
# install
vue.use(Vuex) 会自动调用 , 至于为啥需要 install函数 ,可参考vue-插件
// 在 vuex  index.js中
class Store {
  constructor(){}
}

function install() { //具体使用 后面继续介绍
}

export default {
  Store,
  install,
}
#$store.state
- vue实例 this.$store 的实现:
function install(_vue) {
// 通过mixin 给vue 实例 混入 $store
  _vue.mixin({
    beforeCreate(){
     // console.log('install')  可以看到 打印 n个页面+n个组件 + mian.js 次数
      const options = this.$options;
      if(options.store) {  // 判断是否是在跟组件中,即 mian.js 中的实例
        this.$store = options.store;
      } else {
        if(this.$parent && this.$parent.$store) {
          this.$store = this.$parent.$store;
        }
      }
    }
  })  // applyMixin 函数实现,我这边为方便讲解直接写在函数中
}

// 这时在vue实例中,可以获取到 this.$store
2. vue实例中 this.$store.state 及 其数据的双向绑定 的实现:
class Store {
  constructor(option){
    this.state = option.state; // 你发现 vue 中可以获取到 this.$store.state 的 ️
  }
}
但 在改变数据时,页面并没有发生改变,即没有实现数据的双向绑定;在vue中data的数据可以实现页面的双向绑定,我们是否可以通过vue 来实现这一功能呢?
let vue;
class Store {
  constructor(option){
    // this.state = option.state;

    const _vm = new vue({
      data: option.state
    })

    this.state = _vm.$data;
  }
}

function install(_vue) {
  vue = _vue;
  ...  // 只留 当前 目标的步骤
}

export default{
  install,
  Store,
}
这个时候会发现,当你改变count 的值,页面会发生改变,那就实现了vuex 数据的双向绑定。
3. vuex-modules 子模块 的state
3.1 将option中数据重新整理格式 , 整理后格式为:
root: {
   state:{},  // 用于存储 状态
   _rawModule:{}, // 当前模块
   _children:[  // 当前模块的子模块
    {state:{},_rawModule:{},_children:[]}
    // ...
   ]
}
重点:之后每部分功能的实现都与新整理数据有关
export default class ModuleCollection {
  constructor(rawModlue){
    this.register([], rawModlue)
  }

  /**
   * @desc 注册模块
   * @param {Array} path  []=> root ['student'] => root/student  ['student','a'] => root/student/a
   * @param {Object} rawModule 当前模块
   */
  register(path,rawModlue) {
    const newModule = new Module(rawModlue);

    // 根路径
    if (path.length === 0) {
      this.root = newModule;
    } else {
      // 1. 获取父节点
      const parenModule = this.get(path.slice(0,-1));
      // 2. 当前模块的名字
      const rawModlueName = path[path.length - 1];
      // 3. 挂载到父模块
      parenModule._chidren[rawModlueName] = newModule;
    }

    // 判断当前模块是否存在子模块
    if (rawModlue.modules) {
      Object.keys(rawModlue.modules).forEach(moduleName => {
        const childModule = rawModlue.modules[moduleName];
        this.register(path.concat(moduleName), childModule);
      });
    }
  }

  get(path) {
    return  path.reduce((module, key)=>{
      return module.getChild(key);
    },this.root)
  }
}


class Module {

  constructor(rawModlue) {
    this.state = rawModlue.state || {};
    this._rawModule = rawModlue;
    this._chidren = rawModlue.modules || {};
  }

  getChild(key) {
    return this._chidren[key];
  }
}
3.2 整理 state 数据
数据最终整理为:
// 注意:这里是namespaced:false 的情况下
state: {
   count: 0;
   student: {
     count: 222
  }
}
class Store {
  constructor(option){
    // 将 option重新整理
    ....

    installModule(this, option.state, [], this._modules.root) // ⚠️ this._modules.root 不是 this._modules

    // ...
  }
}

function installModule(Store,rootState, path, module) {
  // 判断是否为根状态
  const isRoot = path.length === 0;
  if (!isRoot) {
    // 1. 父模块状态
    const parentState = getNestedState(path.slice(0, -1), rootState);
    // 2. 当前模块名
    const moduleName = path[path.length - 1];
    // 3. 给父模块放置 该子模块
    parentState[moduleName] = module.state;
  }

  // 循环遍历 module (这个可以给之前的Module 上直接绑定该方法)
  module.forEachChild((childModule, childName) => {
    installModule(Store, rootState, path.concat(childName), childModule);
  })
}

function getNestedState(path, rootState) {
  return path.reduce((moduleState, path)=>{
    return moduleState[path];
  },rootState)
}
到这个时候,vuex 中的 state 功能就结束了!
主要思路,整理下:
补充:
// vue
<template>
  <div id="app">
    <p>
     {{ $store.state.count}}
    </p>
    <hr />
      <!-- {{ $store.state.student.count }} 子模块不存在命名空间 -->
      <!-- {{ $store.state['student/count'] }}  子模块student 存在命名空间-->
    <button @click="handleClick"> click </button>
  </div>
</template>

<script>
export default {
  name: 'App',
  created() {
     console.log(this.$store);
  },
  methods: {
    handleClick() {
      this.$store.state.count ++;
      // this.$store.state.student.count ++ ;
    }
  }
}
</script>
// store.js
import Vue from 'vue'
import Vuex from '../vuex';

Vue.use(Vuex)

export default new Vuex.Store({
  state: {
    count: 0,
  },
  modules: {
    student: {
      // namespaced: true,
      state: {
        count: 1111,
      },
    },
  },
})
源码中会对提取些公共方法,方便后续使用,具体代码可以查看 :
myVuex state分支github.com


 624
624

 被折叠的 条评论
为什么被折叠?
被折叠的 条评论
为什么被折叠?
 到【灌水乐园】发言


