


最近学习了贝塞尔曲线的一些知识,刚好项目中需要实现一个圆形进度,然后就将实现的waveView记录一下。需要使用的知识大概有自定义view、贝塞尔曲线、valueAnimator(属性动画)、Xfermode等。
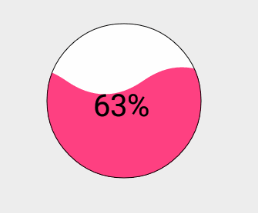
以下为效果图:
废话不多说,直接上代码这里只是一些重要的代码。如果需要demo可以去下载。
首先需要自定义view的属性:
//圆的颜色
//圆的背景色
//水波纹的颜色
//字体的大小
//字体的颜色
第二步自定义CustomWaveView
1、实现构造方法,在构造方法中获取属性值
TypedArray ta = context.obtainStyledAttributes(attrs,R.styleable.custom_wave_view_attr);
//圆的颜色
circle_color = ta.getColor(R.styleable.custom_wave_view_attr_circle_color,getResources().getColor(android.R.color.black));
//圆的背景色
circle_bg_color = ta.getColor(R.styleable.custom_wave_view_attr_circle_background_color,getResources().getColor(android.R.color.white));
//水波纹颜色
wave_color = ta.getColor(R.styleable.custom_wave_view_attr_progress_wave_color,getResources().getColor(android.R.color.holo_blue_dark));
//字体的颜色
text_color = ta.getColor(R.styleable.custom_wave_view_attr_progress_text_color,getResources().getColor(android.R.color.black));
//字体的大小
textSize = ta.getDimension(R.styleable.custom_wave_view_attr_progress_text_size,30f);
//释放资源
ta.recycle();
2、初始化画笔
//初始化背景圆画笔
mBgCirclePaint = new Paint();
//抗锯齿
mBgCirclePaint.setAntiAlias(true);
//设置背景圆的背景色
mBgCirclePaint.setColor(circle_bg_color);
//设置充满
mBgCirclePaint.setStyle(Paint.Style.FILL);
//初始化水波纹画笔
mWavePaint = new Paint();
//抗锯齿
mWavePaint.setAntiAlias(true);
//设置水波纹的背景色
mWavePaint.setColor(wave_color);
//设置充满
mWavePaint.setStyle(Paint.Style.FILL);
//使用Xfermode获取重叠部分
mWavePaint.setXfermode(new PorterDuffXfermode(PorterDuff.Mode.SRC_IN));
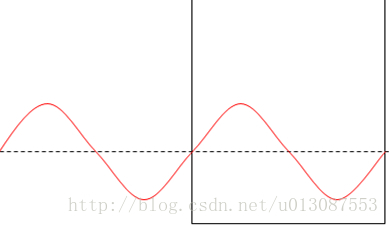
3、绘制贝塞尔曲线。以下为原理图。
/**
* 初始化贝塞尔曲线上的点
*/
private void reset() {
startP = new PointF(-width, height);
nextP = new PointF(-width/2, height);
threeP = new PointF(0, height);
fourP = new PointF(width/2, height);
endP = new PointF(width, height);
controllerP1 = new PointF(-width/4, height);
controllerP2 = new PointF(-width * 3/4, height);
controllerP3 = new PointF(width/4, height);
controllerP4 = new PointF(width * 3/4, height);
}
4、在onDraw方法中画贝塞尔曲线和圆
@Override
protected void onDraw(Canvas canvas) {
super.onDraw(canvas);
//在透明画布上画背景圆
mCanvas.drawCircle(width/2, height/2, radius, mBgCirclePaint);
//贝塞尔曲线
mPath.reset();
mPath.moveTo(startP.x, startP.y);
mPath.quadTo(controllerP1.x, controllerP1.y, nextP.x, nextP.y);
mPath.quadTo(controllerP2.x, controllerP2.y, threeP.x, threeP.y);
mPath.quadTo(controllerP3.x, controllerP3.y, fourP.x, fourP.y);
mPath.quadTo(controllerP4.x, controllerP4.y, endP.x, endP.y);
mPath.lineTo(endP.x, height);
mPath.lineTo(-width, height);
//在透明画布上绘制水波纹
mCanvas.drawPath(mPath,mWavePaint);
//将画好的圆绘制在画布上
canvas.drawBitmap(mBitmap, 0, 0, null);
}
5、使用动画让贝塞尔曲线动起来
/**
* 开始动画 让startP的x点坐标在2S时间内循环移动到0点。
* depth---进度
* waveRipple----水波纹的振幅
*/
private void startAnimator() {
animator = ValueAnimator.ofFloat(startP.x, 0);
animator.setInterpolator(new LinearInterpolator());
animator.setDuration(2000);
//重复循环
animator.setRepeatCount(ValueAnimator.INFINITE);
animator.addUpdateListener(new ValueAnimator.AnimatorUpdateListener() {
@Override
public void onAnimationUpdate(ValueAnimator animation) {
startP.x = (Float) animation.getAnimatedValue();
startP = new PointF(startP.x, height - depth);
nextP = new PointF(startP.x + width/2, height - depth);
threeP = new PointF(nextP.x + width/2, height - depth);
fourP = new PointF(threeP.x + width/2, height - depth);
endP = new PointF(fourP.x + width/2, height - depth);
controllerP1 = new PointF(startP.x + width/4, height - depth + waveRipple);
controllerP2 = new PointF(nextP.x + width/4, height - depth - waveRipple);
controllerP3 = new PointF(threeP.x + width/4, height - depth + waveRipple);
controllerP4 = new PointF(fourP.x + width/4, height - depth - waveRipple);
invalidate();
}
});
animator.start();
}
第三步在XML中使用自定义View
android:id="@+id/custom_circle_wave_view"
android:layout_width="wrap_content"
android:layout_height="wrap_content"
wave:circle_color = "@color/circle_color"
android:layout_centerInParent="true"
wave:circle_background_color = "@color/circle_bg_color"
wave:progress_wave_color = "@color/colorAccent"
wave:progress_text_size = "20sp"
wave:progress_text_color = "@color/circle_color"/>
这样就完成了自定义WaveView。
以上就是本文的全部内容,希望对大家的学习有所帮助,也希望大家多多支持脚本之家。


 436
436

 被折叠的 条评论
为什么被折叠?
被折叠的 条评论
为什么被折叠?
 到【灌水乐园】发言


