


 本文详细解析了SpringBoot自动装配的原理,从@SpringBootApplication注解入手,深入探讨了@EnableAutoConfiguration的作用,以及如何通过AutoConfigurationImportSelector类实现自动装配。

大家好,我是青秧!SpringBoot具备开箱即用的特点,默默的帮我们做了很多事情【自动创建和装配很多对象】,大家都知道Springboot是微服务开发的神器,只需在maven中导入对应的起步依赖,springboot就会自动识别,并自动创建对应的实体类(自动装配)。今天我们就来探究一下springboot的自动装配问题。
先来一段源码:
@SpringBootApplication
public class ConsumerApplication {
    public static void main(String[] args) {
        SpringApplication.run(ConsumerApplication.class, args);
    }
}
这是springboot中的引导类,自动装配就要从这里面的@SpringBootApplication这个注解开始说起,执行main方法,会加载@SpringBootApplication,这里面又配置了@SpringBootConfiguration,@EnableAutoConfiguration,@ComponentScan这三个注解,下面是源码:
@Target({ElementType.TYPE})
@Retention(RetentionPolicy.RUNTIME)
@Documented
@Inherited
**//以上四个都是jdk的注解,这里暂不讲解**
@SpringBootConfiguration
@EnableAutoConfiguration
@ComponentScan(
    excludeFilters = {@Filter(
    type = FilterType.CUSTOM,
    classes = {TypeExcludeFilter.class}
), @Filter(
    type = FilterType.CUSTOM,
    classes = {AutoConfigurationExcludeFilter.class}
)}
)
public @interface SpringBootApplication {
    @AliasFor(
        annotation = EnableAutoConfiguration.class
    )
    Class<?>[] exclude() default {};
@SpringBootConfiguration
@SpringBootConfiguration标注这个类是一个配置类;
它只是@Configuration注解的派生注解;
它与@Configuration注解的功能一致;
只不过@SpringBootConfiguration是springboot的注解,而@Configuration是spring的注解。今天主要讲 自动配置,这里暂时不做深入讲解。
@ComponentScan
@ComponentScan这个注解主要是针对于第三方jar包中注解的应用,这里也不做深入讲解。
接下来就是我们今天的重点: @EnableAutoConfiguration
springboot自动装配的秘密就来源于此,此注释自动载入应用程序所需的所有Bean——这依赖于Spring Boot在类路径中的查找。下面进入这个注解的内部:
还是先来一段源码:
@Target({ElementType.TYPE})
@Retention(RetentionPolicy.RUNTIME)
@Documented
@Inherited
//上面依然是jdk注解
@AutoConfigurationPackage
@Import({AutoConfigurationImportSelector.class})
public @interface EnableAutoConfiguration {
    String ENABLED_OVERRIDE_PROPERTY = "spring.boot.enableautoconfiguration";

    Class<?>[] exclude() default {};

    String[] excludeName() default {};
}
@AutoConfigurationPackage
@AutoConfigurationPackage注解的作用是将 添加该注解的类所在的package 作为 自动配置package 进行管理。但重点并不在这里,而是在与这个注解下面的@Import({AutoConfigurationImportSelector.class})。自动配置的神秘面纱被一层一层的揭开,下面开始真正的神奇操作。
@Import注解仅从字面意思就可以看出这是导入的意思。但重点并不是这个而是被遗落在括号中的那个AutoConfigurationImportSelector.class。这个类里面真正意义上的完成了自动配置关键性的一步。
下面继续上源码:
由于空间有限只展示重要代码部分:
public class AutoConfigurationImportSelector implements DeferredImportSelector, BeanClassLoaderAware, ResourceLoaderAware, BeanFactoryAware, EnvironmentAware, Ordered {
    private static final AutoConfigurationImportSelector.AutoConfigurationEntry EMPTY_ENTRY = new AutoConfigurationImportSelector.AutoConfigurationEntry();
    private static final String[] NO_IMPORTS = new String[0];
    private static final Log logger = LogFactory.getLog(AutoConfigurationImportSelector.class);
    private static final String PROPERTY_NAME_AUTOCONFIGURE_EXCLUDE = "spring.autoconfigure.exclude";
    private ConfigurableListableBeanFactory beanFactory;
    private Environment environment;
    private ClassLoader beanClassLoader;
    private ResourceLoader resourceLoader;

    public AutoConfigurationImportSelector() {
    }
   这里重点
     protected List<AutoConfigurationImportFilter> getAutoConfigurationImportFilters() {
        return SpringFactoriesLoader.loadFactories(AutoConfigurationImportFilter.class, this.beanClassLoader);
        }
     protected List<String> getCandidateConfigurations(AnnotationMetadata metadata, AnnotationAttributes attributes) {
        List<String> configurations = SpringFactoriesLoader.loadFactoryNames(this.getSpringFactoriesLoaderFactoryClass(), this.getBeanClassLoader());
        Assert.notEmpty(configurations, "No auto configuration classes found in META-INF/spring.factories. If you are using a custom packaging, make sure that file is correct.");
        return configurations;
    }
可以看到上面代码中的
**SpringFactoriesLoader.loadFactories(AutoConfigurationImportFilter.class, this.beanClassLoader);**这段代码,你就已经离真相越来越近了。也就是在SpringFactoriesLoader类中的loadFactories这个方法内实现的起步依赖包的配置类的加载。
下面进入这个类:
public final class SpringFactoriesLoader {
    public static final String FACTORIES_RESOURCE_LOCATION = "META-INF/spring.factories";
    private static final Log logger = LogFactory.getLog(SpringFactoriesLoader.class);
    private static final Map<ClassLoader, MultiValueMap<String, String>> cache = new ConcurrentReferenceHashMap();

    private SpringFactoriesLoader() {
    }

    //下面这个方法只截取加载部分的代码
    public static <T> List<T> loadFactories(Class<T> factoryClass, @Nullable ClassLoader classLoader) {
        Assert.notNull(factoryClass, "'factoryClass' must not be null");
        ClassLoader classLoaderToUse = classLoader;
        if (classLoader == null) {
            classLoaderToUse = SpringFactoriesLoader.class.getClassLoader();
        }

        List<String> factoryNames = loadFactoryNames(factoryClass, classLoaderToUse);
        if (logger.isTraceEnabled()) {
            logger.trace("Loaded [" + factoryClass.getName() + "] names: " + factoryNames);
        }

        List<T> result = new ArrayList(factoryNames.size());
        Iterator var5 = factoryNames.iterator();

        while(var5.hasNext()) {
            String factoryName = (String)var5.next();
            result.add(instantiateFactory(factoryName, factoryClass, classLoaderToUse));
        }

        AnnotationAwareOrderComparator.sort(result);
        return result;
    }
List factoryNames = loadFactoryNames(factoryClass, classLoaderToUse);调用本类loadFactoryNames()方法,下面看loadFactoryNames()这个方法:
public static List<String> loadFactoryNames(Class<?> factoryClass, @Nullable ClassLoader classLoader) {
String factoryClassName = factoryClass.getName();
return (List)loadSpringFactories(classLoader).getOrDefault(factoryClassName, Collections.emptyList());
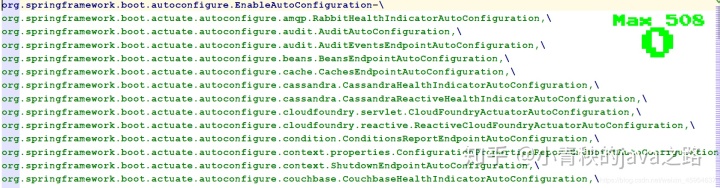
}loadFactoryNames()这个方法中的return (List)loadSpringFactories(classLoader).getOrDefault(factoryClassName, Collections.emptyList()); 调用本类中loadSpringFactories()这个方法中这行代码Enumeration urls = classLoader != null ? classLoader.getResources(“META-INF/spring.factories”) : ClassLoader.getSystemResources(“META-INF/spring.factories”); 读取了META-INF文件夹下的spring.factories这个文件中的所有的所有全类名,保存到集合中,然后遍历将读取的全类名,作为key值,获得对应的一组@Configuration类。
private static Map<String, List<String>> loadSpringFactories(@Nullable ClassLoader classLoader) {
        MultiValueMap<String, String> result = (MultiValueMap)cache.get(classLoader);
        if (result != null) {
            return result;
        } else {
            try {
                Enumeration<URL> urls = classLoader != null ? classLoader.getResources("META-INF/spring.factories") : ClassLoader.getSystemResources("META-INF/spring.factories");
                LinkedMultiValueMap result = new LinkedMultiValueMap();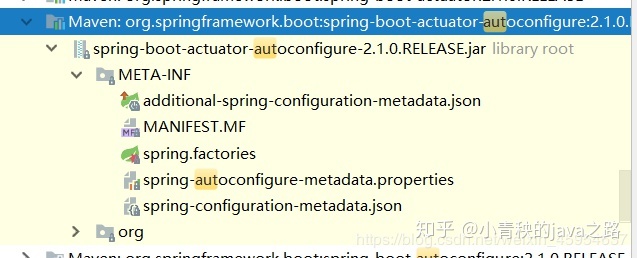
下面是部分spring.factories文件内容:
以redis为例:
@Configuration
@ConditionalOnClass({RedisConnectionFactory.class})
@ConditionalOnBean({RedisConnectionFactory.class})
@ConditionalOnEnabledHealthIndicator("redis")
@AutoConfigureBefore({HealthIndicatorAutoConfiguration.class})
@AutoConfigureAfter({RedisAutoConfiguration.class, RedisReactiveHealthIndicatorAutoConfiguration.class})
public class RedisHealthIndicatorAutoConfiguration extends CompositeHealthIndicatorConfiguration<RedisHealthIndicator, RedisConnectionFactory> {
    private final Map<String, RedisConnectionFactory> redisConnectionFactories;

    public RedisHealthIndicatorAutoConfiguration(Map<String, RedisConnectionFactory> redisConnectionFactories) {
        this.redisConnectionFactories = redisConnectionFactories;
    }

    @Bean
    @ConditionalOnMissingBean(
        name = {"redisHealthIndicator"}
    )
    public HealthIndicator redisHealthIndicator() {
        return this.createHealthIndicator(this.redisConnectionFactories);
    }
}
加载到redis相关的类文件,会根据@ConditionalOnBean()仅仅在当前上下文中存在某个对象时,才会实例化一个Bean
@ConditionalOnClass()某个class位于类路径上,才会实例化一个Bean,经过一系类注解通过执行下面的代码,完成一个对应的bean创建,并将其放到spring的IOC容器中,才实现完成自动装配。
最后非常感谢各位小伙伴的观看!


 8万+
8万+

 被折叠的 条评论
为什么被折叠?
被折叠的 条评论
为什么被折叠?
 到【灌水乐园】发言


