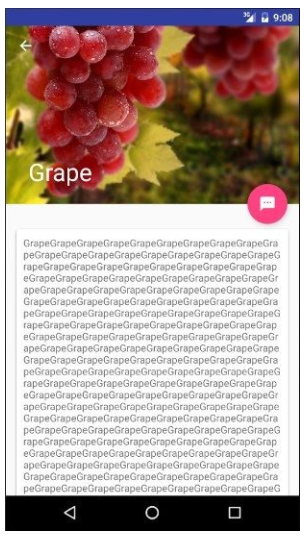
虽说我们现在的标题栏是使用Toolbar来编写的, 不过它看上去和传统的ActionBar其实没什么两样, 只不过可以响应RecyclerView的滚动事件来进行隐藏和显示。 而Material Design中并没有限定标题栏必须是长这个样子的, 事实上, 我们可以根据自己的喜好随意定制标题栏的样式。
顾名思义, CollapsingToolbarLayout是一个作用于Toolbar基础之上的布局, 它也是由DesignSupport库提供的。 CollapsingToolbarLayout可以让Toolbar的效果变得更加丰富, 不仅仅是展示一个标题栏, 而是能够实现非常华丽的效果。
不过, CollapsingToolbarLayout是不能独立存在的, 它在设计的时候就被限定只能作为
AppBarLayout的直接子布局来使用。 而AppBarLayout又必须是CoordinatorLayout的子布局, 因此
本节中我们要实现的功能其实需要综合运用前面所学的各种知识。
首先我们需要一个额外的活动来作为水果的详情展示界面,右击com.example.materialtest包
→New→Activity→Empty Activity, 创建一个FruitActivity, 并将布局名指定成activity_fruit.xml,
然后我们开始编写水果详情展示界面的布局。
由于整个布局文件比较复杂, 这里我准备采用分段编写的方式。 activity_fruit.xml中的内容主要分为两部分, 一个是水果标题栏, 一个是水果内容详情, 我们来一步步实现。
接下来, 我们在CollapsingToolbarLayout中定义标题栏的具体内容, 如下所示:
xmlns:android="http://schemas.android.com/apk/res/android"
xmlns:app="http://schemas.android.com/apk/res-auto"
android:layout_width="match_parent"
android:layout_height="match_parent">
android:id="@+id/appBar"
android:layout_width="match_parent"
android:layout_height="250dp">
android:id="@+id/collapsing_toolbar"
android:layout_width="match_parent"
android:layout_height="match_parent"
android:theme="@style/ThemeOverlay.AppCompat.Dark.ActionBar"
app:contentScrim="?attr/colorPrimary"
app:layout_scrollFlags="scroll|exitUntilCollapsed">
android:id="@+id/fruit_image_view"
android:layout_width="match_parent"
android:layout_height="match_parent"
android:scaleType="centerCrop"
app:layout_collapseMode="parallax" />
android:id="@+id/toolbar"
android:layout_width="match_parent"
android:layout_height="?attr/actionBarSize"
app:layout_collapseMode="pin" />
app:contentScrim属性用于指定CollapsingToolbarLayout在趋于折叠状态以及折叠之后
的背景色, 其实CollapsingToolbarLayout在折叠之后就是一个普通的Toolbar, 那么背景色肯定应
该是colorPrimary了, 具体的效果我们待会儿就能看到。
app:layout_scrollFlags属性我们也是见过的, 只不过之前是给Toolbar指定的, 现在也移到外面来了。
其中, scroll表示CollapsingToolbarLayout会随着水果内容详情的滚动一起滚动,
exitUntilCollapsed 表示当CollapsingToolbarLayout随着滚动完成折叠之后就保留在界面上, 不再移出屏幕。
我们在CollapsingToolbarLayout中定义了一个ImageView和一个Toolbar, 也就意味
着, 这个高级版的标题栏将是由普通的标题栏加上图片组合而成的。 这里定义的大多数属性我
们都是见过的, 就不再解释了, 只有一个app:layout_collapseMode 比较陌生。 它用于指
定当前控件在CollapsingToolbarLayout折叠过程中的折叠模式, 其中Toolbar指定成pin, 表示在折
叠的过程中位置始终保持不变, ImageView指定成parallax, 表示会在折叠的过程中产生一定的
错位偏移, 这种模式的视觉效果会非常好
这样我们就将水果标题栏的界面编写完成了, 下面开始编写水果内容详情部分。 继续修改
activity_fruit.xml中的代码, 如下所示:
xmlns:android="http://schemas.android.com/apk/res/android"
xmlns:app="http://schemas.android.com/apk/res-auto"
android:layout_width="match_parent"
android:layout_height="match_parent">
android:id="@+id/appBar"
android:layout_width="match_parent"
android:layout_height="250dp">
...
android:layout_width="match_parent"
android:layout_height="match_parent"
app:layout_behavior="@string/appbar_scrolling_view_behavior">
水果内容详情的最外层布局使用了一个NestedScrollView, 注意它和AppBarLayout是平级的。 我
们之前在9.2.1小节学过ScrollView的用法, 它允许使用滚动的方式来查看屏幕以外的数据, 而
NestedScrollView在此基础之上还增加了嵌套响应滚动事件的功能。 由于CoordinatorLayout本身
已经可以响应滚动事件了, 因此我们在它的内部就需要使用NestedScrollView或RecyclerView这
样的布局。 另外, 这里还通过app:layout_behavior 属性指定了一个布局行为, 这和之前在
RecyclerView中的用法是一模一样的。
不管是ScrollView还是NestedScrollView, 它们的内部都只允许存在一个直接子布局。 因此, 如果
我们想要在里面放入很多东西的话, 通常都会先嵌套一个LinearLayout, 然后再在LinearLayout
中放入具体的内容就可以了, 如下所示:
android:layout_width="match_parent"
android:layout_height="match_parent"
app:layout_behavior="@string/appbar_scrolling_view_behavior">
android:orientation="vertical"
android:layout_width="match_parent"
android:layout_height="wrap_content">
接下来在LinearLayout中放入具体的内容, 这里我准备使用一个TextView来显示水果的内容详
情, 并将TextView放在一个卡片式布局当中, 如下所示:
android:layout_width="match_parent"
android:layout_height="match_parent"
app:layout_behavior="@string/appbar_scrolling_view_behavior">
android:layout_width="match_parent"
android:layout_height="match_parent"
android:orientation="vertical">
android:layout_width="match_parent"
android:layout_height="wrap_content"
android:layout_marginBottom="15dp"
android:layout_marginLeft="15dp"
android:layout_marginRight="15dp"
android:layout_marginTop="35dp"
app:cardCornerRadius="4dp">
android:layout_width="wrap_content"
android:layout_height="wrap_content"
android:layout_margin="10dp" />
界面完成了之后, 接下来我们开始编写功能逻辑, 修改FruitActivity中的代码, 如下所示:public class FruitActivity extends AppCompatActivity {
public static final String FRUIT_NAME = "fruit_name";
public static final String FRUIT_IMAGE_ID = "fruit_image_id";
@Override
protected void onCreate(Bundle savedInstanceState) {
super.onCreate(savedInstanceState);
setContentView(R.layout.activity_fruit);
Intent intent = getIntent();
String fruitName = intent.getStringExtra(FRUIT_NAME);
int fruitImageId = intent.getIntExtra(FRUIT_IMAGE_ID, 0);
Toolbar toolbar = (Toolbar) findViewById(R.id.toolbar);
CollapsingToolbarLayout collapsingToolbar = (CollapsingToolbarLayout)
findViewById(R.id.collapsing_toolbar);
ImageView fruitImageView = (ImageView) findViewById(R.id.fruit_image_view);
TextView fruitContentText = (TextView) findViewById(R.id.fruit_content_
text);
setSupportActionBar(toolbar);
ActionBar actionBar = getSupportActionBar();
if (actionBar != null) {
actionBar.setDisplayHomeAsUpEnabled(true);
}
collapsingToolbar.setTitle(fruitName);
Glide.with(this).load(fruitImageId).into(fruitImageView);
String fruitContent = generateFruitContent(fruitName);
fruitContentText.setText(fruitContent);
}
private String generateFruitContent(String fruitName) {
StringBuilder fruitContent = new StringBuilder();
for (int i = 0; i
fruitContent.append(fruitName);
}
return fruitContent.toString();
}
@Override
public boolean onOptionsItemSelected(MenuItem item) {
switch (item.getItemId()) {
case android.R.id.home:
finish();
return true;
}
return super.onOptionsItemSelected(item);
}
}
所有工作都完成了吗? 其实还差最关键的一步, 就是处理RecyclerView的点击事件, 不然的话我
们根本就无法打开FruitActivity。 修改FruitAdapter中的代码, 如下所示:public class FruitAdapter extends RecyclerView.Adapter {
...
@Override
public ViewHolder onCreateViewHolder(ViewGroup parent, int viewType) {
if (mContext == null) {
mContext = parent.getContext();
}
View view = LayoutInflater.from(mContext).inflate(R.layout.fruit_item,
parent, false);
final ViewHolder holder = new ViewHolder(view);
holder.cardView.setOnClickListener(new View.OnClickListener() {
@Override
public void onClick(View v) {
int position = holder.getAdapterPosition();
Fruit fruit = mFruitList.get(position);
Intent intent = new Intent(mContext, FruitActivity.class);intent.putExtra(FruitActivity.FRUIT_NAME, fruit.getName());
intent.putExtra(FruitActivity.FRUIT_IMAGE_ID, fruit.getImageId());
mContext.startActivity(intent);
}
});
return holder;
}
...
}


 本文介绍了如何在Android中使用CollapsingToolbarLayout和AppBarLayout结合CoordinatorLayout,实现折叠式标题栏,包括设置背景颜色、滚动标志和折叠模式,以创建丰富的标题栏效果,并展示了在详情页面的布局设计和功能实现。


 1345
1345

 被折叠的 条评论
为什么被折叠?


