 Spring Boot与MyBatis集成


 本文介绍如何在Spring Boot环境中集成MyBatis框架,包括搭建开发环境、配置数据库连接、使用MyBatis Generator自动生成代码及PageHelper实现分页等功能。
正题
本项目使用的环境:
开发工具:Intellij IDEA 2017.1.3
springboot: 1.5.6
jdk:1.8.0_161
maven:3.3.9
额外功能
PageHelper 分页插件
mybatis generator 自动生成代码插件

步骤:
1.创建一个springboot项目:
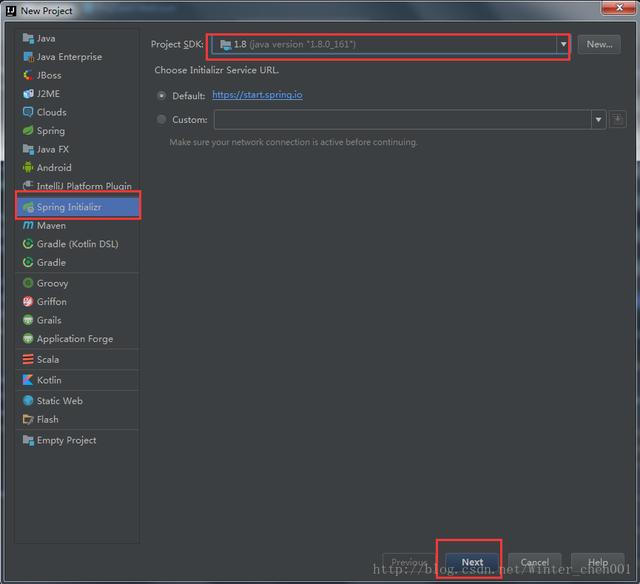
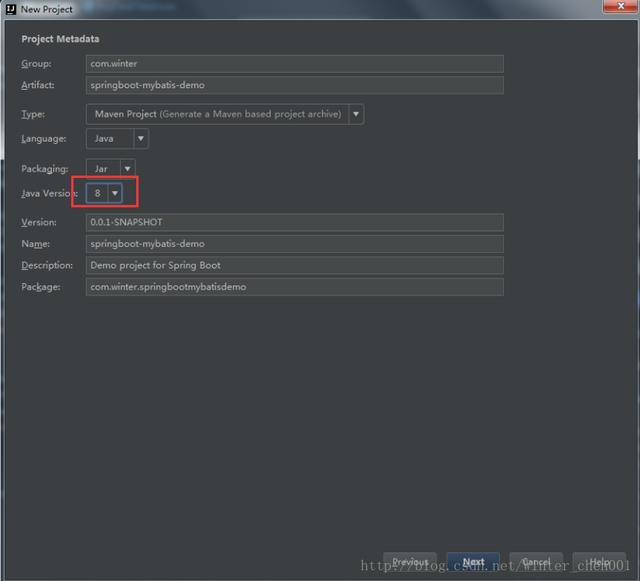
2.创建项目的文件结构以及jdk的版本
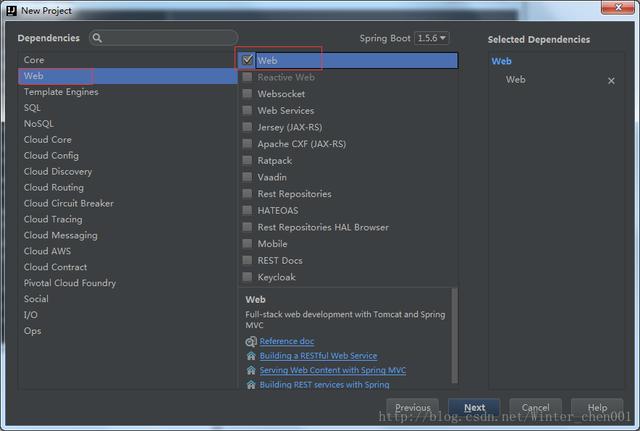
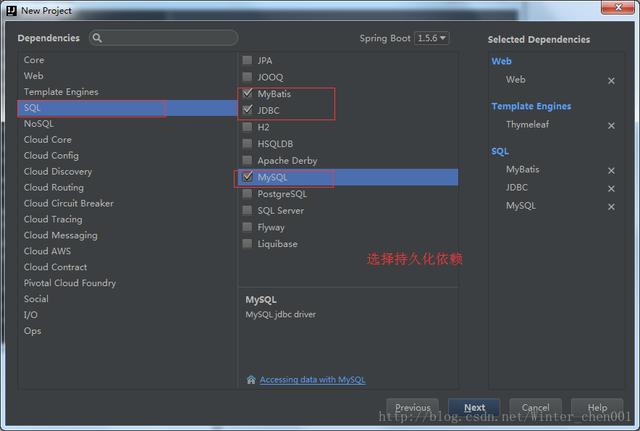
3.选择项目所需要的依赖
然后点击finish
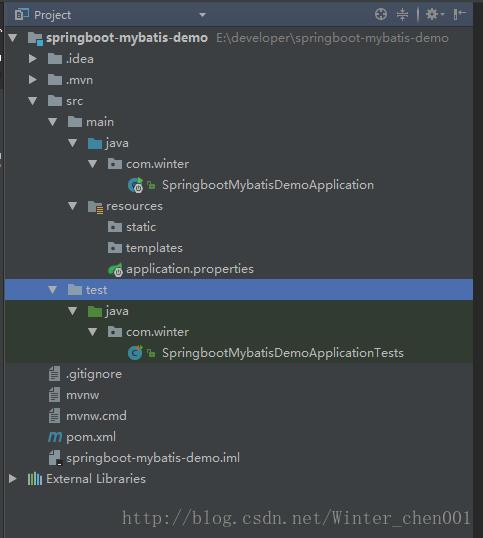
5.看一下文件的结构:
6.查看一下pom.xml:
xsi:schemaLocation="http://maven.apache.org/POM/4.0.0 http://maven.apache.org/xsd/maven-4.0.0.xsd">
4.0.0
com.winter
springboot-mybatis-demo
0.0.1-SNAPSHOT
jar
springboot-mybatis-demo
Demo project for Spring Boot
org.springframework.boot
spring-boot-starter-parent
1.5.6.RELEASE
UTF-8
UTF-8
1.7
org.mybatis.spring.boot
mybatis-spring-boot-starter
1.3.0
org.springframework.boot
spring-boot-starter-thymeleaf
org.springframework.boot
spring-boot-starter-web
org.springframework.boot
spring-boot-starter-test
test
mysql
mysql-connector-java
5.1.35
com.fasterxml.jackson.core
jackson-core
com.fasterxml.jackson.core
jackson-databind
com.fasterxml.jackson.datatype
jackson-datatype-joda
com.fasterxml.jackson.module
jackson-module-parameter-names
com.github.pagehelper
pagehelper-spring-boot-starter
1.1.2
com.alibaba
druid-spring-boot-starter
1.1.0
org.springframework.boot
spring-boot-maven-plugin
org.mybatis.generator
mybatis-generator-maven-plugin
1.3.2
${basedir}/src/main/resources/generator/generatorConfig.xml
true
true
7.项目不使用application.properties文件 而使用更加简洁的application.yml文件:
将原有的resource文件夹下的application.properties文件删除,创建一个新的application.yml配置文件,
文件的内容如下:
server:
port: 8080
spring:
datasource:
name: test
url: jdbc:mysql://127.0.0.1:3306/depot
username: root
password: root
# 使用druid数据源
type: com.alibaba.druid.pool.DruidDataSource
driver-class-name: com.mysql.jdbc.Driver
filters: stat
maxActive: 20
initialSize: 1
maxWait: 60000
minIdle: 1
timeBetweenEvictionRunsMillis: 60000
minEvictableIdleTimeMillis: 300000
validationQuery: select 'x'
testWhileIdle: true
testOnBorrow: false
testOnReturn: false
poolPreparedStatements: true
maxOpenPreparedStatements: 20
## 该配置节点为独立的节点,有很多同学容易将这个配置放在spring的节点下,导致配置无法被识别
mybatis:
mapper-locations: classpath:mapping/*.xml #注意:一定要对应mapper映射xml文件的所在路径
type-aliases-package: com.winter.model # 注意:对应实体类的路径
#pagehelper分页插件
pagehelper:
helperDialect: mysql
reasonable: true
supportMethodsArguments: true
params: count=countSql
8.创建数据库:
CREATE DATABASE mytest;
CREATE TABLE t_user(
user_id INT NOT NULL PRIMARY KEY AUTO_INCREMENT,
user_name VARCHAR(255) NOT NULL ,
password VARCHAR(255) NOT NULL ,
phone VARCHAR(255) NOT NULL
) ENGINE=INNODB AUTO_INCREMENT=1000 DEFAULT CHARSET=utf8;
9.使用mybatis generator 自动生成代码:
- 配置pom.xml中generator 插件所对应的配置文件 ${basedir}/src/main/resources/generator/generatorConfig.xml
/p>
PUBLIC "-//mybatis.org//DTD MyBatis Generator Configuration 1.0//EN"
"http://mybatis.org/dtd/mybatis-generator-config_1_0.dtd">
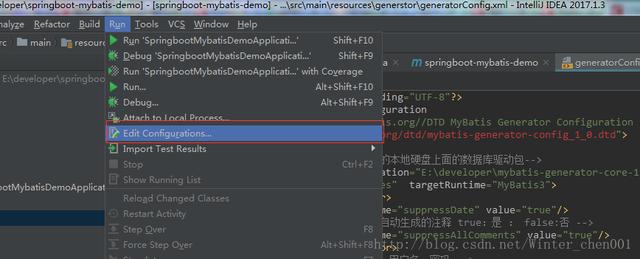
- 点击run-Edit Configurations
- 添加配置
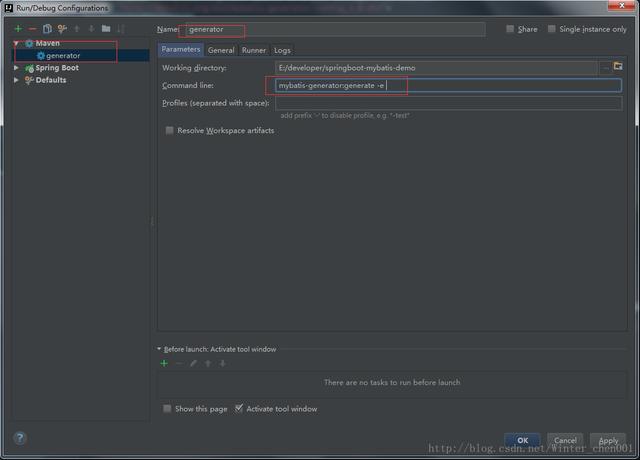
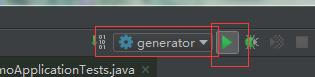
运行
注意!!!同一张表一定不要运行多次,因为mapper的映射文件中会生成多次的代码,导致报错,切记
最后生成的文件以及结构:
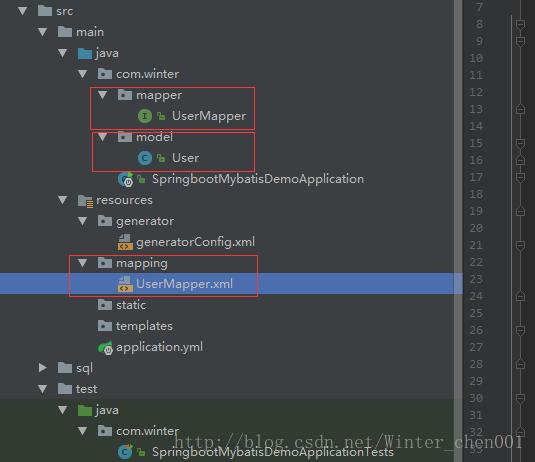
10. 生成的文件
UserMapper.java
package com.winter.mapper;
import com.winter.model.User;
public interface UserMapper {
int deleteByPrimaryKey(Integer userId);
int insert(User record);
int insertSelective(User record);
User selectByPrimaryKey(Integer userId);
int updateByPrimaryKeySelective(User record);
int updateByPrimaryKey(User record);
//这个方式我自己加的
List selectAllUser();
}
User.java
package com.winter.model;
public class User {
private Integer userId;
private String userName;
private String password;
private String phone;
public Integer getUserId() {
return userId;
}
public void setUserId(Integer userId) {
this.userId = userId;
}
public String getUserName() {
return userName;
}
public void setUserName(String userName) {
this.userName = userName == null ? null : userName.trim();
}
public String getPassword() {
return password;
}
public void setPassword(String password) {
this.password = password == null ? null : password.trim();
}
public String getPhone() {
return phone;
}
public void setPhone(String phone) {
this.phone = phone == null ? null : phone.trim();
}
}
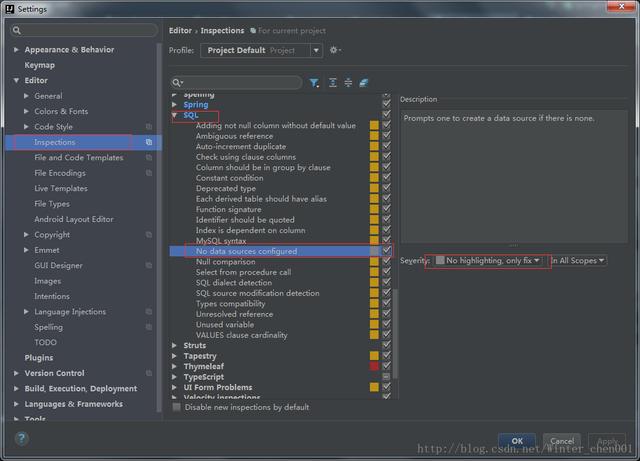
对于sql语句这种黄色的背景,真心是看不下去了(解决方案):
**UserMapper.xml**
user_id, user_name, password, phone
select
from t_user
where user_id = #{userId,jdbcType=INTEGER}
select
from t_user
delete from t_user
where user_id = #{userId,jdbcType=INTEGER}
insert into t_user (user_id, user_name, password,
phone)
values (#{userId,jdbcType=INTEGER}, #{userName,jdbcType=VARCHAR}, #{password,jdbcType=VARCHAR},
#{phone,jdbcType=VARCHAR})
insert into t_user


 502
502

 被折叠的 条评论
为什么被折叠?
被折叠的 条评论
为什么被折叠?
 到【灌水乐园】发言


