


学习笔记----实现底部引导菜单:
1、启动页面

1)布局:
<?xml version="1.0" encoding="utf-8"?>
<RelativeLayout
    xmlns:android="http://schemas.android.com/apk/res/android"
    xmlns:app="http://schemas.android.com/apk/res-auto"
    xmlns:tools="http://schemas.android.com/tools"
    android:layout_width="match_parent"
    android:layout_height="match_parent"
    tools:context="com.atguigu.android.atguigu.MainActivity"
    android:background="#ffffff">

    <ImageView
        android:id="@+id/iv"
        android:layout_centerInParent="true"
        android:layout_width="wrap_content"
        android:layout_height="wrap_content"
        android:src="@drawable/atguigu_logo"/>

    <TextView
        android:textColor="#000000"
        android:textSize="20sp"
        android:layout_centerHorizontal="true"
        android:layout_below="@id/iv"
        android:layout_width="wrap_content"
        android:layout_height="wrap_content"
        android:text="欢迎..."/>

</RelativeLayout>
2)代码:设置两秒之后跳转到主界面
public class WelcomeActivity extends Activity {

    @Override
    protected void onCreate(Bundle savedInstanceState) {
        super.onCreate(savedInstanceState);
        setContentView(R.layout.activity_welcome);

        new Handler().postDelayed(new Runnable() {
            @Override
            public void run() {
                //主线程中执行
                startMainActivity();
            }
        },2000);
    }

    private void startMainActivity() {
        Intent intent = new Intent(this,MainActivity.class);
        startActivity(intent);
        finish();
    }
}
2、主页面
1)布局
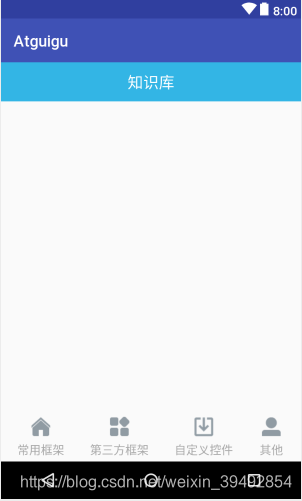
垂直的线性布局,分为三部分,第一部分是标题 titlebar.xml,第二部分是一个FrameLayout,用来加载fragment,第三部分是一个RadioGroup。
<?xml version="1.0" encoding="utf-8"?>
<LinearLayout
    xmlns:android="http://schemas.android.com/apk/res/android"
    xmlns:app="http://schemas.android.com/apk/res-auto"
    xmlns:tools="http://schemas.android.com/tools"
    android:layout_width="match_parent"
    android:layout_height="match_parent"
    tools:context="com.atguigu.android.atguigu.MainActivity"
    android:orientation="vertical">

    <!--标题栏-->
    <include layout="@layout/titlebar"/>

    <!--FrameLayout-->
    <FrameLayout
        android:id="@+id/fl"
        android:layout_width="wrap_content"
        android:layout_height="0dp"
        android:layout_weight="1">

    </FrameLayout>

    <!--底部的RadioGroup-->
    <RadioGroup
        android:id="@+id/rg"
        android:gravity="center_vertical"
        android:orientation="horizontal"
        android:layout_width="match_parent"
        android:layout_height="wrap_content"
        android:padding="5dp">

        <RadioButton
            android:id="@+id/rb_common_frame"
            android:text="常用框架"
            android:drawableTop="@drawable/rb_common_frame_drawable_selector"
            style="@style/bottom_tag_style"
            />
        <RadioButton
            android:id="@+id/rb_thirdparty"
            android:text="第三方框架"
            android:drawableTop="@drawable/rb_thirdparty_drawable_selector"
            style="@style/bottom_tag_style"
            />
        <RadioButton
            android:id="@+id/rb_custom"
            android:text="自定义控件"
            android:drawableTop="@drawable/rb_custom_drawable_selector"
            style="@style/bottom_tag_style"
            />
        <RadioButton
            android:id="@+id/rb_other"
            android:text="其他"
            android:drawableTop="@drawable/rb_other_drawable_selector"
            style="@style/bottom_tag_style"
            />

    </RadioGroup>

</LinearLayout>
titlebar.xml
<?xml version="1.0" encoding="utf-8"?>
<LinearLayout xmlns:android="http://schemas.android.com/apk/res/android"
    android:orientation="horizontal"
    android:layout_width="match_parent"
    android:layout_height="50dp"
    android:background="@android:color/holo_blue_light"
    android:gravity="center">

    <TextView
        android:layout_width="wrap_content"
        android:layout_height="wrap_content"
        android:text="知识库"
        android:textSize="20sp"
        android:textColor="@android:color/white"/>

</LinearLayout>
以bottom_textcolor_drawable_selector.xml为例:
<?xml version="1.0" encoding="utf-8"?>
<selector xmlns:android="http://schemas.android.com/apk/res/android">
    <item android:state_checked="true" android:color="@android:color/holo_blue_light"/>
    <item android:state_checked="false" android:color="@android:color/darker_gray"/>
</selector>
设置选中的时候是蓝色,未选中是灰色。
以rb_common_frame_drawable_selector.xml为例:
<?xml version="1.0" encoding="utf-8"?>
<selector xmlns:android="http://schemas.android.com/apk/res/android">
    <item android:state_checked="true" android:drawable="@drawable/ic_tab_video_press"/>
    <item android:state_checked="false" android:drawable="@drawable/ic_tab_video"/>
</selector>
设置选中的时候是一张蓝色的图片,未选中的时候是一张灰色的图片。
style="@style/bottom_tag_style" ----把相同的代码写在style.xml中
    <style name="bottom_tag_style" >
        <!-- Customize your theme here. -->
        <item name="android:gravity">center</item>
        <item name="android:layout_weight">1</item>
        <item name="android:drawablePadding">3dp</item>
        <item name="android:button">@android:color/transparent</item>
        <item name="android:textColor">@drawable/bottom_textcolor_drawable_selector</item>
        <item name="android:textSize">15sp</item>
        <item name="android:layout_width">wrap_content</item>
        <item name="android:layout_height">wrap_content</item>
    </style>
3、创建各个子页面
1)创建一个基类BaseFragment
一个公共类,CommonFrameFragment,ThirdPartyFragment,CustomFragment,OtherFragment等都要继承该类。
public abstract class BaseFragment extends Fragment{
    protected Context mContext;

    @Override
    public void onCreate(@Nullable Bundle savedInstanceState) {
        super.onCreate(savedInstanceState);
        mContext = getActivity();
    }

    @Nullable
    @Override
    public View onCreateView(LayoutInflater inflater, @Nullable ViewGroup container, @Nullable Bundle savedInstanceState) {
        return initView();
    }

    //强制子类重写,实现子类特有的UI
    protected abstract  View initView();

    @Override
    public void onActivityCreated(@Nullable Bundle savedInstanceState) {
        super.onActivityCreated(savedInstanceState);
        initData();
    }

    //当孩子需要需要初始化数据,联网请求绑定数据,展示数据等等 可以重写该方法
    protected void initData(){

    }
}
2)定义各个子页面
CommonFrameFragment.java
public class CommonFrameFragment extends BaseFragment {
    private static final String TAG =CustomFragment.class.getSimpleName();
    private TextView textView;
    @Override
    protected View initView() {
        Log.w(TAG,"常用框架initView()");
        textView = new TextView(mContext);
        textView.setTextSize(20);
        textView.setGravity(Gravity.CENTER);
        textView.setTextColor(Color.RED);
        return textView;
    }

    @Override
    protected void initData() {
        Log.w(TAG,"常用框架initData()");
        textView.setText("常用框架");
        super.initData();
    }
}
其他类似...
3)初始化fragment
//初始化fragment
initFragment();
private void initFragment() {
baseFragments = new ArrayList<>();
baseFragments.add(new CommonFrameFragment());//常用框架fragment
baseFragments.add(new ThirdPartyFragment());//第三方fragment
baseFragments.add(new CustomFragment());//自定义fragment
baseFragments.add(new OtherFragment());//其他fragment
}4)设置RadioGroup的监听
//设置RadioGroup的监听
setListener();
private void setListener() {
rg.setOnCheckedChangeListener(new MyOnCheckedChangeListener());
//默认选中第一个
rg.check(R.id.rb_common_frame);
}
    class MyOnCheckedChangeListener implements RadioGroup.OnCheckedChangeListener{
        @Override
        public void onCheckedChanged(RadioGroup group, int checkedId) {
            switch (checkedId){
                case R.id.rb_common_frame://常用框架
                    position = 0;
                    break;
                case R.id.rb_thirdparty://第三方
                    position = 1;
                    break;
                case R.id.rb_custom://自定义
                    position = 2;
                    break;
                case R.id.rb_other://其他
                    position = 3;
                    break;
                default:
                    position = 0;
                    break;
            }

            //根据位置得到对应的fragment
            BaseFragment to = getFragment();
            //替换
            switchFragment(to);
        }
    }
5)得到fragment
    public BaseFragment getFragment() {
        BaseFragment fragment = baseFragments.get(position);
        return fragment;
    }
6)切换fragment
    private void switchFragment(BaseFragment fragment) {
        //1.得到fragmentManager
        FragmentManager fragmentManager = getSupportFragmentManager();
        //2.开启事务
        FragmentTransaction transaction = fragmentManager.beginTransaction();
        //3.替换
        transaction.replace(R.id.fl,fragment);
        //4.提交事务
        transaction.commit();
    }
4、出现的问题
1)解决切换fragment导致重新创建fragment的问题
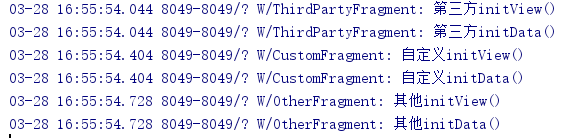
问题:上面切换fragment的方法会导致fragment重建。
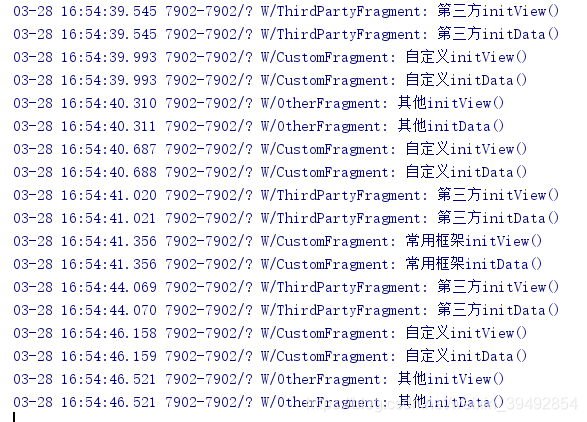
解决:设置两个fragment对象,一个(from)表示刚刚显示的fragment,即将要被替换掉。一个(to)表示即将要显示的fragment。
//替换
switchFragment(mFragment,to);
用show()和add()代替原来的replay()。首先判断有没有添加,如果没有,就添加to,隐藏from。如果有,就显示to。隐藏from。
    private void switchFragment(Fragment from, Fragment to) {
        //如果两个fragment不相等才切换,相等就不用切换了
        if(from != to){
            //1.得到fragmentManager
            FragmentManager fragmentManager = getSupportFragmentManager();
            //2.开启事务
            FragmentTransaction transaction = fragmentManager.beginTransaction();
            mFragment = to;
            //判断有没有被添加
            if(!to.isAdded()) {
                //to没有被添加
                //掩藏from
                if (from != null) {
                    transaction.hide(from);
                }
                //添加to
                if (to != null) {
                    transaction.add(R.id.fl, to).commit();
                }
            }else {
                    //to已经被添加
                    //隐藏from
                    if (from != null) {
                        transaction.hide(from);
                    }
                    //显示to
                    if (to != null) {
                        transaction.show(to).commit();
                    }
                }
        }
    }
只创建一次:
2)解决横竖屏切换fragment导致内容重叠的问题
问题:横竖屏切换fragment导致内容重叠
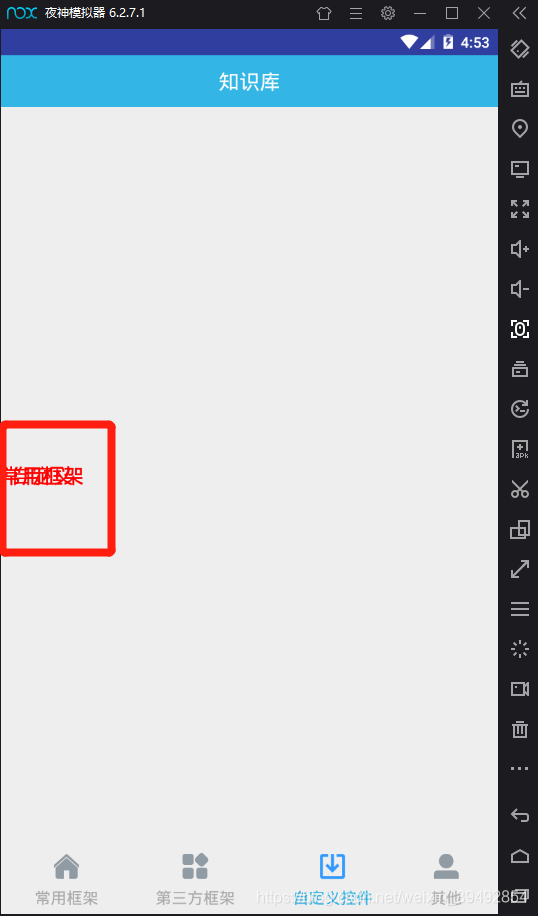
解决:在AndroidManifest.xml中添加:
<activity android:name=".MainActivity"
          android:configChanges="orientation|screenSize|keyboardHidden">
</activity>
5、源码
链接:https://pan.baidu.com/s/1DvFsEJEObIrsE8LQz8aTYw
提取码:ks3o


 966
966

 被折叠的 条评论
为什么被折叠?
被折叠的 条评论
为什么被折叠?
 到【灌水乐园】发言


