


 本文详细介绍了如何使用Composer安装Yii2框架,包括配置国内镜像源、初始化项目、数据库配置及迁移等步骤,并提供了Apache虚拟主机配置示例。
准备工作:
1:本示例通过 Composer 安装框架,未安装Composer的童鞋请参考地址安装:https://www.runoob.com/w3cnote/composer-install-and-usage.html
2:也可以直接下载Composer安装:https://getcomposer.org/Composer-Setup.exe
3:如果您之前已安装 Composer,请确保使用最新版本。 您可以通过运行 composer self-update 来更新Composer。
4:接下来我们可以更改 Packagist 为国内镜像:composer config -g repo.packagist composer https://packagist.laravel-china.org 设置国内服务器,不然下载很慢! 2019-05-21_114657.png

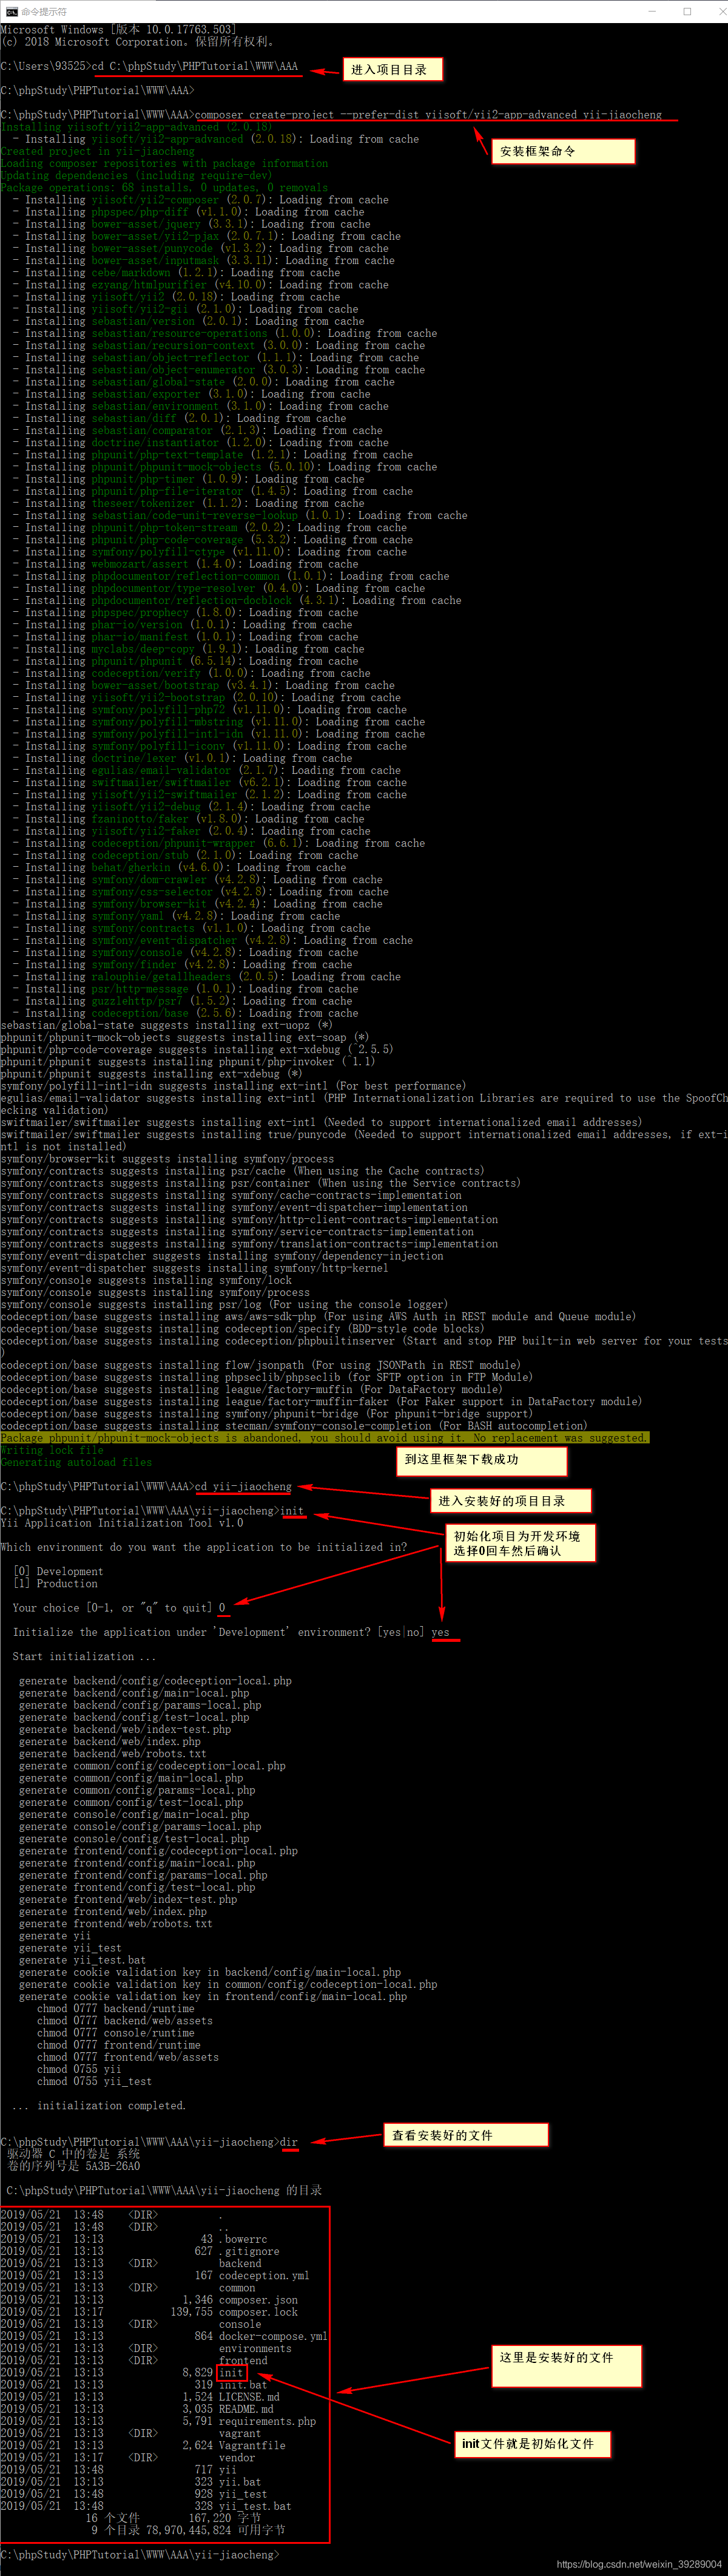
开始安装框架:
1:cmd进入我们想要存放项目的web目录 cd C:\phpStudy\PHPTutorial\WWW\AAA(这是我要安装的目录);
2:键入命令:composer create-project --prefer-dist yiisoft/yii2-app-advanced yii-application (yii-application是项目名,没有的话可以自动创建 );
3:安装框架完成,初始化项目命令:init ;初始化环境为开发环境命令:选择0;选择yes;
4:接下来新建一个数据库,编辑器打开安装好的项目文件common\config\main-local.php文件配置数据库信息
‘class’ => ‘yii\db\Connection’,
‘dsn’ => ‘mysql:host=localhost;dbname=数据库名’,
‘username’ => ‘用户名’,
‘password’ => ‘密码’,
‘charset’ => ‘utf8’,
5:回到命令提示符界面,执行命令:yii migrate 数据库迁移;然后数据库会多出两张表,一张用户表,一张迁移表 6:设置Web服务器的文档根目录;
对于前端 /path/to/yii-application/frontend/web/ 并且使用URL http://frontend.test/ 对于后端 /path/to/yii-application/backend/web/ 并且使用URL http://backend.test/ 对于Apache,使用如下配置: (这里的话我说一下,我个人强烈建议web配置推荐使用官方配置,因为这对搭建YII RESTful API服务非常友好,这里可以直接影响RESTful API接口是否正常工作,如下就是官方配置)
<VirtualHost *:80>
ServerName frontend.test
DocumentRoot “C:\phpStudy\PHPTutorial\WWW\AAA\yii-jiaocheng\frontend\web”
<Directory "C:\phpStudy\PHPTutorial\WWW\AAA\yii-jiaocheng\frontend\web">
    # use mod_rewrite for pretty URL support
    RewriteEngine on
    # If a directory or a file exists, use the request directly
    RewriteCond %{REQUEST_FILENAME} !-f
    RewriteCond %{REQUEST_FILENAME} !-d
    # Otherwise forward the request to index.php
    RewriteRule . index.php

    # use index.php as index file
    DirectoryIndex index.php

    # ...other settings...
</Directory>
<VirtualHost *:80>
ServerName backend.test
DocumentRoot “C:\phpStudy\PHPTutorial\WWW\AAA\yii-jiaocheng\backend\web”
<Directory "C:\phpStudy\PHPTutorial\WWW\AAA\yii-jiaocheng\backend\web">
    # use mod_rewrite for pretty URL support
    RewriteEngine on
    # If a directory or a file exists, use the request directly
    RewriteCond %{REQUEST_FILENAME} !-f
    RewriteCond %{REQUEST_FILENAME} !-d
    # Otherwise forward the request to index.php
    RewriteRule . index.php

    # use index.php as index file
    DirectoryIndex index.php

    # ...other settings...
</Directory>
Windows: c:\Windows\System32\Drivers\etc\hosts
添加
127.0.0.1 frontend.test
127.0.0.1 backend.test
8:到这里整个框架安装完成;浏览器输入 http://frontend.test/ ,注册一个账号,这里注册好的账号是登陆不了的,因为账户需要邮箱验证才可以,但是我们新安装好的框架没有邮箱验证,所只能下黑手了,直接用工打开我们数据库用户表找到我们注册的用户,把状态值改为10就可以登录了


 被折叠的 条评论
为什么被折叠?
被折叠的 条评论
为什么被折叠?
 到【灌水乐园】发言


