


 本文详细介绍了Spring框架的核心功能,包括IoC(控制反转)、AOP(面向切面编程),以及如何使用Spring简化MyBatis。讲解了Spring环境搭建、创建对象、依赖注入、面向切面编程的实现方式,如Schema-based和AspectJ,并提供了实际操作步骤和配置文件示例。
Spring框架以及官方压缩包目录介绍
- 主要发明者:Rod Johnson
- 轮子理论推崇者:
2.1 轮子理论:不要重复发明轮子
2.2 IT行业:直接使用写好的代码 - Spring框架宗旨:不重新发明技术,让原有技术使用起来更方便
- Spring几大核心功能:
4.1 IoC/DI:控制反转/依赖注入
4.2 AOP:面向切面编程
4.3 声明式事务 - Spring框架Runtime
5.1 test:Spring提供的测试功能
5.2 Core Container:核心容器。Spring启动基本条件
······5.2.1 Beans:Spring负责创建类对象并管理
······5.2.2 Core:核心类
······5.2.3 Context:上下文参数,获取外部资源或管理注解等
······5.2.4 SpEl:expression.jar
5.3 AOP:实现aop功能需要依赖
5.4 Aspect:切面。AOP依赖的包
5.5 Data Access/Integration:Spring封装数据访问层的相关内容
······5.5.1 JDBC:Spring对JDBC封装后的代码
······5.5.2 ORM:封装了持久层框架代码,例如Hibernate
······5.5.3 transaction:对应spring-tx.jar,声明事务时使用
5.6 WEB:需要Spring完成web相关功能时
······5.6.1 例如:由tomcat加载Spring配置文件时需要有springp-web包

- Spring框架中重要概念
6.1 容器(Container):Spring当作一个大容器
6.2 BeanFactory接口(老版本)
·······6.2.1 新版本中ApplicationContext接口,是BeanFactory子接口,具有BeanFactory所有功能 - 从Spring3开始把Spring框架拆分成多个jar
7.1 Spring2及以前就一个jar
IoC
- 中文名称:控制反转
- 英文名称:Inversion of Control
- IoC是什么?(Spring中)
3.1 IoC完成的事情:原先有程序员主动通过new实例化对象的事情,交给Spring负责。
3.2 控制反转中控制指:控制类的对象
3.3 控制反转中的反转指:转交给Spring负责
3.4 IoC最大作用:解耦
······3.4.1 程序员不需要管理对象,解除了对象管理和程序员之间的耦合。
Spring环境搭建
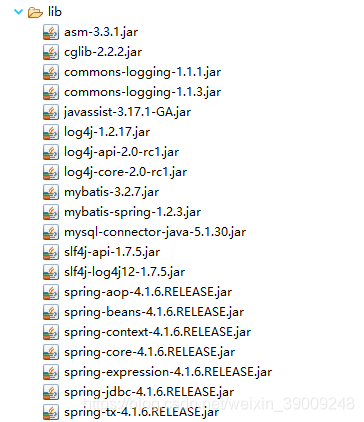
- 导入jar包
1.1 四个核心包一个日志包

- 在src下新建applicationContext.xml
2.1 文件名称和路径自定义
2.2 起上述名称为了记住Spring容器ApplicationContext,applicationContext.xml配置信息最终存储到了该容器中
2.3 Spring的配置文件基于Schema
······2.3.1 schema文件的扩展名.xsd
······2.3.2 把schema理解成DTD(xml语法检查器)升级版
···········2.3.2.1 比DTD具备更好的扩展性
······2.3.3 每次引入一个xsd文件时,其实是一个namespace(xmlns)
2.4 使用基本功能时,配置文件中只需要引入基本schema
······2.4.1 通过<bean>来创建对象
······2.4.1 默认配置文件被加载时创建对象
<?xml version="1.0" encoding="UTF-8"?>
<beans xmlns="http://www.springframework.org/schema/beans"
    xmlns:xsi="http://www.w3.org/2001/XMLSchema-instance"
    xsi:schemaLocation="http://www.springframework.org/schema/beans
        http://www.springframework.org/schema/beans/spring-beans.xsd">
	<!-- id表示获取到对象的标识
		class表示需要创建那个类的对象
	 -->
	<bean id="peo" class="com.sxt.pojo.People"></bean>
</beans>
- 编写测试方法
3.1 getBean(“bean标签id值”,“返回值类型”):如果没有指定第二个参数,默认返回Object
3.2 getBeanDefinitionNames():Spring容器中目前所管理的所有对象
public class Test {
	public static void main(String[] args) {
		ApplicationContext ac=new ClassPathXmlApplicationContext("applicationContext.xml");
		People people = ac.getBean("peo",People.class);
		System.out.println(people);
		People people1 = ac.getBean("peo",People.class);
		System.out.println(people1);
		people1.setName("张三");
		System.out.println(people.equals(people1));

		System.out.println(people+"---"+people1);

		String[] names = ac.getBeanDefinitionNames();
		for (String string : names) {
			System.out.println(string);
		}
	}
}
运行结果:
People [id=0, name=null]
People [id=0, name=null]
true
People [id=0, name=张三]---People [id=0, name=张三]
peo
Spring创建对象的三种方式
- 通过构造方法创建
1.1 无参构造创建:默认情况
1.2 有参构造创建:需要明确配置
······1.2.1 需要在类中提供有参构造方法
······1.2.2 在applicationContext.xml中设置调用哪个构造方法创建对象
···········1.2.2.1 如果设定的条件匹配多个构造方法,则会执行代码中最后的构造方法
···········1.2.2.2 index:表示参数的索引,从0开始
···········1.2.2.3 name:表示参数名
···········1.2.2.4 type:表示参数类型(区分关键字和封装类,如int和Integer)
<?xml version="1.0" encoding="UTF-8"?>
<beans xmlns="http://www.springframework.org/schema/beans"
    xmlns:xsi="http://www.w3.org/2001/XMLSchema-instance"
    xsi:schemaLocation="http://www.springframework.org/schema/beans
        http://www.springframework.org/schema/beans/spring-beans.xsd">
	<!-- id表示获取到对象的标识
		class表示需要创建那个类的对象
	 -->
	<bean id="peo" class="com.sxt.pojo.People">
		<!-- ref引用另一个bean(对象) value基本数据类型或字符串等 -->
		<!-- <constructor-arg index="0" value="123"></constructor-arg>
		<constructor-arg index="1" value="张三" ></constructor-arg> -->
		<constructor-arg name="id" value="123" type="int"></constructor-arg>
		<constructor-arg name="name" value="张三" type="java.lang.String" ></constructor-arg>
	</bean>
</beans>
- 实例工厂
2.1 工厂设计模式:帮助创建类对象,一个工厂可以生产多个对象
2.2 实例工厂:需要先创建工厂,才能生产对象
2.3 实现步骤:
······2.3.1 必须要有一个实例工厂
public class PeopleFactory {
	public People newInstance() {
		return new People(3,"测试");
	}
}
······2.3.2 在applicationContext.xml中配置工厂对象和需要创建的对象
<bean id="factory" class="com.sxt.pojo.PeopleFactory"></bean>
<bean id="peo1" factory-bean="factory" factory-method="newInstance"></bean>
- 静态工厂
3.1 不需要创建工厂,快速创建对象
3.2 实现步骤:
······3.2.1 编写一个静态工厂(在方法上添加staitc)
public class PeopleFactory {
	public static People newInstance() {
		return new People(3,"测试");
	}
}
······3.2.2 在applicationContext.xml中配置
<!-- 静态工厂方式 -->
<bean id="peo2" class="com.sxt.pojo.PeopleFactory"  factory-method="newInstance"></bean>
如何给bean的属性赋值(注入)
- 通过构造方法设置值
- 设置注入(通过set方法)
2.1 如果属性是基本数据类型或String等简单
	<bean id="peo" class="com.sxt.pojo.People">
		<property name="id" value="222"></property>
		<property name="name" value="张三"></property>
	</bean>
·········2.1.1 等效于
<bean id="peo" class="com.sxt.pojo.People">
	<property name="id">
		<value>2222</value>
	</property>
	<property name="name">
		<value>张三</value>
	</property>
</bean>
2.2 如果属性是Set<?>
<property name="sets">
	<set>
		<value>11</value>
		<value>12</value>
		<value>13</value>
		<value>14</value>
	</set>
</property>
2.3 如果属性是List<?>
<property name="list">
	<list>
		<value>1</value>
		<value>2</value>
		<value>3</value>
	</list>
</property>
··········2.3.1 如果list中只有一个值可以
<property name="list" value="1"></property>
2.4 如果属性是数组
<property name="strs">
	<array>
		<value>4</value>
		<value>5</value>
		<value>6</value>
	</array>
</property>
··········2.4.1 如果数组中只有一个值可以通过value属性赋值
2.5 如果属性是map
<property name="map">
	<map>
		<entry key="key1" value="a"></entry>
		<entry key="key2" value="b"></entry>
	</map>
</property>
2.4 如果属性是Properties类型
<property name="demo">
	<props>
		<prop key="key1">value1</prop>
		<prop key="key2">value2</prop>
	</props>
</property>
DI
- DI:中文名称:依赖注入
- 英文名称:(Dependency Injection)
- DI是什么?
3.1 DI是IoC是一样的
3.2 当一个类(A)中需要依赖另一个类(B)对象时,把B赋值给A的过程就叫做依赖注入 - 代码体现:(People类中依赖Desk类对象,属性名为:desk)
<bean id="peo" class="com.sxt.pojo.People">
	<property name="desk" ref="desk"></property>
</bean>
<bean id="desk" class="com.sxt.pojo.Desk">
	<property name="id" value="1"></property>
	<property name="price" value="12"></property>
</bean>
使用Spring简化MyBatis
- 导入mybatis所有jar和spring基本包以及spring-jdbc,spring-tx,spring-aop,spring整合mybatis的包等
- 编写spring配置文件:applicationContext.xml
<?xml version="1.0" encoding="UTF-8"?>
<beans xmlns="http://www.springframework.org/schema/beans"
    xmlns:xsi="http://www.w3.org/2001/XMLSchema-instance"
    xsi:schemaLocation="http://www.springframework.org/schema/beans
        http://www.springframework.org/schema/beans/spring-beans.xsd">
	<!-- 数据源封装类。数据源就是获取数据库连接的 ,spring-jdbc.jar中-->
	<bean id="dataSource" class="org.springframework.jdbc.datasource.DriverManagerDataSource">
		<property name="driverClassName" value="com.mysql.jdbc.Driver"></property>
		<property name="url" value="jdbc:mysql://localhost:3306/ssm"></property>
		<property name="username" value="mysqlUser001"></property>
		<property name="password" value="123456"></property>
	</bean>
	<!-- 创建SqlSessionFactory对象 -->
	<bean id="factory" class="org.mybatis.spring.SqlSessionFactoryBean">
		<!-- 数据库连接信息来源于dataSource -->
		<property name="dataSource" ref="dataSource"></property>
	</bean>
	<!-- 扫描器 相当于mybatis.xml中mappers下的package标签,扫描com.sxt.mapper包后会给接口创建对象 -->
	<bean class="org.mybatis.spring.mapper.MapperScannerConfigurer">
		<!-- 要扫描哪个包 -->
		<property name="basePackage" value="com.sxt.mapper"></property>
		<!-- 和factory产生关系 -->
		<property name="sqlSessionFactory" ref="factory"></property>
	</bean>
	<!-- 由spring管理airportService实现类 -->
	<bean id="airportService" class="com.sxt.service.impl.AirportServiceImpl" >
		<property name="airportMapper" ref="airportMapper"></property>
	</bean>
</beans>
- 编写代码:
3.1 正常编写pojo
3.2 编写mapper包下时,必须使用接口绑定方案或注解方案(必须有接口)
3.3 正常编写Service接口以及其实现类
······3.3.1 需要在Service实现类中声明mapper接口对象,并生成set/get方法(spring注入需要)
······3.3.2 需要通过以下步骤获取到service对象
··········3.3.2.1 在web.xml中配置
<?xml version="1.0" encoding="UTF-8"?>
<web-app version="3.1" xmlns="http://xmlns.jcp.org/xml/ns/javaee" xmlns:xsi="http://www.w3.org/2001/XMLSchema-instance" xsi:schemaLocation="http://xmlns.jcp.org/xml/ns/javaee                       http://xmlns.jcp.org/xml/ns/javaee/web-app_3_1.xsd">

	<!-- 上下文参数 -->
	<context-param>
		<param-name>contextConfigLocation</param-name>
		<!-- Spring配置文件 -->
		<param-value>classpath:applicationContext.xml</param-value>
	</context-param>
	<!-- 封装了一个监听器,帮助加载Spring的配置文件 -->
	<listener>
		<listener-class>org.springframework.web.context.ContextLoaderListener</listener-class>
	</listener>
</web-app>
··········3.3.2.2 在servlet中
@WebServlet("/airport")
public class AirportServlet extends HttpServlet{
	private AirportService airportService;

	@Override
	public void init() throws ServletException {
		//对service实例化
		//Spring和web整合后所有的信息都在WebApplicationContext
		//web.xml中配置了spring的配置文件,且tomcat内置对象applicationContext包含了所有的web.xml信息
		//,故需要传入getServletContext(),从中获取到WebApplicationContext
		ApplicationContext ac = WebApplicationContextUtils.getRequiredWebApplicationContext(getServletContext());
		airportService = ac.getBean("airportService",AirportServiceImpl.class);
	}
	@Override
	protected void service(HttpServletRequest req, HttpServletResponse resp) throws ServletException, IOException {
		req.setAttribute("list", airportService.show());
		req.getRequestDispatcher("index.jsp").forward(req, resp);
		return;
	}
}
3.4 spring无法管理Servlet
AOP
- AOP:中文名称:面向切面编程
- 英文名称:Aspect oriented Programming
- 正常程序执行流程都是纵向执行流程
3.1 在原有纵向执行流程中,添加横切面,又叫面向切面编程
3.2 不需要修改原有程序代码
······3.2.1 高扩展性
······3.2.2 原有功能相当于释放了部分逻辑,让自责更加明确。
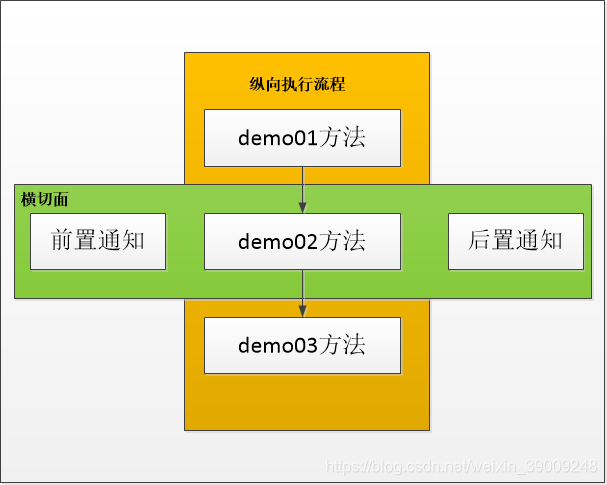
- 面向切面编程:在程序原有纵向执行流程中,针对某一个或一些方法添加通知,形成横切面的过程,就叫做面向切面编程。
- 常用概念:
5.1 原有功能:切点,pointcut
5.2 前置通知:在切点之前执行的功能,before advice
5.3 后置通知:在切点之后执行的功能,after advice
5.4 如果切点执行过程中出现异常,会出发异常通知:throw advice
5.5 所有功能的总称叫做切面。
5.6 织入:把切面嵌入原有功能的过程叫做织入 - spring提供了2中AOP实现方式
6.1 Schema-based
······6.1.1 每个通知都需要实现接口或类
······6.1.2 配置spring配置文件时在aop:config\子标签aop:pointcut\(配置切点)以及aop:advisor\(配置通知)
6.2 AspectJ
······6.2.1 每个通知不需要实现接口或类
······6.2.2 配置spring配置文件时在aop:config\子标签aop:aspect\中配置
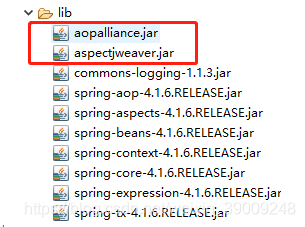
Schema-based实现步骤
- 导入jar包
- 新建通知类
2.1 新建前置通知类
·····2.1.1 arg0:切点方法对象,Method对象
·····2.1.2 arg1:切点方法参数
·····2.1.3 arg2:切点在所属对象
public class MyBeforeAdvice implements MethodBeforeAdvice {
	@Override
	public void before(Method arg0, Object[] arg1, Object arg2) throws Throwable {
		System.out.println("执行前置通知");
	}
}
	2.2 新建后置通知类
		2.2.1 arg0:切点方法的返回值
		2.2.2 arg1:切点方法对象
		2.2.3 arg2:切点方法参数
		2.2.4 arg3:切点方法所属类对象
public class MyAfterAdvice implements AfterReturningAdvice{
	@Override
	public void afterReturning(Object arg0, Method arg1, Object[] arg2, Object arg3) throws Throwable {
		System.out.println("执行后置通知");
	}
}
- 配置spring配置文件
3.1 引入aop命名空间
3.2 配置通知类的bean
3.3 配置切面:配置切点,配置通知并引入通知类的bean
3.4 *:通配符,匹配任意方法名,任意类名,任意一级包名
3.5 如果希望匹配任意方法参数:(…)
<?xml version="1.0" encoding="UTF-8"?>
<beans xmlns="http://www.springframework.org/schema/beans"
    xmlns:xsi="http://www.w3.org/2001/XMLSchema-instance"
    xmlns:aop="http://www.springframework.org/schema/aop"
    xsi:schemaLocation="http://www.springframework.org/schema/beans
        http://www.springframework.org/schema/beans/spring-beans.xsd
        http://www.springframework.org/schema/aop
        http://www.springframework.org/schema/aop/spring-aop.xsd">
    <!-- 配置通知类的对象,在切面中引入 -->
	<bean id="mybefore" class="com.sxt.advice.MyBeforeAdvice"></bean>
	<bean id="myafter" class="com.sxt.advice.MyAfterAdvice"></bean>

	<!-- 配置切面 -->
	<aop:config>
		<!-- 配置切点 -->
		<aop:pointcut expression="execution(* com.sxt.test.Demo.demo02())" id="mypoint"/>
		<!-- 配置前后通知 -->
		<aop:advisor advice-ref="mybefore" pointcut-ref="mypoint"/>
		<aop:advisor advice-ref="myafter" pointcut-ref="mypoint"/>
	</aop:config>
	<!-- 配置切点所在的demo类,用于测试 -->
	<bean id="demo" class="com.sxt.test.Demo"></bean>
</beans>
- 编写测试代码
public class Test {
	public static void main(String[] args) {
		ApplicationContext ac=new ClassPathXmlApplicationContext("applicationContext.xml");
		Demo demo = ac.getBean("demo",Demo.class);
		demo.demo01();
		demo.demo02();
		demo.demo03();
	}
}
运行结果:
demo01
执行前置通知
demo02
执行后置通知
demo03
配置异常通知的步骤(AspectJ方式)
- 只有当切点报异常才能触发异常通知
- 在spring中AspectJ方式提供了异常通知的办法。
2.1 如果希望通过schema-based方式实现需要按照特定的要求自己编写方法。 - 实现步骤:
3.1 新建类:在类中写任意名称的方法
public class MyThrowAdvice{
	public void myexception(Exception e) {
		System.out.println("执行异常通知,异常message:"+e.getMessage());
	}
}
	3.2 在spring配置文件中配置
		3.2.1 关于<aop:aspect>中ref属性:表示方法在哪个类中
		3.2.2 所有的<aop:xxxxx>标签,就表示xxxx通知
		3.2.3 method:当触发这个通知时调用哪个方法
		3.2.4 throwing:表示异常对象名,必须和通知中方法参数名相同(可以不在通知声明异常对象!!!也就是说异常通知方法参数中可以不声明)
<bean id="mythrow" class="com.sxt.advice.MyThrowAdvice"></bean>
<aop:config>
	<aop:aspect ref="mythrow">
		<aop:pointcut expression="execution(* com.sxt.test.Demo.demo01())" id="mypoint"/>
		<aop:after-throwing method="myexception" pointcut-ref="mypoint" throwing="e"/>
	</aop:aspect>
</aop:config>
<bean id="demo" class="com.sxt.test.Demo"></bean>
配置异常通知的步骤(Schema-based方式)
- 新建一个类,实现ThrowsAdvice接口
1.1 必须自己写方法,且必须叫afterThrowing
1.2 两种参数方式:
······1.2.1 必须是1个或4个
1.3 异常类型要与切点报的异常一致
public class MyThrow implements ThrowsAdvice {
//	public void afterThrowing(Exception ex) throws Throwable {
//		System.out.println("执行异常通知-schema-based");
//	}

	public void afterThrowing(Method m, Object[] args, Object target, Exception ex) {
		System.out.println("执行异常通知-schema-based");
	}
}
- 在applicationContext.xml中配置
<bean id="mythrow" class="com.sxt.advice.MyThrow"></bean>
<aop:config>
	<aop:pointcut expression="execution(* com.sxt.test.Demo.demo01())" id="mypoint"/>
	<aop:advisor advice-ref="mythrow" pointcut-ref="mypoint" />
</aop:config>
<bean id="demo" class="com.sxt.test.Demo"></bean>
环绕通知(Schema-based)
- 把前置通知和后置通知都写到一个通知中,组成了环绕通知
- 实现步骤
2.1 新建一个类,实现MethodInterceptor接口
public class MyArround implements MethodInterceptor{
	@Override
	public Object invoke(MethodInvocation arg0) throws Throwable {
		System.out.println("环绕-前置");
		Object result = arg0.proceed();//放行,调用切点方法
		System.out.println("环绕-后置");
		return result;
	}
}
2.2 在applicationContext.xml中配置
<bean id="myarround" class="com.sxt.advice.MyArround"></bean>
<aop:config>
	<aop:pointcut expression="execution(* com.sxt.test.Demo.demo01())" id="mypoint"/>
	<aop:advisor advice-ref="myarround" pointcut-ref="mypoint" />
</aop:config>
<bean id="demo" class="com.sxt.test.Demo"></bean>
使用AspectJ方式实现通知(前置、后置、异常、环绕)
- 新建一个类:
1.1 类中方法名任意
public class MyAdvice {
	public void mybefore(String name1,int age1) {
		System.out.println("前置-->"+name1+"-"+age1);
	}

	public void myafter() {
		System.out.println("后置1");
	}

	public void myaftering() {
		System.out.println("后置2");
	}

	public void mythrow() {
		System.out.println("异常通知");
	}

	public Object myarround(ProceedingJoinPoint p) throws Throwable {
		System.out.println("执行环绕-前置");
		Object result = p.proceed();
		System.out.println("执行环绕-后置");
		return result;
	}
}
	1.2 在applicationContext.xml中配置
		1.2.1 <aop:after>:后置通知,无论切点是否异常都执行
		1.2.2 <aop:after-returning>:后置通知,当切点正确执行时才会执行
		1.2.3 <aop:after> 、<aop:after-returning>和<aop:after-throwing>执行顺序和配置顺序有关。
		1.2.4 execution():括号不能括上args
		1.2.5 中间使用and连接args而不能使用&&,由spring把and解析成&&
		1.2.6  args(参数名称):参数名称自定义与切点的参数名称无关,但参数类型与切点方法参数顺序相同
		1.2.7 <aop:before>:arg-names="参数名称",来源于expression中args(参数名称),故需要保持一致
			1.2.7.1 参数顺序、参数名称以及参数个数必须保持一致
			1.2.7.2 arg-names="参数名称",参数名称顺序个数必须与通知方法的参数相同
<bean id="myadvice" class="com.sxt.advice.MyAdvice"></bean>
<aop:config>
	<aop:aspect ref="myadvice">
		<aop:pointcut expression="execution(* com.sxt.test.Demo.demo01(String,int)) and args(name1,age1)" id="mypoint"/>
		<aop:before method="mybefore" pointcut-ref="mypoint" arg-names="name1,age1"/>
		<!-- after与 after-returning区别:after无论切点是否异常都会执行-->
	<!-- 	<aop:after method="myafter" pointcut-ref="mypoint"/>
		<aop:after-returning method="myaftering" pointcut-ref="mypoint" />
		<aop:after-throwing method="mythrow" pointcut-ref="mypoint"/>
		<aop:around method="myarround" pointcut-ref="mypoint"/> -->
	</aop:aspect>
</aop:config>
<bean id="demo" class="com.sxt.test.Demo"></bean>
使用注解(基于Aspect)
1. spring不会自动去寻找注解,必须告诉spring哪些包下的类中可能有注解
	1.1 需要引入xmlns:context,并配置applicationContext.xml如下:base-package=“配置需要扫描的包,多个包用逗号隔开”
<context:component-scan base-package="com.sxt.advice"> </context:component-scan>
2. @Component()
	2.1 相当于<bean>标签
	2.2 如果没有参数,把类名首字母变小写,相当于<bean id=" ">
	2.3 @Component("自定义名称")
3. 实现步骤
	3.1 在applicationContext.xml设置注解在哪些包中
<context:component-scan base-package="com.sxt.advice,com.sxt.test"></context:component-scan>
<!-- proxy-target-class:true使用cglib动态代理(注解基于此方式),false使用jdk动态代理 -->
<aop:aspectj-autoproxy proxy-target-class="true"></aop:aspectj-autoproxy>
	3.2 在Demo类中添加@Componet()
		3.2.1 在方法上添加@Pointcut() 表示定义切点
@Component()
public class Demo {
	@Pointcut("execution(* com.sxt.test.Demo.demo01())")
	public void demo01() throws Exception{
//		int a=5/0;
		System.out.println("demo01");
	}
}
3.3 在通知类中配置
	3.3.1 @Component():表示类被Spring管理
	3.3.2 @Aspect():相当于<aop:aspect ref=“”>标签,表示通知方法在当前类中
@Component
@Aspect
public class MyAdvice {
	@Before("com.sxt.test.Demo.demo01()")
	public void mybefore() {
		System.out.println("前置");
	}

	@After("com.sxt.test.Demo.demo01()")
	public void myafter() {
		System.out.println("后置");
	}

	@AfterThrowing("com.sxt.test.Demo.demo01()")
	public void mythrow() {
		System.out.println("异常通知");
	}

	@Around("com.sxt.test.Demo.demo01()")
	public Object myarround(ProceedingJoinPoint p) throws Throwable {
		System.out.println("环绕通知-前置");
		Object result = p.proceed();
		System.out.println("环绕通知-后置");
		return result;
	}
}
4. 通知中获取切点信息(参数、名称等)的方式
	4.1 通过JoinPoint(非环绕通知)或ProceedingJoinPoint(环绕通知)参数,其实ProceedingJoinPoint是JointPoint的子接口
		4.1.1 Object[] getArgs:返回目标方法的参数
		4.1.2 Signature getSignature:返回目标方法的签名
		4.1.3 Object getTarget:返回被织入增强处理的目标对象
		4.1.4 Object getThis:返回AOP框架为目标对象生成的代理对象
@Before("com.sxt.test.Demo.demo01(String)) && args(name)")
public void mybefore(JoinPoint jp) {
	System.out.println(Arrays.toString(jp.getArgs()));
	System.out.println(jp.getSignature().getName());
	System.out.println(jp.getTarget());
	System.out.println(jp.getThis());
	System.out.println("前置");
}
4.2 还可以直接 接收与切入点方法执行有关的对象,比如切入点方法参数、切入点目标对象(target)、切入点代理对象(this)等。


 2564
2564

 被折叠的 条评论
为什么被折叠?
被折叠的 条评论
为什么被折叠?
 到【灌水乐园】发言


