


 本文详细介绍了MySQL主从复制的配置过程,包括主数据库master的修改、授权,以及slave服务器的配置。同时,深入探讨了GTID模式下的主从复制,展示了如何在主从服务器上设置配置文件,实现数据的自动同步。
1.主数据库master修改
注意要my.cnf中要设置server-id,log_bin这两个属性
vim /etc/my.cnf

#
# Remove leading # and set to the amount of RAM for the most important data
# cache in MySQL. Start at 70% of total RAM for dedicated server, else 10%.
# innodb_buffer_pool_size = 128M
#
# Remove leading # to turn on a very important data integrity option: logging
# changes to the binary log between backups.
# log_bin=mysql-bin
#
# Remove leading # to set options mainly useful for reporting servers.
# The server defaults are faster for transactions and fast SELECTs.
# Adjust sizes as needed, experiment to find the optimal values.
# join_buffer_size = 128M
# sort_buffer_size = 2M
# read_rnd_buffer_size = 2M
datadir=/var/lib/mysql
socket=/var/lib/mysql/mysql.sock

# Disabling symbolic-links is recommended to prevent assorted security risks
symbolic-links=0

log-error=/var/log/mysqld.log
pid-file=/var/run/mysqld/mysqld.pid
log_bin=mysql-bin #如果不添加这句话,会报mysqldump: Error: Binlogging on server not active
server-id=1       #这是mysql主从复制是一个很重要的标识,注意要唯一
2.登陆主服务器mysql,进行授权
[root@localhost ~]# mysql -uroot -p
 mysql> GRANT REPLICATION SLAVE ON *.* TO 'firecontrol'@'%' IDENTIFIED BY 'MyNewPass4!';
Query OK, 0 rows affected, 1 warning (0.40 sec)

mysql> show databases;
+--------------------+
| Database           |
+--------------------+
| information_schema |
| firecontrol        |
| mysql              |
| performance_schema |
| sys                |
+--------------------+
5 rows in set (0.00 sec)

mysql> show master status;
+------------------+----------+--------------+------------------+-------------------+
| File             | Position | Binlog_Do_DB | Binlog_Ignore_DB | Executed_Gtid_Set |
+------------------+----------+--------------+------------------+-------------------+
| mysql-bin.000001 |      436 |              |                  |                   |
+------------------+----------+--------------+------------------+-------------------+
1 row in set (0.00 sec)
GRANT REPLICATION SLAVE ON *.* TO 'firecontrol'@'%' IDENTIFIED BY 'MyNewPass4!';这里的firecontrol是随便取的master名。
这时的文件名是mysql-bin.000001,位置是436;到时得在slave中执行change to master操作需要。
3.在slave服务器中配置
先修改/etc/my.cnf文件,添加server-id的属性。这里设置的是server-id=2
[root@localhost ~]# mysql -p
mysql> change master to master_host='192.168.1.28', master_user='firecontrol', master_password='MyNewPass4!', master_log_file='mysql-bin.000001', master_log_pos=463;
mysql> start slave;    #启动slave同步进程
mysql> show slave status\G;  #查看状态
具体如下:
mysql> change master to master_host='192.168.1.28', master_user='firecontrol', master_password='MyNewPass4!', master_log_file='mysql-bin.000001', master_log_pos=436;
Query OK, 0 rows affected, 2 warnings (0.03 sec)

mysql> start slave;
Query OK, 0 rows affected (0.01 sec)

mysql> show slave status\G;
*************************** 1. row ***************************
               Slave_IO_State: Waiting for master to send event
                  Master_Host: 192.168.1.28
                  Master_User: firecontrol
                  Master_Port: 3306
                Connect_Retry: 60
              Master_Log_File: mysql-bin.000001
          Read_Master_Log_Pos: 436
               Relay_Log_File: localhost-relay-bin.000002
                Relay_Log_Pos: 320
        Relay_Master_Log_File: mysql-bin.000001
             Slave_IO_Running: Yes
            Slave_SQL_Running: Yes
              Replicate_Do_DB:
          Replicate_Ignore_DB:
           Replicate_Do_Table:
       Replicate_Ignore_Table:
      Replicate_Wild_Do_Table:
  Replicate_Wild_Ignore_Table:
                   Last_Errno: 0
                   Last_Error:
                 Skip_Counter: 0
          Exec_Master_Log_Pos: 436
              Relay_Log_Space: 531
              Until_Condition: None
               Until_Log_File:
                Until_Log_Pos: 0
           Master_SSL_Allowed: No
           Master_SSL_CA_File:
           Master_SSL_CA_Path:
              Master_SSL_Cert:
            Master_SSL_Cipher:
               Master_SSL_Key:
        Seconds_Behind_Master: 0
Master_SSL_Verify_Server_Cert: No
                Last_IO_Errno: 0
                Last_IO_Error:
               Last_SQL_Errno: 0
               Last_SQL_Error:
  Replicate_Ignore_Server_Ids:
             Master_Server_Id: 1
                  Master_UUID: d5e4a7db-0b18-11e9-bd36-080027643e9f
             Master_Info_File: /var/lib/mysql/master.info
                    SQL_Delay: 0
          SQL_Remaining_Delay: NULL
      Slave_SQL_Running_State: Slave has read all relay log; waiting for more updates
           Master_Retry_Count: 86400
                  Master_Bind:
      Last_IO_Error_Timestamp:
     Last_SQL_Error_Timestamp:
               Master_SSL_Crl:
           Master_SSL_Crlpath:
           Retrieved_Gtid_Set:
            Executed_Gtid_Set:
                Auto_Position: 0
         Replicate_Rewrite_DB:
                 Channel_Name:
           Master_TLS_Version:
1 row in set (0.00 sec)
以上,步骤完成,就是主从连接完成
4.普通主从服务器复制:
mysql> create database test1;
Query OK, 1 row affected (0.01 sec)

mysql> use test1
Database changed
mysql> create table userlist (username varchar(15) not null,password varchar(25) not null);
Query OK, 0 rows affected (0.32 sec)

mysql> desc userlist;
+----------+-------------+------+-----+---------+-------+
| Field    | Type        | Null | Key | Default | Extra |
+----------+-------------+------+-----+---------+-------+
| username | varchar(15) | NO   |     | NULL    |       |
| password | varchar(25) | NO   |     | NULL    |       |
+----------+-------------+------+-----+---------+-------+
2 rows in set (0.00 sec)

mysql> insert into userlist values ('user1','123');
Query OK, 1 row affected (0.00 sec)

mysql> insert into userlist values ('user2','456');
Query OK, 1 row affected (0.05 sec)

mysql> exit
Bye
这时去slave中查看:
mysql> use test1;
Reading table information for completion of table and column names
You can turn off this feature to get a quicker startup with -A

Database changed
mysql> select * from userlist;
+----------+----------+
| username | password |
+----------+----------+
| user1    | 123      |
| user2    | 456      |
+----------+----------+
2 rows in set (0.00 sec)
数据已经同步过来了!!!!
2.gtid主从复制
(1)主从服务器修改配置文件,注意此处是主从都得设置!!!
[root@localhost ~]# vim /etc/my.cnf    ##添加以下内容
gtid_mode=ON
enforce-gtid-consistency=true
[root@localhost ~]# systemctl stop mysqld
[root@localhost ~]# systemctl start mysqld
然后重新登陆mysql
[root@localhost ~]# mysql -p

mysql> show master status;
+------------------+----------+--------------+------------------+-------------------+
| File             | Position | Binlog_Do_DB | Binlog_Ignore_DB | Executed_Gtid_Set |
+------------------+----------+--------------+------------------+-------------------+
| mysql-bin.000002 |      154 |              |                  |                   |
+------------------+----------+--------------+------------------+-------------------+
1 row in set (0.00 sec)

mysql>
这时的文件名是mysql-bin.000002,位置是154;到时得在slave中执行change to master操作需要。
从服务器操作:
[root@localhost ~]# mysql -p
mysql> stop slave;   #停止slave同步进程
mysql> change master to master_host='192.168.1.28', master_user='firecontrol', master_password='MyNewPass4!', MASTER_AUTO_POSITION=1;
mysql> start slave;   #启动slave同步进程
mysql> show slave status\G;   ##查看状态
mysql> stop slave;
Query OK, 0 rows affected (0.00 sec)

mysql> change master to master_host='192.168.1.28', master_user='firecontrol', master_password='MyNewPass4!', MASTER_AUTO_POSITION=1;
Query OK, 0 rows affected, 2 warnings (0.02 sec)

mysql> start slave;
Query OK, 0 rows affected (0.00 sec)

mysql> show slave status\G;
*************************** 1. row ***************************
               Slave_IO_State: Waiting for master to send event
                  Master_Host: 192.168.1.28
                  Master_User: firecontrol
                  Master_Port: 3306
                Connect_Retry: 60
              Master_Log_File: mysql-bin.000002
          Read_Master_Log_Pos: 154
               Relay_Log_File: localhost-relay-bin.000002
                Relay_Log_Pos: 367
        Relay_Master_Log_File: mysql-bin.000002
             Slave_IO_Running: Yes
            Slave_SQL_Running: Yes
              Replicate_Do_DB:
          Replicate_Ignore_DB:
           Replicate_Do_Table:
       Replicate_Ignore_Table:
      Replicate_Wild_Do_Table:
  Replicate_Wild_Ignore_Table:
                   Last_Errno: 0
                   Last_Error:
                 Skip_Counter: 0
          Exec_Master_Log_Pos: 154
              Relay_Log_Space: 578
              Until_Condition: None
               Until_Log_File:
                Until_Log_Pos: 0
           Master_SSL_Allowed: No
           Master_SSL_CA_File:
           Master_SSL_CA_Path:
              Master_SSL_Cert:
            Master_SSL_Cipher:
               Master_SSL_Key:
        Seconds_Behind_Master: 0
Master_SSL_Verify_Server_Cert: No
                Last_IO_Errno: 0
                Last_IO_Error:
               Last_SQL_Errno: 0
               Last_SQL_Error:
  Replicate_Ignore_Server_Ids:
             Master_Server_Id: 1
                  Master_UUID: d5e4a7db-0b18-11e9-bd36-080027643e9f
             Master_Info_File: /var/lib/mysql/master.info
                    SQL_Delay: 0
          SQL_Remaining_Delay: NULL
      Slave_SQL_Running_State: Slave has read all relay log; waiting for more updates
           Master_Retry_Count: 86400
                  Master_Bind:
      Last_IO_Error_Timestamp:
     Last_SQL_Error_Timestamp:
               Master_SSL_Crl:
           Master_SSL_Crlpath:
           Retrieved_Gtid_Set:
            Executed_Gtid_Set:
                Auto_Position: 1
         Replicate_Rewrite_DB:
                 Channel_Name:
           Master_TLS_Version:
1 row in set (0.00 sec)
此时,主从已经建立连接。
测试一下,在主服务器上删除一条数据。
mysql> use test1;
Reading table information for completion of table and column names
You can turn off this feature to get a quicker startup with -A

Database changed
mysql> select * from userlist;
+----------+----------+
| username | password |
+----------+----------+
| user1    | 123      |
| user2    | 456      |
+----------+----------+
2 rows in set (0.00 sec)

mysql> delete from userlist where username = 'user1';
Query OK, 1 row affected (0.01 sec)
然后去slave中查询:
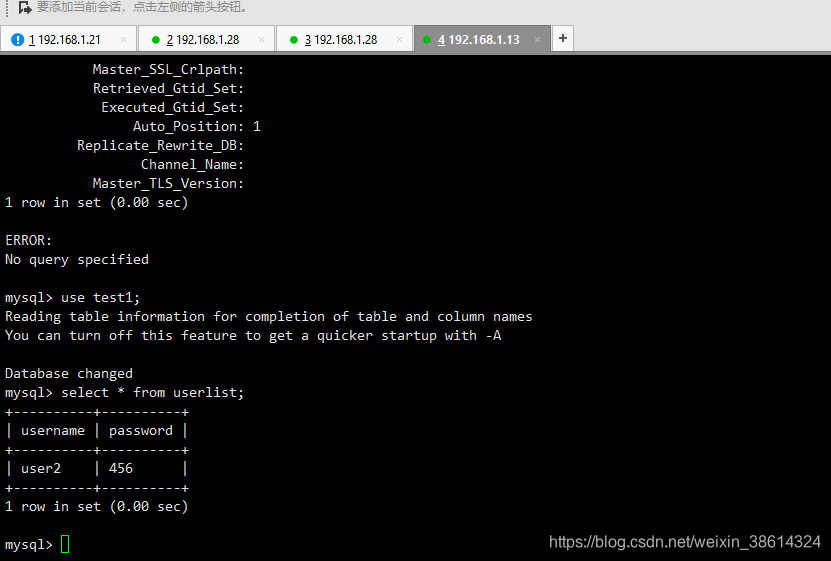
同步完成!!!


 2630
2630

 被折叠的 条评论
为什么被折叠?
被折叠的 条评论
为什么被折叠?
 到【灌水乐园】发言


