


目录
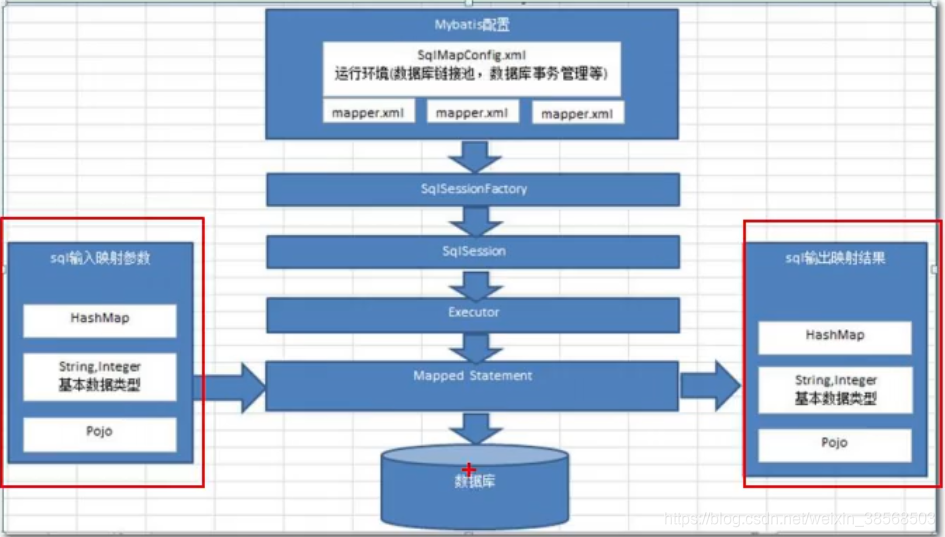
MyBatais运行原理:
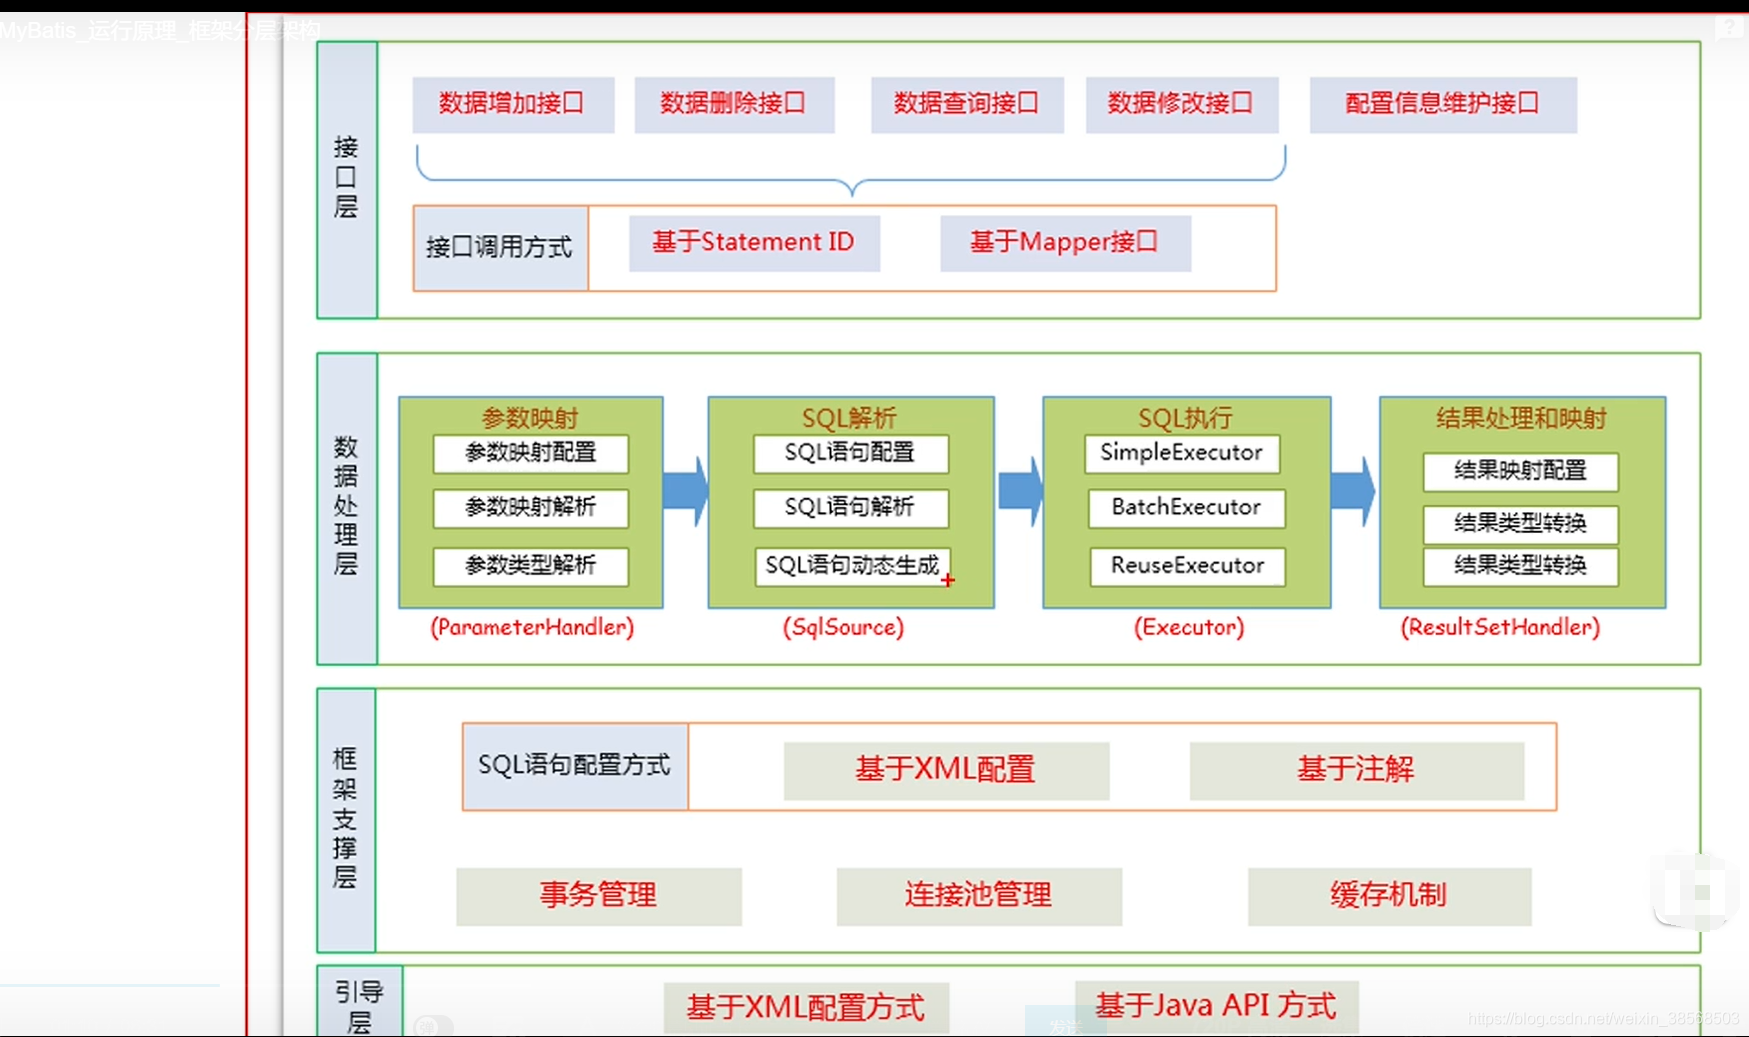
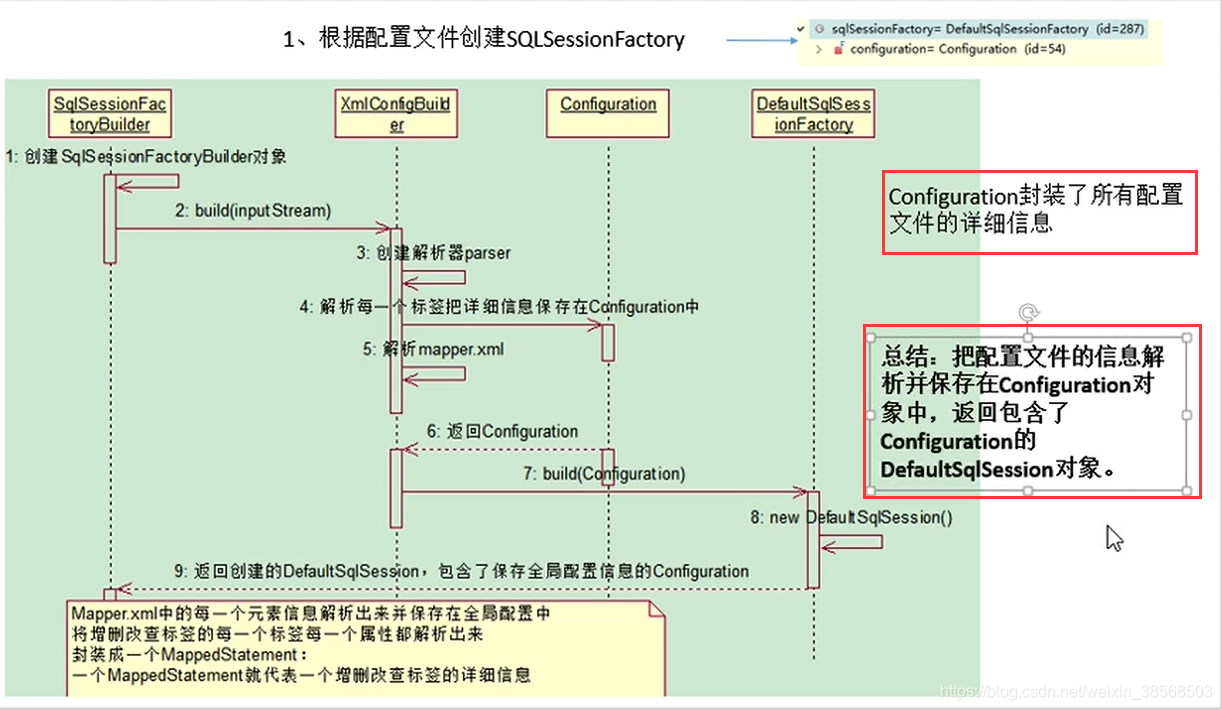
第一大步骤:根据配置文件创建SqlSessionFactory:
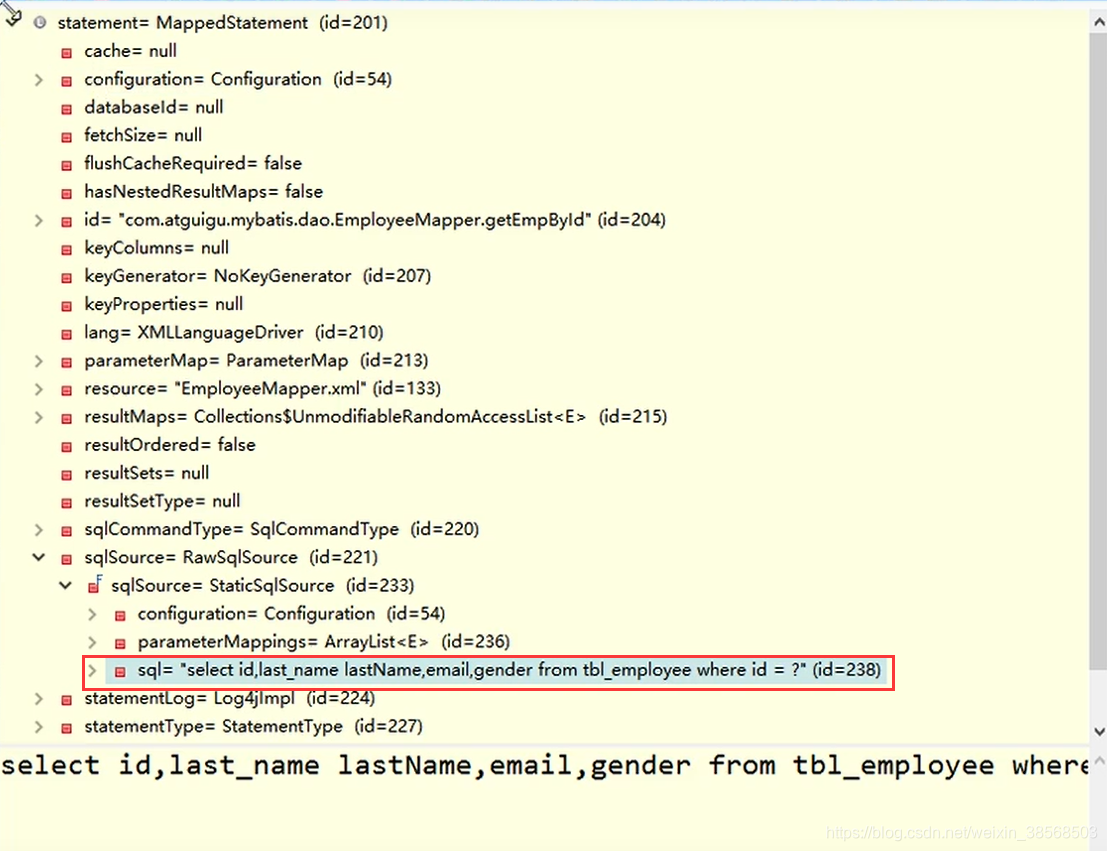
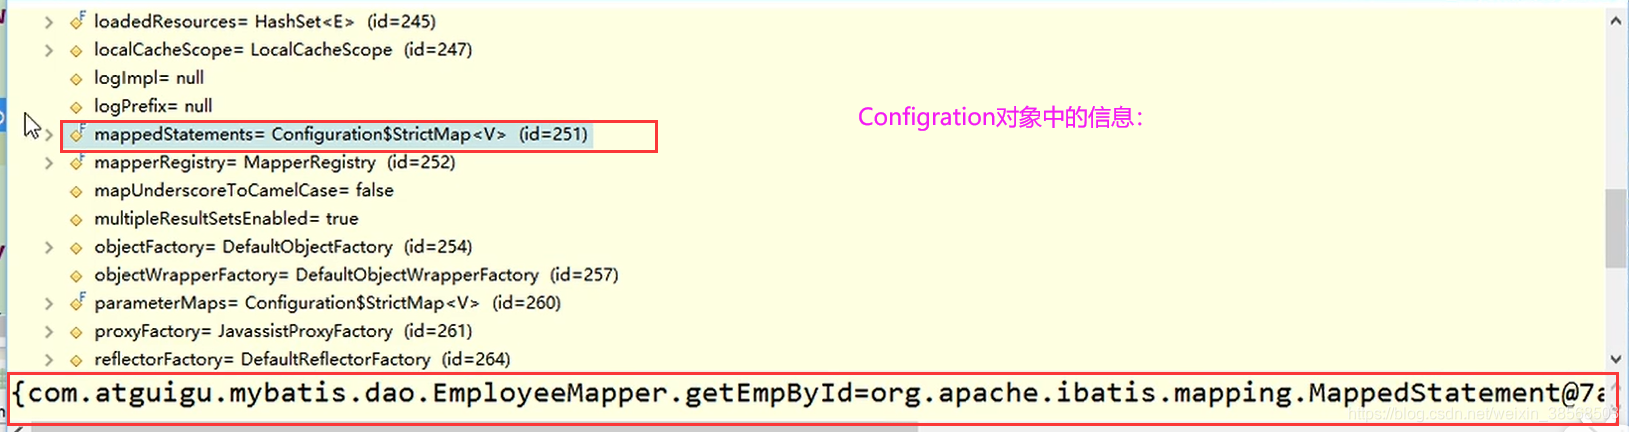
一个MappedStatement代表一个增删改查标签的详细信息:
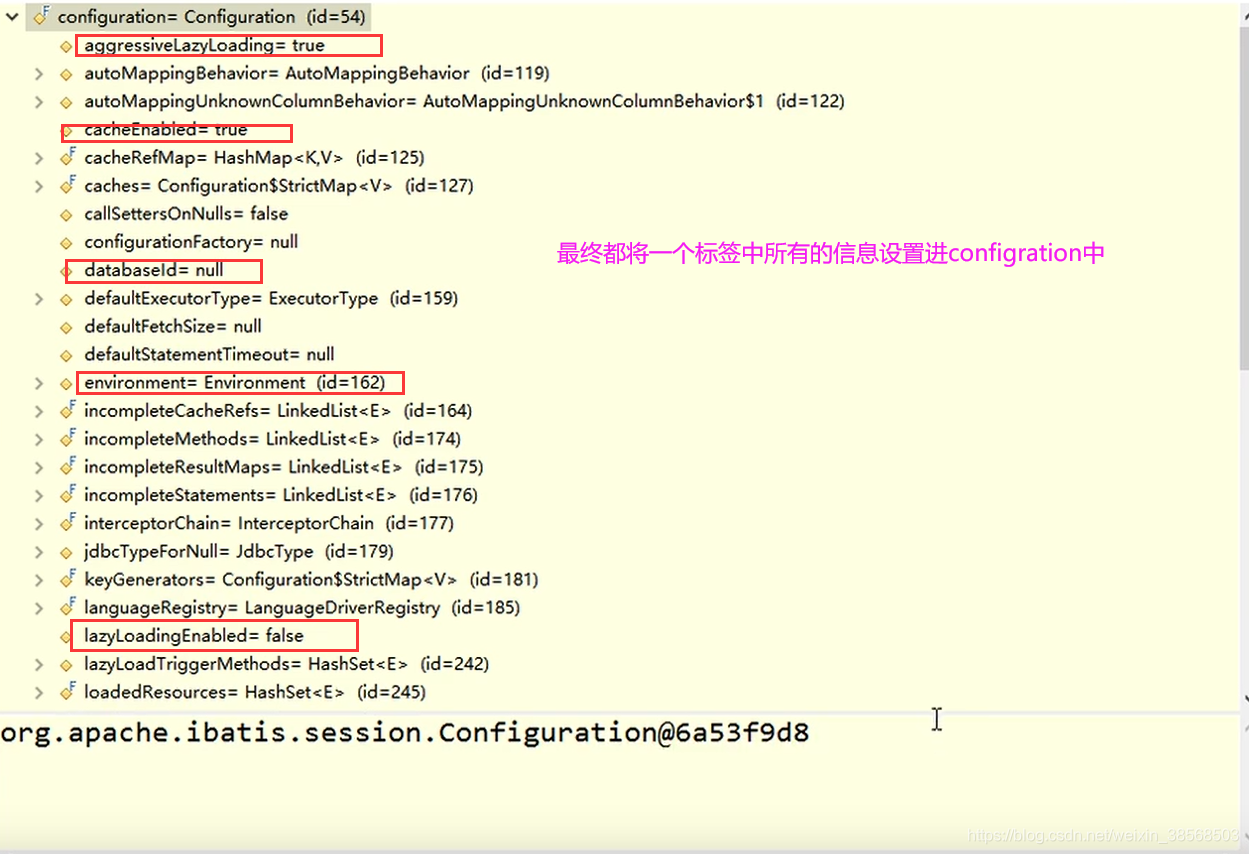
Configration对象保存了所有配置文件的详细信息:
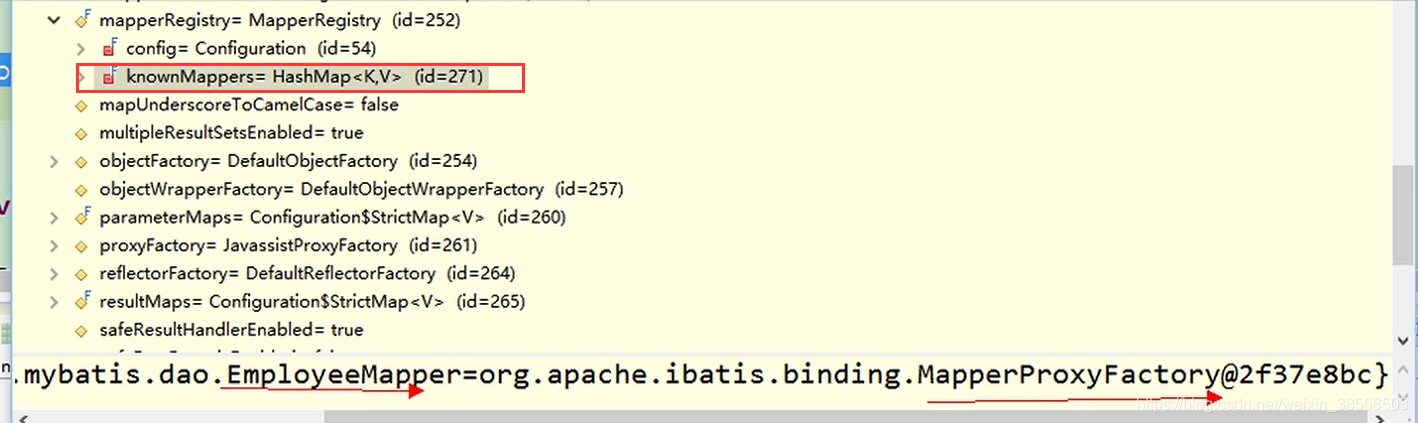
全局Configration中的一个重要属性:
全局Configration中的一个重要属性:
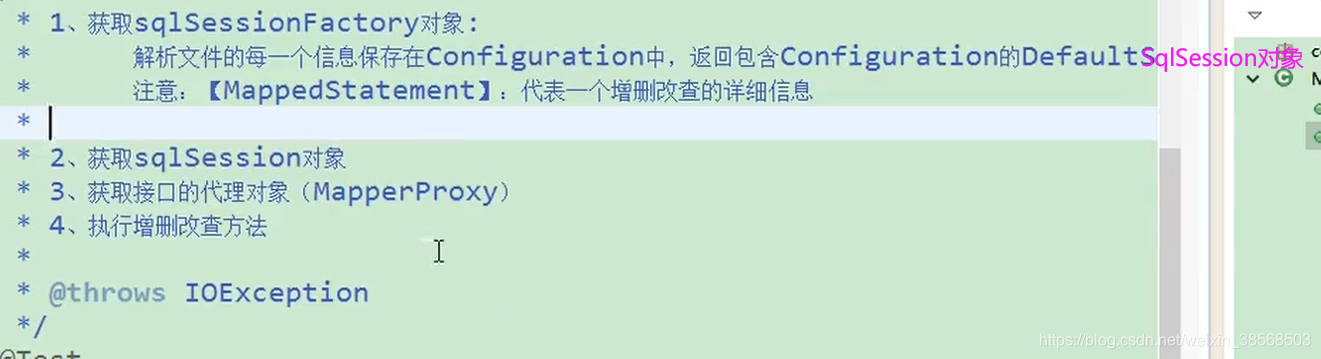
总结 :
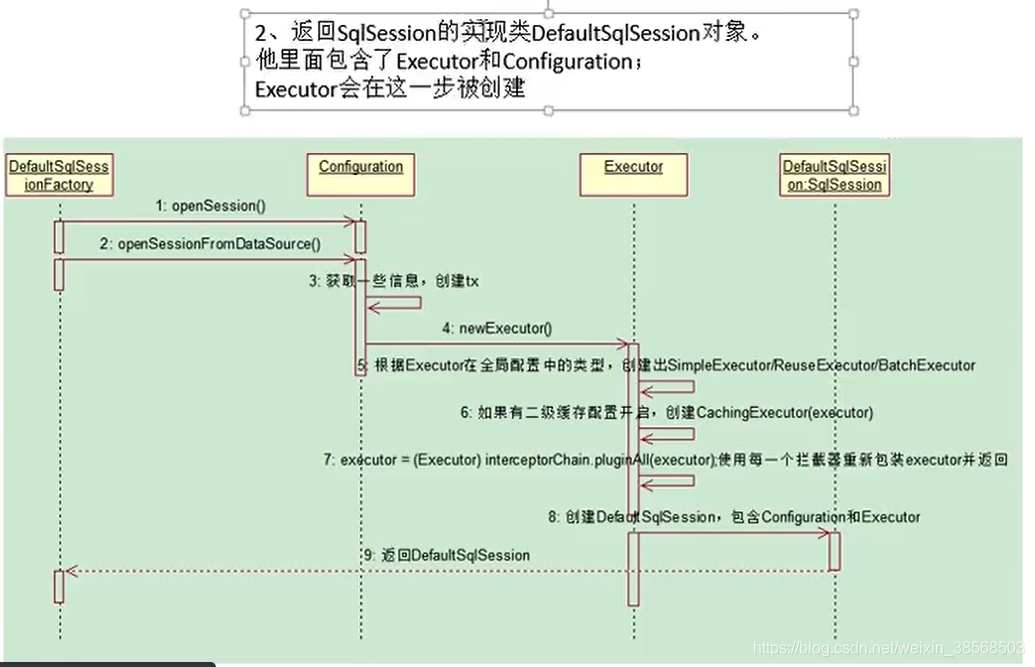
第二大步骤:openSassion()过程:
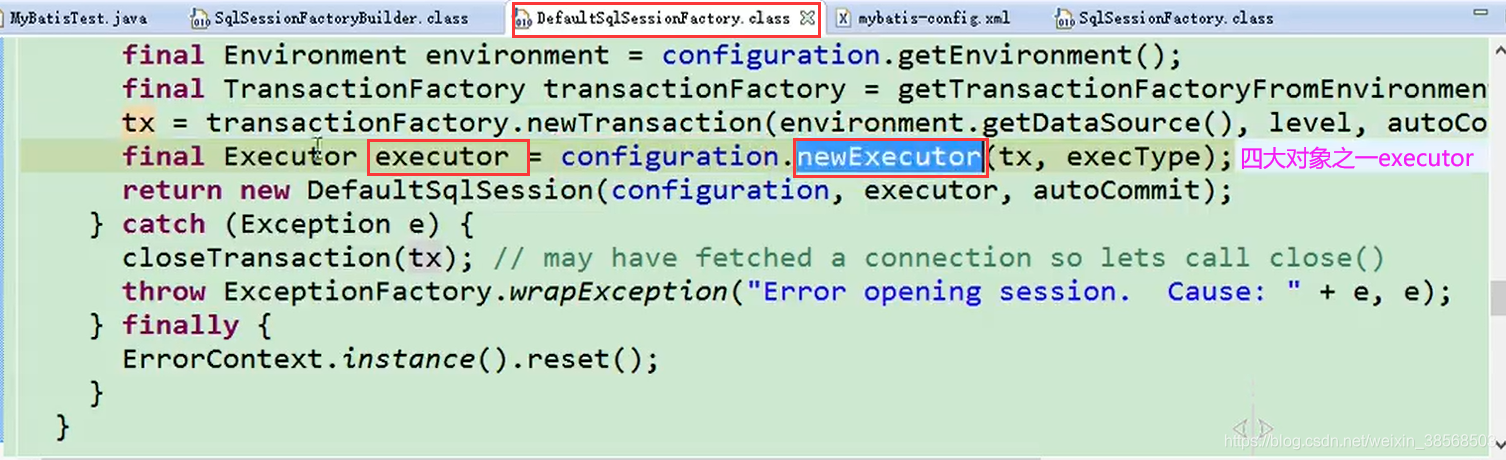
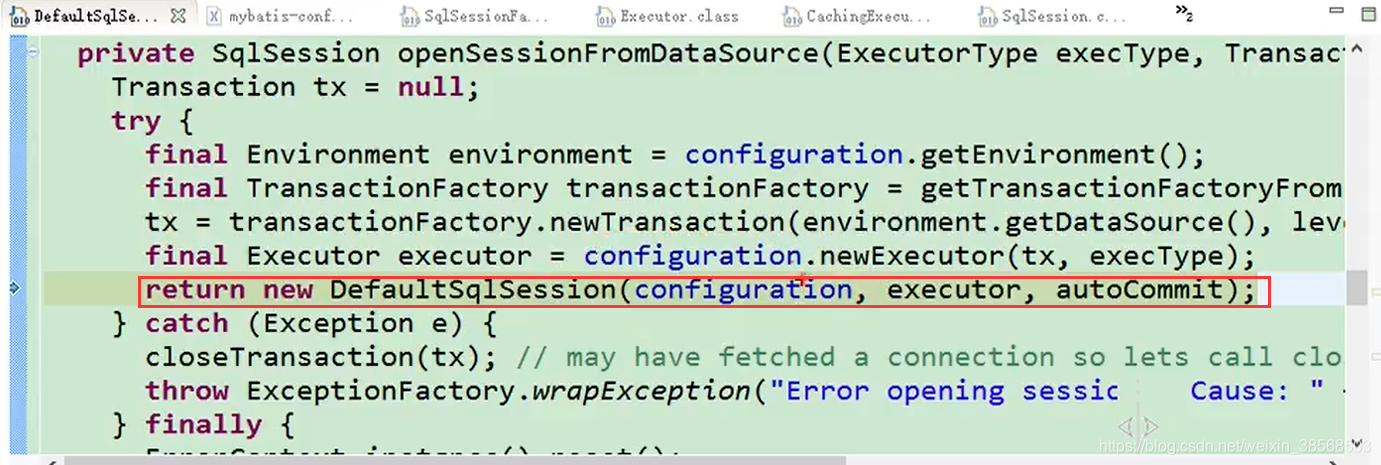
总结:
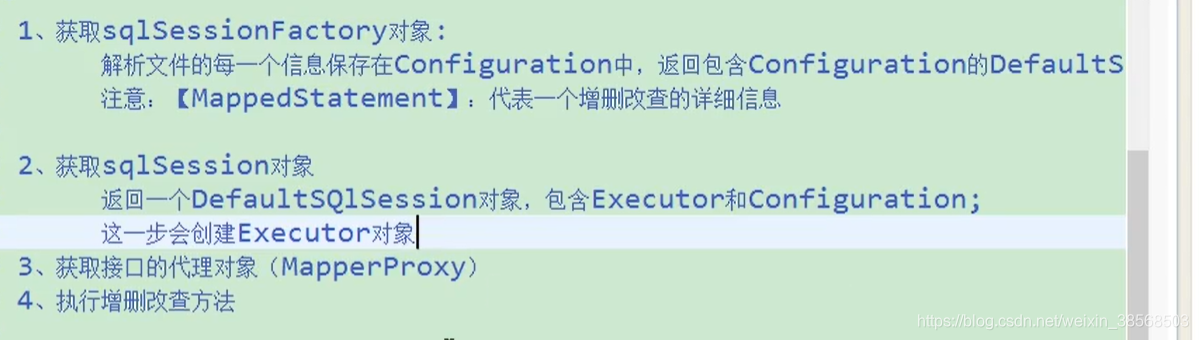
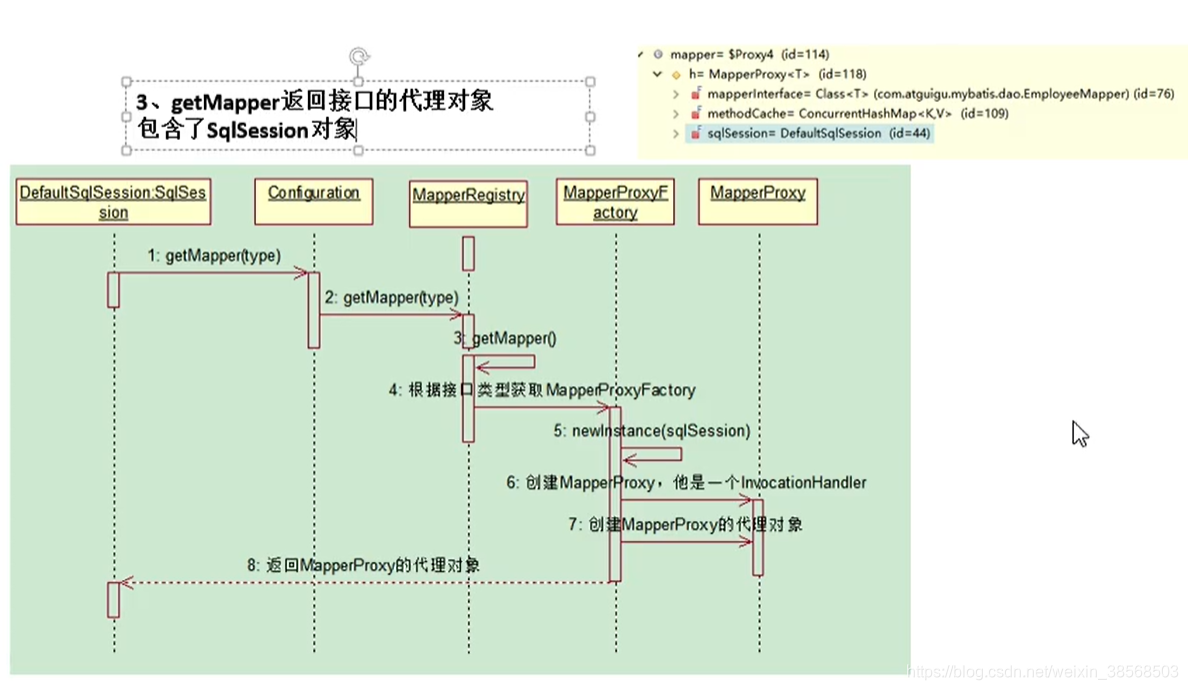
第三大步骤:SqlSession.getMapper(接口的 类型的class):

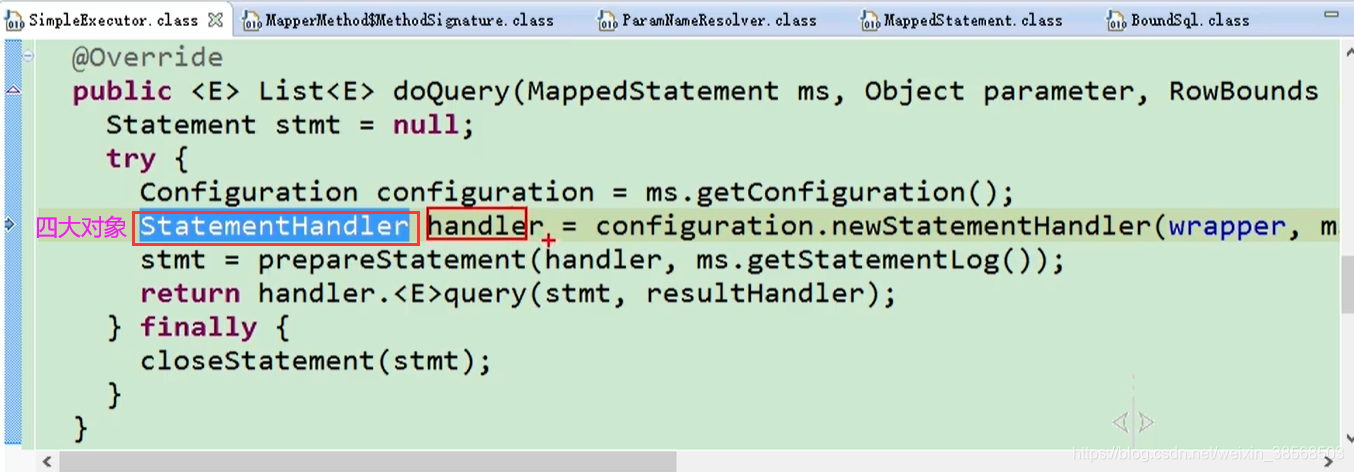
第四大步骤,执行增删改查方法的实现:
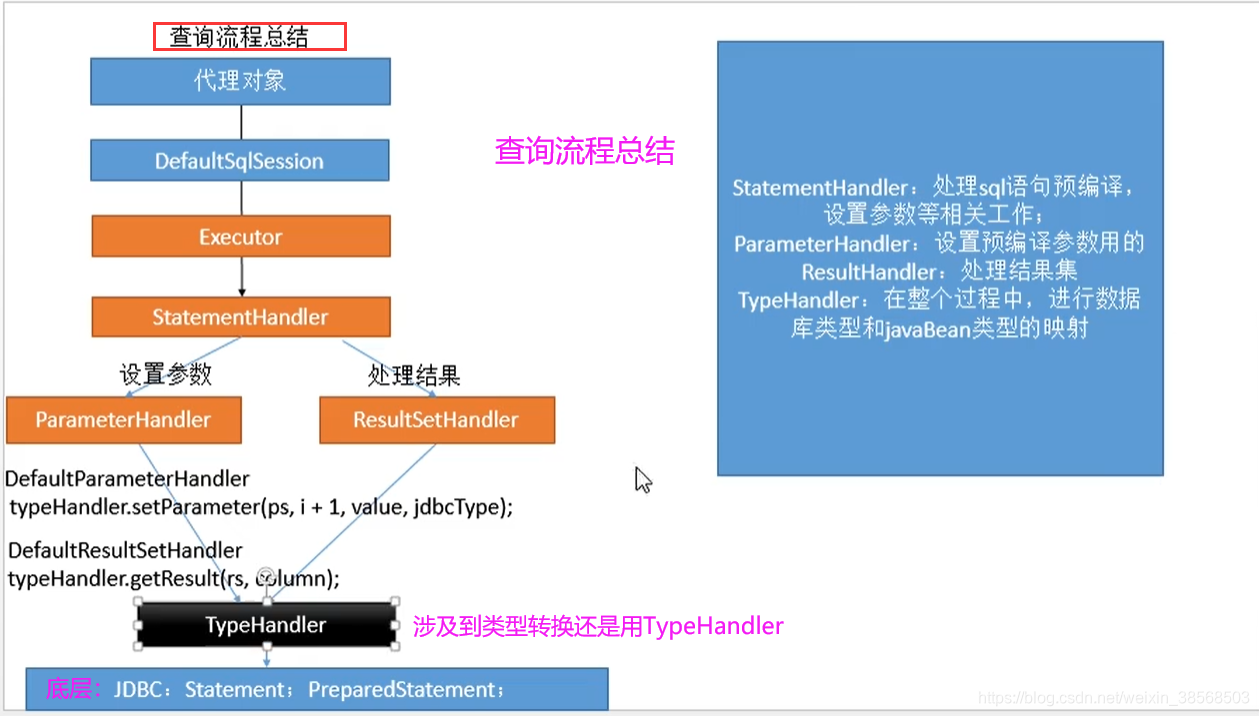
查询流程总结:
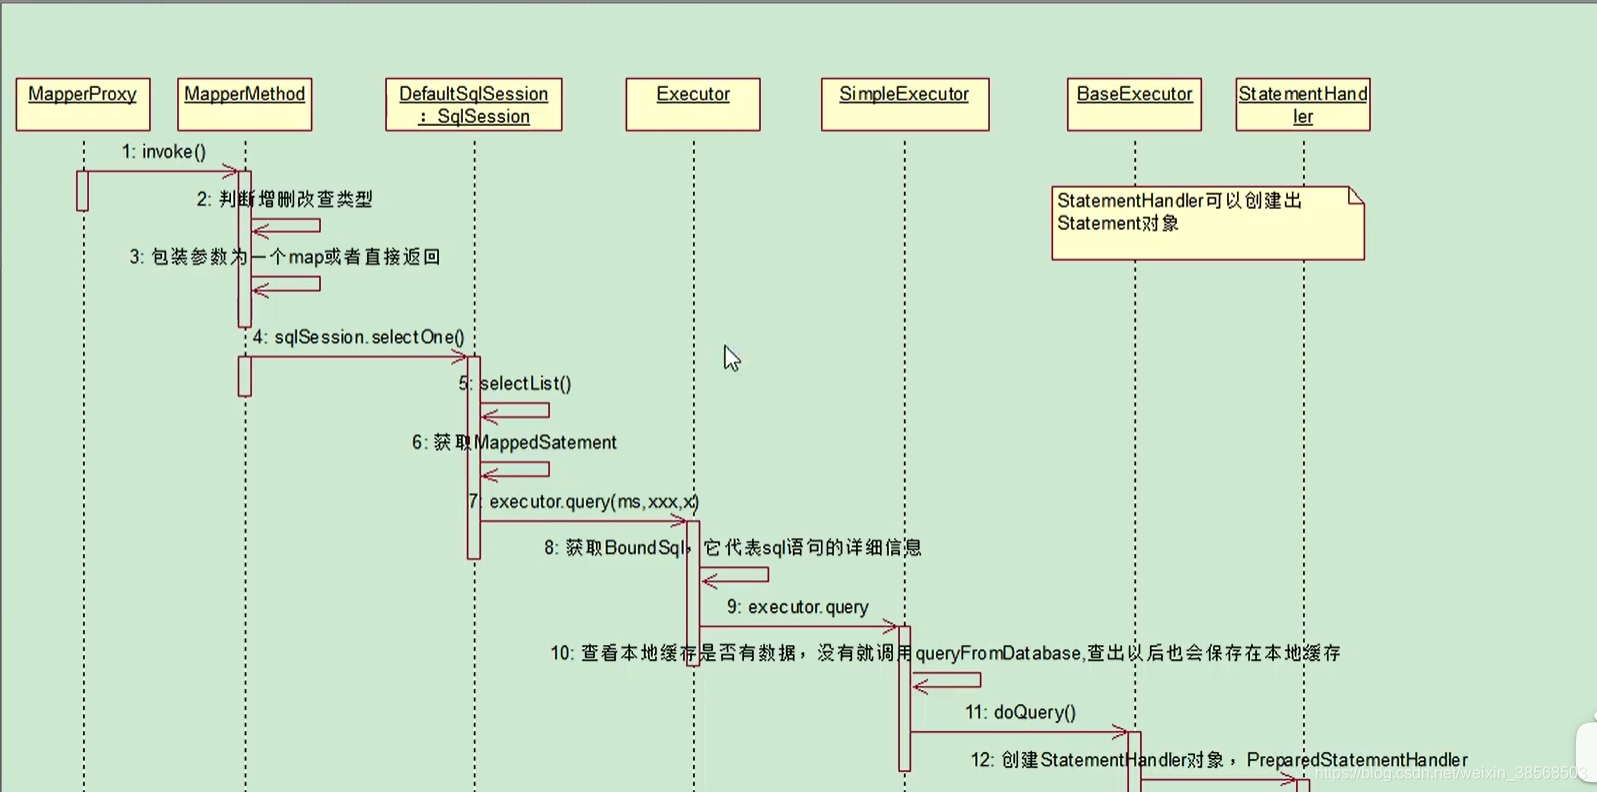
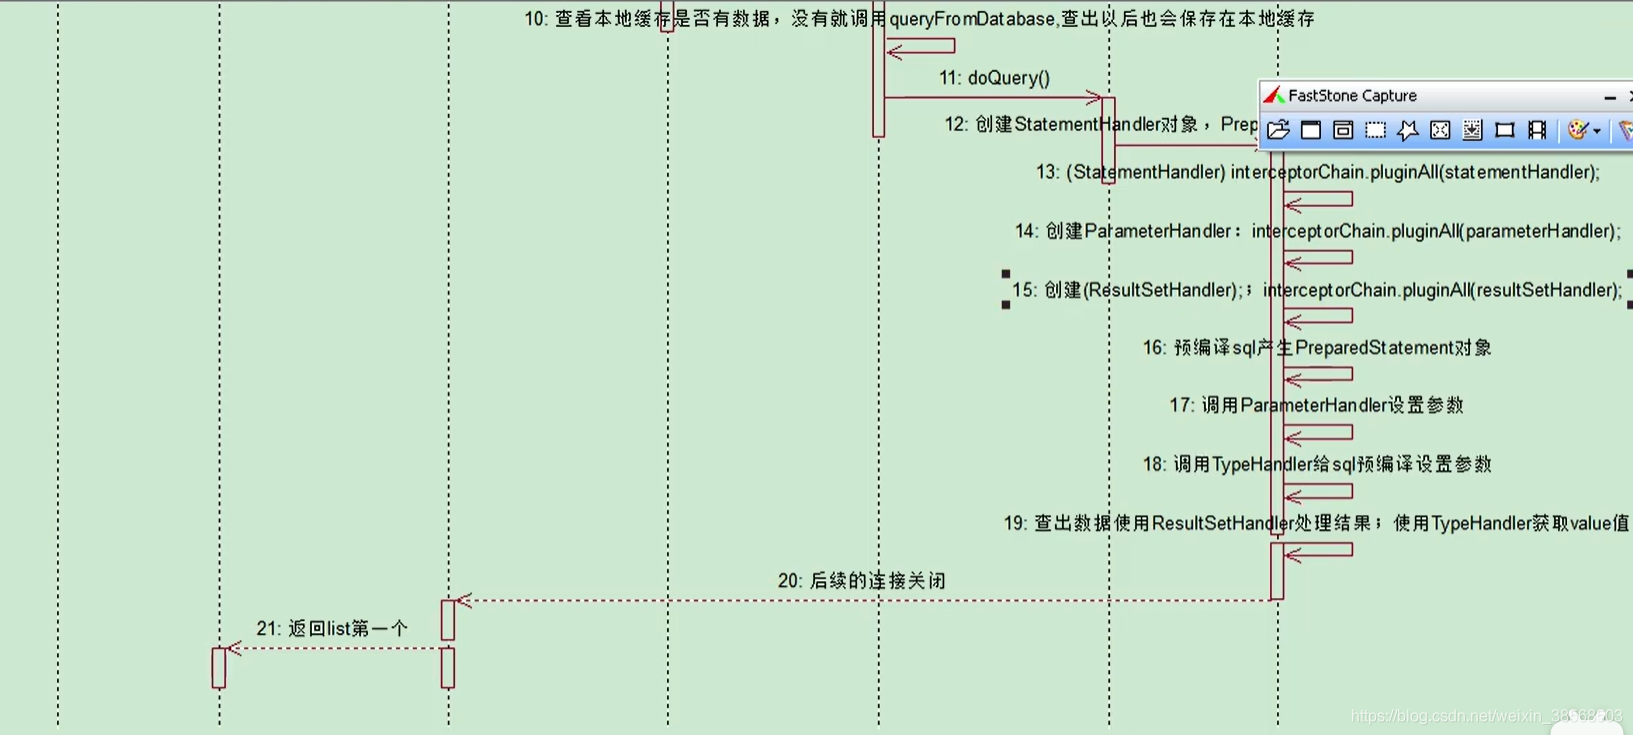
查询流程总结:
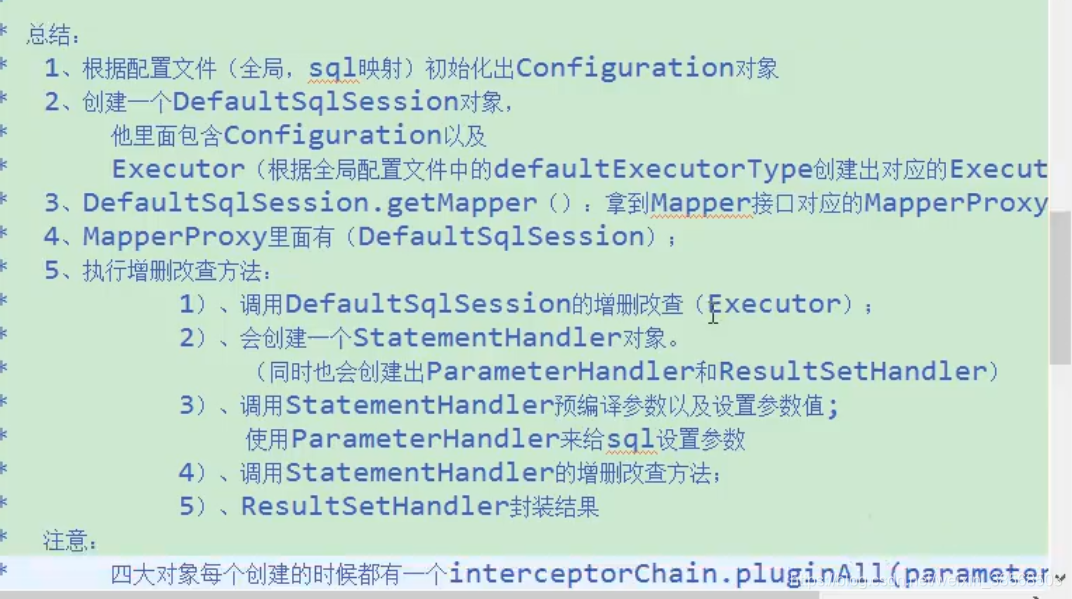
mybatis工作原理总结:
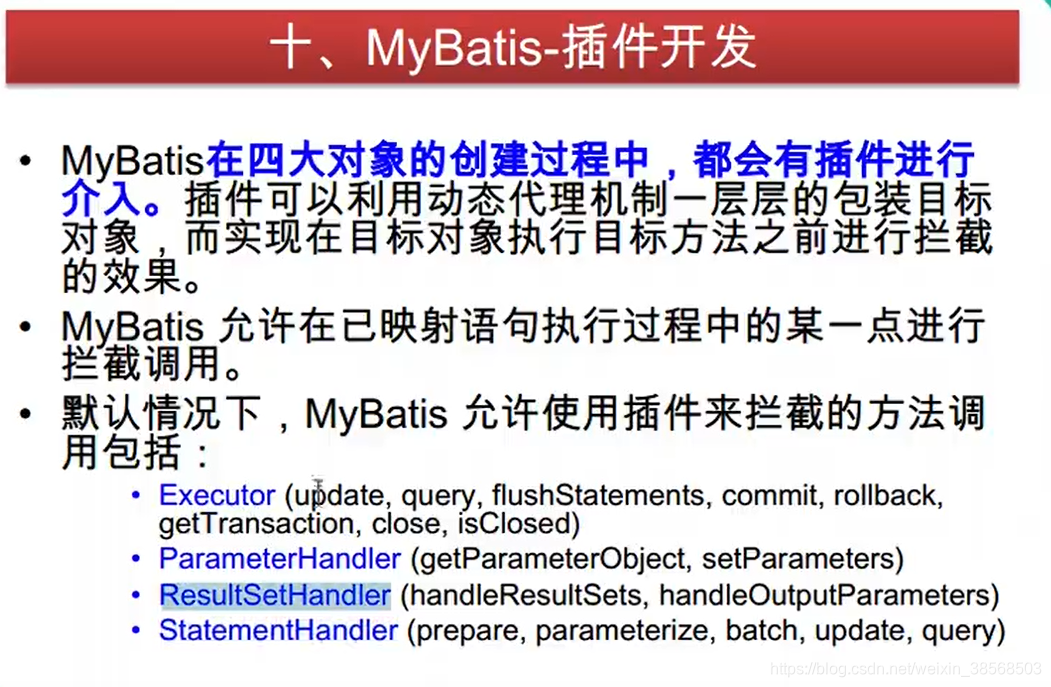
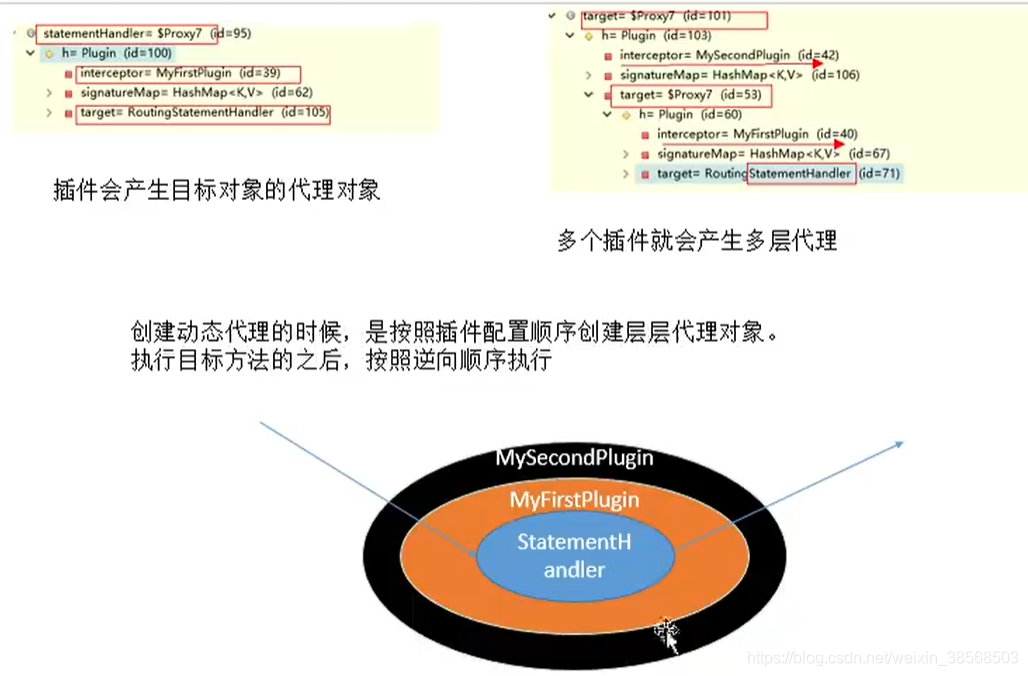
MyBatis插件原理:
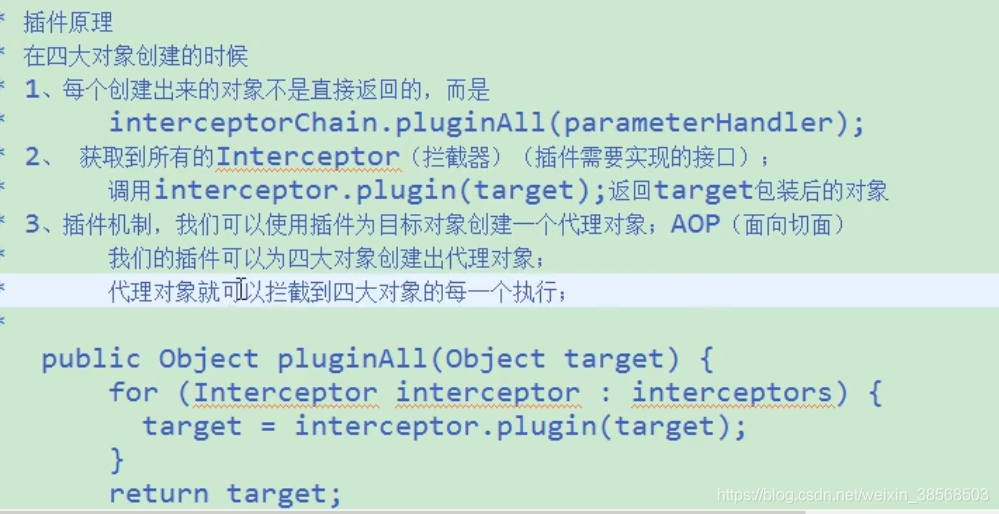
插件编写的步骤:
- 编写Intercepter的实现类
- 使用@Intercepters注解完成插件签名
- 将写好的插件注册到全局配置文件中
自定义插件的代码:
package com.fan.mapper;
import org.apache.ibatis.executor.statement.StatementHandler;
import org.apache.ibatis.plugin.*;
import java.util.Properties;
/*完成插件的签名:告诉mybatis当前插件用来拦截哪个对象的哪个方法*/
@Intercepts(
{
@Signature(type = StatementHandler.class,
method = "parameterize",
args = java.sql.Statement.class)
}
)
public class MyFirstPlugin implements Interceptor {
/*
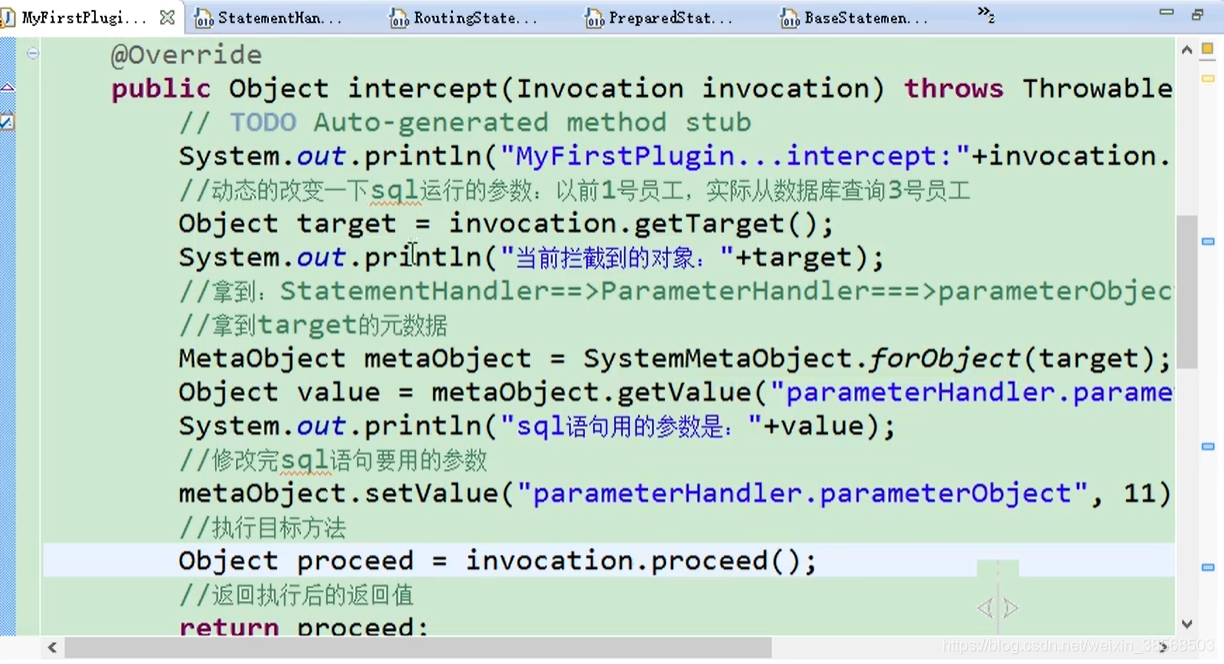
intercept:拦截:拦截目标对象的目标方法的执行
*/
@Override
public Object intercept(Invocation invocation) throws Throwable {
System.out.println("MyFirstPlugin的intercept:"+invocation.getMethod());
//执行目标方法
Object proceed = invocation.proceed();
//返回执行后的返回值
return proceed;
}
/*
plugin:插件:包装目标对象的:包装:为目标对象创建一个代理对象
*/
@Override
public Object plugin(Object target) {
System.out.println("MyFirstPlugin的plugin(mybatis将要包装的对象):"+target);
//我们可以借助Plugin的wrap方法来使用当前Intercepter包装我们目标对象
Object wrap = Plugin.wrap(target, this);
//返回为当前target创建的动态代理
return wrap;
}
/*
setProperties:将插件注册时的Property属性设置进来
* */
@Override
public void setProperties(Properties properties) {
System.out.println("插件配置的信息:" + properties);
}
}
将插件配置到全局配置文件中:
<typeAliases>
<!--注意别名怎么设置都是不区分大小写的,可以在类上使用注解@Alias("Emp")
,也可以在这里全局开启package-->
<package name="com.fan.pojo"/>
</typeAliases>
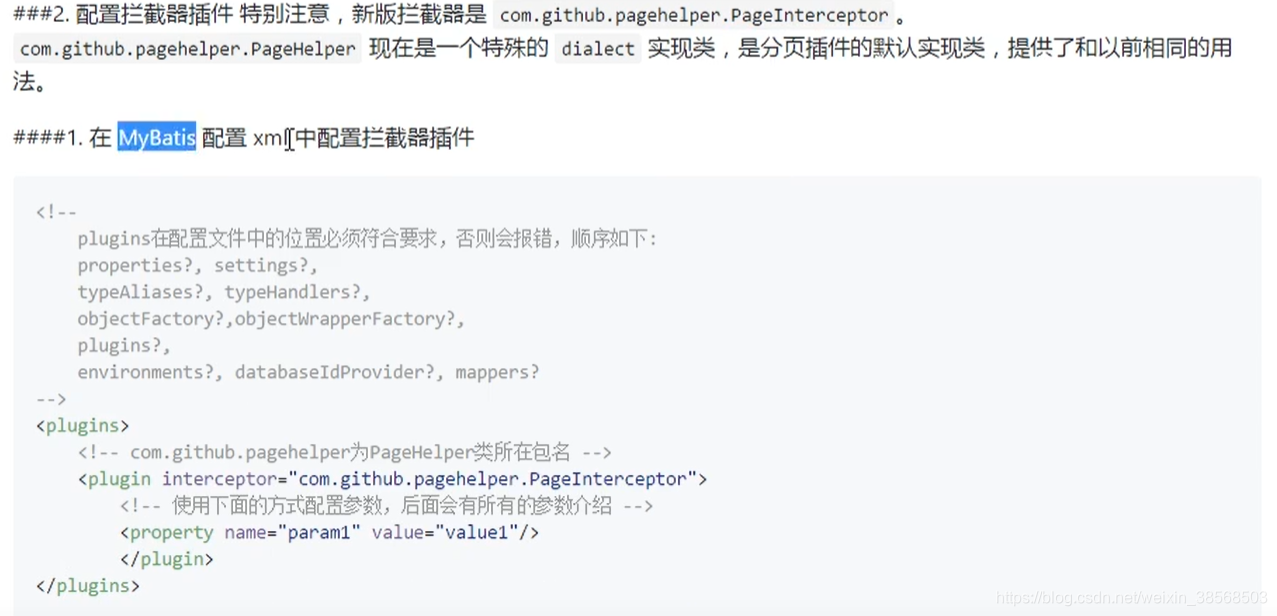
<!--插件的注册-->
<plugins>
<plugin interceptor="com.fan.mapper.MyFirstPlugin">
<property name="username" value="root"/>
<property name="password" value="root"/>
</plugin>
</plugins>
多个插件的开发:
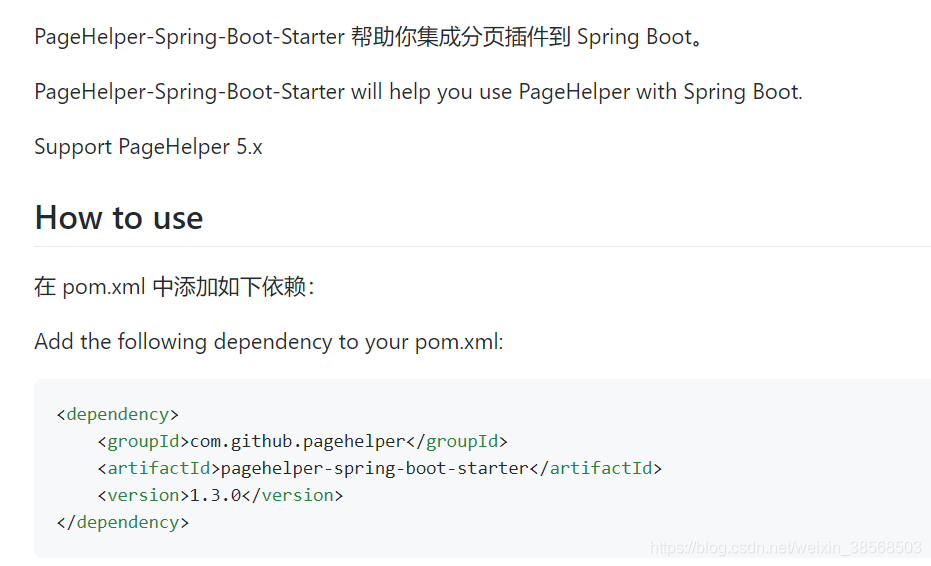
分页插件的使用(结合springboot和thymleaf):
参考官方文档开发使用:
https://github.com/pagehelper/Mybatis-PageHelper/blob/master/README_zh.md.

springboot中的使用:
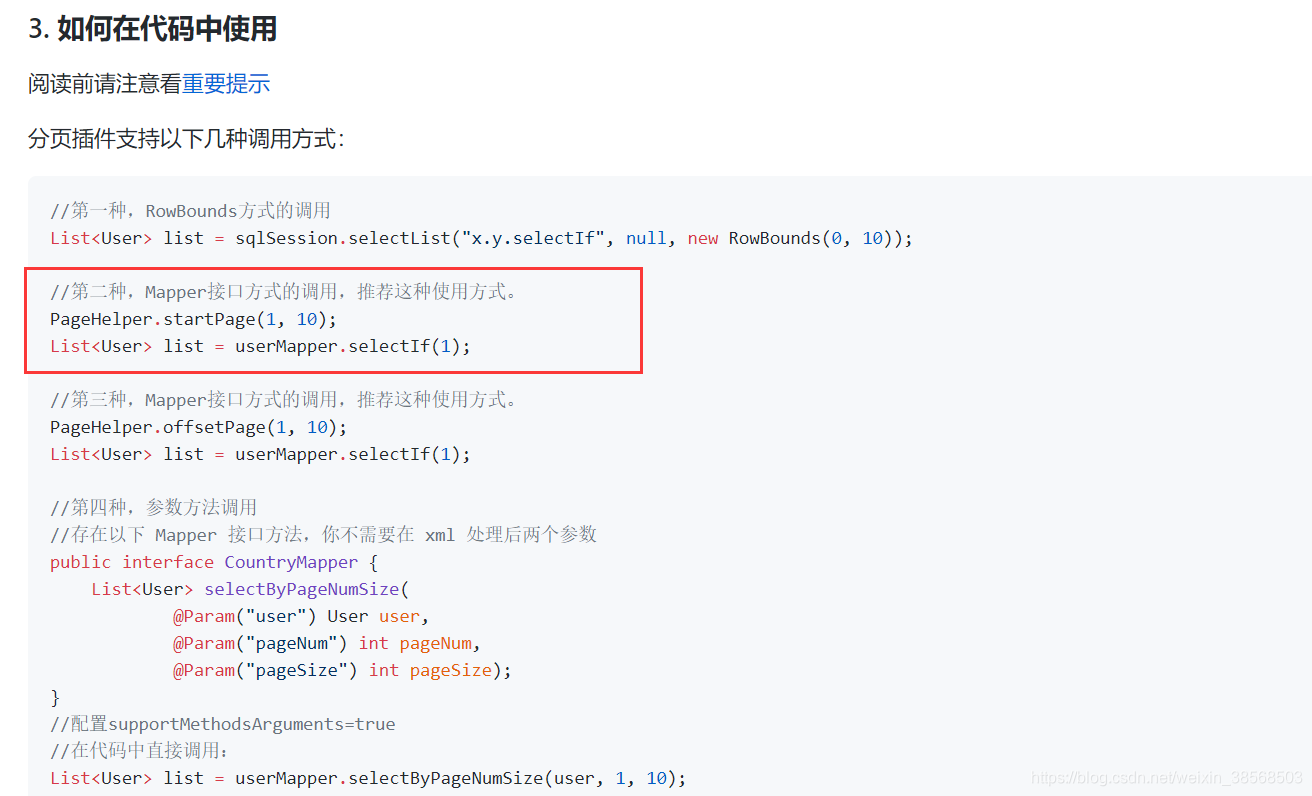
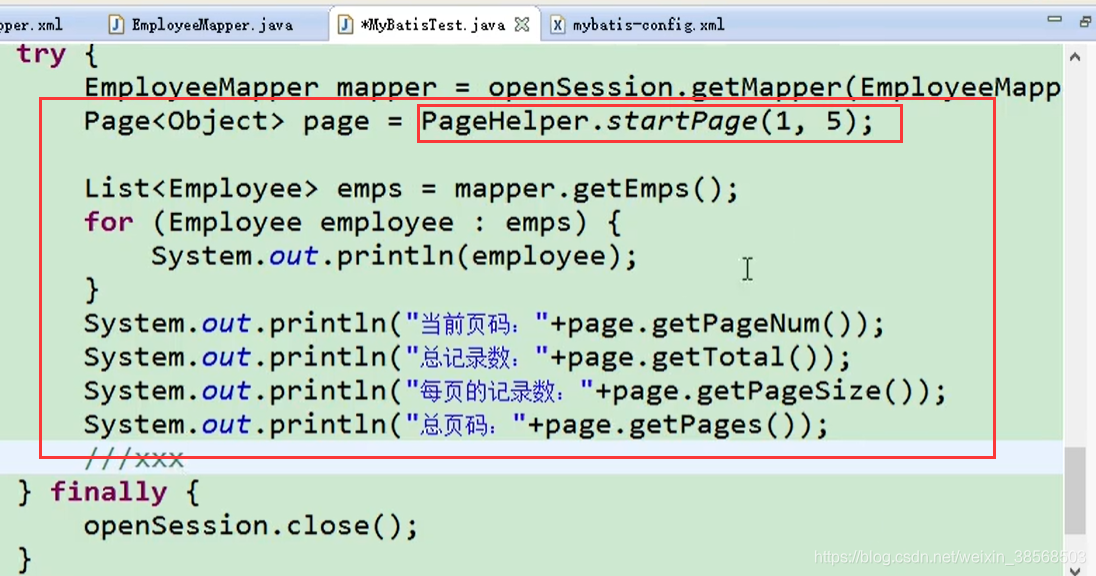
代码中的使用:
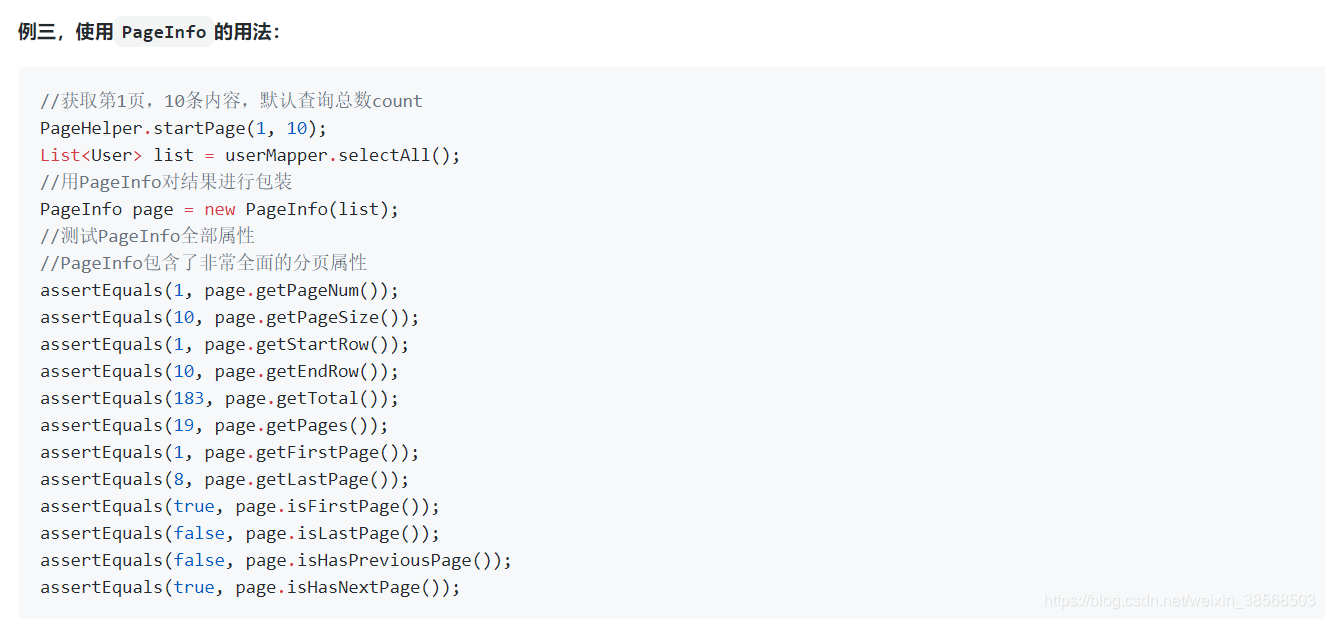
//用PageInfo对结果进行包装
PageInfo page = new PageInfo(list);
//测试PageInfo全部属性
//PageInfo包含了非常全面的分页属性
assertEquals(1, page.getPageNum());
assertEquals(10, page.getPageSize());
assertEquals(1, page.getStartRow());
assertEquals(10, page.getEndRow());
assertEquals(183, page.getTotal());
assertEquals(19, page.getPages());
assertEquals(1, page.getFirstPage());
assertEquals(8, page.getLastPage());
assertEquals(true, page.isFirstPage());
assertEquals(false, page.isLastPage());
assertEquals(false, page.isHasPreviousPage());
assertEquals(true, page.isHasNextPage());
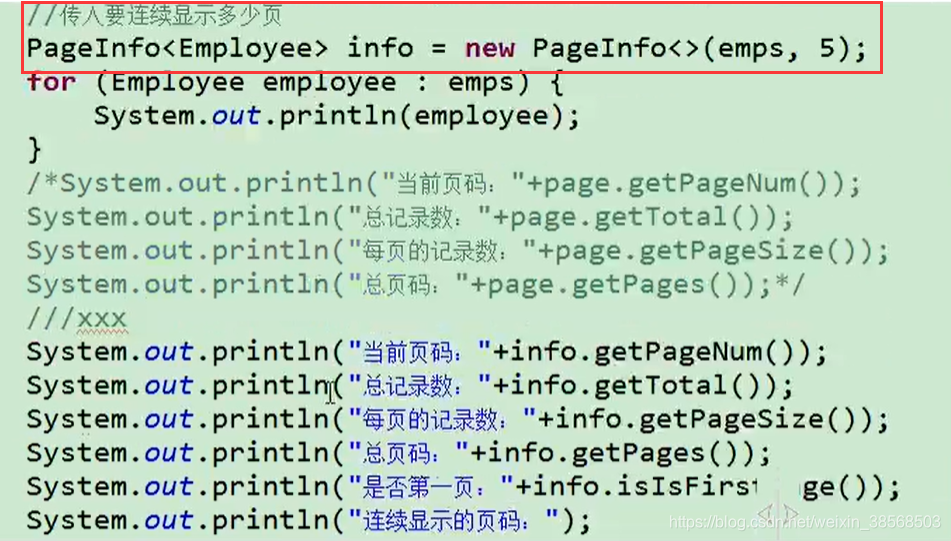
连续显示多少页:
PageInfo中每个参数代表的意思 示例:
pageNum=1,当前页码
pageSize=1,每页个数
size=1,当前页个数
startRow=1,由第几条开始
endRow=1,到第几条结束
total=3,总条数
pages=3,总页数
list= XXXX 查出出来的数据集合
prePage=0,上一页
nextPage=2,下一页
isFirstPage=true,是否为首页
isLastPage=false,是否为尾页
hasPreviousPage=false,是否有上一页
hasNextPage=true,是否有下一页
navigatePages=8,每页显示的页码个数
navigateFirstPage=1,首页
navigateLastPage=3,尾页
navigatepageNums=[1, 2, 3]}页码数
dept分页完整代码演示:(后台的):
controller代码:
@Controller
public class DeptController {
@Resource
private DeptMapper deptMapper;
@Resource
private DeptService deptService;
@Resource
private TableService tableService;
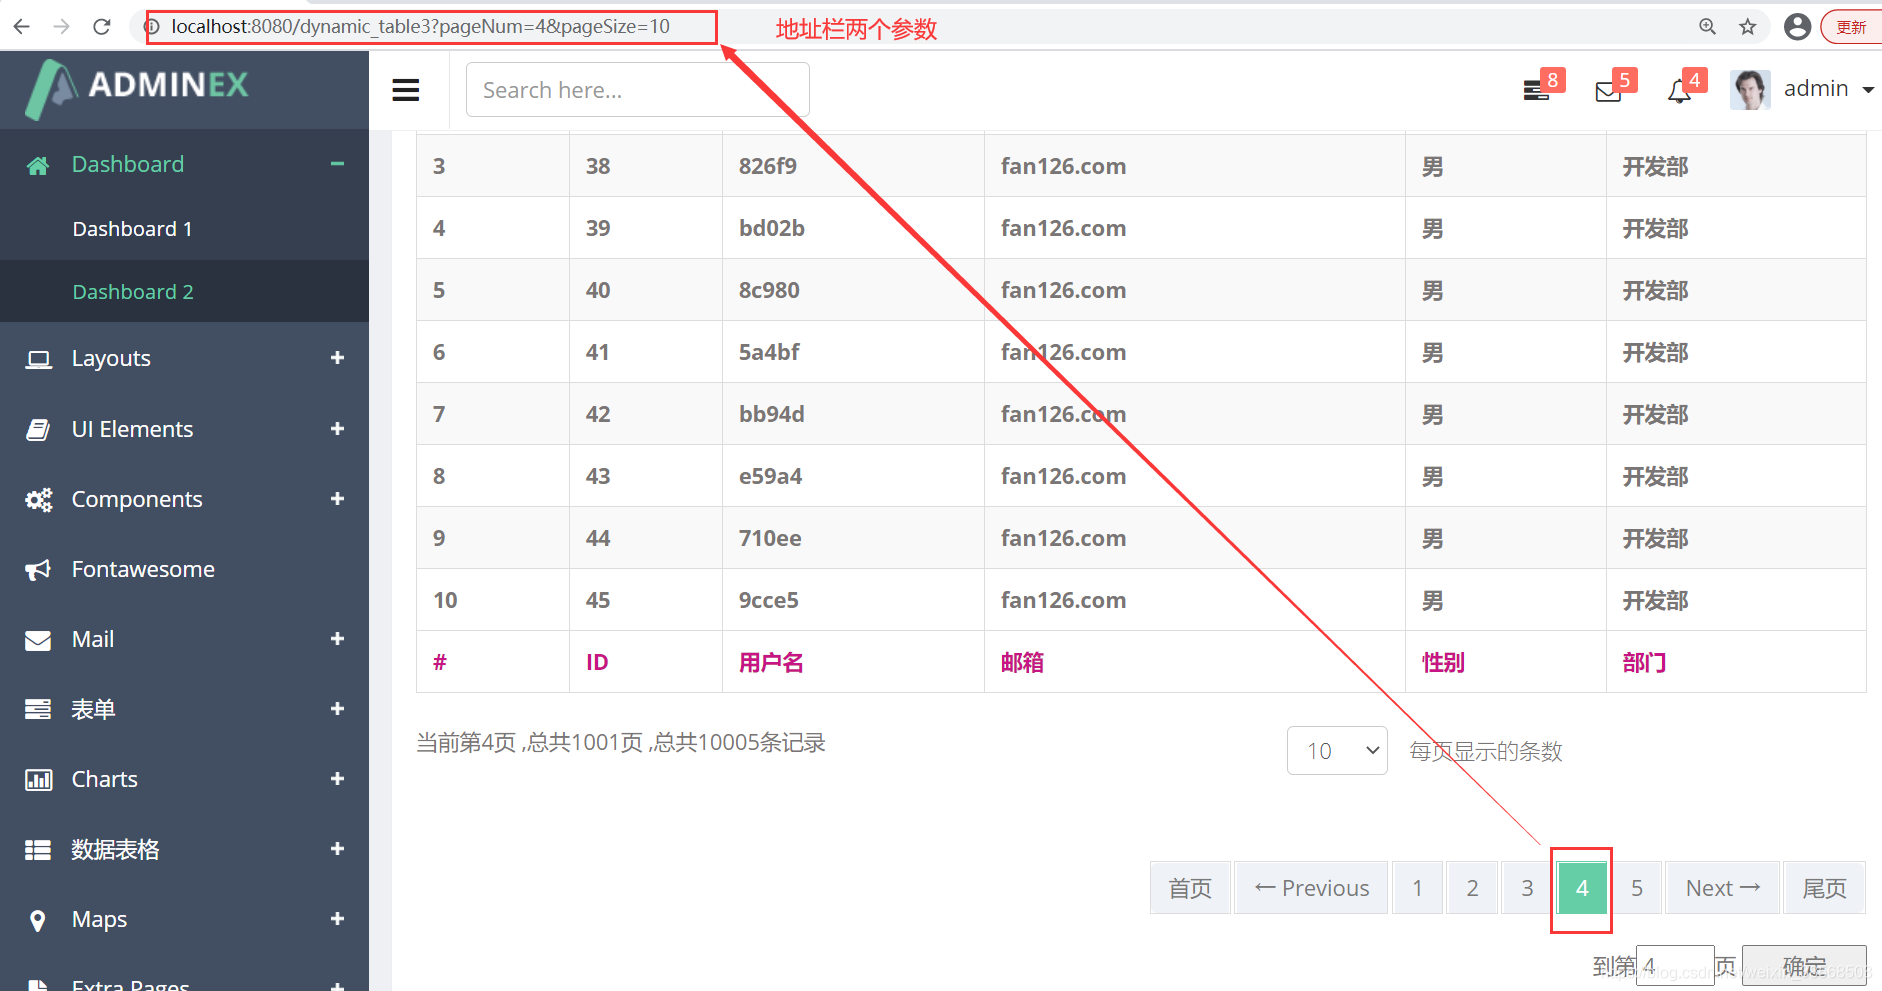
@GetMapping("/dynamic_table3")//带2个分页参数的
public String dynamic_table3(Model model,
@RequestParam(required = true,defaultValue = "1",value ="pageNum" )Integer pageNum,
@RequestParam(required = false,defaultValue = "5",value = "pageSize")Integer pageSize
){
if(pageNum==null){
pageNum=1;
}
if(pageSize==null){
pageSize=10;
}
Integer deptId = 1;//默认查第一个部门
PageInfo<Emp> pageInfo = tableService.getAllEmpByPageInfo(pageNum, pageSize);
model.addAttribute("pageInfo",pageInfo);
return "table/dynamic_table3";
}
service接口:
public interface TableService {
    //带分页的查找
    PageInfo<Emp> getAllEmpByPageInfo(Integer pageNum,Integer pageSize);

}
serviceImpl实现类:
@Service
public class TableServiceImpl implements TableService {
    @Resource
    private EmpMapper empMapper;


    @Override//带分页的查找,将普通的查找进行分页分装
    public PageInfo<Emp> getAllEmpByPageInfo(Integer pageNum,Integer pageSize) {
        //分页的启动页的分页设置,分页一定要至少传递这两个参数
        Page<Student> page = PageHelper.startPage(pageNum, pageSize);
        //紧跟分页设置的后的第一个查询会被分页查询
        List<Emp> emps = empMapper.selectAllEmpAndDept();

        //navigatepage(导航页,显示的页码):默认显示5个连续页,页码导航连续显示的页数5
        PageInfo<Emp> empPageInfo = new PageInfo<>(emps, 5);//将集合封装到pageInfo

        return empPageInfo;
    }
}
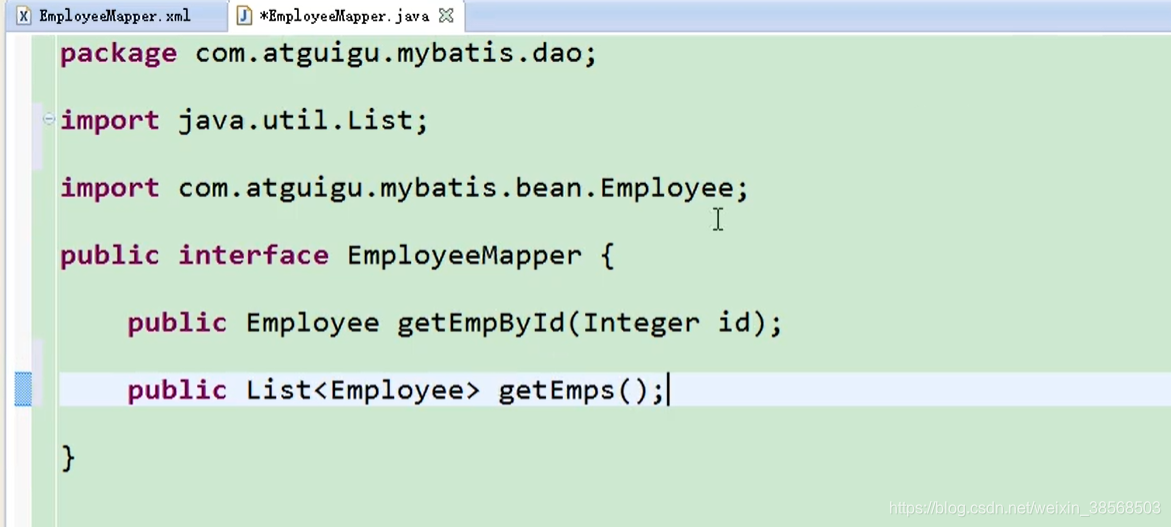
dao层/mapper层接口:
public interface EmpMapper {
	//一进来就查询进行分页,不需要参数
    List<Emp> selectAllEmpAndDept();
}
dao层的实现:EmpMapper.xml:
  <sql id="Base_Column_List">
    id, last_name, email, gender, d_id
  </sql>

  <resultMap id="myEmp1" type="com.fan.domain.Emp">
    <id column="id" property="id"></id>
    <result column="last_name" property="lastName"></result>
    <result column="email" property="email"></result>
    <result column="gender" property="gender"></result>
    <!--单个对象的封装,这里涉及一个分部查询,在Deptmapper中进行查询处理处理了-->
    <association column="d_id" property="dept"  select="com.fan.mapper.DeptMapper.selectByPrimaryKey" >
    </association>
  </resultMap>

 <!--selectAllEmpAndDept(),第一步-->
  <select id="selectAllEmpAndDept" resultMap="myEmp1">
    select <include refid="Base_Column_List"></include>
     from emp
  </select>
dept分页前端页面代码演示:(前端的thymleaf):
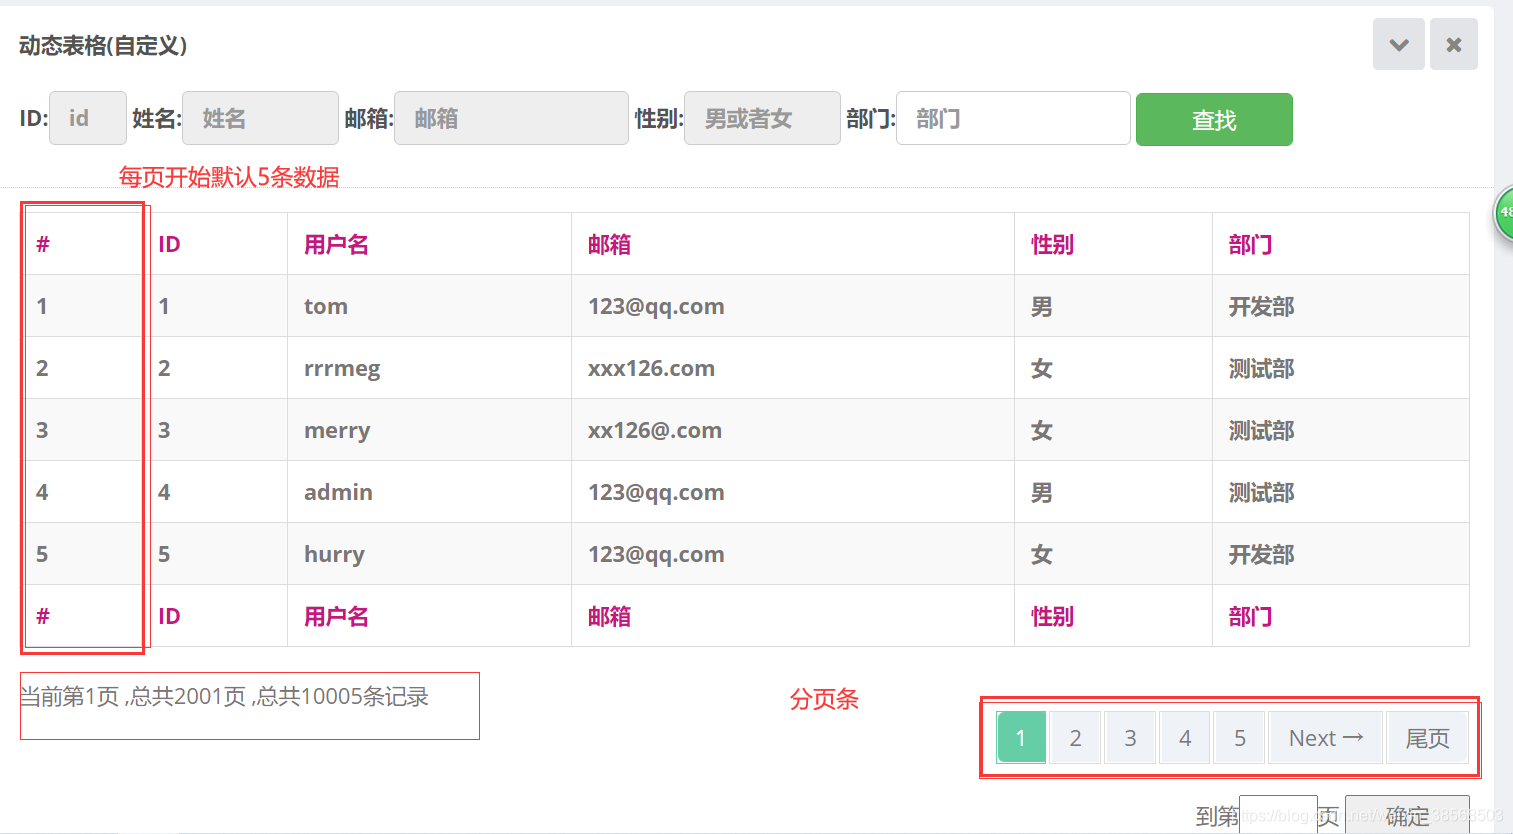
前端页面初级效果:(后面可以将下拉选择每页展示数据条数写上)
前端代码开始:
1.后台数据在页面的填充:
<tr class="gradeX" th:each="emp,state: ${pageInfo.list}">

    <th th:text="${state.count}">#</th>
    <th th:text="${emp.id}">ID</th>
    <th th:text="${emp.lastName}">用户名</th>
    <th th:text="${emp.email}" class="hidden-phone">邮箱</th>
    <th th:text="${emp.gender=='1'}?'男':'女' " class="hidden-phone">性别</th>
    <th th:text="${emp.dept.deptName}" class="hidden-phone">部门</th>

</tr>
2.页码条的设计:(将此段单代码放到/table结束标签的紧接的下边):
<div class="row-fluid">
<div class="span6">
<div class="dataTables_info" id="dynamic-table_info">当前第[[${pageInfo.pageNum}]]页
,总共[[${pageInfo.pages}]]页
,总共[[${pageInfo.total}]]条记录
</div>
</div>
<div class="span6">
<div class="dataTables_paginate paging_bootstrap pagination">
<ul class="pagination pull-right no-margin">
<!--首页和尾页不需要class标签,显示首页条件:有上一页才显示首页,同样,有上一页才显示上一页
逻辑判断的是当前页大于第一页( 即如果已经是第一页,则不显示上一页和首页)-->
<li th:if="${pageInfo.hasPreviousPage}"><a th:href="@{'/dynamic_table3?pageNum=1'} ">首页</a></li>
<li class="prev " th:if="${pageInfo.hasPreviousPage}"><a th:href="@{'/dynamic_table3?pageNum='+${pageInfo.prePage}}">← Previous</a></li>
<!--#numbers.sequence(1,pageInfo.pages)生成一个从第一页到最后一页的总数列号-->
<!-- <li th:each="pageNo:${#numbers.sequence(1,pageInfo.pages)}" th:if="${pageNo} <= 5 ">
<!–th:text="${num}":a标签显示的值,pageNum=${num}请求参数的值是便签显示的值–>
<a href="@{ '/dynamic_table3?pageNum=' +${pageNo} }" th:text="${pageNo}"></a>
</li>-->
<li th:class="${pageNo==pageInfo.pageNum?'active':''} " th:each="pageNo:${#numbers.sequence(1,pageInfo.pages)}"
th:if="${pageNo} <= 5 ">
<!--th:text="${num}":a标签显示的值,pageNum=${num}请求参数的值是便签显示的值-->
<a th:href="@{'/dynamic_table3?pageNum='+${pageNo} }"
th:text="${pageNo}"></a>
</li>
<!--首页和尾页不需要class标签,显示首页条件:有上一页才显示首页,同样,有上一页才显示上一页,
本质是如果已经是最后一页,则不显示下一页和尾页-->
<li class="next" th:if="${pageInfo.hasNextPage}">
<a th:href="@{'/dynamic_table3?pageNum='+${pageInfo.nextPage}}">Next → </a>
</li>
<li th:if="${pageInfo.hasNextPage}"><a th:href="@{'/dynamic_table3?pageNum='+${pageInfo.pages}}">尾页</a></li>
</ul>
<!--直接跳到某一页-->
<div style="padding-top: 30px">
到第<input style="width: 50px" name="pn" id="pn_input" th:value="${param.pageNum}">页
<input id="searchPageBtn" style="width: 80px" type="button" value="确定">
</div>
</div>
</div>
</div>
上一段代码设计thymleaf生成页码序列,和遍历数据集合,以及href地址的参数拼接。
3.定位到多少页的js:
<!--定位到多少页的js-->
<script >
    $(function () {
        //跳到指定的页码
        $("#searchPageBtn").click(function () {
            //alert(location.href);
            var inputPageNum = $("#pn_input").val();
           var total=[[${pageInfo.total}]];
           alert(total);
            //地址栏参数的变化:相当于放松了一个请求:
            location.href="/dynamic_table3?pageNum="+inputPageNum;
        });
    });
</script>
上段js放在/body结束标签紧邻前;
4.处理下拉选择每页条目数:
<div class="span6">
     <div class="dataTables_info" id="dynamic-table_info">当前第[[${pageInfo.pageNum}]]页
         ,总共[[${pageInfo.pages}]]页
         ,总共[[${pageInfo.total}]]条记录
     </div>
 </div>

 <!--分页通过下拉框选择每页显示的个数,此段div放一个合适位置-->
 <div id="dynamic-table_length" style="width: 300px" class="dataTables_length">
     <label>
         <select
                 class="form-control" size="1" name="dynamic-table_length"
                 aria-controls="dynamic-table">

             <option value="5" th:selected="${pageInfo.pageSize==5 }">5</option>
             <option value="10" th:selected="${pageInfo.pageSize==10}">10</option>
             <option value="20" th:selected="${pageInfo.pageSize==20}">20</option>
             <option value="100" th:selected="${pageInfo.pageSize==100}">100</option>
         </select>
         每页显示的条数
     </label>
 </div>
5.通过js驱动下拉框选中的时候地址栏改变(相当于发送了新的请求,此种方法简单,便于实现):
location.href="/dynamic_table2?pageNum=1" +"&pageSize="+pageSize;代码是让取到地址栏并拼接参数。
<!--下拉框选择分页pageSize发送请求-->
<script type="text/javascript">
    $(".dataTables_length").change(function(){
        var pageSize = $(".dataTables_length option:selected").val();

      /*   alert(pageSize);*/

        location.href="/dynamic_table3?pageNum=1" +"&pageSize="+pageSize;

    });
</script>
6.修改新的a标签,给页码的a标签添加class属性。然后js控制地址栏的变化,发送新的get请求:
新的页码a标签:
<a class="a_pageNum" th:href="@{'/dynamic_table3?pageNum='+${pageNo} }"
                                                       th:text="${pageNo}"></a>
对应的js代码:
<!--点击页码条的时候发送一个新的地址栏,带两个分页参数的-->
<script type="text/javascript" th:inline="javascript">
    $(".a_pageNum").click(function () {
        var pageSize = $(".dataTables_length option:selected").val();
        var pageNum = $(this).text();

        alert(pageNum);
        alert(pageSize);
        //alert(location.href);
        location.href='/dynamic_table3?pageNum='+pageNum+'&pageSize='+pageSize;
        //此段代码解决地址栏失效的。
        window.event.returnValue=false;
    });
</script>
最终页面展示效果:
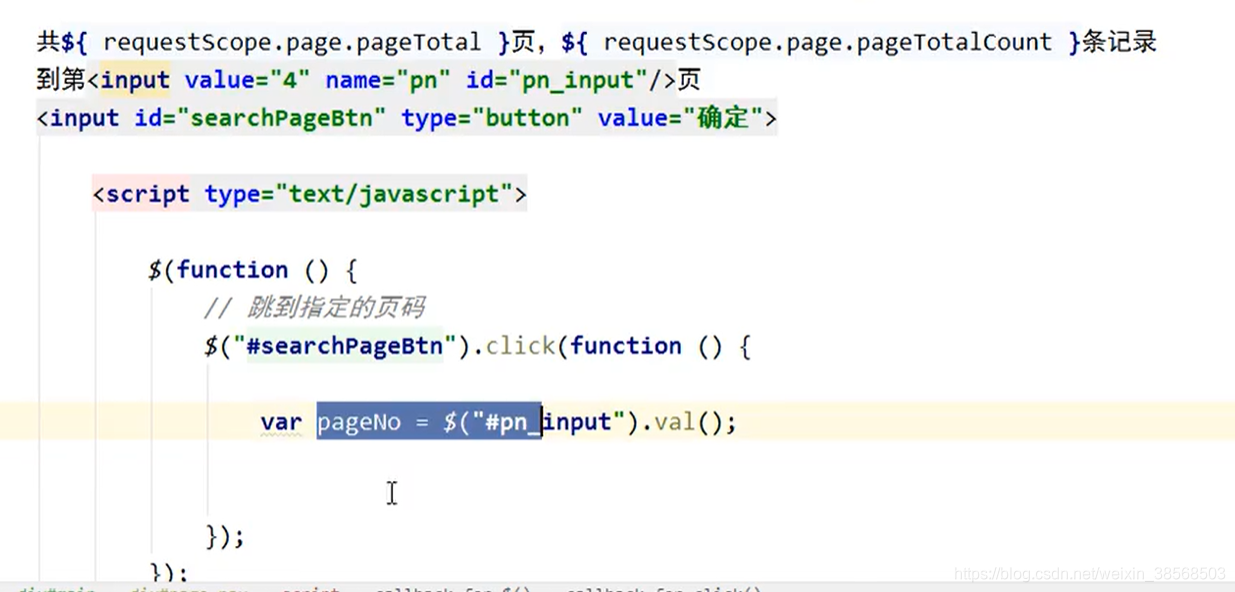
定位到多少页的链接:
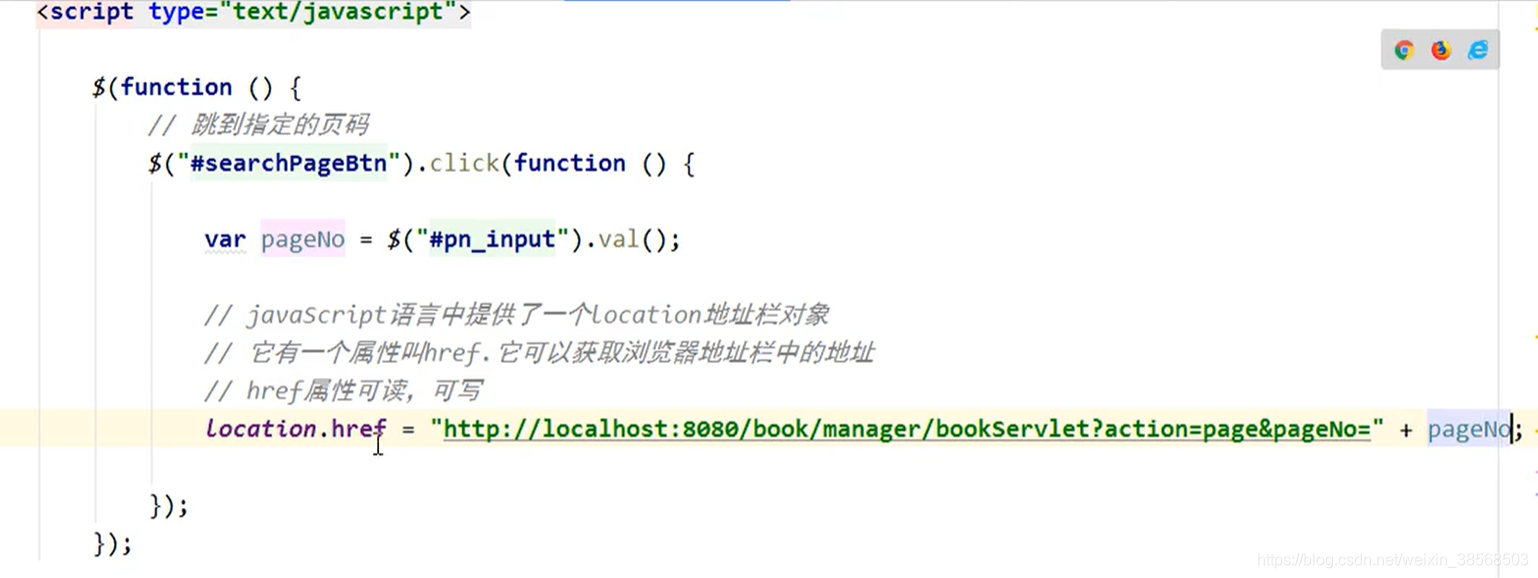
页面代码:
<!--直接跳到某一页-->
 <div style="padding-top: 30px">
 到第<input style="width: 50px" name="pn" id="pn_input" th:value="${param.pageNum}">页
 <input id="searchPageBtn" style="width: 80px" type="button"  value="确定">

 </div>
 <!--注意将script放到body结束标签前 -->
<script type="text/javascript">
    $(function () {
        //跳到指定的页码
        $("#searchPageBtn").click(function () {
            //alert(location.href);
            var inputPageNum = $("#pn_input").val();
            //地址栏参数的变化:相当于放松了一个请求:
            //location.href="http://localhost:8080/dynamic_table3?pageNum="+inputPageNum;
            location.href="/dynamic_table3?pageNum="+inputPageNum;
        });
    });
</script>
注意将script放到body结束标签前
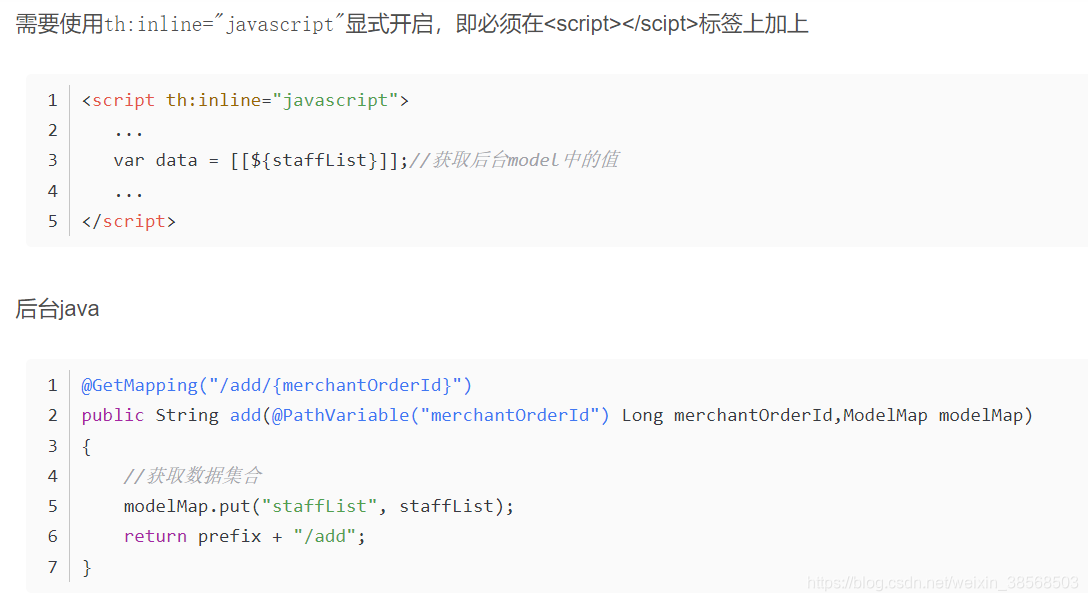
数据回显:
参考:https://www.cnblogs.com/liqbk/p/13252066.html#
js中获取后台数据模型中的值:
页码条的展示:

MyBatais批量处理:
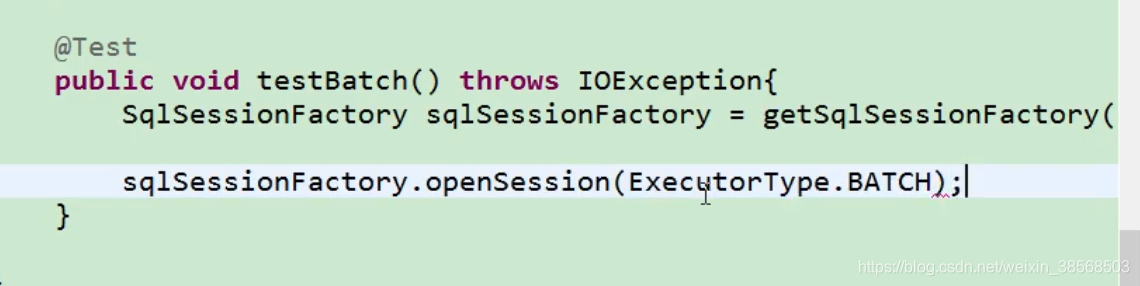
mybatis批处理很简单:
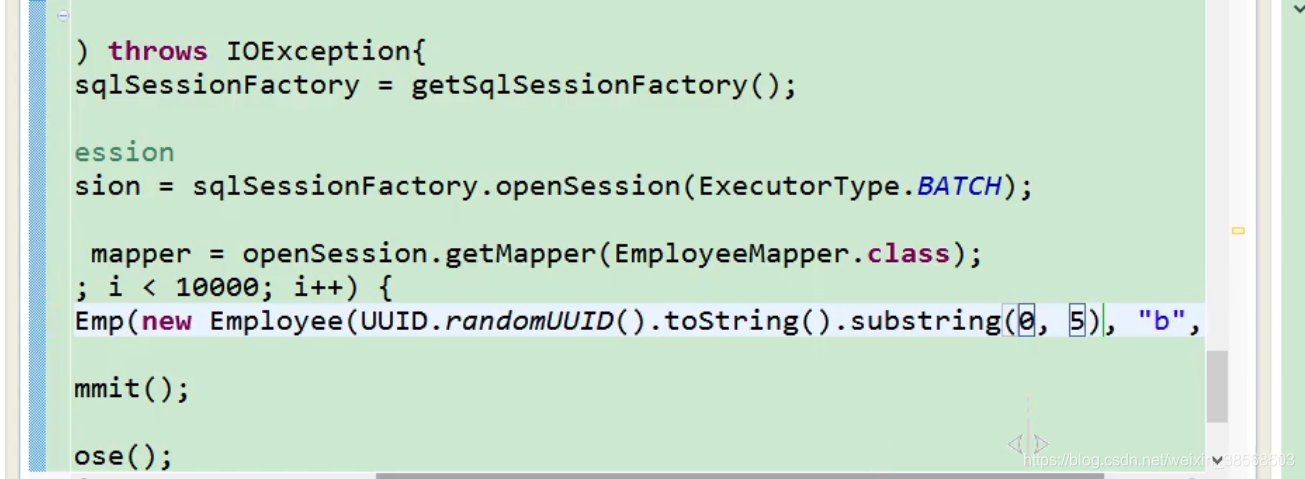
代码演示:
 @Test//批量处理的测试
    public void test04() throws IOException {
        SqlSessionFactory sqlSessionFactory = getSqlSessionFactory();
        //在开启会话的时候,传一个执行的类型为batch参数
        SqlSession sqlSession = sqlSessionFactory.openSession(ExecutorType.BATCH);
        EmpMapper mapper = sqlSession.getMapper(EmpMapper.class);

        long start = System.currentTimeMillis();
        for (int i = 0; i < 10000; i++) {
            Emp emp = new Emp(null, UUID.randomUUID().toString().substring(0, 5), "fan126.com", "1", 1);
            int insert = mapper.insert(emp);
        }
        //提交放到最后,SqlSession openSession(ExecutorType execType, boolean autoCommit)方式会失效
        sqlSession.commit();
        long end = System.currentTimeMillis();
        System.out.println("执行话费的总时间:"+(end-start) );
    }
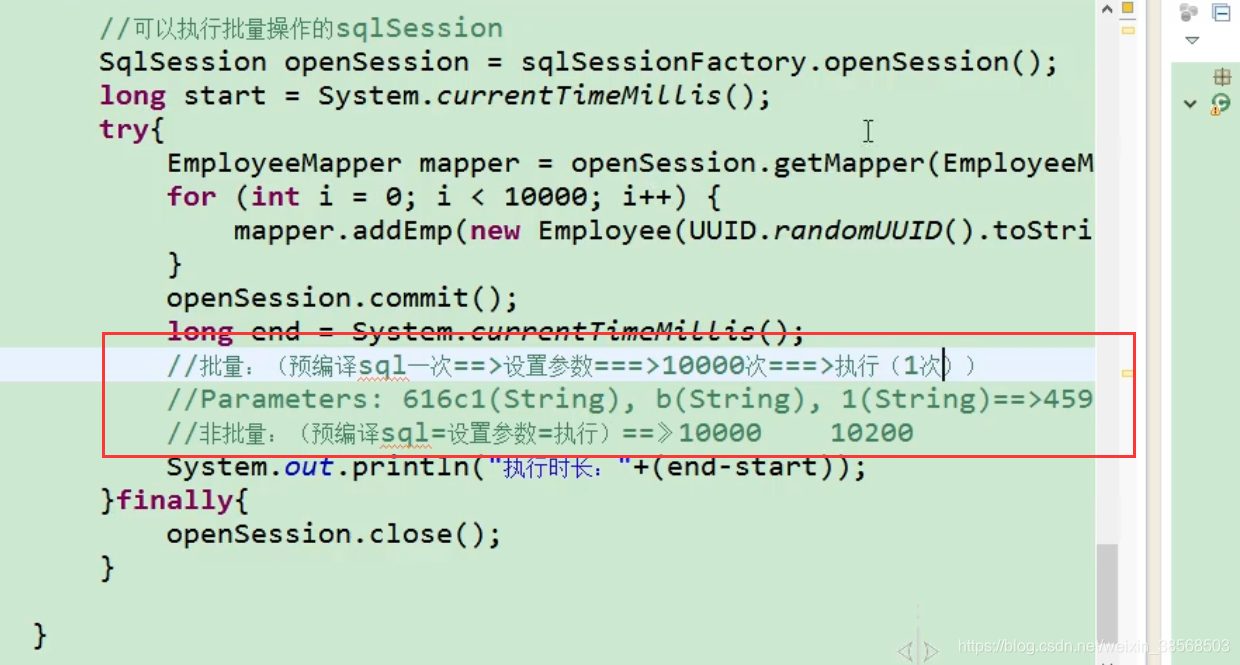
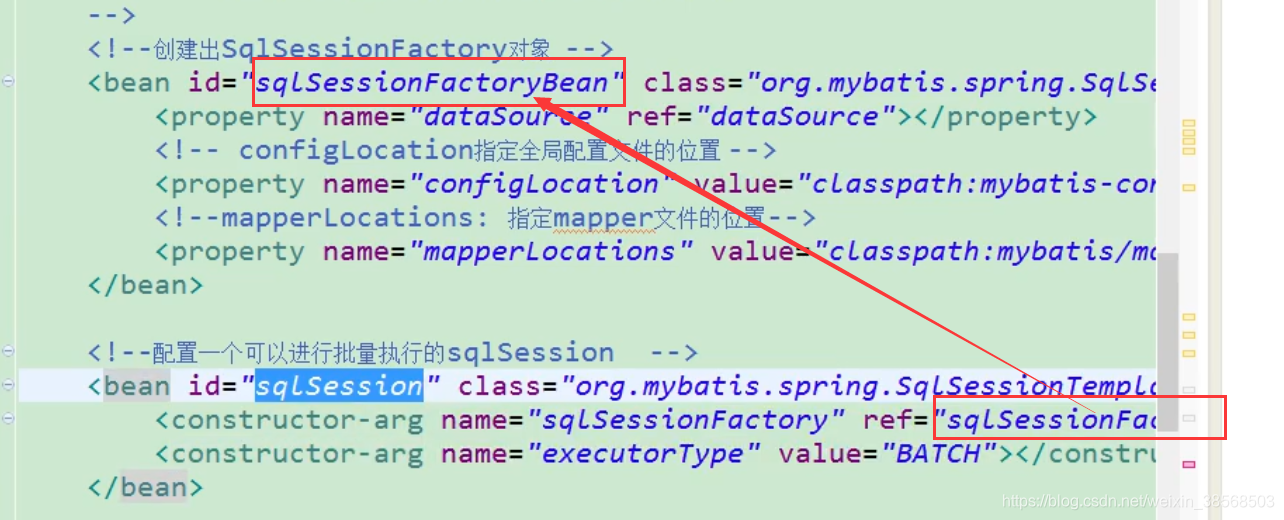
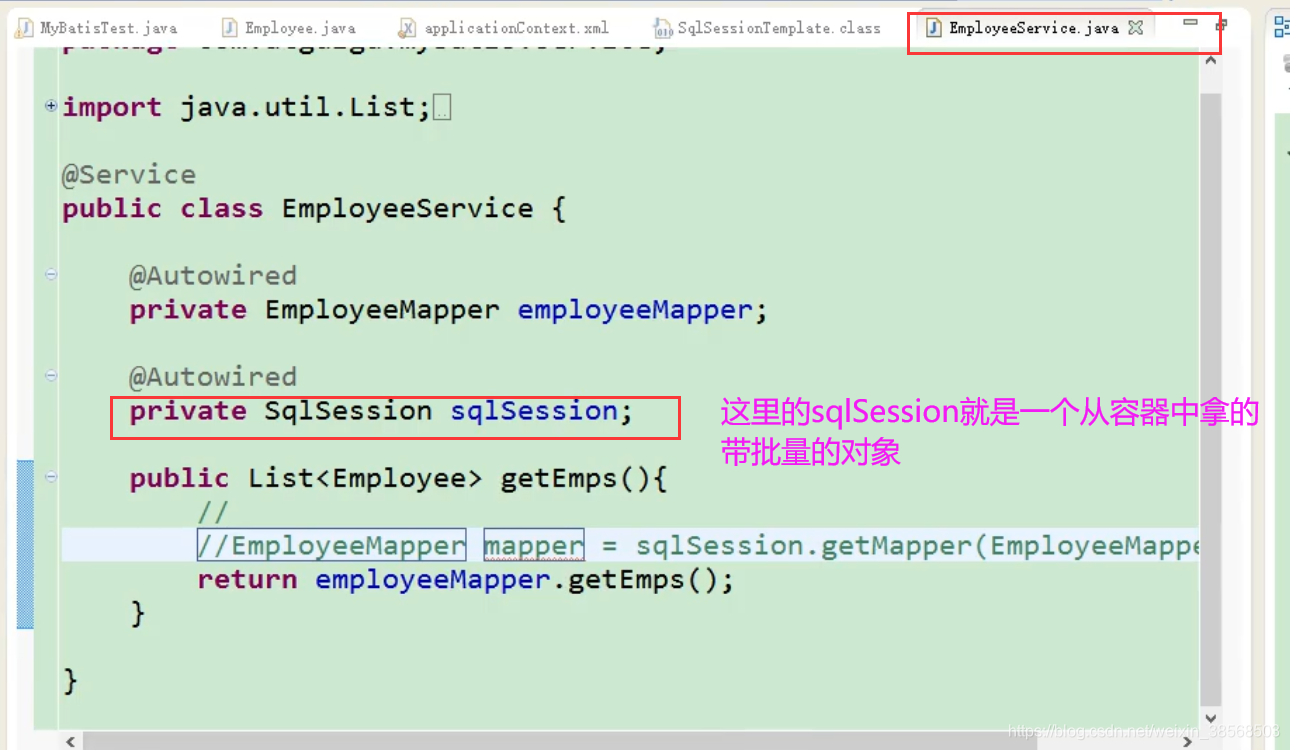
与spring的整合的批量处理:


 被折叠的 条评论
为什么被折叠?
被折叠的 条评论
为什么被折叠?
 到【灌水乐园】发言


