


 本文深入讲解Android开发中常用的三种布局:LinearLayout(线性布局)、RelativeLayout(相对布局)和FrameLayout(框架布局)。涵盖布局特性、属性设置及实例演示,帮助开发者掌握布局技巧。
Android几种常用的布局
Android中系统SDK有5种布局,所有的布局都继承自ViewGroup,分别是LinearLayout(线性布局)、FrameLayout(框架布局)、AbsoluteLayout(绝对布局)、RelativeLayout(相对布局)、TableLayout(表格布局)AbsoluteLayout与TableLayout几乎没有用到,所以就给大家讲解其他三个常用布局。
LinearLayout(线性布局)
LinearLayout是线性布局控件,是ViewGroup的子类,会按照android:orientation属性的值对子View进行排序,可以将子View设置为垂直或水平方向布局。LinearLayout的每个子视图都会按照它们各自在XML中的出现顺序显示在屏幕上。其他两个属性android:layout_width和android:layout_height则是所有视图的必备属性,用于指定它们的尺寸
- 设置排列方式
 android:orientation="vertical"  垂直排列
 android:orientation="horizontal" 水平排列
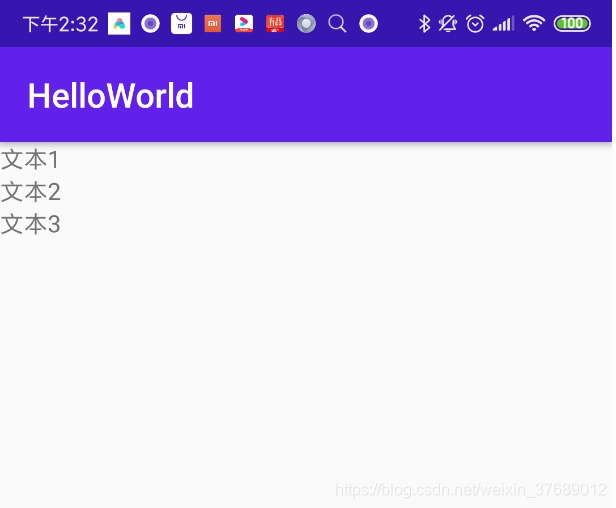
例如,在LinearLayout布局中放三个TextView并且垂直显示,布局如下:
<?xml version="1.0" encoding="utf-8"?>
<LinearLayout xmlns:android="http://schemas.android.com/apk/res/android"

    android:layout_width="match_parent"
    android:layout_height="match_parent"
    android:orientation="vertical">

    <TextView
        android:layout_width="wrap_content"
        android:layout_height="wrap_content"
        android:text='文本1'/>

    <TextView
        android:layout_width="wrap_content"
        android:layout_height="wrap_content"
        android:text='文本2'/>

    <TextView
        android:layout_width="wrap_content"
        android:layout_height="wrap_content"
        android:text='文本3'/>


</LinearLayout>
效果如下
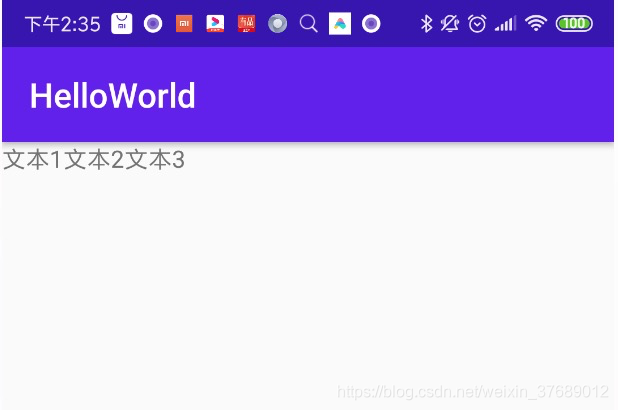
水平显示,效果如下
2.android:layout_gravity(对齐方式)
layout_gravity是LinearLayout子元素的特有属性。对于layout_gravity,该属性用于设置控件相对于容器的对齐方式,可选项有top、bottom、left、right、center_vertical、center_horizontal、center、fill等。接着上面的布局进行修改,给LinearLayout中文本2设置一个layout_gravity属性:
    <TextView
        android:layout_width="wrap_content"
        android:layout_height="wrap_content"
        android:layout_gravity="center_horizontal"
        android:text='文本2'/>
效果如下:
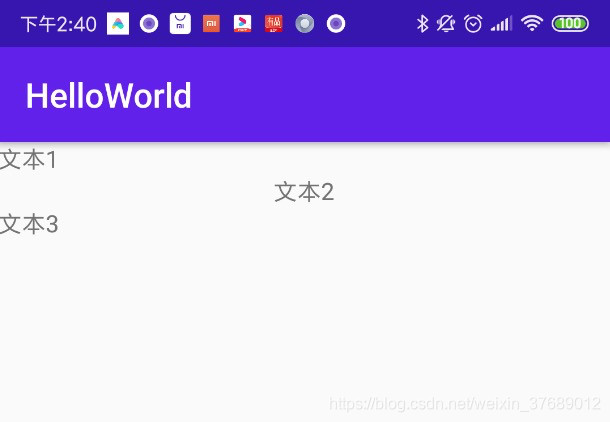
从效果图中可以看到,显示文本2的TextView水平居中了
- weight(权重)
LinearLayout布局中layout_weight属性用来分配子View在LinearLayout中占用的空间(显示大小),只有LinearLayout包裹的View才有这个属性。将上面水平显示的布局文件修改一下
<?xml version="1.0" encoding="utf-8"?>
<LinearLayout xmlns:android="http://schemas.android.com/apk/res/android"

    android:layout_width="match_parent"
    android:layout_height="match_parent"
    android:orientation="horizontal">

    <TextView
        android:layout_width="wrap_content"
        android:layout_height="wrap_content"
        android:layout_weight="1"
        android:background="@android:color/holo_green_light"
        android:text='文本1'/>

    <TextView
        android:layout_width="wrap_content"
        android:layout_height="wrap_content"
        android:layout_weight="1"
        android:background="@color/colorAccent"
        android:text='文本2'/>

    <TextView
        android:layout_width="wrap_content"
        android:layout_height="wrap_content"
        android:background="@android:color/holo_orange_dark"
        android:layout_weight="1"
        android:text='文本3'/>


</LinearLayout>
效果如下图:
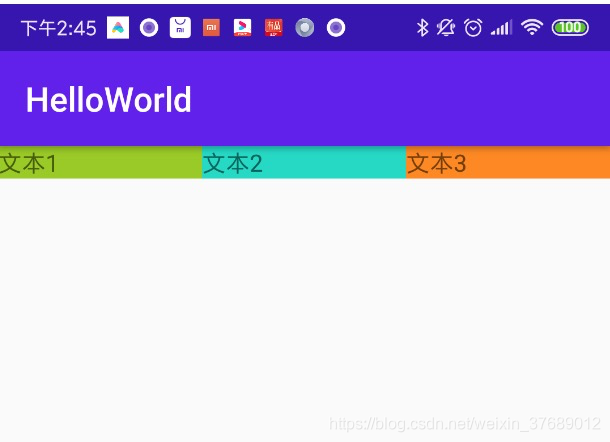
LinearLayout的宽度匹配父类,也就是屏幕的宽度,然后来看三个TextView都设置了android:layout_weight=“1”,其实就是整个屏幕分成三份,显示三个文本。因为怕大家不好区分,所以顺便给TextView加上了背景颜色。在学习过程中大家也可以自己修改android:layout_weight的值,看看会出现什么效果。例如,把1:1:1改成2:3:4,当android:layout_weight的值改成2:3:4时,通俗点解释就是把屏幕的宽度分成9份,第一个TextView的宽度是2/9,第二个TextView的宽度是3/9,第三个TextView的宽度是4/9。
RelativeLayout(相对布局)
RelativeLayout是相对布局,控件的位置是按照相对位置来计算的,一个控件需要依赖另外一个控件或者依赖父控件。这是实际布局中最常用的布局方式之一。它灵活性大很多,当然属性也多,操作难度也大。RelativeLayout常用的一些属性如下:
RelativeLayout常用的一些属性如下:
第一类:属性值为true或false

第二类:属性值必须为id的引用名"@+id/name"
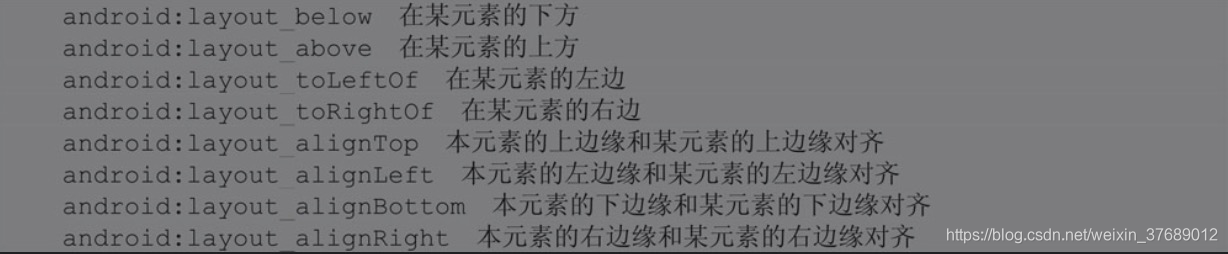
第三类:属性值为具体的值,如30dp、40dp

由于涉及的属性比较多,就不一一详细讲解了,用RelativeLayout布局写了一个登录界面,大家可以学习在布局中如何运用这些属性。
<?xml version="1.0" encoding="utf-8"?>
<RelativeLayout xmlns:android="http://schemas.android.com/apk/res/android"

    android:layout_width="match_parent"
    android:layout_height="match_parent">


    <TextView
        android:id="@+id/tv_nickname"
        android:layout_marginTop="10dp"
        android:layout_width="wrap_content"
        android:layout_height="wrap_content"
        android:layout_weight="1"
        android:background="@android:color/holo_green_light"
        android:textSize="20sp"
        android:text='用户名'/>

    <EditText
        android:id="@+id/et_nickname"
        android:layout_width="match_parent"
        android:layout_toRightOf="@+id/tv_nickname"
        android:textSize="20sp"
        android:text="请输入用户名"
        android:layout_height="wrap_content"/>

    <TextView
        android:id="@+id/tv_password"
        android:layout_marginTop="20dp"
        android:layout_below="@id/tv_nickname"
        android:textSize="20sp"
        android:text="密码"
        android:layout_width="wrap_content"
        android:layout_height="wrap_content"/>

    <EditText
        android:id="@+id/et_password"
        android:layout_marginTop="10dp"
        android:layout_below="@+id/tv_nickname"
        android:layout_toRightOf="@+id/tv_password"
        android:textSize="20sp"
        android:text="请输入密码"

        android:layout_width="match_parent"
        android:layout_height="wrap_content"/>

    <Button
        android:layout_below="@+id/et_password"
        style="@style/Widget.AppCompat.Button.Colored"
        android:layout_alignParentRight="true"
        android:layout_width="wrap_content"
        android:text="登录"
        android:layout_height="wrap_content"/>


</RelativeLayout>
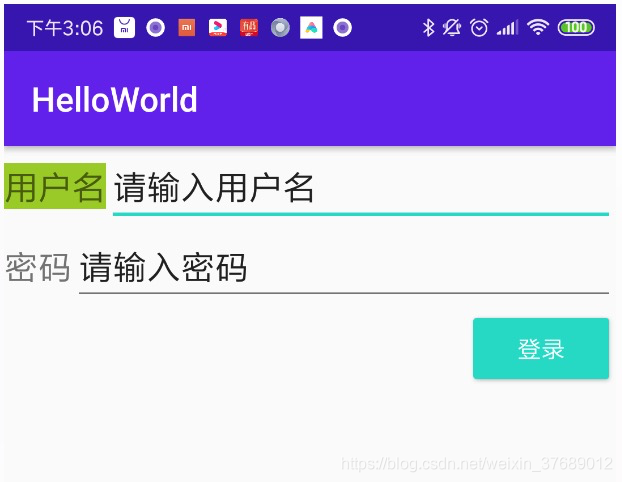
从布局中可以看到,通过android:layout_toRightOf="@+id/tv_nickname"属性把输入框放到文本的后面,或者通过android:layout_below="@+id/tv_nickname"属性把密码输入框放到用户名的下面。还可以通过android:layout_marginTop设置上面的外边距,并为Button设置android:layout_alignParentRight="true"属性,就是放在父布局的右边。
效果如下图:
FrameLayout(框架布局)
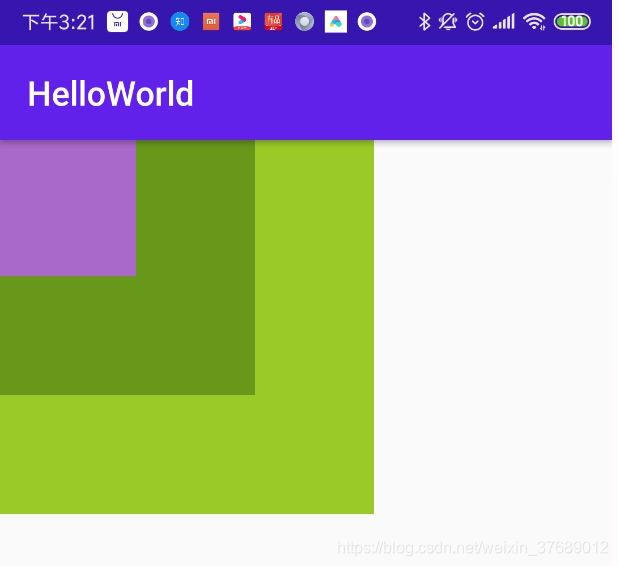
FrameLayout是Android中比较简单的布局之一,该布局直接在屏幕上开辟出了一块空白区域。向其中添加控件时,所有的组件都会置于这块区域的左上角。如果所有的组件都一样大的话,同一时刻只能看到最上面的那个组件。当然,可以为组件添加layout_gravity属性,从而指定对齐方式。
布局文件最外层是FrameLayout布局,第一个控件是TextView,宽高都是220dp,第二个和第三个的宽高依次减少,可以看到第三个会覆盖第二个,第二个会覆盖第一个,第四个TextView因为设置了android:layout_gravity="center_horizontal|bottom"属性,所以相对父布局水平居中并且位于底部。
<?xml version="1.0" encoding="utf-8"?>
<FrameLayout xmlns:android="http://schemas.android.com/apk/res/android"

    android:layout_width="match_parent"
    android:layout_height="match_parent">

    <TextView
        android:id="@+id/tv_nickname"
        android:layout_width="220dp"
        android:layout_height="220dp"
        android:background="@android:color/holo_green_light"
        android:textSize="20sp"
       />

    <TextView
        android:id="@+id/et_nickname"
        android:layout_width="150dp"
        android:background="@android:color/holo_green_dark"
        android:textSize="20sp"
        android:layout_height="150dp"/>

    <TextView
        android:id="@+id/tv_password"
        android:textSize="20sp"
        android:background="@android:color/holo_purple"
        android:layout_width="80dp"
        android:layout_height="80dp"/>


</FrameLayout>
三大布局嵌套以及动态添加View
- 多层嵌套
当布局比较复杂时,就需要多层嵌套来解决问题了,但是也不要嵌套过多,要灵活运用学会的这几种布局。当熟悉之后看到一个Android界面,就知道哪里应该用什么布局。多层嵌套所有的布局都支持的,LinearLayout嵌套FrameLayout,FrameLayout也可以嵌套LinearLayout,这里就用LinearLayout实现登录界面
<?xml version="1.0" encoding="utf-8"?>
<LinearLayout xmlns:android="http://schemas.android.com/apk/res/android"

    android:layout_width="match_parent"
    android:layout_height="match_parent"
    android:orientation="vertical">

    <LinearLayout
        android:layout_width="match_parent"
        android:layout_height="wrap_content"
        android:orientation="horizontal">


        <TextView

            android:layout_width="wrap_content"
            android:layout_height="wrap_content"
            android:textSize="20sp"
            android:text='用户名'/>

        <EditText
            android:layout_width="match_parent"
            android:textSize="20sp"
            android:text="请输入用户名"
            android:layout_height="wrap_content"/>

    </LinearLayout>


   <LinearLayout
       android:layout_width="match_parent"
       android:layout_height="wrap_content"
       android:orientation="horizontal">


       <TextView

           android:layout_width="wrap_content"
           android:layout_toRightOf="@+id/tv_nickname"
           android:textSize="20sp"
           android:text="密码:"
           android:layout_height="wrap_content"/>

       <EditText
           android:text="请输入密码"
           android:layout_width="wrap_content"
           android:layout_height="wrap_content"/>


   </LinearLayout>

    <Button
        style="@style/Widget.AppCompat.Button.Colored"
        android:layout_width="wrap_content"
        android:layout_height="wrap_content"
        android:layout_gravity="right"
        android:text="登录" />


</LinearLayout>
从宏观的角度来看,第一行、第二行、第三行可以用LinearLayout的垂直排列实现,接下来细分到每一行,第一行与第二行用到了两个控件,所以可以嵌套一层,然后设置水平排列方式。第三行是一个按钮,可以设置android:layout_gravity="right"属性。


 2313
2313

 被折叠的 条评论
为什么被折叠?
被折叠的 条评论
为什么被折叠?
 到【灌水乐园】发言


