


 这篇博客详细解析了Spring中Bean的初始化过程,从构造方法开始,经过属性赋值,到BeanPostProcessor的前后处理方法,再到@PostConstruct注解的方法和InitializingBean接口的afterPropertiesSet方法,最后是Init-method指定的初始化方法。博主通过跟踪源码,逐步揭示了Bean初始化的整个流程,强调了理解和掌握这一过程对于解决实际问题的重要性。
之前一直对spring中bean的初始化顺序模糊不清,感觉作用都一样,也没去认真的去看看它的源码,直到遇到问题才想着去认真看下,这拖延症真的是太可怕了。
首先说下结论再去跟着结论去看源码。
bean的构造方法-----》属性赋值-----》BeanPostProcessor的postProcessBeforeInitialization方法-----》@PostConstruct注解修饰的方法-----》InitializingBean接口afterPropertiesSet方法---》Init-method方法----》BeanPostProcessor的postProcessAfterInitialization方法。
跟着这个结论来一起看下源码是怎么实现的。
1.首先看下这个容器入口。
AnnotationConfigApplicationContext context = new AnnotationConfigApplicationContext(SpringDemo.class);
2.查看该构造方法 可以看到初始化方法refresh()
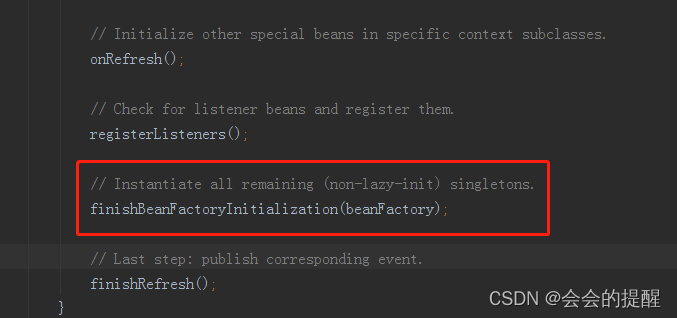
3.进入refresh()方法,可以看到在BeanFactory初始化完成后进去finishBeanFactoryInitialization方法加载所有的单例对象。
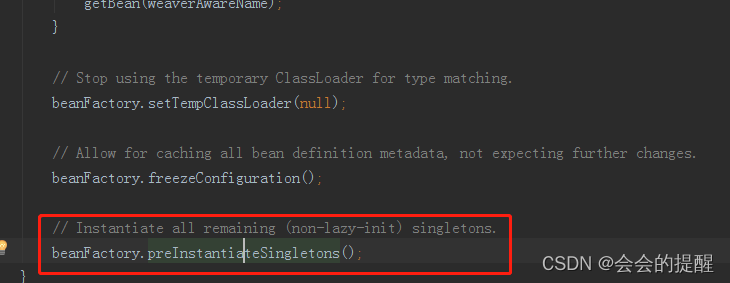
4.通过 beanFactory.preInstantiateSingletons()实例化所有的单例对象
5.在该方法中通过bean名称来获取该bean的元数据,调用getBean()方法获取bean实例。
public void preInstantiateSingletons() throws BeansException {
		if (this.logger.isInfoEnabled()) {
			this.logger.info("Pre-instantiating singletons in " + this);
		}
		List<String> beanNames;
		synchronized (this.beanDefinitionMap) {
			// Iterate over a copy to allow for init methods which in turn register new bean definitions.
			// While this may not be part of the regular factory bootstrap, it does otherwise work fine.
			beanNames = new ArrayList<String>(this.beanDefinitionNames);
		}

		for (String beanName : beanNames) {
			RootBeanDefinition bd = getMergedLocalBeanDefinition(beanName);
			if (!bd.isAbstract() && bd.isSingleton() && !bd.isLazyInit()) {
				if (isFactoryBean(beanName)) {
					final FactoryBean<?> factory = (FactoryBean<?>) getBean(FACTORY_BEAN_PREFIX + beanName);
					boolean isEagerInit;
					if (System.getSecurityManager() != null && factory instanceof SmartFactoryBean) {
						isEagerInit = AccessController.doPrivileged(new PrivilegedAction<Boolean>() {
							public Boolean run() {
								return ((SmartFactoryBean<?>) factory).isEagerInit();
							}
						}, getAccessControlContext());
					}
					else {
						isEagerInit = (factory instanceof SmartFactoryBean &&
								((SmartFactoryBean<?>) factory).isEagerInit());
					}
					if (isEagerInit) {
						getBean(beanName);
					}
				}
				else {
					getBean(beanName);
				}
			}
		}
	}
6.进去doGetBean方法。该方法前面是从容器中去获取bean,获取不到走底下的创建这个bean实例逻辑。
// Create bean instance.
				if (mbd.isSingleton()) {
					sharedInstance = getSingleton(beanName, new ObjectFactory<Object>() {
						public Object getObject() throws BeansException {
							try {
								return createBean(beanName, mbd, args);
							}
							catch (BeansException ex) {
								// Explicitly remove instance from singleton cache: It might have been put there
								// eagerly by the creation process, to allow for circular reference resolution.
								// Also remove any beans that received a temporary reference to the bean.
								destroySingleton(beanName);
								throw ex;
							}
						}
					});
					bean = getObjectForBeanInstance(sharedInstance, name, beanName, mbd);
				}
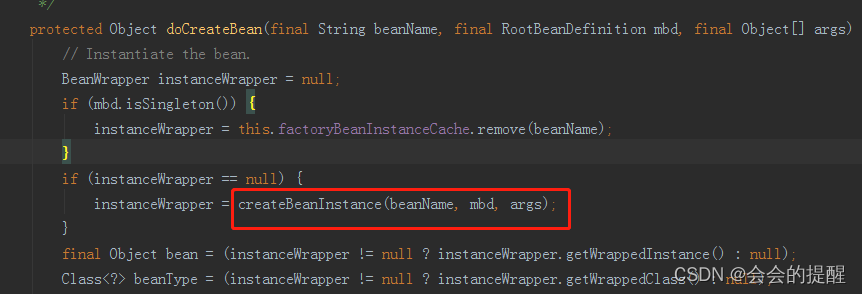
7.进去 createBean方法,首先会初始化bean实例
下面会通过 populateBean方法给实例的属性赋值。接着会执行初始化动作。
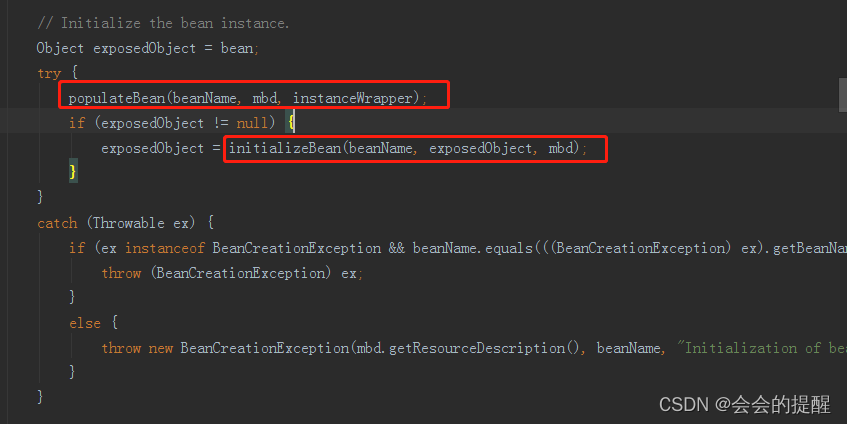
8.来看下初始化方法initializeBean。从方法名称上可以清楚的看到后置处理器的before先执行,中间是initMethod方法,最后是后置处理器的After方法。
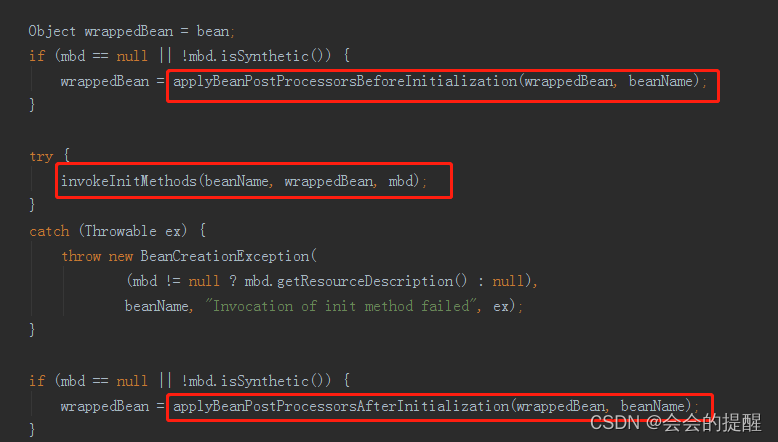
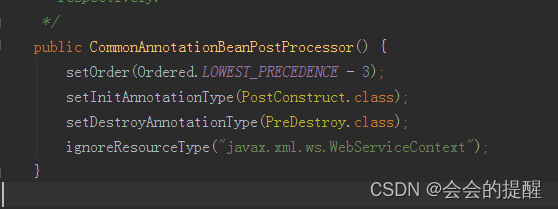
9.进去applyBeanPostProcessorsBeforeInitialization方法。获取所有的BeanPostProcessor接口实现类来进行匹配,这是Spring的一个扩展点,而我们的@PostConstruct就是通过这种扩展机制实现的,它对应的类是InitDestroyAnnotationBeanPostProcessor。
可以看到有该注解的存在
10.现在我们进入下面的方法invokeInitMethods,该方法逻辑简单,判断是否实现了InitializingBean接口下面再判断了是否有自定义初始化方法。
protected void invokeInitMethods(String beanName, final Object bean, RootBeanDefinition mbd)
			throws Throwable {

		boolean isInitializingBean = (bean instanceof InitializingBean);
		if (isInitializingBean && (mbd == null || !mbd.isExternallyManagedInitMethod("afterPropertiesSet"))) {
			if (logger.isDebugEnabled()) {
				logger.debug("Invoking afterPropertiesSet() on bean with name '" + beanName + "'");
			}
			if (System.getSecurityManager() != null) {
				try {
					AccessController.doPrivileged(new PrivilegedExceptionAction<Object>() {
						public Object run() throws Exception {
							((InitializingBean) bean).afterPropertiesSet();
							return null;
						}
					}, getAccessControlContext());
				}
				catch (PrivilegedActionException pae) {
					throw pae.getException();
				}
			}
			else {
				((InitializingBean) bean).afterPropertiesSet();
			}
		}

		if (mbd != null) {
			String initMethodName = mbd.getInitMethodName();
			if (initMethodName != null && !(isInitializingBean && "afterPropertiesSet".equals(initMethodName)) &&
					!mbd.isExternallyManagedInitMethod(initMethodName)) {
				invokeCustomInitMethod(beanName, bean, mbd);
			}
		}
	}
10.最后是后置处理器的after方法。


 2284
2284


 到【灌水乐园】发言


