


 本文详细介绍了如何在Windows上下载、安装和配置MySQL 5.7,包括设置环境变量、创建配置文件my.ini、安装服务、启动与停止服务,以及解决初次登录无密码的问题和更改root用户的密码。
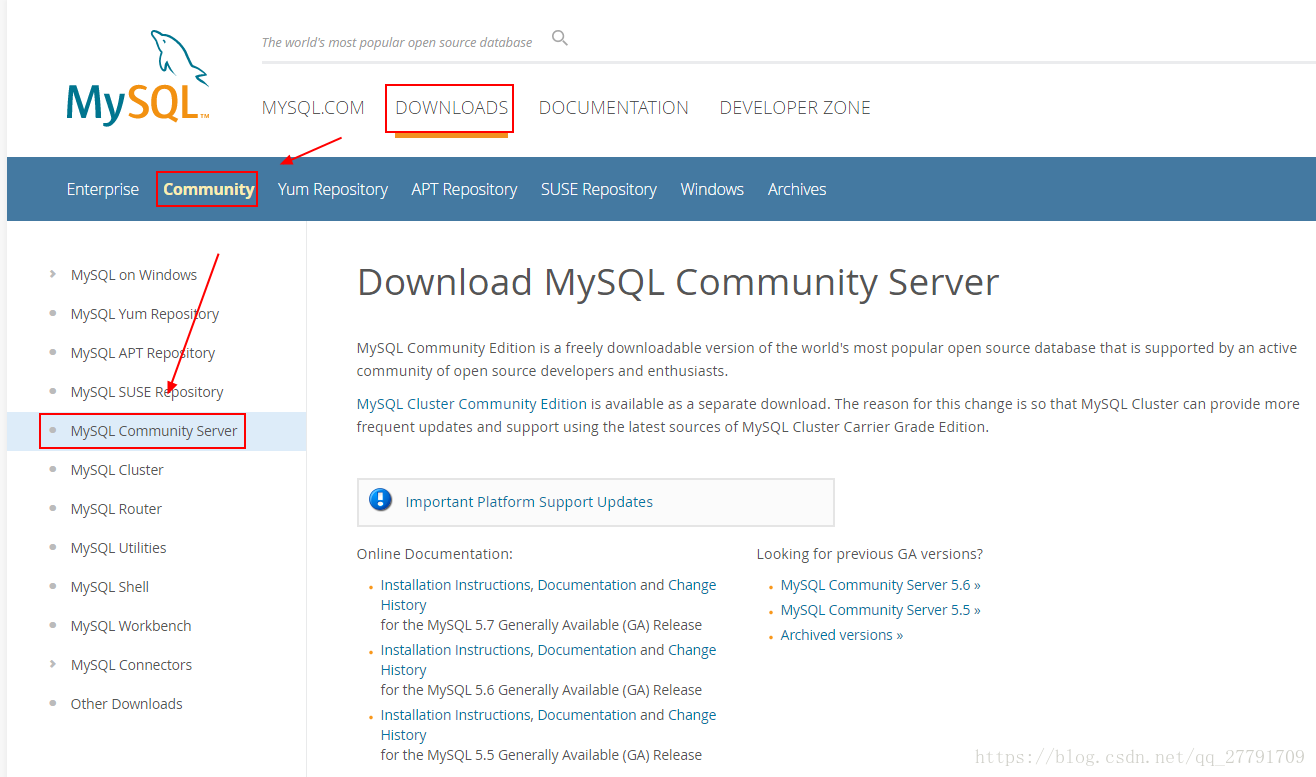
Windows安装及配置MySQL

一、下载
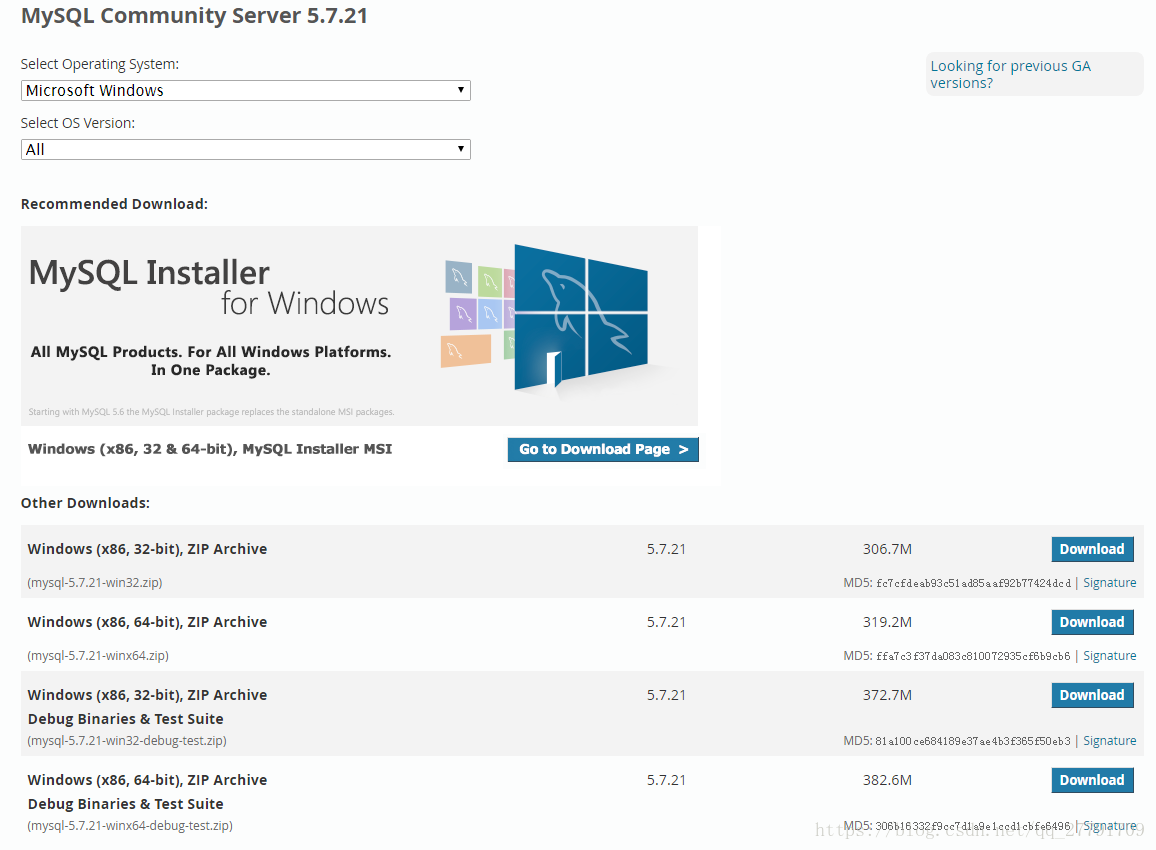
MySQL下载地址:https://dev.mysql.com/downloads/mysql/
二、配置
因为下载的为.zip格式,是不要安装的,解压完成进行配置就可以使用。
1、解压完,将文件夹改名为:MySQL Server 5.7.21,放在D:\Tools\MySQL路径下(可根据自身的需求存放);
2、配置环境变量
计算机右键-->属性-->高级系统设置-->高级(环境变量),在path后面追加;D:\Tools\MySQL\MySQL Server 5.7.21\bin (注意是追加,不是覆盖)
3、MySQL Server 5.7.21下新建data文件夹和my.ini。
配置my.ini,basedir和datadir修改为对应的地址,如下:
basedir = D:\Tools\MySQL\MySQL Server 5.7.21
datadir = D:\Tools\MySQL\MySQL Server 5.7.21\data
[html] view plaincopy
# For advice on how to change settings please see
# http://dev.mysql.com/doc/refman/5.6/en/server-configuration-defaults.html
# *** DO NOT EDIT THIS FILE. It's a template which will be copied to the
# *** default location during install, and will be replaced if you
# *** upgrade to a newer version of MySQL.
[client]
default-character-set = utf8mb4
[mysql]
default-character-set = utf8mb4
[mysqld]
character-set-client-handshake = FALSE
character-set-server = utf8mb4
collation-server = utf8mb4_unicode_ci
init_connect='SET NAMES utf8mb4'
# Remove leading # and set to the amount of RAM for the most important data
# cache in MySQL. Start at 70% of total RAM for dedicated server, else 10%.
innodb_buffer_pool_size = 128M
# Remove leading # to turn on a very important data integrity option: logging
# changes to the binary log between backups.
# log_bin
# These are commonly set, remove the # and set as required.
basedir = D:\Tools\MySQL\MySQL Server 5.7.21
datadir = D:\Tools\MySQL\MySQL Server 5.7.21\data
port = 3306
# server_id = .....
# Remove leading # to set options mainly useful for reporting servers.
# The server defaults are faster for transactions and fast SELECTs.
# Adjust sizes as needed, experiment to find the optimal values.
join_buffer_size = 128M
sort_buffer_size = 16M
read_rnd_buffer_size = 16M
sql_mode=NO_ENGINE_SUBSTITUTION,STRICT_TRANS_TABLES
4、安装
进入D:\Tools\MySQL\MySQL Server 5.7.21\bin文件夹,在地址栏出入cmd回车,输入mysqld -install(若不行试着以管理员身份运行)。
Service successfully installed. --提示安装成功


5、运行/停止服务
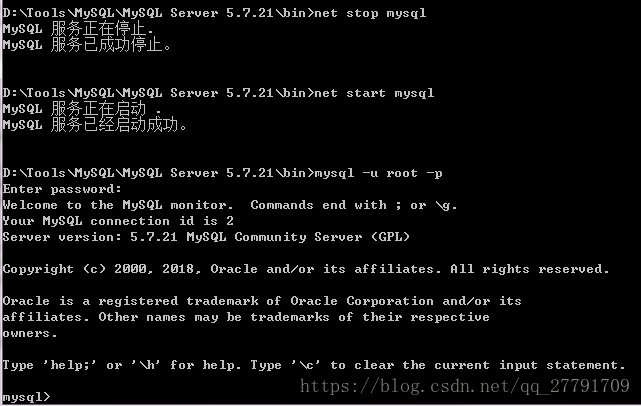
安装成功后就要启动服务了,继续在cmd中输入:net start mysql(如图),服务启动成功!

继续在cmd中输入:net stop mysql(如图),服务停止成功!

6、进入MySQL
输入mysql -u root -p(第一次登录没有密码,直接按回车过),登录成功! --网上查了好多教程是这样的,然鹅,我居然失败了

解决办法:
(1)my.ini文件,在里面找到 [mysqld] 这一项,然后在该配置项下添加 skip-grant-tables这个配置,然后保存文件。
(2)重启mysql服务。net stop mysql / net start mysql
(3)输入mysql -u root -p,回车,果然登录成功!哈哈~
(4)修改密码
在mysql5.7以下的版本如下:
mysql> UPDATE user SET Password=PASSWORD('newpassword') where USER='root' and host='127.0.0.1' or host='localhost';//把空的用户密码都修改成非空的密码就行了。
在mysql5.7版本如下:
update mysql.user set authentication_string=password('newpassword') where user='root' and host='127.0.0.1' or host='localhost';
mysql> FLUSH PRIVILEGES;
mysql> quit # /etc/init.d/mysqld restart //离开并重启mysql
# mysql -uroot -p
Enter password:


 282
282

 被折叠的 条评论
为什么被折叠?
被折叠的 条评论
为什么被折叠?
 到【灌水乐园】发言


