


 本文详细介绍了在Android中实现底部标签栏的三种常见方法:TabActivity、ActivityGroup和FragmentActivity,并提供了每种方式的代码实现。尽管TabActivity和ActivityGroup已被官方弃用,但为了兼容旧项目,仍然有必要了解。作者推荐使用FragmentActivity,因其代码简洁,易于维护。文章通过代码示例展示了如何设置标签的文本、图标以及对应的页面跳转,并给出了三种方式的效果图。
底部标签页实现思路
现在的APP,大多在页面底部显示标签栏Tabbar,用于切换不同栏目的页面。Tabbar起源于iOS,iOS的Tabbar自动位于页面下方,可是Android搬过来的时候做了改动,自带的Tabbar位于页面上方,很不适合用户的使用习惯。为此我们在Android实现底部标签栏,得额外进行底部适配处理,适配思路基本都是在底部罗列一排的按钮,然后根据点击不同的按钮,跳到不同的Activity页面。具体的实现方式,目前发现了三个:
1、使用TabActivity。其中在布局文件中设置TabHost、TabWidget和RadioButton,在代码文件中应用TabActivity、TabSpec和CompoundButton。
2、使用ActivityGroup。将几个栏目的首页Activity都放入ActivityGroup,然后根据点击事件选择切换到哪个Activity。
3、使用FragmentActivity和Fragment。将几个栏目的首页Fragment都放入FragmentActivity,可自动响应点击事件。
其中TabActivity继承自ActivityGroup,目前Android声称TabActivity与ActivityGroup都已废弃,建议采用Fragment和FragmentManager来代替。从实现代码来看,TabActivity和ActivityGroup两种方式的代码量都较多,而FragmentActivity方式的代码就显得很简洁,所以博主也推荐第三种方式。
下面简要介绍三种方式的代码实现:
TabActivity方式
调用代码如下:
import android.app.TabActivity;
import android.content.Intent;
import android.os.Bundle;
import android.widget.CompoundButton;
import android.widget.CompoundButton.OnCheckedChangeListener;
import android.widget.TabHost;
@SuppressWarnings("deprecation")
public class TestTabActivity extends TabActivity implements OnCheckedChangeListener {
private static final String TAG = "TestTabActivity";
private Bundle mBundle = new Bundle();
private TabHost tab_host;
private CompoundButton first_button;
private CompoundButton second_button;
private CompoundButton third_button;
private String FIRST_TAG = "first";
private String SECOND_TAG = "second";
private String THIRD_TAG = "third";
private TabHost.TabSpec getNewTab(String spec, int label, int icon, Intent intent) {
return tab_host
.newTabSpec(spec)
.setIndicator(getString(label), getResources().getDrawable(icon))
.setContent(intent);
}
private void setButtonCheck(CompoundButton button) {
if (button.equals(first_button)) {
button.setChecked(true);
second_button.setChecked(false);
third_button.setChecked(false);
} else if (button.equals(third_button)) {
button.setChecked(true);
second_button.setChecked(false);
first_button.setChecked(false);
} else if (button.equals(second_button)) {
button.setChecked(true);
first_button.setChecked(false);
third_button.setChecked(false);
}
}
@Override
protected void onCreate(Bundle savedInstanceState) {
super.onCreate(savedInstanceState);
setContentView(R.layout.activity_test_tab);
mBundle.putString("tag", TAG);
tab_host = getTabHost();
tab_host.addTab(getNewTab(FIRST_TAG, R.string.menu_first,
R.drawable.tab_first_selector, new Intent(this, FirstActivity.class).putExtras(mBundle)));
tab_host.addTab(getNewTab(SECOND_TAG, R.string.menu_second,
R.drawable.tab_second_selector, new Intent(this, SecondActivity.class).putExtras(mBundle)));
tab_host.addTab(getNewTab(THIRD_TAG, R.string.menu_third,
R.drawable.tab_third_selector, new Intent(this, ThirdActivity.class).putExtras(mBundle)));
first_button = ((CompoundButton) findViewById(R.id.rbtn_tab_first));
first_button.setOnCheckedChangeListener(this);
second_button = ((CompoundButton) findViewById(R.id.rbtn_tab_second));
second_button.setOnCheckedChangeListener(this);
third_button = ((CompoundButton) findViewById(R.id.rbtn_tab_third));
third_button.setOnCheckedChangeListener(this);
tab_host.setCurrentTabByTag(FIRST_TAG);
setButtonCheck(first_button);
}
@Override
public void onCheckedChanged(CompoundButton buttonView, boolean isChecked) {
if (isChecked == true) {
setButtonCheck(buttonView);
if (buttonView.equals(first_button)) {
tab_host.setCurrentTabByTag(FIRST_TAG);
} else if (buttonView.equals(second_button)) {
tab_host.setCurrentTabByTag(SECOND_TAG);
} else if (buttonView.equals(third_button)) {
tab_host.setCurrentTabByTag(THIRD_TAG);
}
}
}
}
该方式的核心是getNewTab函数,可设置标签的文本和图标,以及该标签对应的跳转页面。当发生点击事件时,系统调用TabHost的setCurrentTabByTag函数来定位到具体的跳转页面。
ActivityGroup方式
调用代码如下:
import android.app.ActivityGroup;
import android.content.Intent;
import android.os.Bundle;
import android.view.View;
import android.view.View.OnClickListener;
import android.widget.ImageView;
import android.widget.LinearLayout;
import android.widget.TextView;
@SuppressWarnings("deprecation")
public class TestGroupActivity extends ActivityGroup implements OnClickListener {
private static final String TAG = "TestGroupActivity";
private Bundle mBundle = new Bundle();
private LinearLayout layout_container, layout_first, layout_second, layout_third;
private ImageView img_first, img_second, img_third;
private TextView txt_first, txt_second, txt_third;
public static final int PAGE_FIRST = 1001;
public static final int PAGE_SECOND = 1002;
public static final int PAGE_XINXI = 1003;
@Override
protected void onCreate(Bundle savedInstanceState) {
super.onCreate(savedInstanceState);
setContentView(R.layout.activity_test_group);
layout_container = (LinearLayout) findViewById(R.id.layout_container);
layout_first = (LinearLayout) findViewById(R.id.layout_first);
layout_second = (LinearLayout) findViewById(R.id.layout_second);
layout_third = (LinearLayout) findViewById(R.id.layout_third);
img_first = (ImageView) findViewById(R.id.img_first);
img_second = (ImageView) findViewById(R.id.img_second);
img_third = (ImageView) findViewById(R.id.img_third);
txt_first = (TextView) findViewById(R.id.txt_first);
txt_second = (TextView) findViewById(R.id.txt_second);
txt_third = (TextView) findViewById(R.id.txt_third);
layout_first.setOnClickListener(this);
layout_second.setOnClickListener(this);
layout_third.setOnClickListener(this);
mBundle.putString("tag", TAG);
changeContainerView(PAGE_FIRST);
}
private void changeContainerView(int page) {
switch (page) {
case PAGE_FIRST:
layout_first.setBackgroundResource(R.drawable.ic_tabbar_bg_click);
layout_second.setBackgroundResource(R.drawable.ic_tabbar_bg_normal);
layout_third.setBackgroundResource(R.drawable.ic_tabbar_bg_normal);
img_first.setBackgroundResource(R.drawable.ic_tabbar_first_pressed);
img_second.setBackgroundResource(R.drawable.ic_tabbar_second_normal);
img_third.setBackgroundResource(R.drawable.ic_tabbar_third_normal);
txt_first.setTextColor(getResources().getColor(R.color.tab_text_selected));
txt_second.setTextColor(getResources().getColor(R.color.tab_text_normal));
txt_third.setTextColor(getResources().getColor(R.color.tab_text_normal));
toActivity("item1", new Intent(this, FirstActivity.class).putExtras(mBundle));
return;
case PAGE_SECOND:
layout_first.setBackgroundResource(R.drawable.ic_tabbar_bg_normal);
layout_second.setBackgroundResource(R.drawable.ic_tabbar_bg_click);
layout_third.setBackgroundResource(R.drawable.ic_tabbar_bg_normal);
img_first.setBackgroundResource(R.drawable.ic_tabbar_first_normal);
img_second.setBackgroundResource(R.drawable.ic_tabbar_second_pressed);
img_third.setBackgroundResource(R.drawable.ic_tabbar_third_normal);
txt_first.setTextColor(getResources().getColor(R.color.tab_text_normal));
txt_second.setTextColor(getResources().getColor(R.color.tab_text_selected));
txt_third.setTextColor(getResources().getColor(R.color.tab_text_normal));
toActivity("item1", new Intent(this, SecondActivity.class).putExtras(mBundle));
return;
case PAGE_XINXI:
layout_first.setBackgroundResource(R.drawable.ic_tabbar_bg_normal);
layout_second.setBackgroundResource(R.drawable.ic_tabbar_bg_normal);
layout_third.setBackgroundResource(R.drawable.ic_tabbar_bg_click);
img_first.setBackgroundResource(R.drawable.ic_tabbar_first_normal);
img_second.setBackgroundResource(R.drawable.ic_tabbar_second_normal);
img_third.setBackgroundResource(R.drawable.ic_tabbar_third_pressed);
txt_first.setTextColor(getResources().getColor(R.color.tab_text_normal));
txt_second.setTextColor(getResources().getColor(R.color.tab_text_normal));
txt_third.setTextColor(getResources().getColor(R.color.tab_text_selected));
toActivity("item1", new Intent(this, ThirdActivity.class).putExtras(mBundle));
return;
default:
return;
}
}
@Override
public void onClick(View view) {
switch (view.getId()) {
case R.id.layout_first:
changeContainerView(PAGE_FIRST);
return;
case R.id.layout_second:
changeContainerView(PAGE_SECOND);
return;
case R.id.layout_third:
changeContainerView(PAGE_XINXI);
return;
default:
return;
}
}
private void toActivity(String label, Intent intent) {
layout_container.removeAllViews();
View view = getLocalActivityManager().startActivity(label, intent).getDecorView();
layout_container.addView(view);
}
}
该方式的核心是toActivity函数,也可设置标签的文本和图标,以及该标签对应的跳转页面。在toActivity函数中可以看到,startActivity方法返回一个Window对象,系统从该Window对象提取标签页的实际视图getDecorView(我们可以把DecorView理解为该标签页的根视图),然后这个DecorView加入到Tabbar的视图容器中。
FragmentActivity方式
调用代码如下:
import android.annotation.SuppressLint;
import android.graphics.drawable.Drawable;
import android.os.Bundle;
import android.support.v4.app.FragmentActivity;
import android.support.v4.app.FragmentTabHost;
import android.view.View;
import android.widget.LinearLayout;
import android.widget.TabHost.TabSpec;
import android.widget.TextView;
@SuppressLint("InflateParams")
public class TestFragmentActivity extends FragmentActivity {
private static final String TAG = "TestFragmentActivity";
private Bundle mBundle = new Bundle();
private FragmentTabHost mTabHost;
@Override
protected void onCreate(Bundle savedInstanceState) {
super.onCreate(savedInstanceState);
setContentView(R.layout.activity_test_fragment);
mBundle.putString("tag", TAG);
mTabHost = (FragmentTabHost)findViewById(android.R.id.tabhost);
mTabHost.setup(this, getSupportFragmentManager(), R.id.realtabcontent);
//addTab(标题,跳转的Fragment,传递参数的Bundle)
mTabHost.addTab(getTabView(R.string.menu_first, R.drawable.tabbar_first_selector), FirstFragment.class, mBundle);
mTabHost.addTab(getTabView(R.string.menu_second, R.drawable.tabbar_second_selector), SecondFragment.class, mBundle);
mTabHost.addTab(getTabView(R.string.menu_third, R.drawable.tabbar_third_selector), ThirdFragment.class, mBundle);
//设置tabs之间的分隔线不显示
mTabHost.getTabWidget().setShowDividers(LinearLayout.SHOW_DIVIDER_NONE);
}
private TabSpec getTabView(int textId, int imgId) {
String text = getResources().getString(textId);
Drawable drawable = getResources().getDrawable(imgId);
//必须设置图片大小,否则不显示
drawable.setBounds(0, 0, drawable.getMinimumWidth(), drawable.getMinimumHeight());
View tabbar_item = getLayoutInflater().inflate(R.layout.tabbar_item, null);
TextView tv_item = (TextView) tabbar_item.findViewById(R.id.tv_item);
tv_item.setText(text);
tv_item.setCompoundDrawables(null, drawable, null, null);
TabSpec spec = mTabHost.newTabSpec(text).setIndicator(tabbar_item);
return spec;
}
}
该方式的核心是getTabView函数,可自定义每个标签项的具体视图。因为FragmentTabHost已经自动处理了点击事件,所以该方式的代码量比前两种缩小很多。
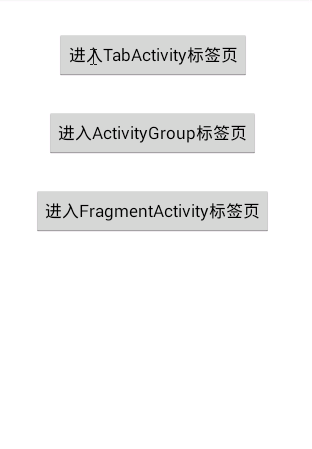
下面是底部标签页三种方式的效果图


 3616
3616

 被折叠的 条评论
为什么被折叠?
被折叠的 条评论
为什么被折叠?
 到【灌水乐园】发言


