


 本文介绍了网络爬虫的基本概念及组成,包括控制节点、爬虫节点和资源库等。详细阐述了不同类型的爬虫,如通用网络爬虫、聚焦网络爬虫等。并通过Python的Urllib库展示了如何实现简单的网页爬取、模拟浏览器请求、使用代理服务器等功能。

1、爬虫的组成
网络爬虫由控制节点、爬虫节点、资源库构成。
控制节点:控制节点是爬虫的中央控制器,主要负责根据URL地址分配线程,并调用爬虫节点进行具体的爬行。
网络爬虫中可以有多个控制节点,每个控制节点下可以有多个爬虫节点
2、网络爬虫的类型
- 通用网络爬虫‘
通用网络爬虫又称全网爬虫,爬去的目标资源在全互联网中,主要应用于大型搜索引擎中。
- 聚焦网络爬虫
聚焦网络爬虫又称主题网络爬虫,是按照预先定义好的主题有选择地进行网页爬去的一类爬虫。
- 增量式网络爬虫
只爬取内容发生变化的网页或者新产生的网页
- 深层网络爬虫
爬取深层页面的爬虫。表层页面指的是不需要提交表单,使用静态的链接就能够到达的静态页面。而深层页面则隐藏在表单后面,不能通过静态链接直接获取,是需要一定的关键词之后才能够获取得到的页面。
实际中的爬虫通常是这四类爬虫的组合。
3、爬行策略
- 深度优先
- 广度优先
- 大站优先(如果某个网站的网页数量多,那么我们则将其称为大站)
- 反链(反向链接数,指的是某个网页被其他网页指向的次数)
4、python简单实现
Urllib库是Python中的一个功能强大、用于操作URL、并在做爬虫时经常要用到的库。、
4.1、读取网页
import urllib.request

# 使用urlopen()方法读取网页
file = urllib.request.urlopen("http://www.baidu.com")
# 使用read()方法输出网页的所有内容
data = file.read()
print(data)
# 注意file对象和Java中的“流”类似,是一次性读取的,随着读取指针向后移,直至末尾,不能返回
# 如果file.read()将file中的数据全部输出,后面再次读取就会是空的
# 这里返回b''
data = file.readline()
print(data)
file = urllib.request.urlopen("http://www.baidu.com")
# readline()方法读取“下一行”
data = file.readline()
print(data)
file = urllib.request.urlopen("http://www.baidu.com")
# readlines()方法读取全部数据到一个list中,list中每个元素代表一行
data = file.readlines()
print(data)
url地址只接收字母、数字和部分特殊字符,对汉字与剩下的多数特殊字符都不支持,固在进行请求之前常常需要编码,后续处理也常常需要解码。request包中提供了对应的这些方法:
import urllib.request

# 编码,返回https%3A//www.baidu.com/s%3Fwd%3D%E6%97%A5%E5%8E%86
quote = urllib.request.quote("https://www.baidu.com/s?wd=日历")
print(quote)
# 解码
unquote = urllib.request.unquote("https%3A//www.baidu.com/s%3Fwd%3D%E6%97%A5%E5%8E%86")
print(unquote)
urlopen()是一个阻塞方法,如果有一个网页由于网速偏慢等等原因导致长时间获取不到,可能会导致程序的长时间阻塞。固我们一般需要给请求设置超时时间,单位为s。如下:
# 设置超时间为1s,超时会抛出异常
try:
    urlopen = urllib.request.urlopen("https://www.baidu.com/s?wd=日历", timeout=1)
except Exception as e:
    print(str(e))
4.2、将网页存到本地
思路如下:
- 爬取网页
- 写入到本地的*.html文件中
from urllib import request
file = request.urlopen("http://www.baidu.com")
data = file.read()
# wb表示以二进制写入模式打开
fhandle = open("C:/Users/ASUS/Desktop/baidu.html","wb")
fhandle.write(data)
# 注意需要主动关闭文件
fhandle.close()
也可以直接使用urllib中的方法:
urlretrieve = request.urlretrieve("http://www.baidu.com", "C:/Users/ASUS/Desktop/baidu.html")
# 清除urlretrieve产生的缓存
request.urlcleanup()
4.3、查看获取的网页的其他信息
urlopen方法返回的类为http.client.HTTPResponse,除了可以像流一样读取内容以外,这个类还提供了一系列的方法,用于获取响应的一些信息。
import http.client
import urllib.request


response = urllib.request.urlopen("http://www.baidu.com")  # type:http.client.HTTPResponse
# 获取相应的网页的响应信息
print(response.info())
# 获取相应的状态码
print(response.getcode())
# 获取相应的url
print(response.geturl())
4.4、模拟浏览器
有些网站进行了一些反爬虫的设置,可能导致我们爬取一些网页时,报403异常,比如爬取oschina的博客时:
import urllib.request

response = urllib.request.urlretrieve("https://my.oschina.net/pierrecai/blog/1142711"
                                      , "C:/Users/ASUS/Desktop/blog.html")
urllib.request.urlcleanup()
会抛出HTTPError,报403异常。
    raise HTTPError(req.full_url, code, msg, hdrs, fp)
urllib.error.HTTPError: HTTP Error 403: Forbidden这时我们就需要更改请求的Headers,将其伪装成一个浏览器。
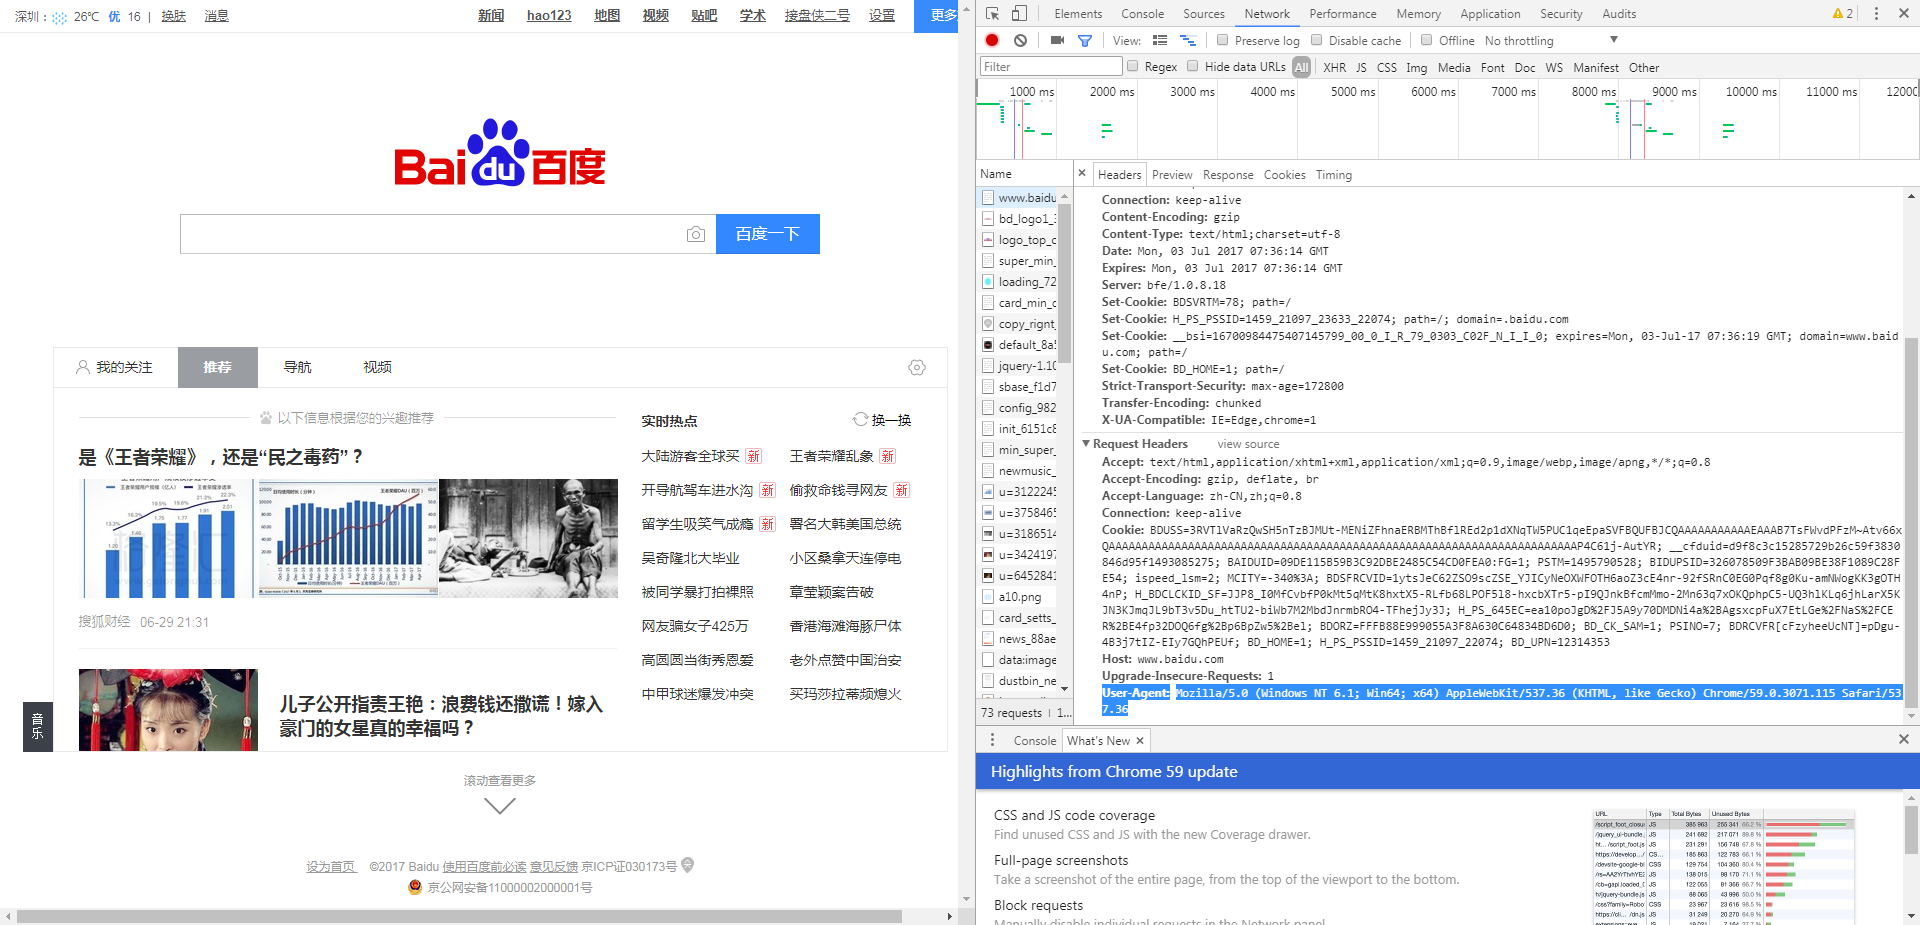
一种简单的方法就是,打开浏览器的调试模式,直接将一个真实的Http Request中的Headers中的“User-Agent”部分内容截取出来。这里以google chrome为例:
按F12进入调试模式,随意打开一个网页,找到下面的信息:
然后需要更改报头,下面提供两种方法:
4.4.1、使用build_opener()
request类并没有直接提供可以自定义报文头的方法,可以通过build_opener()方法获取urllib.request.OpenerDirector对象,然后进行添加。如下:
import urllib.request

# 需要添加的报文头内容
headers = ("User-Agent",
           "Mozilla/5.0 (Windows NT 6.1; Win64; x64) AppleWebKit/537.36 (KHTML, like Gecko) "
           "Chrome/59.0.3071.115 Safari/537.36")
opener = urllib.request.build_opener()
# 添加报文头
opener.addheaders = [headers]
# 发出请求
opener_open = opener.open("https://my.oschina.net/pierrecai/blog/1142711")
print(opener_open.read())
4.4.2、使用add_header()
也可以先获取urllib.request.Request对象,然后再对Request对象进行操作,添加报文头,如下:
# 构建Request对象
request = urllib.request.Request("https://my.oschina.net/pierrecai/blog/1142711")
# 添加头
request.add_header("User-Agent",
                   "Mozilla/5.0 (Windows NT 6.1; Win64; x64) AppleWebKit/537.36 (KHTML, like Gecko) "
                   "Chrome/59.0.3071.115 Safari/537.36")
# 发出请求
response = urllib.request.urlopen(request)
print(response.read())
4.5、HTTP请求实例
4.5.1、GET请求实例
使用百度进行查询:
from http.client import HTTPResponse
from urllib import request


# 接受关键字,使用拼接字符串的方式,使用GET请求从百度进行查询
def query(keyword: str)->HTTPResponse:
    url = "http://www.baidu.com/s?wd="
    return request.urlopen(url+keyword)

response = query("cai")
htmlFile = open("F:/test.html", "wb")
htmlFile.write(response.read())
htmlFile.close()
构建步骤:
- 分析请求的url格式
- 拼接字符串发送请求
4.5.1、POST请求实例
def post_query(**keywords):
    """通过post表单传递信息"""
    # 使用uril.parse对字典信息进行编码,编码为服务端可识别的post形式
    url = "http://www.iqianyue.com/mypost/"
    post_data = urllib.parse.urlencode(keywords).encode("utf-8")
    # 结合url和post请求数据,构建Request对象
    req = urllib.request.Request(url, post_data)
    # 添加请求头
    req.add_header("User-Agent", "Mozilla/5.0 (Windows NT 6.1; Win64; x64) AppleWebKit/537.36 "
                                 "(KHTML, like Gecko) Chrome/59.0.3071.115 Safari/537.36")
    return urllib.request.urlopen(req)

response = post_query(**{'name': 'cai', 'pass': '1234'})
htmlFile = open("E:/test.html", "wb")
htmlFile.write(response.read())
htmlFile.close()
构建步骤:
- 打开对应网页,分析表单格式,找到需要提交的输入框的name属性
- 根据对应的name属性构建一个dict
- 使用urllib.parse.urlencode(dict).encode("utf-8")对字典进行编码
- 使用urllib.request.Request(url, post_data)构建Request对象
- 添加头信息
- 发送请求
5、代理服务器设置
有时候使用同一个IP去爬取同一个网站的网页,久了以后容易被该网站服务器屏蔽。
为了解决这个问题,我们可以使用代理服务器,隐藏自己的ip。代理服务器可以在下面的网站中寻找:
http://www.xicidaili.com/
使用代理服务器进行连接:
def use_porxy(proxy_addr,url):
    """使用代理服务器发起连接"""
    # 构建代理对象
    proxy = urllib.request.ProxyHandler({'http':proxy_addr})
    # 构建opener对象,并注册到request中,构建全局的opener
    opener = urllib.request.build_opener(proxy, urllib.request.HTTPHandler)
    urllib.request.install_opener(opener)
    return urllib.request.urlopen(url)

# 注意代理服务器很有可能不稳定,导致各种形式的连接失败
response = use_porxy("61.51.136.84:8118", "http://www.baidu.com")
htmlFile = open("E:/test.html", "wb")
htmlFile.write(response.read())
htmlFile.close()
6、python爬虫的DebugLog
# 将opener注册到全局
http_handler = urllib.request.HTTPHandler(debuglevel=1)
https_handler = urllib.request.HTTPSHandler(debuglevel=1)
opener = urllib.request.build_opener(http_handler, https_handler)
urllib.request.install_opener(opener)
只要构建一个opener,添加HTTPHandler和HTTPSHandler,再将opener注册到全局,即可。
7、异常处理
def query(keyword):
    """增加异常处理"""
    try:
        url = "http://www.baidu.com/s?wd="
        keyword = urllib.request.quote(keyword)
        return urllib.request.urlopen(url + keyword)
    except urllib.request.URLError as e:
        if hasattr(e, 'code'):
            print(e.code)
        if hasattr(e, 'reason'):
            print(e.reason)


 1万+
1万+

 被折叠的 条评论
为什么被折叠?
被折叠的 条评论
为什么被折叠?
 到【灌水乐园】发言


