


 本文通过一个实战案例介绍了如何利用Spring框架中的HttpInvoker实现客户端与服务器端的远程调用。该技术结合了HTTP通信的优势与Java序列化的便利性,适用于防火墙环境下的远程服务交互。
为了解决
RCP
客户端与后台业务层交互的问题,我找到了
Spring
提供的
Http Invoker
。给我的感觉就是:不用知道,一用吓一跳,居然会如此简单!为了确保文章简明性和程序的可运行性,我抽出了
Http Invoker
的基本框架,做了一个简单的演示程序来演示
Http Invoker
的工作过程(附源代码)。
About Http Invoker
Spring
开发小组意识到在RMI服务和基于HTTP的服务(如Hessian和Burlap)之间的空白。一方面,RMI使用Java标准的对象序列化,但很难穿越防火墙;另一方面,Hessian/Burlap能很好地穿过防火墙工作,但使用自己私有的一套对象序列化机制。HTTP invoker是一个新的远程调用模型,作为Spring框架的一部分,来执行基于HTTP的远程调用(让防火墙高兴的事),并使用Java的序列化机制(让程序员高兴的事)。
―――
引自《
Spring in Action
中文版
》
还是“
Grow up
”的一贯风格,在开始之前先给大家看一个漂亮的演示图,从图中获得一个总体的映像,不至于一顿“神编(指埋头写代码)”后不知道自己在干啥。
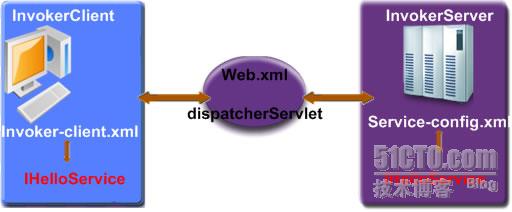
从图中可以清晰的看出,客户端通过读取
Invoker-client.xml
(
Invoker-client.xml
配置内容见下面的内容)来了获得远程访问的信息,请求提供后,(如提交了:
some.service
)
,
将由
Web.xml
中配置的
dispatcherServlet
来处理
service
请求,并把它转发到相应的组件上。服务器接受到请求后,根据
Service-config
的配置信息,对请求进行处理,相应用户请求。从图中可以看出客户端和服务器端必须同时提供服务的接口“
IhelloService
”类。至于为何要这样,如果感兴趣可以去查一下文档,但有一点非常明确,如果客户端没有与服务器对应的接口类,你将无法在你的程序中编写调用远程服务的方法。不理解没关系,这点会在稍后的介绍中继续说明。
要实现
Http Invoker
的完整演示,我们需要进行服务器端和客户端两部分的开发。
第一部分:服务器端的开发
1
.在
eclipse
中新建
web
项目,在
classpath
中加入
spring.jar
,并拷贝到
lib
目录下。创建提供服务的接口类
IhelloService.java
|
public
interface
IHelloService {
//
为了演示方便,只提供一个服务,你可以在添加你想发布的任何服务
//
这个服务负责对前台传入的name说Hello
public
String doHelloService(String name);
}
|
2
.创建接口实现类
helloServiceImpl.java
|
public
class
HelloServiceImpl
implements
IHelloService {
public
String doHelloService(String name) {
return
"Hello "
+name +
",this is the result for your request"
;
}
}
|
3
.创建服务发布描述文件
Service-config.xml
|
<
bean
id
=
"urlMapping"
class
=
"org.springframework.web.servlet.handler.SimpleUrlHandlerMapping"
>
<
property
name
=
"mappings"
>
<
props
>
<
prop
key
=
"/some.service"
>
serviceExporter
</
prop
>
</
props
>
</
property
>
</
bean
>
<!—-
配置要发布的服务类-->
<
bean
id
=
"helloService"
class
=
"edu.bjtu.invokerServer.HelloServiceImpl"
/>
<!—-
用HttpInvokerServiceExporter 发布服务-->
<
bean
id
=
"serviceExporter"
class
=
"org.springframework.remoting.httpinvoker.HttpInvokerServiceExporter"
>
<
property
name
=
"service"
ref
=
"helloService"
/>
<
property
name
=
"serviceInterface"
value
=
"edu.bjtu.invokerServer.IHelloService"
/>
</
bean
>
</
beans
>
|
4
.配置
DispatcherServlet
类
web.xml
|
<
servlet
>
<
servlet-name
>
dispatcherServlet
</
servlet-name
>
<
servlet-class
>
org.springframework.web.servlet.DispatcherServlet
</
servlet-class
>
<
init-param
>
<
param-name
>
contextConfigLocation
</
param-name
>
<
param-value
>
/WEB-INF/service-config.xml
</
param-value
>
</
init-param
>
<
load-on-startup
>
1
</
load-on-startup
>
</
servlet
>
<
servlet-mapping
>
<
servlet-name
>
dispatcherServlet
</
servlet-name
>
<
url-pattern
>
*.service
</
url-pattern
>
</
servlet-mapping
>
|
完成以上工作后,服务器端的开发工作就完成了。下面用
tomcat
来发布这个服务,为了开发方便,我将在
Tomcat
的
server.xml
(位于
%TOMCAT_HOME%conf/
目录下)中配置一个虚拟路径,直接指向
workplace
中的
HttpInvokerServer
目录,代码如下:
:
|
<Context path="/invoker" docBase="D:\j2ee\workspace\HttpInvokerServer\WebContent" reloadable="true" debug="0" />
|
第二部分,客户端的开发
1.
在
eclipse
中新建项目,在
classpath
中加入
spring.jar
,并拷贝到
lib
目录下。把前面创建的接口类
IhelloService
拷贝到相应的包下。
2
.
InvokerClient.java
|
import
org.springframework.context.ApplicationContext;
import
org.springframework.context.
support.ClassPathXmlApplicationContext;
public
class
InvokerClient {
public
static
void
main(String[] args) {
ApplicationContext context =
new
ClassPathXmlApplicationContext(
"invoker-client.xml"
);
//
在此引入了服务接口类,只有在客户端有了这个接口类,才能调用远程的服务。
IHelloService service =
(IHelloService) context.getBean(
"helloServiceProxy"
);
String result = service.doHelloService(
"ZHAO YUAN"
);
System.
out
.println(result);
}
}
|
3.
创建
invoker-client.xml
|
<!--
客户端能够使用下面的代理连接到远程服务 -->
<
bean
id
=
"helloServiceProxy"
class
=
"org.springframework.remoting.httpinvoker.HttpInvokerProxyFactoryBean"
>
<
property
name
=
"serviceUrl"
value
=
"http://59.64.8.33:8080/invoker/some.service"
/>
<
property
name
=
"serviceInterface"
value
=
"edu.bjtu.invoker.IHelloService"
/>
</
bean
>
<!--
注意serviceUrl的值,这是一个标准的http请求。如果在本机测试可以把IP地址改成localhost -->
</
beans
>
|
第三步,运行演示
启动
Tomcat
服务器,可以直接在
eclipse
中运行
InvokerClient.java
,此时在控制台输出:
|
Hello ZHAO YUAN, this is the result for your request
|
如果你看到输出,表示你成功了。
通过上面的演示我们已经实现了
http invoker
的前后台通信,我们可以把客户端调用的代码嵌入到
RCP
中,这样就可以实现
RCP
与后台服务的交互。这在理论和实践上都是没有问题的,但是因为各自项目的需求不同,在实际开发中你仍会遇到很多问题,
这就要考验你解决问题的能力了。
在以后的文章中我会接续就
RCP
中使用
http invoker
进行讨论。
为了大家能以最快的速度获得一个感性的认识,我把文中的源代码附上,希望能对你有所帮助。源代码在
MyEclipse5.1.1
,
apache-tomcat-5.5.17
上测试通过。
本文出自 “Grow up” 博客,出处http://growup.blog.51cto.com/229061/50412
附件下载:
 演示程序源代码


 83
83

 被折叠的 条评论
为什么被折叠?
被折叠的 条评论
为什么被折叠?
 到【灌水乐园】发言


