


 本文介绍Nginx的安装与基本配置方法,包括常用命令、服务启动及配置文件详解。此外还提供了一个Windows环境下实现日志文件按日期自动切割的方案。

下载软件包,并解压。
我的版本是 nginx-1.4.7.zip
执行命令:
cd nginx-1.4.7
start nginx
这时,nginx 服务就启动了。
输入 http://127.0.0.1/ 就可以看到nginx的欢迎页面。
常用命令:
nginx -s stop         // 停止nginx
nginx -s reload       // 重新加载配置文件
nginx -s quit         // 退出nginx
配置文件
nginx.conf
#user  nobody;
worker_processes  1;

#error_log  logs/error.log;
#error_log  logs/error.log  notice;
#error_log  logs/error.log  info;

#pid        logs/nginx.pid;

events {
    worker_connections  1024;
}

http {
    include       mime.types;
    default_type  application/octet-stream;

    log_format  main  '$remote_addr - $remote_user [$time_local] "$request" '
                      '$status $body_bytes_sent "$http_referer" '
                      '"$http_user_agent" "$http_x_forwarded_for"';

    access_log  logs/access.log  main;

    sendfile        on;
    #tcp_nopush     on;

    #keepalive_timeout  0;
    keepalive_timeout  65;

    #gzip  on;

    server {
        listen       8888;
        server_name  localhost;

        #charset koi8-r;

        #access_log  logs/host.access.log  main;

        location / {
            root   html;
            index  index.html index.htm;
        }

        #error_page  404              /404.html;

        # redirect server error pages to the static page /50x.html
        #
        error_page   500 502 503 504  /50x.html;
        location = /50x.html {
            root   html;
        }

        location /epg/ {
           alias /var/moho/;
           autoindex on;
           autoindex_exact_size off;
           autoindex_localtime on;
        }

        # proxy the PHP scripts to Apache listening on 127.0.0.1:80
        #
        #location ~ \.php$ {
        #    proxy_pass   http://127.0.0.1;
        #}

        # pass the PHP scripts to FastCGI server listening on 127.0.0.1:9000
        #
        #location ~ \.php$ {
        #    root           html;
        #    fastcgi_pass   127.0.0.1:9000;
        #    fastcgi_index  index.php;
        #    fastcgi_param  SCRIPT_FILENAME  /scripts$fastcgi_script_name;
        #    include        fastcgi_params;
        #}

        # deny access to .htaccess files, if Apache's document root
        # concurs with nginx's one
        #
        #location ~ /\.ht {
        #    deny  all;
        #}
    }


    # another virtual host using mix of IP-, name-, and port-based configuration
    #
    #server {
    #    listen       8000;
    #    listen       somename:8080;
    #    server_name  somename  alias  another.alias;

    #    location / {
    #        root   html;
    #        index  index.html index.htm;
    #    }
    #}


    # HTTPS server
    #
    #server {
    #    listen       443;
    #    server_name  localhost;

    #    ssl                  on;
    #    ssl_certificate      cert.pem;
    #    ssl_certificate_key  cert.key;

    #    ssl_session_timeout  5m;

    #    ssl_protocols  SSLv2 SSLv3 TLSv1;
    #    ssl_ciphers  HIGH:!aNULL:!MD5;
    #    ssl_prefer_server_ciphers   on;

    #    location / {
    #        root   html;
    #        index  index.html index.htm;
    #    }
    #}

}
切割日志:
在nginx根目录,创建 split_log.bat
@echo off

rem 查看系统中正在运行的nginx进程
rem tasklist /fi "imagename eq nginx.exe"

rem 备份并根据时间重命名访问日志文件
set "cmdstr=move D:\nginx-1.7.2\logs\access.log D:\nginx-1.7.2\logs\access.%date:~0,4%-%date:~5,2%-%date:~8,2%.log
call %cmdstr%"

rem 备份并根据时间重命名错误日志文件
set "cmdstr=move D:\nginx-1.7.2\logs\error.log D:\nginx-1.7.2\logs\error.%date:~0,4%-%date:~5,2%-%date:~8,2%.log
call %cmdstr%"

rem re-opening log files
nginx -s reopen
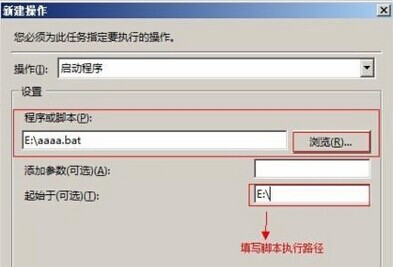
在windows下添加一个任务计划,每天执行一次即可。
说明:
Windows Server 2008 计划任务配置 (我首次配,没有执行;后来经过测试,找到了原因)注意以下关键点:
1- 使用最高权限

2- “起始于(可选)”这里一定要填写相应执行程序或是BAT文件的所在目录,要不然是执行不成功的。路径中不能有引号。


 1152
1152

 被折叠的 条评论
为什么被折叠?
被折叠的 条评论
为什么被折叠?
 到【灌水乐园】发言


