


做完基本的web环境 配置和Spring配置,紧接就要填设计entity模型并编写它们在数据层和业务层了吧?先不着急,有很多Web通用的东西的需要准备,比如说,最基本东东,单元测试。好的,今天就让我的Web Application 建立起单元测试模块吧。关于这一点,很快我们会想到两个熟悉的框架,JUnit 和TestNG。也不知道众高手们喜欢哪一个,笔者选择的是JUnit。
JUnit 4比起3要灵活好多,用注解的方式规避了一些诸如方法名必须test开头的硬性要求,而且我们本身就是需要去更加熟悉注解的好处的。那么,果断搜罗Junit4的资料吧。Junit 的官网服务器down中,不过还是可以从github下截最新的jar 包junit-4.11.jar,当然如果需要看源码,可以解junit4.11.zip 这一包找到所有你需要的jars。
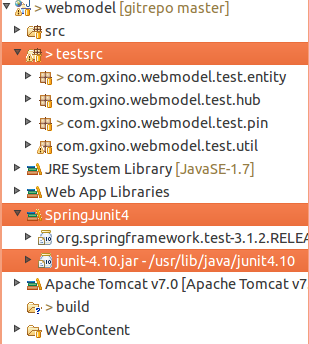
首先建立另外的源包testsrc,无论是什么IDE,都可以设置不部署/发布该包中的build,很明显,这样设置的原因在于test代码不需要在product中存在。那么上文所说的jar 也没有必要放在WEB-INF/lib下,只需要设置在IDE或说开发环境的classpath下(笔者是eclipse添加user lib 'SpringJunit4' )。当然,如果需要版本控制系统track测试源码包,就需要将jar包放到合适的位置了。
接着,在com.xxxx.webmodel.util建个工具class,例如一定会用到的String 加密或者是文件内容摘要的工具类,这里笔者命名它为DataHash. 代码如下
- package com.xxxxx.webmodel.util;
- import java.security.MessageDigest;
- import java.security.NoSuchAlgorithmException;
- public class DataHash {
- private MessageDigest msgDigest;
- private String d4tAlgorithm="SHA1";
- public MessageDigest getMsgDigest() {
- return msgDigest;
- }
- public void setMsgDigest(MessageDigest msgDigest) {
- this.msgDigest = msgDigest;
- }
- public String encryptData(byte[] content){
- String result =null;
- if(msgDigest == null)
- try {
- msgDigest = MessageDigest.getInstance(d4tAlgorithm);
- byte[] resultBytes =msgDigest.digest(content);
- result= new String(resultBytes);
- } catch (NoSuchAlgorithmException e) {
- e.printStackTrace();
- }
- return result;
- }
- public String encryptData(String string){
- byte[] bytes = string.getBytes();
- return this.encryptData(bytes);
- }
- public boolean passWords(String typedString,String correctString){
- if(typedString!=null && correctString !=null){
- String ecStr = this.encryptData(typedString);
- return ecStr.equals(correctString);}
- else return false;
- }
- }
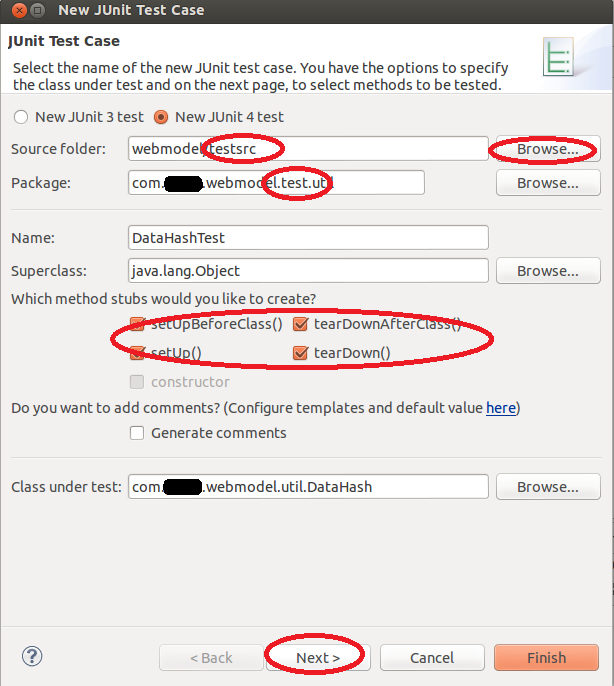
在eclipse 中 右键点击该类文件,New-> JUnit Test Case , 弹出了生成TestCase 的属性对话框,有Jutni3 与4 的单选框,这里选择4,将Source folder Browse到testsrc,将package 名中的项目名和模块名间加个test。将setUpBeforeClass, tearDownAfterClass setUp tearDown 四个方法前的checkbox勾上。
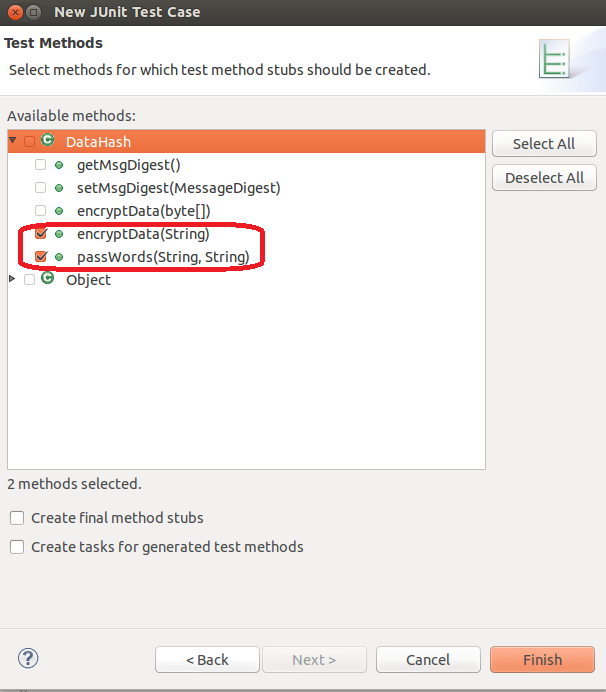
点Next后, 将要测试的方法前checkbox勾上,
Finish 后就生成了testsrc下com.xxxxx.webmodel.test.util包下的DataHashTest.java. 其中setUpBeforeClass()由@BeforeClass 注解,tearDownAfterClass由@AfterClass注解以及setUp 与tearDown分别被@BeforeClass与@AfterClass注解。 都是什么意思呢?一试便知。在每个方法中写入方法标识的控制台输出语句,顺便加上构造方法一并测试。代码如下:
- package com.xxxxx.webmodel.test.util;
- import static org.junit.Assert.fail;
- import org.junit.After;
- import org.junit.AfterClass;
- import org.junit.Assert;
- import org.junit.Before;
- import org.junit.BeforeClass;
- import org.junit.Test;
- import com.gxino.webmodel.util.DataHash;
- public class DataHashTest {
- @BeforeClass
- public static void init() throws Exception {
- System.out.println("BeforeClass");
- }
- @AfterClass
- public static void dispose() throws Exception {
- System.out.println("AfterClass");
- }
- public DataHashTest(){
- System.out.println("Constructor");
- }
- @Before
- public void startTest() throws Exception {
- System.out.println("Before");
- }
- @After
- public void endTest() throws Exception {
- System.out.println("After");
- }
- @Test
- public void testEncryptDataString() {
- System.out.println("Test1");
- fail("Not yet implemented");
- }
- @Test
- public void testPassWords() {
- System.out.println("Test2");
- fail("Not yet implemented");
- }
- }
在Eclipse的编辑器中右键选择Run as或者Debug as, 次级对话框中选择JUnit Test, 控制台会输出
BeforeClass
Constructor
Before
Test1
After
Constructor
Before
Test2
After
AfterClass
很明显setUpBeforeClass会在整个测试周期的开始被执行,tearDownAfterClass是整个测试周期结束时执行, 每个一方法的测试周期都会生成一个新的测试类对象,然后按以下顺序执行:setUp 测试方法,tearDown.由于JUnit4中方法名不需固定,用注解即可,所以这四个方法的名字是可以自定义的,笔者这里换为了init,dispose, startTest endTest.
之后,就真正测试一下吧,在本测试类里加入成员变量 testedObj, 类型是DataHash, 并完成那那个方法,代码如下
- private DataHash testedObj;
- @Test
- public void testEncryptDataString() {
- String testedStr = "Test string";
- String testedOut = testedObj.encryptData(testedStr);
- Assert.assertFalse(testedStr.equals(testedOut));
- System.out.println("Test1");
- }
- @Test
- public void testPassWords() {
- String testedStr = "Test string";
- String testedOut = testedObj.encryptData(testedStr);
- Assert.assertTrue(testedObj.passWords(testedStr, testedOut));
- System.out.println("Test2");
- }
初始化testedObj的语句可以放在构造方法里,或是setUp中,当然也可以做成静态变量,在startUpBeforeClass方法中初始化使得整个测试周期只用一个DataHash的对象。同样的方法运行这个写好的测试类,结果如下:
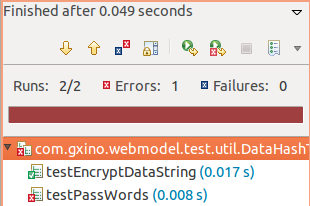
发现第二个方法测出了问题,去Debug发现,在上面DataHash的String encryptData(byte[] content)方法中,if(msgDigest == null) 写错了地方,应该是作为判断是否初始化msgDigest的,结果写在了try块的外面。
更改后,再运行,测试通过。
这里有两个测试方法,如果测试方法多了,会出现一个问题,就是有些测试方法还未写完,或说有些方法不需要在整个测试周期中被测试时,却想要集中测试一个或多个方法该怎么办? @Ignore 注解在这里就发挥了作用。在不需要被测试的方法上面标注@Ignore 使其在测试运行时被忽略。
上述的测试方案只能够运用在单独写那么一个类,可是我们的WebApplication通常是有上下文环境的。例如一个Service类对象中,需要有一个数据访问层的对象,建立这个对象需要连数据库等等的配置,即使都在@BeforeClass注解的方法中做到了,有时也还是需要一些事务类的方法做切面的, OK, @Before 和@After是可以做到,不过要在每个类中去重写这些代码,工程量未免有些太大了?
说来说去,就是缺少Spring架在Web中的环境嘛,Spring早为我们做好了,那就是org.springframewor.test包的作用。不必啰嗦,直接上代码吧:
- package com.xxxxxx.webmodel.test.entity;
- import javax.annotation.Resource;
- import org.junit.Assert;
- import org.junit.BeforeClass;
- import org.junit.Test;
- import org.junit.runner.RunWith;
- import org.springframework.test.context.ContextConfiguration;
- import org.springframework.test.context.TestExecutionListeners;
- import org.springframework.test.context.junit4.SpringJUnit4Cla***unner;
- import org.springframework.test.context.support.DependencyInjectionTestExecutionListener;
- import org.springframework.test.context.support.DirtiesContextTestExecutionListener;
- import com.gxino.webmodel.util.ApplicationContext;
- import com.gxino.webmodel.util.WebConfiguration;
- @RunWith(SpringJUnit4Cla***unner.class)
- @ContextConfiguration(classes={ApplicationContext.class})
- @TestExecutionListeners( { DependencyInjectionTestExecutionListener.class, DirtiesContextTestExecutionListener.class })
- public class ComponetSingletonTest {
- @BeforeClass
- public static void init() throws Exception{
- new WebConfiguration().onStartup(null);
- // Properties defaultParameters= WebConfiguration.getSysParams();
- // defaultParameters.put("jdbc.driver", "com.mysql.jdbc.Driver");
- // defaultParameters.put("jdbc.url", "jdbc:mysql://localhost/webmodel");
- // defaultParameters.put("jdbc.username", "root");
- // defaultParameters.put("jdbc.password", "root");
- // defaultParameters.put("hibernate.dialect","org.hibernate.dialect.MySQLDialect");
- }
- private org.springframework.context.ApplicationContext appCtx;
- public org.springframework.context.ApplicationContext getAppCtx() {
- return appCtx;
- }
- @Resource
- public void setAppCtx(org.springframework.context.ApplicationContext appCtx) {
- this.appCtx = appCtx;
- }
- @Test
- public final void testWhetherAccountEntityPrototype() {
- Object objAccountA=appCtx.getBean("accountEntity");
- Object objAccountB=appCtx.getBean("accountEntity");
- Assert.assertNotSame(objAccountA,objAccountB);
- Object persitenceA=appCtx.getBean("hibernatePersistencePin");
- Object persitenceB=appCtx.getBean("hibernatePersistencePin");
- Assert.assertSame(persitenceA, persitenceB);
- }
- }
这里关键就要是类头上的那三个注解了吧。 @RunWith是junit的注解,用以将环境代入,具体的环境的类应该是由 它(上下文环境)方自定义的类,上面用的是Spring 中的一个runner类,这样Spring的上下文环境,就被代到了测试中。@ContextConfiguration将我们写的注解配置引入,另外在测试运行时需要到一些Spring的中的bean,那就由@TestExecutionListeners来完成,这里面配置了 提供依赖注入的Listener和刷新bean配置(一些测试方法会改变bean原来的配置)的 脏位Listener,在测试DAO时还会用到解析事务配置的Listener.
这个类中,还需要要加载一些sysParam上的配置,本来我是在@BeforeClass中完成了,上面代码段中注释掉的代码,但有时还是会与已经写好的properties文件弄混,就是在想“本来properties已经配置好了,怎么在这里没有?” 毕竟测试环境不是Web环境,为了逼真地将Web环境代入,笔者加了些代码在WebConfiguration的onStartUp中,主要目的就是发现加载不到sysParams.properties时,去以非web的方式(开发环境的相对文件路径)找到sysParam.properties 文件并加载。 然后在@BeforeClass的方法中去调用onStartUp方法,没有servletContext,传个null进去就好。
上面的代码的测试用例,笔者是针对Spring的单例与多例模式做个简单的测试,读者们可以做下这个测试。accountEntity是标注了@Scope(“prototype”)的bean。hibernatePersistencePin是未标注的Scope即单例的bean。将spring的applicationContext注入到该测试类中的appCtx, 以使上述两种bean可以从中得到。
关于单元测试的内容,就分享到这里。
转载于:https://blog.51cto.com/palmtale/1085144


 被折叠的 条评论
为什么被折叠?
被折叠的 条评论
为什么被折叠?
 到【灌水乐园】发言


