


 本文介绍如何使用Ansible自动化部署Nginx的过程,包括配置管理、角色划分及任务定义等内容。通过创建详细的playbook文件,实现Nginx配置文件的管理与回滚。
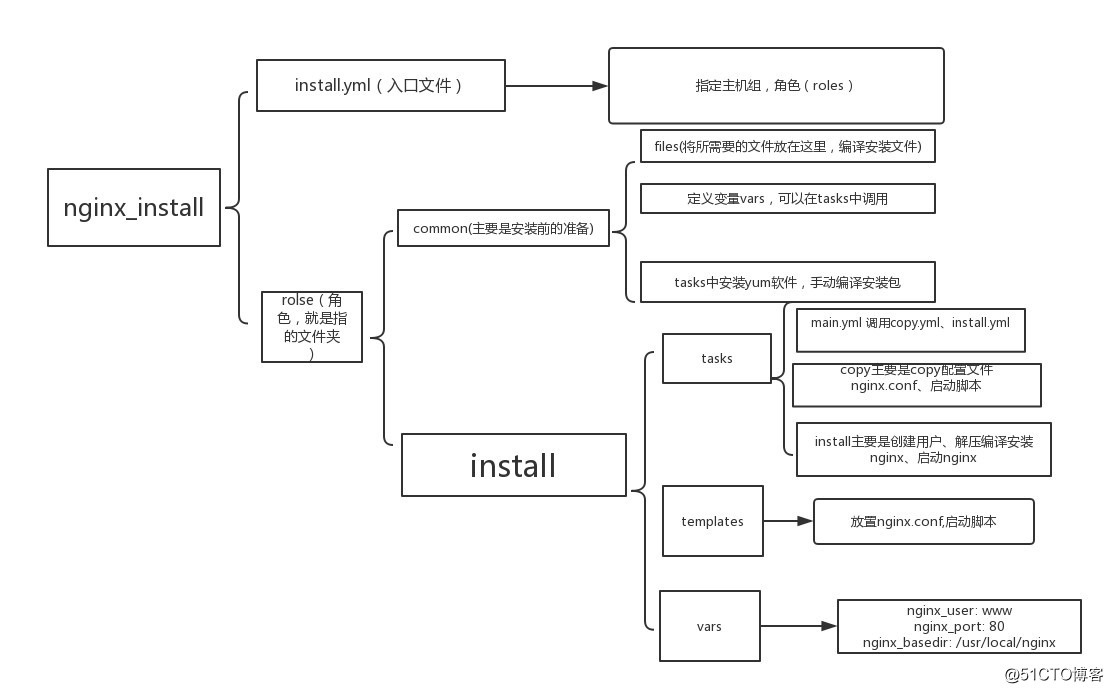
图解:
说明:
系统版本:
CentOS Linux release 7.4.1708 (Core)
需要先在一台机上先装好nginx,再配置ansible服务
1、将替换的文件放入到templates中,ansible可以找到
2、自动化安装时得确定系统版本一致
3、gather_facts: True 获取主机的信息,可以关闭
4、roles目录下有两个角色,common为一些准备操作,install为安装nginx的操作。每个角色下面又有几个目录,handlers下面是当发生改变时要执行的操作,通常用在配置文件发生改变,重启服务。files为安装时用到的一些文件,meta为说明信息,说明角色依赖等信息,tasks里面是核心的配置文件,templates通常存一些配置文件,启动脚本等模板文件,vars下为定义的变量
5、觉得可以用编译好了的nginx包来做,比如在一台机上安装编译好nginx目录,然后打成tar包后,传入到目标主机中,目标主机只需要安装插件即可
6、主函数必须要是main.yml,不然找不到这个就不执行这个
管理配置文件
生产环境中大多时候是需要管理配置文件的,安装软件包只是在初始化环境的时候用一下。下面我们来写个管理nginx配置文件的playbook
1、[root@test-01 install]# mkdir -p /etc/ansible/nginx_config/roles/{new,old}/{files,handlers,vars,tasks}
其中new为更新时用到的,old为回滚时用到的,files下面为nginx.conf和vhosts目录,handlers为重启nginx服务的命令
关于回滚,需要在执行playbook之前先备份一下旧的配置,所以对于旧配置文件的管理一定要严格,千万不能随便去修改线上机器的配置,并且要保证new/files下面的配置和线上的配置一致
2、先把nginx.conf和vhosts目录放到files目录下面
3、cp nginx.conf vhost -R /etc/ansible/nginx_config/roles/new/files/
4、 vim /etc/ansible/nginx_config/roles/new/vars/main.yml //定义变量
nginx_basedir: /usr/local/nginx

vim /etc/ansible/nginx_config/roles/new/handlers/main.yml //定义重新加载nginx服务
-
name: restart nginx
shell: /etc/init.d/nginx reload
vim /etc/ansible/nginx_config/roles/new/tasks/main.yml //这是核心的任务
-
name: copy conf file
copy: src={{ item.src }} dest={{ nginx_basedir }}/{{ item.dest }} backup=yes owner=root group=root mode=0644 #循环
with_items:- { src: nginx.conf, dest: conf/nginx.conf }
- { src: vhosts, dest: conf/ }
notify: restart nginx #上面的配置文件改变后,可通过“notify”通知给相应的handlers reload nginx服务;

5 vi /etc/ansible/nginx_config/update.yml // 最后是定义总入口配置
-
hosts: testhost
user: root
roles:- new

执行: ansible-playbook /etc/ansible/nginx_config/update.yml
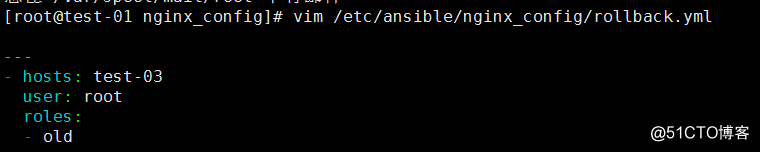
6而回滚的backup.yml对应的roles为old
rsync -av /etc/ansible/nginx_config/roles/new/ /etc/ansible/nginx_config/roles/old/
回滚操作就是把旧的配置覆盖,然后重新加载nginx服务, 每次改动nginx配置文件之前先备份到old里,对应目录为/etc/ansible/nginx_config/roles/old/files
vi /etc/ansible/nginx_config/rollback.yml // 最后是定义总入口配置 - hosts: testhost
user: root
roles:- old
- old
比如执行了一大批yum 后失败,重新执行又要等,可以忽略这个task,给这个task打标签
<pre class="plain" name="code"># example 1 test1.yml
- hosts: test-agent
  tasks:
    - command: echo test1
      tags:                       可以写在一行  tags:test1   没有空格,连着写
         - test1
    - command: echo test2
      tags:
         - test2
    - command: echo test3
      tags:
         - test3

当执行  ansible-playbook test1.yml --tags="test1,test3"  ,则只会执行 test1和test3的echo命令。

当执行  ansible-playbook test1.yml --skip-tags="test2"  ,同样只会执行 test1和test3的echo命令。
转载于:https://blog.51cto.com/jacksoner/2141372


 1128
1128

 被折叠的 条评论
为什么被折叠?
被折叠的 条评论
为什么被折叠?
 到【灌水乐园】发言


