


 本文介绍了使用Java Servlet创建一个简单的登录项目的两种方法。一种是通过传统web.xml配置,另一种是利用web3.0的注解配置。每种方法都详细展示了配置过程及核心代码。

学学Java Servlet:创建一个简单的Servlet
项目介绍:
创建一个简单的WebProject项目,通过项目配置,用两种配置方法实现servlet一个简单的登录登出小项目。
登录成功显示成功,登录失败显示失败。so easy...
配置简介:myeclipse,tomcat7.0
详细步骤:
1、创建一个web project项目,创建的时候选择J2EE6.0的版本
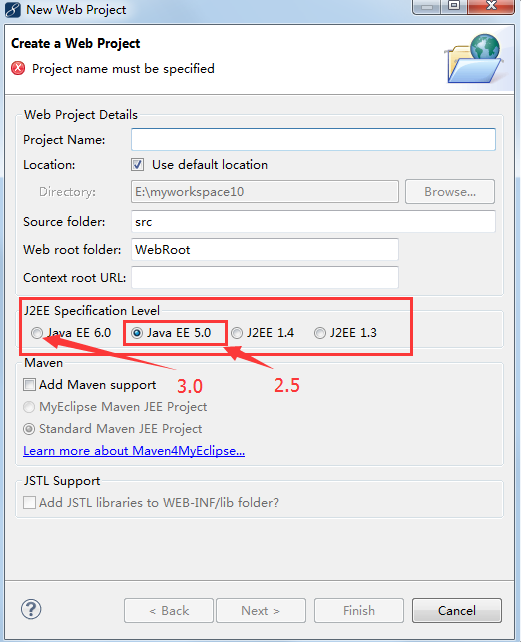
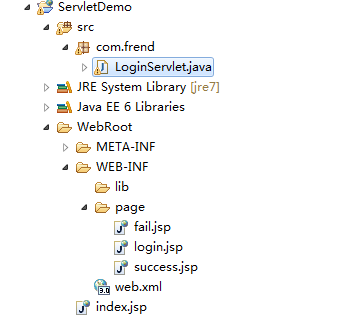
项目结构图:
然后下一步、结束就好。接着写三个页面,登录、成功、失败页面。(注意编码)
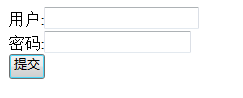
login.jsp代码:
<%@ page language="java" import="java.util.*" pageEncoding="utf-8"%>
<%
String path = request.getContextPath();
String basePath = request.getScheme()+"://"+request.getServerName()+":"+request.getServerPort()+path+"/";
%>
<!DOCTYPE HTML PUBLIC "-//W3C//DTD HTML 4.01 Transitional//EN">
<html>
<head>
<base href="<%=basePath%>">
<title>My JSP 'login.jsp' starting page</title>
<meta http-equiv="pragma" content="no-cache">
<meta http-equiv="cache-control" content="no-cache">
<meta http-equiv="expires" content="0">
<meta http-equiv="keywords" content="keyword1,keyword2,keyword3">
<meta http-equiv="description" content="This is my page">
<!--
<link rel="stylesheet" type="text/css" href="styles.css">
-->
</head>
<body>
<form action="<%=basePath%>login" method="post">
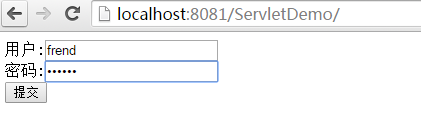
用户:<input type="text" name="name"/><br>
密码:<input type="password" name="passwd"/><br>
<input type="submit" value="提交">
</form>
</body>
</html>
success.jsp代码:
<%@ page language="java" import="java.util.*" pageEncoding="utf-8"%>
<%
String path = request.getContextPath();
String basePath = request.getScheme()+"://"+request.getServerName()+":"+request.getServerPort()+path+"/";
%>
<!DOCTYPE HTML PUBLIC "-//W3C//DTD HTML 4.01 Transitional//EN">
<html>
<head>
<base href="<%=basePath%>">
<title>My JSP 'success.jsp' starting page</title>
<meta http-equiv="pragma" content="no-cache">
<meta http-equiv="cache-control" content="no-cache">
<meta http-equiv="expires" content="0">
<meta http-equiv="keywords" content="keyword1,keyword2,keyword3">
<meta http-equiv="description" content="This is my page">
<!--
<link rel="stylesheet" type="text/css" href="styles.css">
-->
</head>
<body>
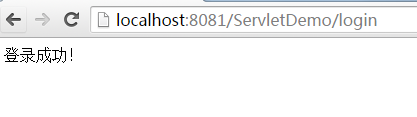
登录成功!
</body>
</html>
fail.jsp代码:
<%@ page language="java" import="java.util.*" pageEncoding="utf-8"%>
<%
String path = request.getContextPath();
String basePath = request.getScheme()+"://"+request.getServerName()+":"+request.getServerPort()+path+"/";
%>

<!DOCTYPE HTML PUBLIC "-//W3C//DTD HTML 4.01 Transitional//EN">
<html>
  <head>
    <base href="<%=basePath%>">

    <title>My JSP 'fail.jsp' starting page</title>

	<meta http-equiv="pragma" content="no-cache">
	<meta http-equiv="cache-control" content="no-cache">
	<meta http-equiv="expires" content="0">
	<meta http-equiv="keywords" content="keyword1,keyword2,keyword3">
	<meta http-equiv="description" content="This is my page">
	<!--
	<link rel="stylesheet" type="text/css" href="styles.css">
	-->

  </head>

  <body>
    帐号或密码错误,登录失败!<br>
<a href="<%=basePath%>">返回登录</a>
  </body>
</html>
注:根据web的版本可以不同的实现servlet的访问,现在3.0版本的居多,也少了更多的配置信息,用注解显得更加的方便灵活。web.xml版本在Myeclipse里面可以很直接的看到:
![]()
![]()
还有就是通过具体的配置文件信息,也明确的写明了web2.5和web3.0的版本信息:
web.xml2.5配置信息:
<web-app version="2.5"
	xmlns="http://java.sun.com/xml/ns/javaee"
	xmlns:xsi="http://www.w3.org/2001/XMLSchema-instance"
	xsi:schemaLocation="http://java.sun.com/xml/ns/javaee
	http://java.sun.com/xml/ns/javaee/web-app_2_5.xsd">

</web-app>
web.xml3.0配置信息
<web-app version="3.0"
	xmlns="http://java.sun.com/xml/ns/javaee"
	xmlns:xsi="http://www.w3.org/2001/XMLSchema-instance"
	xsi:schemaLocation="http://java.sun.com/xml/ns/javaee
	http://java.sun.com/xml/ns/javaee/web-app_3_0.xsd">

</web-app>
版本的选择也能让我们用不同的方式来开发Servlet,下面我们就用两种方法来写这个Demo。
方法一:web3.0以下版本的传统web.xml配置
1、web.xml的配置:
<?xml version="1.0" encoding="UTF-8"?>
<web-app version="3.0"
	xmlns="http://java.sun.com/xml/ns/javaee"
	xmlns:xsi="http://www.w3.org/2001/XMLSchema-instance"
	xsi:schemaLocation="http://java.sun.com/xml/ns/javaee
	http://java.sun.com/xml/ns/javaee/web-app_3_0.xsd">
  <display-name></display-name>

  <!-- 加载的默认首页 -->
  <welcome-file-list>
    <welcome-file>/WEB-INF/page/login.jsp</welcome-file>
  </welcome-file-list>

  <!-- 配置Servlet -->
  <servlet>
  	<!-- Servlet名:在配置文件中唯一 -->
  	<servlet-name>LoginServlet</servlet-name>
  	<!-- Servlet对应的类 -->
	<servlet-class>com.frend.LoginServlet</servlet-class>
  </servlet>
  <servlet-mapping>
  	<!-- Servlet名对应前面 -->
  	<servlet-name>LoginServlet</servlet-name>
  	<!-- /login:请求的url -->
  	<url-pattern>/login</url-pattern>
  </servlet-mapping>
</web-app>
2、Servlet类:
package com.frend;

import java.io.IOException;
import java.io.PrintWriter;

import javax.servlet.RequestDispatcher;
import javax.servlet.ServletException;
import javax.servlet.http.HttpServlet;
import javax.servlet.http.HttpServletRequest;
import javax.servlet.http.HttpServletResponse;

public class LoginServlet extends HttpServlet {

	private static final long serialVersionUID = 5798229038714266939L;

	@Override
	public void init() throws ServletException {
	}

	@Override
	protected void doGet(HttpServletRequest request, HttpServletResponse response)
			throws ServletException, IOException {
		doPost(request, response);
	}

	@Override
	protected void doPost(HttpServletRequest request, HttpServletResponse response)
			throws ServletException, IOException {
		response.setCharacterEncoding("utf-8");//设置编码格式以支持中文

		String name = request.getParameter("name");//获取账户名
		String passwd = request.getParameter("passwd");//获取密码

		System.out.println("*****账户:"+name+",密码:"+passwd);//打印账户密码

		RequestDispatcher dispatcher = null;
		//验证账户名和密码
		if(!"frend".equals(name) || !"abc123".equals(passwd)){
			dispatcher = request.getRequestDispatcher("/WEB-INF/page/fail.jsp");//获取RequestDispatcher对象
		}else{
			dispatcher = request.getRequestDispatcher("/WEB-INF/page/success.jsp");//获取RequestDispatcher对象
		}
		dispatcher.forward(request, response);//向目的路径跳转
	}

	@Override
	public void destroy() {
	}

}
方法二:web3.0以上版本的注解配置
1、web.xml的配置:
<?xml version="1.0" encoding="UTF-8"?>
<web-app version="3.0"
	xmlns="http://java.sun.com/xml/ns/javaee"
	xmlns:xsi="http://www.w3.org/2001/XMLSchema-instance"
	xsi:schemaLocation="http://java.sun.com/xml/ns/javaee
	http://java.sun.com/xml/ns/javaee/web-app_3_0.xsd">
  <display-name></display-name>

  <!-- 加载的默认首页 -->
  <welcome-file-list>
    <welcome-file>/WEB-INF/page/login.jsp</welcome-file>
  </welcome-file-list>
</web-app>
2、Servlet类:
/**
 * @(#) LoginServlet.java	2016-7-20 上午10:29:48
 *
 * Copyright (c) 2014-2015 Diyvc, Inc.
 * 103 Sports Road, Victoria Plaza tower 1104, Tianhe District Guangzhou City, China.
 * All rights reserved.
 *
 */
package com.frend;

import java.io.IOException;

import javax.servlet.RequestDispatcher;
import javax.servlet.ServletException;
import javax.servlet.annotation.WebServlet;
import javax.servlet.http.HttpServlet;
import javax.servlet.http.HttpServletRequest;
import javax.servlet.http.HttpServletResponse;

@WebServlet(name="LoginServlet",urlPatterns="/login")
public class LoginServlet extends HttpServlet {

	private static final long serialVersionUID = 5798229038714266939L;

	@Override
	public void init() throws ServletException {
	}

	@Override
	protected void doGet(HttpServletRequest request, HttpServletResponse response)
			throws ServletException, IOException {
		doPost(request, response);
	}

	@Override
	protected void doPost(HttpServletRequest request, HttpServletResponse response)
			throws ServletException, IOException {
		response.setCharacterEncoding("utf-8");//设置编码格式以支持中文

		String name = request.getParameter("name");//获取账户名
		String passwd = request.getParameter("passwd");//获取密码

		System.out.println("*****账户:"+name+",密码:"+passwd);//打印账户密码

		RequestDispatcher dispatcher = null;
		//验证账户名和密码
		if(!"frend".equals(name) || !"abc123".equals(passwd)){
			dispatcher = request.getRequestDispatcher("/WEB-INF/page/fail.jsp");//获取RequestDispatcher对象
		}else{
			dispatcher = request.getRequestDispatcher("/WEB-INF/page/success.jsp");//获取RequestDispatcher对象
		}
		dispatcher.forward(request, response);//向目的路径跳转
	}

	@Override
	public void destroy() {
	}

}
页面截图:
1、失败情景
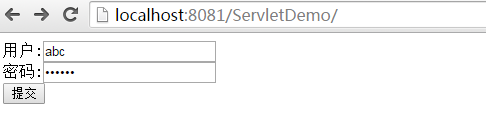

2、成功情景
小结:
传统的web.xml适合配置文件控制,但是servlet多的情况下完全不方便管理;
注解方式简单方便,很适用开发。


 920
920