


 本文详细介绍了在Red Hat Enterprise Linux上安装MongoDB社区版和企业版的过程。包括文件解压、目录配置、服务启动及网络设置等步骤,并提供了安装后的验证方法。
安装社区版:
[root@vhost2 tools]# ls
mongodb-linux-x86_64-rhel62-3.4.10.tgz
[root@vhost2 tools]#tar -zxvf mongodb-linux-x86_64-rhel62-3.4.10.tgz -C /usr/local/
[root@vhost2 ~]# mv /usr/local/mongodb-linux-x86_64-rhel62-3.4.10.tgz /usr/local/mongodb
[root@vhost2 ~]#mkdir -p /data/mongodb/
[root@vhost2 ~]#/usr/local/mongodb/bin/mongod --dbpath=/data/mongodb/ --logpath=/data/mongodb/mongodb.log --logappend&
[root@vhost2 ~]#ln -s /usr/local/mongodb/bin/mongo /usr/bin/mongo
[root@vhost2 ~]#mongo
MongoDB shell version v3.4.10
connecting to: mongodb://127.0.0.1:27017
MongoDB server version: 3.4.10
Server has startup warnings:
2016-07-10T14:08:20.696+0800 I STORAGE [initandlisten]
2016-07-10T14:08:20.696+0800 I STORAGE [initandlisten] ** WARNING: Using the XFS filesystem is strongly recommended with the WiredTiger storage engine
2016-07-10T14:08:20.696+0800 I STORAGE [initandlisten] ** See http://dochub.mongodb.org/core/prodnotes-filesystem
2016-07-10T14:08:21.954+0800 I CONTROL [initandlisten]
2016-07-10T14:08:21.954+0800 I CONTROL [initandlisten] ** WARNING: Access control is not enabled for the database.
2016-07-10T14:08:21.954+0800 I CONTROL [initandlisten] ** Read and write access to data and configuration is unrestricted.
2016-07-10T14:08:21.954+0800 I CONTROL [initandlisten] ** WARNING: You are running this process as the root user, which is not recommended.
2016-07-10T14:08:21.954+0800 I CONTROL [initandlisten]
2016-07-10T14:08:21.954+0800 I CONTROL [initandlisten]
2016-07-10T14:08:21.954+0800 I CONTROL [initandlisten] ** WARNING: /sys/kernel/mm/transparent_hugepage/enabled is 'always'.
2016-07-10T14:08:21.954+0800 I CONTROL [initandlisten] ** We suggest setting it to 'never'
2016-07-10T14:08:21.954+0800 I CONTROL [initandlisten]
2016-07-10T14:08:21.954+0800 I CONTROL [initandlisten] ** WARNING: /sys/kernel/mm/transparent_hugepage/defrag is 'always'.
2016-07-10T14:08:21.954+0800 I CONTROL [initandlisten] ** We suggest setting it to 'never'
2016-07-10T14:08:21.954+0800 I CONTROL [initandlisten]
>
[root@vhost2 ~]# netstat -nutlp
Active Internet connections (only servers)
Proto Recv-Q Send-Q Local Address Foreign Address State PID/Program name
tcp 0 0 0.0.0.0:22 0.0.0.0:* LISTEN 1272/sshd
tcp 0 0 127.0.0.1:25 0.0.0.0:* LISTEN 1617/master
tcp 0 0 0.0.0.0:27017 0.0.0.0:* LISTEN 8980/mongod
tcp 0 0 :::22 :::* LISTEN 1272/sshd
tcp 0 0 ::1:25 :::* LISTEN 1617/master
tcp 0 0 :::33061 :::* LISTEN 8627/mysqld
tcp 0 0 :::33062 :::* LISTEN 3790/mysqld
默认端口号是27017,在启动时也可以指定未使用的其它端口。
[root@vhost2 ~]# ls /data/mongodb/
collection-0-189391915660725480.wt index-3-189391915660725480.wt mongodb.log WiredTiger WiredTiger.wt
collection-2-189391915660725480.wt index-4-189391915660725480.wt mongod.lock WiredTigerLAS.wt
diagnostic.data journal sizeStorer.wt WiredTiger.lock
index-1-189391915660725480.wt _mdb_catalog.wt storage.bson WiredTiger.turtle
安装企业版:
https://docs.mongodb.com/manual/tutorial/install-mongodb-enterprise-on-red-hat/
1:修改主机名
[root@vhost2 ~]# cat /etc/hostname
vhost2.localdomain
[root@vhost2 ~]# cat /etc/redhat-release
Red Hat Enterprise Linux Server release 7.0 (Maipo)
2:网络配置,实现rhel7联网
[root@vhost2 ~]# cat /etc/sysconfig/network-scripts/ifcfg-eno16777736
HWADDR=00:0C:29:48:93:2C
TYPE=Ethernet
BOOTPROTO=dhcp
DEFROUTE=yes
PEERDNS=yes
PEERROUTES=yes
IPV4_FAILURE_FATAL=no
IPADDR=192.168.10.12
NETMASK=255.255.255.0
GATEWAY0=191.268.10.1
DNS1=202.96.134.133
DNS2=202.96.128.166
IPV6INIT=yes
IPV6_AUTOCONF=yes
IPV6_DEFROUTE=yes
IPV6_PEERDNS=yes
IPV6_PEERROUTES=yes
IPV6_FAILURE_FATAL=no
NAME=eno16777736
UUID=704bfebe-776e-4147-95cd-9f4e454e15ac
ONBOOT=yes
[root@vhost2 ~]# cat /etc/resolv.conf
# Generated by NetworkManager
domain localdomain
search localdomain
nameserver 192.168.10.1
nameserver 202.96.134.133
nameserver 202.96.128.166
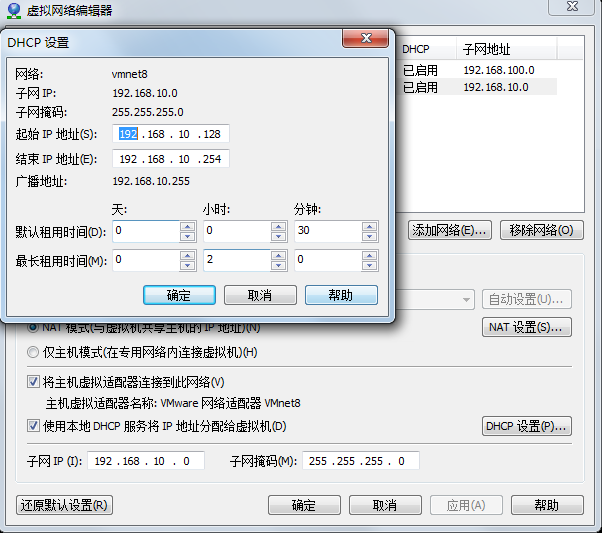
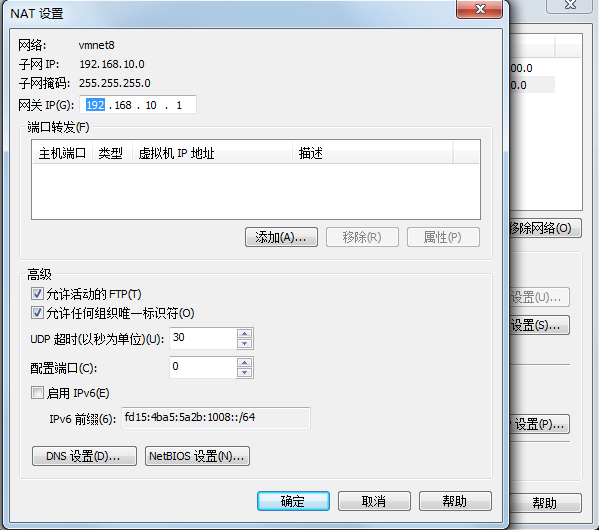
vmware 虚拟机配置信息:
[root@vhost2 ~]# ping baidu.com
PING baidu.com (123.125.114.144) 56(84) bytes of data.
64 bytes from 123.125.114.144: icmp_seq=1 ttl=128 time=14.1 ms
64 bytes from 123.125.114.144: icmp_seq=2 ttl=128 time=5.90 ms
64 bytes from 123.125.114.144: icmp_seq=3 ttl=128 time=6.74 ms
64 bytes from 123.125.114.144: icmp_seq=4 ttl=128 time=5.05 ms
3:配置本地yum源
[root@vhost2 ~]# cat /etc/yum.repos.d/rhel7.repo
[rhel-yum]
name=rhel7
baseurl=file:///mnt
enabled=1
gpgcheck=0
4:创建mongodb-enterprise.repo源
Create an /etc/yum.repos.d/mongodb-enterprise.repo file so that you can install MongoDB enterprise directly, using yum.
[mongodb-enterprise]
name=MongoDB Enterprise Repository
baseurl=https://repo.mongodb.com/yum/redhat/$releasever/mongodb-enterprise/3.4/$basearch/ gpgcheck=1 enabled=1 gpgkey=https://www.mongodb.org/static/pgp/server-3.4.asc
5:安装企业版 install -y mongodb-enterprise
WARNING
On RHEL 7.0, if you change the data path, the default SELinux policies will prevent mongod from having write access on the new data path if you do not change the security context.
The MongoDB instance stores its data files in /var/lib/mongo and its log files in /var/log/mongodb by default, and runs using the mongod user account. You can specify alternate log and data file directories in /etc/mongod.conf. See systemLog.path and storage.dbPath for additional information.
If you change the user that runs the MongoDB process, you must modify the access control rights to the /var/lib/mongo and /var/log/mongodb directories to give this user access to these directories.
[root@vhost2 ~]# ls /var/log/mongodb/
mongod.log
[root@vhost2 ~]# ls /var/lib/mongo/
collection-0--2337306620506737398.wt diagnostic.data index-3--2337306620506737398.wt journal mongod.lock storage.bson WiredTigerLAS.wt WiredTiger.turtle
collection-2--2337306620506737398.wt index-1--2337306620506737398.wt index-4--2337306620506737398.wt _mdb_catalog.wt sizeStorer.wt WiredTiger WiredTiger.lock WiredTiger.wt
6:启动服务
[root@vhost2 ~]# systemctl start mongod
You can verify that the mongod process has started successfully by checking the contents of the log file at /var/log/mongodb/mongod.log for a line reading
[root@vhost2 ~]# tail -f /var/log/mongodb/mongod.log


2017-11-06T06:18:16.407-0500 I CONTROL  [initandlisten]
2017-11-06T06:18:16.407-0500 I CONTROL  [initandlisten]
2017-11-06T06:18:16.407-0500 I CONTROL  [initandlisten] ** WARNING: /sys/kernel/mm/transparent_hugepage/enabled is 'always'.
2017-11-06T06:18:16.407-0500 I CONTROL  [initandlisten] **        We suggest setting it to 'never'
2017-11-06T06:18:16.407-0500 I CONTROL  [initandlisten]
2017-11-06T06:18:16.407-0500 I CONTROL  [initandlisten] ** WARNING: /sys/kernel/mm/transparent_hugepage/defrag is 'always'.
2017-11-06T06:18:16.407-0500 I CONTROL  [initandlisten] **        We suggest setting it to 'never'
2017-11-06T06:18:16.407-0500 I CONTROL  [initandlisten]
2017-11-06T06:18:16.409-0500 I FTDC     [initandlisten] Initializing full-time diagnostic data capture with directory '/var/lib/mongo/diagnostic.data'
2017-11-06T06:18:16.412-0500 I NETWORK  [thread1] waiting for connections on port 27017
[root@vhost2 ~]# systemctl enable mongod.service
[root@vhost2 ~]# mongo
MongoDB shell version v3.4.10
connecting to: mongodb://127.0.0.1:27017
MongoDB server version: 3.4.10
Server has startup warnings:
2017-11-06T06:18:16.407-0500 I CONTROL [initandlisten]
2017-11-06T06:18:16.407-0500 I CONTROL [initandlisten] ** WARNING: Access control is not enabled for the database.
2017-11-06T06:18:16.407-0500 I CONTROL [initandlisten] ** Read and write access to data and configuration is unrestricted.
2017-11-06T06:18:16.407-0500 I CONTROL [initandlisten]
2017-11-06T06:18:16.407-0500 I CONTROL [initandlisten]
2017-11-06T06:18:16.407-0500 I CONTROL [initandlisten] ** WARNING: /sys/kernel/mm/transparent_hugepage/enabled is 'always'.
2017-11-06T06:18:16.407-0500 I CONTROL [initandlisten] ** We suggest setting it to 'never'
2017-11-06T06:18:16.407-0500 I CONTROL [initandlisten]
2017-11-06T06:18:16.407-0500 I CONTROL [initandlisten] ** WARNING: /sys/kernel/mm/transparent_hugepage/defrag is 'always'.
2017-11-06T06:18:16.407-0500 I CONTROL [initandlisten] ** We suggest setting it to 'never'
2017-11-06T06:18:16.407-0500 I CONTROL [initandlisten]
MongoDB Enterprise >
Begin using MongoDB.
To help you start using MongoDB, MongoDB provides Getting Started Guides in various driver editions. See Getting Started for the available editions.
Before deploying MongoDB in a production environment, consider the Production Notes document.
Later, to stop MongoDB, press Control+C in the terminal where the mongod instance is running.
最后,Uninstall MongoDB
Uninstall MongoDB
To completely remove MongoDB from a system, you must remove the MongoDB applications themselves, the configuration files, and any directories containing data and logs. The following section guides you through the necessary steps.

WARNING
This process will completely remove MongoDB, its configuration, and all databases. This process is not reversible, so ensure that all of your configuration and data is backed up before proceeding.
1  Stop MongoDB.
Stop the mongod process by issuing the following command:
sudo service mongod stop
2  Remove Packages.
Remove any MongoDB packages that you had previously installed.
sudo yum erase $(rpm -qa | grep mongodb-enterprise)
3  Remove Data Directories.
Remove MongoDB databases and log files.
sudo rm -r /var/log/mongodb
sudo rm -r /var/lib/mongo


 996
996

 被折叠的 条评论
为什么被折叠?
被折叠的 条评论
为什么被折叠?
 到【灌水乐园】发言


