


 本文介绍了一个使用SpringBoot实现的简单CRUD应用示例,包括实体类、持久层接口、控制器和服务层的实现,并展示了如何利用JSR-303进行数据验证。

加入依赖
    <dependencies>
        <dependency>
            <groupId>org.springframework.boot</groupId>
            <artifactId>spring-boot-starter-web</artifactId>
        </dependency>
        <dependency>
            <groupId>org.springframework.boot</groupId>
            <artifactId>spring-boot-starter-freemarker</artifactId>
        </dependency>
        <dependency>
            <groupId>org.springframework.boot</groupId>
            <artifactId>spring-boot-starter-validation</artifactId>
        </dependency>
        <dependency>
            <groupId>org.springframework.boot</groupId>
            <artifactId>spring-boot-starter-data-jpa</artifactId>
        </dependency>
        <dependency>
            <groupId>org.springframework.boot</groupId>
            <artifactId>spring-boot-starter-test</artifactId>
            <scope>test</scope>
        </dependency>
        <dependency>
            <groupId>com.h2database</groupId>
            <artifactId>h2</artifactId>
            <scope>runtime</scope>
        </dependency>
    </dependencies>
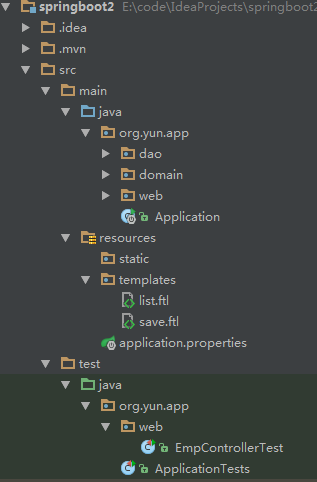
项目结构如图:
开发实体类
@Entity
public class Emp {

    @Id
    @GeneratedValue
    private Long id;
    private String name;
    private Date birthday;
    private Double salary;

    //getter and setter
}
开发持久层
@Repository
public interface EmpDao extends JpaRepository<Emp, Long> {
}
定义一个Dao接口直接继承JpaRepository<T,Serializable>。 这样EmpDao便有了基本的CRUD归功能。不用再自己编写代码。
因为,只是简单的CRUD演示操作,所以略掉Service,直接控制器调用持久层。
开发控制器
@Controller
public class EmpController {

    @Autowired
    private EmpDao empDao;

    @RequestMapping("/list")
    public String list(Model model) {
        model.addAttribute("emps", empDao.findAll());
        return "list";
    }

    @RequestMapping("/save")
    public String save() {
        return "save";
    }

    @RequestMapping(value = "/save", method = RequestMethod.POST)
    public String save(@Valid Emp emp, BindingResult result) {
        if (result.hasErrors()) {
            return "save";
        }
        empDao.save(emp);
        return "redirect:/list";
    }

    @RequestMapping("/{id}")
    public String update(@PathVariable Long id, Model model) {
        model.addAttribute("emp", empDao.getOne(id));
        return "save";
    }

    @RequestMapping("/delete/{id}")
    public String delete(@PathVariable Long id) {
        empDao.deleteById(id);
        return "redirect:/list";
    }
}
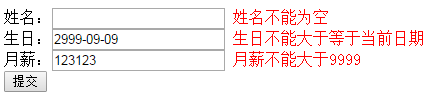
加入JSR-303校验
在【添加/修改】操作时候,加入了@Valid注解 是为了实现JSR-303的校验。此时,也要在实体类的字段上加入校验的注解。
@Entity
public class Emp {

    @Id
    @GeneratedValue
    private Long id;

    @NotBlank(message = "姓名不能为空")
    private String name;

    @NotNull(message = "生日不能为空")
    @Past(message = "生日不能大于等于当前日期")
    @DateTimeFormat(iso = DateTimeFormat.ISO.DATE)
//标记表单的日期格式为yyyy-MM-dd
//SpringMVC默认是yyyy/MM/dd否则会抛出404异常
    private Date birthday;

    @NotNull(message = "月薪不能为空")
    @DecimalMin(value = "1000", message = "月薪不能低于1000")
    @DecimalMax(value = "9999", message = "月薪不能大于9999")
    @NumberFormat(style = NumberFormat.Style.NUMBER)
//标记表单的月薪显示格式
    private Double salary;

    //getter and setter
}
@NotEmpty:用在集合类上面。@NotBlank:用在String上面。@NotNull:可用在所有类型上。建议用在除了@NotEmpty和@NotBlank之外的非空判断上。
开发视图
list.ftl
<html>
<head>
    <title>list</title>
</head>
<body>
<table>
    <tr><td>姓名</td><td>生日</td><td>月薪</td><td>操作</td></tr>
    <#list emps as emp>
        <tr>
            <td><a href="${rc.contextPath}/${emp.id}">${emp.name}</a></td>
            <td>${emp.birthday?string('yyyy-MM-dd')}</td>
            <td>${emp.salary}</td>
            <td><a href="${rc.contextPath}/delete/${emp.id}">删除</a></td>
        </tr>
    </#list>
</table>
<br/>
<a href="/save">添加雇员</a>
</body>
</html>
${rc.contextPath}是为了取得web上下文。- 生日是日期类型,所以需要格式化显示。
例如:${emp.birthday?string('yyyy-MM-dd')}
save.ftl
<!--引入spring提供的freemarker宏-->
<#import "spring.ftl" as spring />
<html>
<head>
    <title>save</title>
</head>
<body>

<form action="${rc.contextPath}/save" method="post">
    <input type="hidden" name="id" value="${emp.id}"/>
    姓名:<input type="text" name="name" value="${emp.name}"/>
    <#if emp??>
        <@spring.bind "emp.name" />
        <@spring.showErrors "<br />" "color:red"/>
    </#if>
    <br />
    <#if emp.birthday??>
        生日:<input type="text" name="birthday" value="${emp.birthday?string('yyyy-MM-dd')}"/>
    <#else>
        生日:<input type="text" name="birthday"/>
    </#if>
    <#if emp??>
        <@spring.bind "emp.birthday" />
        <@spring.showErrors "<br />" "color:red"/>
    </#if>
    <br />
    月薪:<input type="text" name="salary" value="${emp.salary}"/>
    <#if emp??>
        <@spring.bind "emp.salary" />
        <@spring.showErrors "<br />" "color:red"/>
    </#if>
    <br />
    <input type="submit" value="提交"/>
</form>

</body>
</html>
SpringMVC为FreeMarker提供了支持。 首先要在页面中引入<#import "spring.ftl" as spring />。 而后,有对表单校验提供的支持。
姓名:<input type="text" name="name" value="${emp.name}"/>
<#if emp??>
    <@spring.bind "emp.name" />
    <@spring.showErrors "<br />" "color:red"/>
</#if>
spring.bind指定要校验绑定的字段。-- 格式是: <@spring.bind 属性名 />。
spring.showErrors指定显示错误消息。
格式是:<@spring.showErrors 分隔符 样式 />。
全局配置文件
spring.freemarker.expose-session-attributes=true
spring.freemarker.expose-request-attributes=true
spring.freemarker.request-context-attribute=rc

#springboot默认将freemarker的数字用,分割了。取消的方法如下:
spring.freemarker.settings.number_format=0.##

#设置freemarker全局的日期、时间格式
#spring.freemarker.settings.date_format=yyyy-MM-dd
#spring.freemarker.settings.time_format=HH:mm:ss
#spring.freemarker.settings.datetime_format=yyyy-MM-dd HH:mm:ss

#保证即使${xxx}不存在,也不报错
spring.freemarker.settings.classic_compatible=true
启动类
@SpringBootApplication
public class Application {
	public static void main(String[] args) {
		SpringApplication.run(Application.class, args);
	}
}
运行
- 方式一:直接Applicaton.java IDE右键【Run】
- 方式二:
mvn spring-boot:run
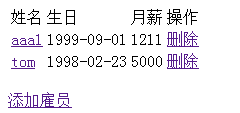
访问,http://localhost:8080/list,看到如下页面:


 2399
2399

 被折叠的 条评论
为什么被折叠?
被折叠的 条评论
为什么被折叠?
 到【灌水乐园】发言


