


 本文详细介绍了如何从MySQL数据库导入数据到Solr的过程,包括创建数据驱动的核心、配置Solr和进行全量及增量导入的具体步骤。

Data Import
This tutorial uses Mysql database import data into Solr。
Create table
node table:
CREATE TABLE `node` (
  `id` varchar(50) NOT NULL,
  `name` varchar(50) NOT NULL COMMENT 'node name',
  `node_size` int(11) NOT NULL COMMENT 'node size',
  `creator_id` varchar(50) NOT NULL COMMENT 'creator Id',
  `parent_id` varchar(50) NOT NULL COMMENT '父节点Id',
  `path` varchar(200) NOT NULL COMMENT '路径',
  `create_time` datetime NOT NULL COMMENT 'create time',
  PRIMARY KEY (`id`)
) ENGINE=InnoDB DEFAULT CHARSET=utf8 COMMENT='node';
node table has tens of thousands of records, test uses only 300.
Full-Import
Create data driven Core
在Solr Home中Create Core,Solr Home路径为:D:\Environment\apache-tomcat-7.0.37\webapps\solr\solrhome。
Solr Core 的基础配置文件存放在solr-X.X.X\server\solr\configsets:

basic_configs为基础core的配置,data_driven_shcema_configs是数据库连接的配置。复制相应的Core配置内容,更改相应的参数即可使用。为了方便此处复制sample_techproducts_configs,因为data_driven_schema_configs中没有schema.xml文件,所以使用sample_techproducts_configs。
Configuration Steps
1. 在Tomcat的 Solr home 中,Create a new folder named comment;
2. 在apache-tomcat-8.0.37\webapps\solr\solrhome\cat中,Create a new folder named data;
3. Copy solr-5.X.X\server\solr\configsets\sample_techproducts_configs\conf to apache-tomcat-7.0.37\webapps\solr\solrhome,as follows: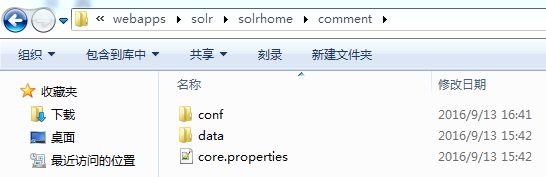
4. Configuration solrconfig.xml
add request handler data import.
<requestHandler name="/dataimport" class="org.apache.solr.handler.dataimport.DataImportHandler">
	<lst name="defaults">
	    <str name="config">db-config.xml</str>
	</lst>
</requestHandler>
5. Configuration db-config.xml
此处db-config.xml与solrconfig.xml在同一目录。
<dataConfig>
    <dataSource type="JdbcDataSource" driver="com.mysql.jdbc.Driver" url="jdbc:mysql://localhost:3306/solr"
	user="solr" password="solr" batchSize="-1"/>
    <document>
        <entity name="comment" pk="id" query="select id,name,create_time,node_size,creator_id,parent_id,path from node limit 300">
			<field column="id" name="id" />
            <field column="name" name="name" />
			<field column="create_time" name="createTime"/>
			<field column="node_size" name="nodeSize" />
			<field column="creator_id" name="creatorId" />
			<field column="parent_id" path="parentId" />
			<field column="path" path="path" />
        </entity>
    </document>
</dataConfig>
6. Configuration schema.xml
   <field name="_version_" type="long" indexed="true" stored="true"/>

   <!-- points to the root document of a block of nested documents. Required for nested
      document support, may be removed otherwise
   -->
   <field name="_root_" type="string" indexed="true" stored="false"/>

   <!-- Only remove the "id" field if you have a very good reason to. While not strictly
     required, it is highly recommended. A <uniqueKey> is present in almost all Solr
     installations. See the <uniqueKey> declaration below where <uniqueKey> is set to "id".
     Do NOT change the type and apply index-time analysis to the <uniqueKey> as it will likely
     make routing in SolrCloud and document replacement in general fail. Limited _query_ time
     analysis is possible as long as the indexing process is guaranteed to index the term
     in a compatible way. Any analysis applied to the <uniqueKey> should _not_ produce multiple
     tokens
   -->
   <field name="id" type="string" indexed="true" stored="true" required="true" multiValued="false" />
   <field name="name" type="text_ik" indexed="true" stored="true"/>
   <field name="nodeSize" type="int" indexed="true" stored="true"/>
   <field name="creatorId" type="text_general" indexed="false" stored="true"/>
   <field name="parentId" type="string" indexed="false" stored="true"/>
   <field name="path" type="text_ik" indexed="true" stored="true"/>
   <field name="createTime" type="date" indexed="true" stored="true"/>

   <!-- defined filedtype -->
   <fieldType name="text_ik" class="solr.TextField">
         <analyzer type="index" class="org.wltea.analyzer.lucene.IKAnalyzer" useSmart="false"/>
         <analyzer type="query" class="org.wltea.analyzer.lucene.IKAnalyzer" useSmart="true"/>
	</fieldType>
7. 通过Solr 控制台新增Core,但前提是要创建Core文件夹,conf(配置文件夹)、data(索引存储文件夹)、schema.xml(模式配置)和solrconfig.xml(索引配置),注意图上灰色文字。
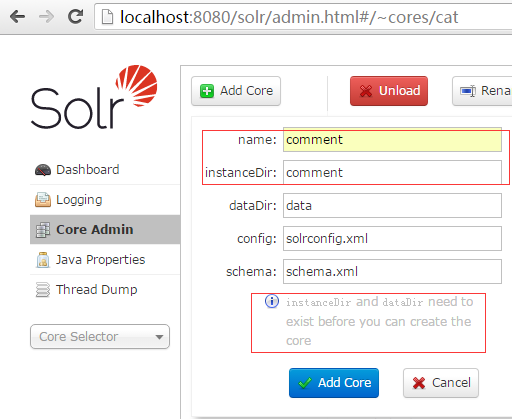
8. Create core success,Then Core Seletor select "comment",click Dataimport。
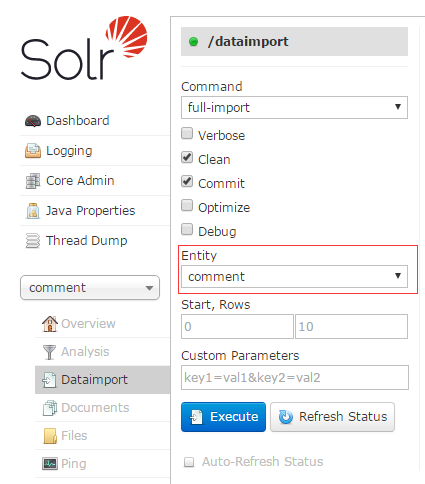
Command有两种: full-import (全量导入)、delta-import (增量导入)。
注意:执行delta-import导入的时候不要勾选“clean”,否则会将之前已存在的数据清空。
Select Entity 为 "comment",click Execute即可全量导入数据。
勾选“Auto-Refresh Status”,页面会自动刷新状态,可以从页面右侧看见导入的情况,否则需要手动点击"Refresh Status"。
Tomcat log as follows:

会出现一段DataImporter Starting Full Import,到执行完毕后会显示DataImporter success。
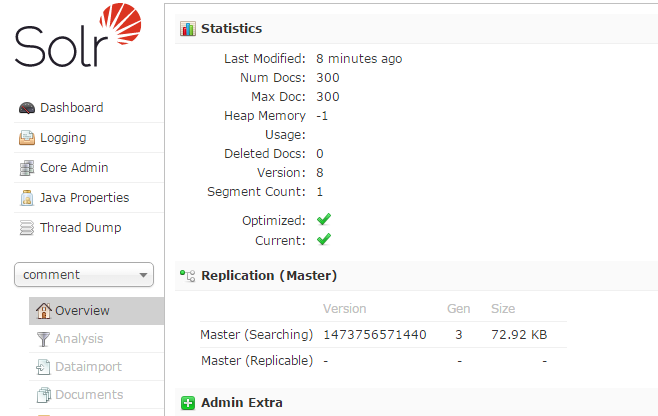
9. Data Importer success as follows:


 625
625

 被折叠的 条评论
为什么被折叠?
被折叠的 条评论
为什么被折叠?
 到【灌水乐园】发言


