 Nginx配置实战


 本文详细介绍了Nginx的安装步骤、默认虚拟主机配置、用户认证及域名重定向的方法。通过实际案例演示如何进行Nginx的各项配置,帮助读者快速掌握Nginx的使用。

6月7日任务
12.6 Nginx安装
12.7 默认虚拟主机
12.8 Nginx用户认证
12.9 Nginx域名重定向
扩展
nginx.conf 配置详解 http://www.ha97.com/5194.htmlhttp://my.oschina.net/duxuefeng/blog/34880
nginx rewrite四种flag http://www.netingcn.com/nginx-rewrite-flag.htmlhttp://unixman.blog.51cto.com/10163040/1711943
安装步骤:
- cd /usr/local/src
- wget http://nginx.org/download/nginx-1.4.7.tar.gz
- tar zxf nginx-1.4.7.tar.gz
- ./configure --prefix=/usr/local/nginx
- make && make install
- vim /etc/init.d/nginx //复制如下内容(参考https://coding.net/u/aminglinux/p/aminglinux-book/git/blob/master/D15Z/etc_init.d_nginx )
- chmod 755 /etc/init.d/nginx
- chkconfig --add nginx
- chkconfig nginx on
- cd /usr/local/nginx/conf/; mv nginx.conf nginx.conf.bak
- vim nginx.conf //写入如下内容(参考https://coding.net/u/aminglinux/p/aminglinux-book/git/blob/master/D15Z/nginx.conf)
- /usr/local/nginx/sbin/nginx -t
- /etc/init.d/nginx start
- netstat -lntp |grep 80
Nginx安装
- 切换到/usr/local/src/目录下
[root@yong-01 ~]# cd /usr/local/src/
- 下载Nginx安装包
- wget http://nginx.org/download/nginx-1.4.7.tar.gz
[root@yong-01 src]# wget http://nginx.org/download/nginx-1.4.7.tar.gz- 解压安装包
[root@yong-01 src]# tar zxvf nginx-1.4.7.tar.gz
- 切换到nginx-1.4.7目录下 cd nginx-1.4.7/
- 初始化./configure --prefix=/usr/local/nginx
[root@yong-01 nginx-1.4.7]# ./configure --prefix=/usr/local/nginx- 然后make && make install
[root@yong-01 nginx-1.4.7]# make && make install- 查看nginx目录
[root@yong-01 nginx-1.4.7]# ls /usr/local/nginx/
conf  html  logs  sbin
- conf目录,配置文件目录
- html目录,样例文件
- logs目录,存放日志的
- sbin目录,核心进程目录
- 支持-t 检查配置文件语法错误
[root@yong-01 nginx-1.4.7]# /usr/local/nginx/sbin/nginx -t
nginx: the configuration file /usr/local/nginx/conf/nginx.conf syntax is ok
nginx: configuration file /usr/local/nginx/conf/nginx.conf test is successful
- 给nginx创建启动脚本,vim /etc/init.d/nginx,复制如下内容(参考https://coding.net/u/aminglinux/p/aminglinux-book/git/blob/master/D15Z/etc_init.d_nginx )保存退出
- 更改配置文件的权限
[root@yong-01 nginx-1.4.7]# chmod 755 /etc/init.d/nginx
- 将nginx加入到服务列表里
[root@yong-01 nginx-1.4.7]# chkconfig --add nginx- 配置开启启动nginx服务
[root@yong-01 nginx-1.4.7]# chkconfig nginx on- 定义配置文件,默认conf目录下是有一个nginx.conf文件的,但我们不使用它,使用自己配置的
[root@yong-01 nginx-1.4.7]# cd /usr/local/nginx/conf/
[root@yong-01 conf]# ls
fastcgi.conf            koi-utf             nginx.conf           uwsgi_params
fastcgi.conf.default    koi-win             nginx.conf.default   uwsgi_params.default
fastcgi_params          mime.types          scgi_params          win-utf
fastcgi_params.default  mime.types.default  scgi_params.default
[root@yong-01 conf]# mv nginx.conf nginx.conf.bak
- 创建一个配置文件vim nginx.conf ,写入如下内容(参考https://coding.net/u/aminglinux/p/aminglinux-book/git/blob/master/D15Z/nginx.conf
- 作为一个网站的服务,必须监听一个端口,默认监听的是80端口,假如没有配置 server 这个几行,那么nginx将识别不到监听端口,导致服务不可用
- 编译好配置文件,检查配置文件是否存在语法错误
[root@yong-01 conf]# /usr/local/nginx/sbin/nginx -t
nginx: the configuration file /usr/local/nginx/conf/nginx.conf syntax is ok
nginx: configuration file /usr/local/nginx/conf/nginx.conf test is successful- 启动nginx服务
[root@yong-01 conf]# /etc/init.d/nginx start
Starting nginx (via systemctl): [ 确定 ]- 查看nginx进程
[root@yong-01 conf]# ps aux |grep nginx
root      4036  0.0  0.0  24800   784 ?        Ss   21:24   0:00 nginx: master process /usr/local/nginx/sbin/nginx -c /usr/local/nginx/conf/nginx.conf
nobody    4037  0.0  0.1  27104  3364 ?        S    21:24   0:00 nginx: worker process
nobody    4038  0.0  0.1  27104  3364 ?        S    21:24   0:00 nginx: worker process
root      4043  0.0  0.0 112676   980 pts/0    R+   21:24   0:00 grep --color=auto nginx
- 测试nginx,这里可以输入curl localhost 或者输入curl 127.0.0.1 得到的结果相同
[root@yong-01 conf]# curl localhost
<!DOCTYPE html>
<html>
<head>
<title>Welcome to nginx!</title>
<style>
    body {
        width: 35em;
        margin: 0 auto;
        font-family: Tahoma, Verdana, Arial, sans-serif;
    }
………………
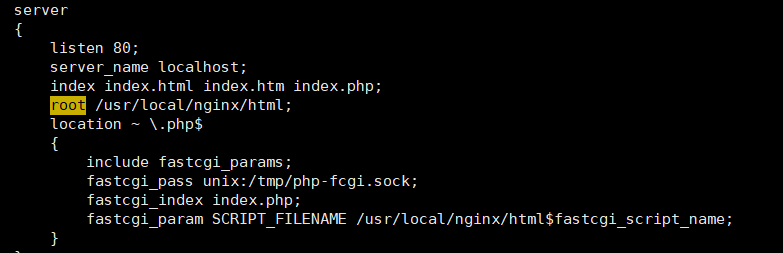
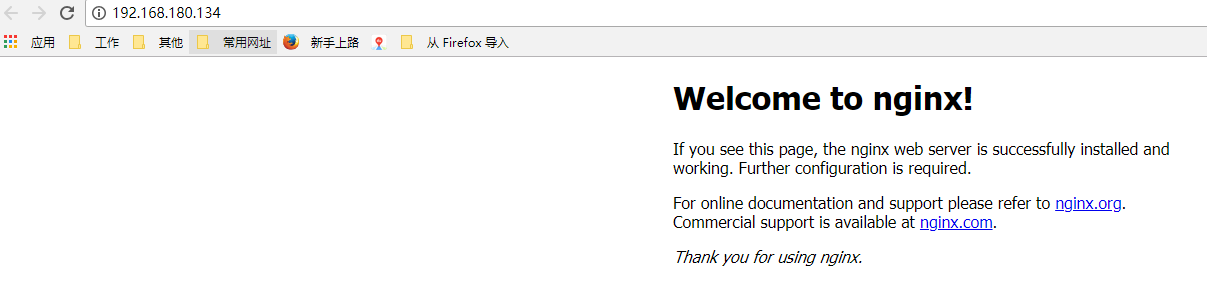
- 在本地电脑访问192.168.180.134
- 测试解析php,新建一个1.php文件
[root@yong-01 conf]# vim /usr/local/nginx/html/1.php
<?php
echo "hello nginx.";
[root@yong-01 conf]# curl localhost/1.php
hello nginx.
默认虚拟主机目录概要
- vim /usr/local/nginx/conf/nginx.conf //增加include vhost/*.conf
- mkdir /usr/local/nginx/conf/vhost
- cd !$; vim default.conf //加入如下内容
server
{
    listen 80 default_server;  // 有这个标记的就是默认虚拟主机
    server_name aaa.com;
    index index.html index.htm index.php;
    root /data/wwwroot/default;
}
- mkdir -p /data/wwwroot/default/
- echo “This is a default site.”>/data/wwwroot/default/index.html
- /usr/local/nginx/sbin/nginx -t
- /usr/local/nginx/sbin/nginx -s reload
- curl localhost
- curl -x127.0.0.1:80 123.com
默认虚拟主机
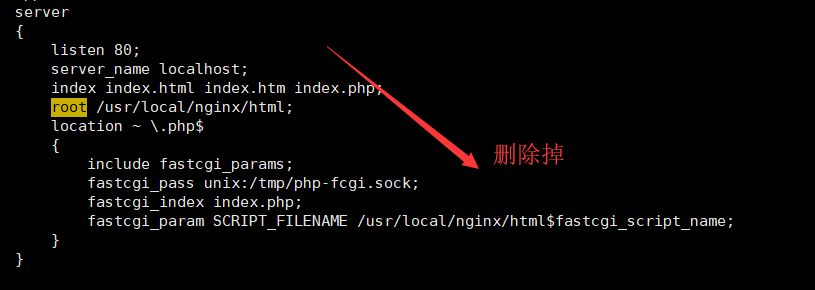
- 首先删除/usr/local/nginx/conf/nginx.conf 中的一部分内容——>目的是修改nginx.cnf配置,删除server后面的内容 ,重新定义虚拟主机配置所在路径
- 然后在配置文件中增加一行,include vhost/*.conf;,保存退出

- 新建/usr/local/nginx/conf/vhost目录
[root@yong-01 conf]# mkdir /usr/local/nginx/conf/vhost
- 进入到/usr/local/nginx/conf/vhost目录下
[root@yong-01 conf]# cd !$
cd /usr/local/nginx/conf/vhost- 定义新增虚拟主机的配置,然后保存退出
[root@yong-01 vhost]# vim aaa.com.conf
server
{
    listen 80 default_server;
    server_name aaa.com;
    index index.html index.htm index.php;
    root /data/wwwroot/default;
}
- 创建目录 mkdir -p /data/wwwroot/default/
[root@yong-01 vhost]# mkdir -p /data/wwwroot/default/- 切换到/data/wwwroot/default/目录下,在目录下写入一些东西vim index.html
[root@hanfeng vhost]# cd /data/wwwroot/default/
[root@yong-01 default]# vim index.html
This is a test default site.- 检测配置文件是否存在语法错误 /usr/local/nginx/sbin/nginx -t
[root@yong-01 default]# /usr/local/nginx/sbin/nginx -t
nginx: the configuration file /usr/local/nginx/conf/nginx.conf syntax is ok
nginx: configuration file /usr/local/nginx/conf/nginx.conf test is successful- 再修改配置文件后,一般都 -t 去检查下,防止误操作
- 修改完,重启nginx或者重新加载nginx
- 使用/etc/init.d/nginx restart 或者 /usr/local/nginx/sbin/nginx -s reload重新加载
[root@yong-01 default]# /usr/local/nginx/sbin/nginx -s reload
- 测试访问默认页
- 出来的就是之前/data/wwwroot/default/index.html里面定义的内容
[root@yong-01 default]# curl localhost
This is a test default site.
[root@yong-01 default]# curl localhost:80 bbb.com
This is a test default site.- nginx支持include这种语法
定义默认虚拟主机
因为修改了nginx.conf的配置,现在看到的默认索引页,是我们刚刚新增的vhost的虚拟主机的索引页了 定义默认虚拟主机的两种办法: 1.默认虚拟主机,是根据目录的第一个.conf了进行选择,所以只需要在vhost目录下依次创建就可以了,当然这种方法不智能 2.只需要在vhost目录的.conf配置文件内,加上一个“default_server ”即可,把当前的这个配置对应的网站设置为第一个默认虚拟主机
Nginx用户认证目录概要
- vim /usr/local/nginx/conf/vhost/test.com.conf//写入如下内容
server
{
    listen 80;
    server_name test.com;
    index index.html index.htm index.php;
    root /data/wwwroot/test.com;

    location  /
    {
        auth_basic              "Auth";
        auth_basic_user_file   /usr/local/nginx/conf/htpasswd;
    }
}
- yum install -y httpd
- htpasswd -c /usr/local/nginx/conf/htpasswd aming
- -t && -s reload //测试配置并重新加载
- mkdir /data/wwwroot/test.com
- echo “test.com”>/data/wwwroot/test.com/index.html
- curl -x127.0.0.1:80 test.com -I//状态码为401说明需要验证
- curl -uaming:passwd 访问状态码变为200
- 编辑windows的hosts文件,然后在浏览器中访问test.com会有输入用户、密码的弹窗
- 针对目录的用户认证
location  /admin/
    {
        auth_basic              "Auth";
        auth_basic_user_file   /usr/local/nginx/conf/htpasswd;
}
Nginx用户认证
- 首先切换到usr/local/nginx/conf/vhost/目录下
[root@yong-01 default]# cd /usr/local/nginx/conf/vhost/
- 新建新建一个虚拟主机test.com.conf,并编辑
[root@yong-01 vhost]# vim test.com.conf
server
{
    listen 80;
    server_name test.com;
    index index.html index.htm index.php;
    root /data/wwwroot/test.com;

    location  /                //表示全站,都需要进行用户认证
    #location  /admin         //这个地方只要加上” /admin ” 就变成 针对这个站点的“admin” 这个目录需要用户认证
    #location  ~ admin.php       //如果把这行这样写,就会变成,匹配 “ admin.php ”这个页面的时候才需要用户认证
    {
        auth_basic              "Auth";            //定义用户认证的名字
        auth_basic_user_file   /usr/local/nginx/conf/htpasswd;         //用户名密码文件
    }
}

保存退出
- 在配置完成后,需要生成密码文件
- 在生成密码文件,需要用到Apache生成密码文件的工具“ htpasswd ”
- 若本机已经安装过Apache,可以直接使用命令htpasswd进行生成
/usr/local/apache2/bin/htpasswd
- 若是本机未安装Apache,可直接 yum install -y httpd 进行安装,因为yum安装的,所以工具存放在/usr/bin/下,可以直接使用htpasswd
- htpasswd指定文件,生成用户
[root@yong-01 vhost]# /usr/local/apache2/bin/htpasswd -c /usr/local/nginx/conf/htpasswd yueyong
New password:
Re-type new password:
Adding password for user yueyong
- 使用cat 命令查看/usr/local/nginx/conf/htpasswd 文件,会看到生成了一行字符串
[root@yong-01 vhost]# cat /usr/local/nginx/conf/htpasswd
yueyong:$apr1$2z3VXNaH$ACdIVwH0mjC7f92wip8AG0
- 关于htpasswd -c 命令 第一次创建的时候因为没有htpasswd这个文件,需要-c创建,第二使用的时候因为已经有这个htpasswd文件了,将不再需要-c 选项,如果还继续使用-c 这个选项,将会重置 htpasswd里的东西
- 再来htpasswd指定文件,生成另一个用户
[root@yong-01 vhost]# /usr/local/apache2/bin/htpasswd /usr/local/nginx/conf/htpasswd user1
New password:
Re-type new password:
Adding password for user user1
[root@yong-01 vhost]# cat /usr/local/nginx/conf/htpasswd
yueyong:$apr1$2z3VXNaH$ACdIVwH0mjC7f92wip8AG0
user1:$apr1$MRSdQqmY$ou3wQ.ZdYU70WVfvntg6u.
- 检查配置nginx文件是否存在语法错误
[root@yong-01 vhost]# /usr/local/nginx/sbin/nginx -t
nginx: the configuration file /usr/local/nginx/conf/nginx.conf syntax is ok
nginx: configuration file /usr/local/nginx/conf/nginx.conf test is successful
- 重新加载配置文件
- 在重新加载的时候,若配置文件中存在错误,配置文件将不会生效;
- 如果是直接使用restart,如果配置有错,将会直接影响到网站的运行
[root@yong-01 vhost]# /usr/local/nginx/sbin/nginx -s reload
- 测试
[root@yong-01 vhost]# curl -x127.0.0.1:80 test.com
<html>
<head><title>401 Authorization Required</title></head>
<body bgcolor="white">
<center><h1>401 Authorization Required</h1></center>
<hr><center>nginx/1.4.7</center>
</body>
</html>
- 会提示错误码401,就是需要用户,所以用curl指定用户
- 这时指定用户和密码再来访问,会提示404,这是因为去访问index.html,但是还未创建
[root@yong-01 vhost]# curl -uyueyong:123456 -x127.0.0.1:80 test.com
<html>
<head><title>404 Not Found</title></head>
<body bgcolor="white">
<center><h1>404 Not Found</h1></center>
<hr><center>nginx/1.4.7</center>
</body>
</html>- 创建目录,然后新建index.html,再来访问,会看到显示正常
[root@yong-01 vhost]# mkdir /data/wwwroot/test.com
[root@yong-01 vhost]# echo "test.com" > /data/wwwroot/test.com/index.html
[root@yong-01 vhost]# curl -uyueyong:123456 -x127.0.0.1:80 test.com
test.com- 这里的用户认证是针对整站
针对某一个目录下,才需要认证
- 比如访问admin的时候,才需要认证
- 首先访问admin尝试下
[root@yong-01 vhost]# curl -uyueyong:123456 -x127.0.0.1:80 test.com/admin/
<html>
<head><title>404 Not Found</title></head>
<body bgcolor="white">
<center><h1>404 Not Found</h1></center>
<hr><center>nginx/1.4.7</center>
</body>
</html>
- 然后在/usr/local/nginx/conf/vhost/test.com.conf配置文件中定义,只需要在location / 后加上admin/ 目录即可
[root@yong-01 vhost]# vim test.com.conf
server
{
    listen 80;
    server_name test.com;
    index index.html index.htm index.php;
    root /data/wwwroot/test.com;

    location  /admin/   // 后加上admin/ 目录
    {
        auth_basic              "Auth";
        auth_basic_user_file   /usr/local/nginx/conf/htpasswd;
    }
}
- 检查配置文件是否存在语法错误 重新加载配置文件
[root@yong-01 vhost]# /usr/local/nginx/sbin/nginx -t
nginx: the configuration file /usr/local/nginx/conf/nginx.conf syntax is ok
nginx: configuration file /usr/local/nginx/conf/nginx.conf test is successful
[root@yong-01 vhost]# /usr/local/nginx/sbin/nginx -s reload
- 这时候再来访问test.com,就不需要指定用户名和密码了
[root@yong-01 vhost]# curl -x127.0.0.1:80 test.com
test.com
- 访问test.com/admin/目录
[root@yong-01 vhost]# curl -x127.0.0.1:80 test.com/admin
<html>
<head><title>401 Authorization Required</title></head>
<body bgcolor="white">
<center><h1>401 Authorization Required</h1></center>
<hr><center>nginx/1.4.7</center>
</body>
</html>- 这时创建一个测试页面 先新建目录 然后在admin目录下新建index.html
[root@yong-01 vhost]# mkdir /data/wwwroot/test.com/admin
[root@yong-01 vhost]# echo "test.com admin dir" > /data/wwwroot/test.com/admin/index.html
- 这时再来访问 test.com/admin/ 会显示401,但是指定用户名和密码后就会正常显示
[root@yong-01 vhost]# curl -x127.0.0.1:80 test.com/admin/
<html>
<head><title>401 Authorization Required</title></head>
<body bgcolor="white">
<center><h1>401 Authorization Required</h1></center>
<hr><center>nginx/1.4.7</center>
</body>
</html>
[root@yong-01 vhost]# curl -uyueyong:123456 -x127.0.0.1:80 test.com/admin/
test.com admin dir
针对URL
- 比如针对admin.php
- 首先在配置文件/usr/local/nginx/conf/vhost/test.com.conf下定义,在 location 后加~ admin.php即可
[root@yong-01 vhost]# vim test.com.conf

在 location  后加~ admin.php即可
server
{
    listen 80;
    server_name test.com;
    index index.html index.htm index.php;
    root /data/wwwroot/test.com;

    location  ~ admin.php
    {
        auth_basic              "Auth";
        auth_basic_user_file   /usr/local/nginx/conf/htpasswd;
    }
}
- 检查配置文件是否存在语法错误 重新加载配置文件
[root@yong-01 vhost]# /usr/local/nginx/sbin/nginx -t
nginx: the configuration file /usr/local/nginx/conf/nginx.conf syntax is ok
nginx: configuration file /usr/local/nginx/conf/nginx.conf test is successful
[root@yong-01 vhost]# /usr/local/nginx/sbin/nginx -s reload
- 这时候就可以直接访问 test.com/admin/,不需要指定用户名和密码了,但是在访问admin.php的时候,则会显示401——>状态码为401说明需要验证
[root@yong-01 vhost]# curl -x127.0.0.1:80 test.com/admin/
test.com admin dir
[root@yong-01 vhost]# echo "test admin.php" > /data/wwwroot/test.com/admin.php
[root@yong-01 vhost]# curl -x127.0.0.1:80 test.com/admin.php
<html>
<head><title>401 Authorization Required</title></head>
<body bgcolor="white">
<center><h1>401 Authorization Required</h1></center>
<hr><center>nginx/1.4.7</center>
</body>
</html>
加上用户名和密码就可以正常访问了
[root@yong-01 vhost]# curl -uyueyong:123456 -x127.0.0.1:80 test.com/admin.php
test admin.php
Nginx域名重定向目录概要
- 更改test.com.conf
server
{
    listen 80;
    server_name test.com test1.com test2.com;
    index index.html index.htm index.php;
    root /data/wwwroot/test.com;
    if ($host != 'test.com' ) {
        rewrite  ^/(.*)$  http://test.com/$1  permanent;
    }
}
- server_name后面支持写多个域名,这里要和httpd的做一个对比
- permanent为永久重定向,状态码为301,如果写redirect则为302
Nginx域名重定向
- 在Nginx里“server_name” 支持跟多个域名;但是Apache“server_name”只能跟一个域名,需要跟多个域名,需要使用Alisa;
- 在Nginx的conf配置文件里“server_name ” 设置了多个域名,就会使网站的权重变了,到底需要哪个域名为主站点,所以需要域名重定向
- 修改配置文件vim /usr/local/nginx/conf/vhost/test.com.conf,(这里删除用户认证那一块代码)
[root@yong-01 vhost]# vim test.com.conf
server
{
    listen 80;
    server_name test.com test1.com test2.com;
    index index.html index.htm index.php;
    root /data/wwwroot/test.com;
    if ($host != 'test.com' ) {
        rewrite  ^/(.*)$  http://test.com/$1  permanent;
    }
}
- if ($host != ‘test.com’ ) //假如域名,“!=”不等于 test.com,将执行下面的脚本
- rewrite ^/(.)$ http://test.com/$1 permanent; // ^/(.)$ 正式写法 http://$host/(.*)$ 这段可以直接省略掉的,同时还可以加上一些规则,
- permanent 就是301的意思
- 如果想弄成302,只需要更改为 redirect
检查配置文件语法错误,并重新加载配置文件
[root@yong-01 vhost]# /usr/local/nginx/sbin/nginx -t
nginx: the configuration file /usr/local/nginx/conf/nginx.conf syntax is ok
nginx: configuration file /usr/local/nginx/conf/nginx.conf test is successful
[root@yong-01 vhost]# /usr/local/nginx/sbin/nginx -s reload
- 测试,用test2.com去访问,会看到显示301,给它重定向到了http://test.com/index.html
[root@yong-01 vhost]# curl -x127.0.0.1:80 test2.com/index.html -I
HTTP/1.1 301 Moved Permanently
Server: nginx/1.4.7
Date: Thu, 07 Jun 2018 14:46:00 GMT
Content-Type: text/html
Content-Length: 184
Connection: keep-alive
Location: http://test.com/index.html

[root@yong-01 vhost]# curl -x127.0.0.1:80 test2.com/admin/index.html -I
HTTP/1.1 301 Moved Permanently
Server: nginx/1.4.7
Date: Thu, 07 Jun 2018 14:46:21 GMT
Content-Type: text/html
Content-Length: 184
Connection: keep-alive
Location: http://test.com/admin/index.html
- 它会访问默认虚拟主机
- 这时若是随意访问一个不存在的网址,则会显示404
[root@yong-01 vhost]# curl -x127.0.0.1:80 test5.com/admin/index.html -I
HTTP/1.1 404 Not Found
Server: nginx/1.4.7
Date: Thu, 07 Jun 2018 14:47:19 GMT
Content-Type: text/html
Content-Length: 168
Connection: keep-alive


 691
691

 被折叠的 条评论
为什么被折叠?
被折叠的 条评论
为什么被折叠?
 到【灌水乐园】发言


