


 本文详细解析了ASP.NET请求处理的两步过程:创建运行环境和使用模块、处理器及页面对象处理请求。从用户发送请求到IIS开始,直至响应返回浏览器结束,包括HTTP模块与处理器的作用及ASP.NET页面生命周期等关键环节。
The Two step process
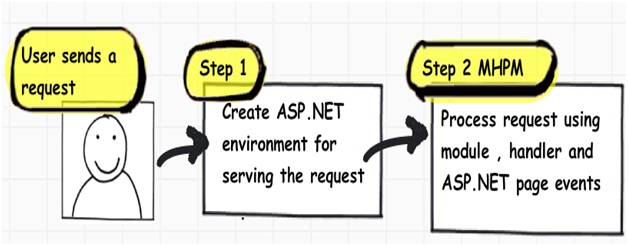
From 30,000 feet level ASP.NET request processing is a 2 step process as shown below. User sends a request to the IIS:
- ASP.NET creates an environment which can process the request. In other words it creates the application object, request, response and context objects to process the request.
- Once the environment is created the request is processed through series of events which is processed by using modules, handlers and page objects. To keep it short lets name this step as MHPM (Module, handler, page and Module event), we will come to details later.
In the coming sections we will understand both these main steps in more details.
Creation of ASP.NET environment
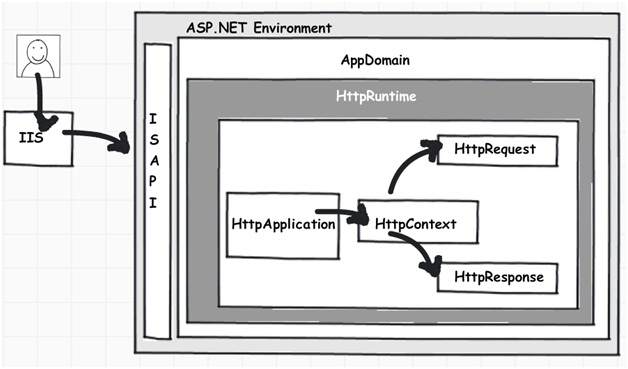
Step 1:- The user sends a request to IIS. IIS first checks which ISAPI extension can serve this request. Depending on file extension the request is processed. For instance if the page is an '.ASPX page' then it will be passed to 'aspnet_isapi.dll' for processing.
Step 2:- If this the first request to the website then a class called as 'ApplicationManager' creates an application domain where the website can run. As we all know application domain creates isolation between two web applications hosted on the same IIS. So in case there is issue in one app domain it does not affect the other app domain.
Step 3:- The newly created application domain creates hosting environment i.e. the 'HttpRuntime' object. Once the hosting environment is created necessary core ASP.NET objects like 'HttpContext' , 'HttpRequest' and 'HttpResponse' objects are created.
Step 4:- Once all the core ASP.NET objects are created 'HttpApplication' object is created to serve the request. In case you have a 'global.asax' file in your system then object of the 'global.asax' file will be created. Please note 'global.asax' file inherits from 'HttpApplication' class.
Note: The first time an ASP.NET page is attached to an application, a new instance of 'HttpApplication' is created. Said and done to maximize performance, 'HttpApplication' instances might be reused for multiple requests.
Step 5:- The 'HttpApplication' object is then assigned to the core ASP.NET objects to process the page.
Step 6:- 'HttpApplication' then starts processing the request by http module events , handlers and page events. It fires the MHPM event for request processing.

Below image explains how the internal object model looks like for an ASP.NET request. At the top level is the ASP.NET runtime which has creates an 'Appdomain' which in turn has 'HttpRuntime' with 'request', 'response' and 'context' objects.
Process request using MHPM events fired
Once 'HttpApplication' is created it starts processing request it goes through 3 different sections 'HttpModule' , 'Page' and 'HttpHandler'. As it moves through these sections it invokes different events which the developer can extend and add customize logic to the same.
Before we move ahead lets understand what are 'HttpModule' and 'HttpHandlers'. They help us to inject custom logic before and after the ASP.NET page is processed. The main differences between both of them are:-
If you want to inject logic based in file extensions like '.ASPX' , '.HTML' then you use 'HttpHandler'. In other words 'HttpHandler' is an extension based processor.
If you want to inject logic in the events of ASP.NET pipleline then you use 'HttpModule'. ASP.NET . In other word 'HttpModule' is an event based processor.
You can read more about the differences from http://computerauthor.blogspot.com/2009/09/two-interceptors-httpmodule-and.html
Below is the logical flow of how the request is processed. There are 4 important steps MHPM as explained below :-
Step 1(M - HttpModule):- Client request processing starts. Before the ASP.NET engine goes and creates the ASP.NET 'HttpModule' emits events which can be used to inject customized logic. There are 6 important events which you can utilize before your page object is created 'BeginRequest','AuthenticateRequest','AuthorizeRequest','ResolveRequestCache','AcquireRequestState' and 'PreRequestHandlerExecute'.
Step 2 (H - 'HttpHandler' ) :- Once the above 6 events are fired , ASP.NET engine will invoke 'ProcessRequest' event if you have implemented 'HttpHandler' in your project.
Step 3 (P - ASP.NET page):- Once the 'HttpHandler' logic executes the ASP.NET page object is created. While the ASP.NET page object is created many events are fired which can help us to write our custom logic inside those page events. There are 6 important events which provides us placeholder to write logic inside ASP.NET pages 'Init' , 'Load' , 'validate' , 'event' , 'render' and 'unload'. You can remember the word 'SILVER' to remember the events S - Start ( does not signify anything as such just forms the word ) , I - (Init) , L ( Load) , V ( Validate) , E ( Event) and R ( Render).
Step4 (M - HttpModule):- Once the page object is executed and unloaded from memory 'HttpModule' provides post page execution events which can be used to inject custom post-processing logic. There are 4 important post-processing events 'PostRequestHandlerExecute', 'ReleaserequestState', 'UpdateRequestCache' and 'EndRequest'.
Below figure shows the same in a pictorial format.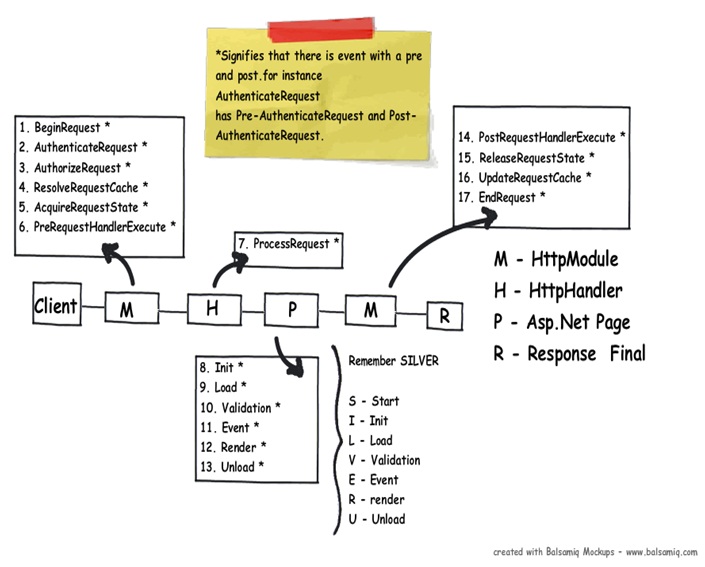
In What event we should do what?
The million dollar question is in which events we should do what? . Below is the table which shows in which event what kind of logic or code can go.
| Section | Event | Description |
| HttpModule | BeginRequest | This event signals a new request; it is guaranteed to be raised on each request. |
| HttpModule | AuthenticateRequest | This event signals that ASP.NET runtime is ready to authenticate the user. Any authentication code can be injected here. |
| HttpModule | AuthorizeRequest | This event signals that ASP.NET runtime is ready to authorize the user. Any authorization code can be injected here. |
| HttpModule | ResolveRequestCache | In ASP.NET we normally use outputcache directive to do caching. In this event ASP.NET runtime determines if the page can be served from the cache rather than loading the patch from scratch. Any caching specific activity can be injected here. |
| HttpModule | AcquireRequestState | This event signals that ASP.NET runtime is ready to acquire session variables. Any processing you would like to do on session variables. |
| HttpModule | PreRequestHandlerExecute | This event is raised just prior to handling control to the HttpHandler. Before you want the control to be handed over to the handler any pre-processing you would like to do. |
| HttpHandler | ProcessRequest | Httphandler logic is executed. In this section we will write logic which needs to be executed as per page extensions. |
| Page | Init | This event happens in the ASP.NET page and can be used for :-
In this section we do not have access to viewstate , postedvalues and neither the controls are initialized. |
| Page | Load | In this section the ASP.NET controls are fully loaded and you write UI manipulation logic or any other logic over here. |
| Page | Validate | If you have valuators on your page, you would like to check the same here. |
| Render | It's now time to send the output to the browser. If you would like to make some changes to the final HTML which is going out to the browser you can enter your HTML logic here. | |
| Page | Unload | Page object is unloaded from the memory. |
| HttpModule | PostRequestHandlerExecute | Any logic you would like to inject after the handlers are executed. |
| HttpModule | ReleaserequestState | If you would like to save update some state variables like session variables. |
| HttpModule | UpdateRequestCache | Before you end if you want to update your cache. |
| HttpModule | EndRequest | This is the last stage before your output is sent to the client browser. |
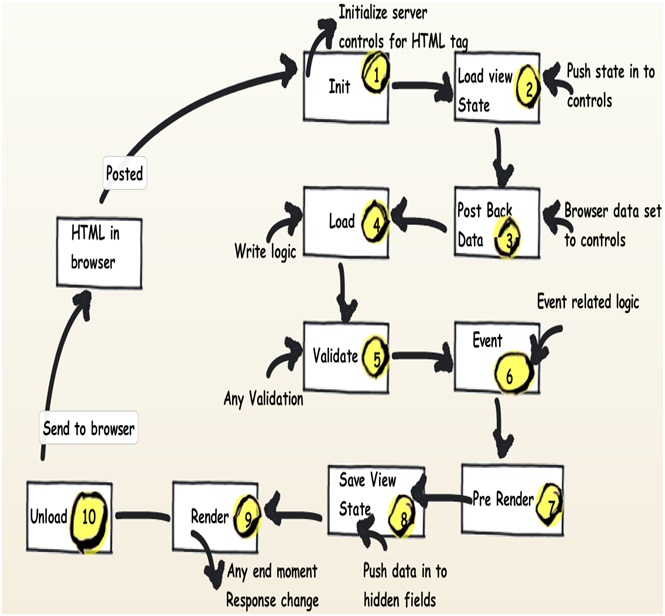
Zooming ASP.NET page events
In the above section we have seen the overall flow of events for an ASP.NET page request. One of the most important section is the ASP.NET page, we have not discussed the same in detail. So let's take some luxury to describe the ASP.NET page events in more detail in this section.
Any ASP.NET page has 2 parts one is the page which is displayed on the browser which has HTML tags , hidden values in form of viewstate and data on the HTML inputs. When the page is posted these HTML tags are created in to ASP.NET controls with viewstate and form data tied up together on the server. Once you get these full server controls on the behind code you can execute and write your own login on the same and render the page back to the browser.
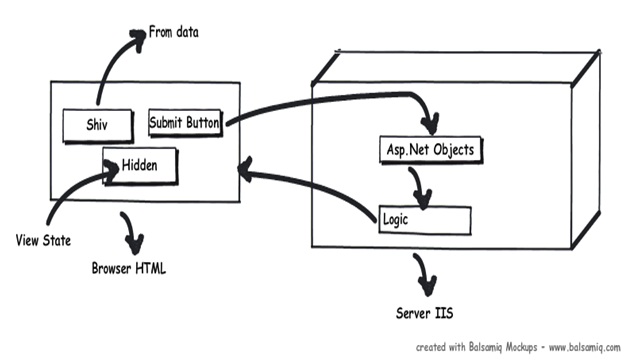
Now between these HTML controls coming live on the server as ASP.NET controls, the ASP.NET page emits out lot of events which can be consumed to inject logic. Depending on what task / logic you want to perform we need to put these logics appropriately in those events.
Note: - Most of the developers directly use the 'page_load' method for everything, which is not a good thought. So it's either populating the controls, setting view state, applying themes etc everything happens on the page load. So if we can put logic in proper events as per the nature of the logic that would really make your code clean.
| Seq | Events | Controls Initialized | View state Available | Form data Available | What Logic can be written here? |
| 1 | Init | No | No | No | Note: - You can access form data etc by using ASP.NET request objects but not by Server controls.Creating controls dynamically, in case you have controls to be created on runtime. Any setting initialization.Master pages and them settings.In this section we do not have access to viewstate , posted values and neither the controls are initialized. |
| 2 | Load view state | Not guaranteed | Yes | Not guaranteed | You can access view state and any synch logic where you want viewstate to be pushed to behind code variables can be done here. |
| 3 | PostBackdata | Not guaranteed | Yes | Yes | You can access form data. Any logic where you want the form data to be pushed to behind code variables can be done here. |
| 4 | Load | Yes | Yes | Yes | This is the place where you will put any logic you want to operate on the controls. Like flourishing a combox box from the database , sorting data on a grid etc. In this event we get access to all controls , viewstate and their posted values. |
| 5 | Validate | Yes | Yes | Yes | If your page has validators or you want execute validation for your page this is the right place to the same. |
| 6 | Event | Yes | Yes | Yes | If this is a post back by a button click or a dropdown change then the relative events will be fired. Any kind of logic which is related to that event can be executed here. |
| 7 | Pre-render | Yes | Yes | Yes | If you want to make final changes to the UI objects like changing tree structure or property values, before these controls are saved in to view state. |
| 8 | Save view state | Yes | Yes | Yes | Once all changes to server controls are done this event can be an opportunity to save control data in to view state. |
| 9 | Render | Yes | Yes | Yes | If you want to add some custom HTML to the output this is the place you can. |
| 10 | Unload | Yes | Yes | Yes | Any kind of clean up you would like to do here. |
Reference: http://www.c-sharpcorner.com/UploadFile/shivprasadk/894/Default.aspx


 113
113

 被折叠的 条评论
为什么被折叠?
被折叠的 条评论
为什么被折叠?
 到【灌水乐园】发言


