


 博客记录了OpenSSL版本升级过程。因系统安全扫描发现问题需升级,介绍了在RHEL 6.6操作系统下的升级操作,包括下载、解压、安装等步骤,还提及升级openresty中openssl时编译报错的解决办法,同时提醒生产环境操作前要备份。
需求说明:
最近在对系统进行安全扫描的时候,出现了openssl版本的问题,建议对openssl版本进行升级,在此记录下升级过程。
环境说明:
操作系统:RHEL 6.6
升级操作过程:
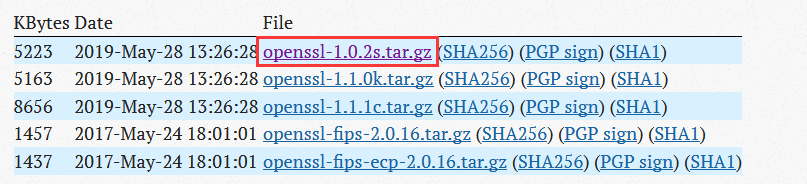
1.下载最新版本openssl
下载地址:https://www.openssl.org/source/
下载1.0.2的分支版本
2.将压缩包上传到服务器上
3.查看当前openssl版本信息
[root@openssl ~]# openssl version -a
OpenSSL 1.0.1e-fips 11 Feb 2013
built on: Fri Aug 15 03:59:00 EDT 2014
platform: linux-x86_64
options:  bn(64,64) md2(int) rc4(16x,int) des(idx,cisc,16,int) idea(int) blowfish(idx)
compiler: gcc -fPIC -DOPENSSL_PIC -DZLIB -DOPENSSL_THREADS -D_REENTRANT -DDSO_DLFCN -DHAVE_DLFCN_H -DKRB5_MIT -m64 -DL_ENDIAN -DTERMIO -Wall -O2 -g -pipe -Wall -Wp,-D_FORTIFY_SOURCE=2 -fexceptions -fstack-protector --param=ssp-buffer-size=4 -m64 -mtune=generic -Wa,--noexecstack -DPURIFY -DOPENSSL_IA32_SSE2 -DOPENSSL_BN_ASM_MONT -DOPENSSL_BN_ASM_MONT5 -DOPENSSL_BN_ASM_GF2m -DSHA1_ASM -DSHA256_ASM -DSHA512_ASM -DMD5_ASM -DAES_ASM -DVPAES_ASM -DBSAES_ASM -DWHIRLPOOL_ASM -DGHASH_ASM
OPENSSLDIR: "/etc/pki/tls"
engines:  rdrand dynamic
4.解压,检查配置,安装
[root@openssl ~]# ls -l openssl-1.0.2s.tar.gz
-rw-r--r--. 1 root root 5349149 May 30 11:28 openssl-1.0.2s.tar.gz
[root@openssl ~]# tar -zxf openssl-1.0.2s.tar.gz
[root@openssl ~]# cd openssl-1.0.2s
[root@openssl openssl-1.0.2s]# ./config shared zlib-dynamic
[root@openssl openssl-1.0.2s]# make && make install
备注:新的openssl默认安装在/usr/local/ssl目录下
5.将原来openssl命令备份,重命名原来的openssl目录
[root@openssl openssl-1.0.2s]# mv /usr/bin/openssl  /usr/bin/openssl.old
[root@openssl openssl-1.0.2s]# mv /usr/include/openssl  /usr/include/openssl.old
6.基于新安装openssl建立命令,目录的软链接
[root@openssl openssl-1.0.2s]# ln -s /usr/local/ssl/bin/openssl  /usr/bin/openssl
[root@openssl openssl-1.0.2s]# ln -s /usr/local/ssl/include/openssl  /usr/include/openssl
7.修改系统自带的openssl库文件,软链接升级后的openssl库
[root@openssl openssl-1.0.2s]# mv /usr/lib64/libssl.so /usr/lib64/libssl.so.bak
[root@openssl openssl-1.0.2s]# ln -s /usr/local/ssl/lib/libssl.so /usr/lib64/libssl.so
8.查看openssl依赖的库的版本
[root@openssl openssl-1.0.2s]# strings /usr/lib64/libssl.so |grep OpenSSL
OpenSSLDie
SSLv3 part of OpenSSL 1.0.2s  28 May 2019
TLSv1 part of OpenSSL 1.0.2s  28 May 2019
DTLSv1 part of OpenSSL 1.0.2s  28 May 2019
OpenSSL 1.0.2s  28 May 2019
9.在/etc/ld.so.conf文件中写入openssl库文件的搜索路径,并使得修改生效
[root@openssl openssl-1.0.2s]# echo "/usr/local/ssl/lib" >> /etc/ld.so.conf
[root@openssl openssl-1.0.2s]# ldconfig -v

10.查看openssl版本
[root@openssl openssl-1.0.2s]# openssl version -a
OpenSSL 1.0.2s  28 May 2019
built on: reproducible build, date unspecified
platform: linux-x86_64
options:  bn(64,64) rc4(16x,int) des(idx,cisc,16,int) idea(int) blowfish(idx)
compiler: gcc -I. -I.. -I../include  -fPIC -DOPENSSL_PIC -DZLIB_SHARED -DZLIB -DOPENSSL_THREADS -D_REENTRANT -DDSO_DLFCN -DHAVE_DLFCN_H -Wa,--noexecstack -m64 -DL_ENDIAN -O3 -Wall -DOPENSSL_IA32_SSE2 -DOPENSSL_BN_ASM_MONT -DOPENSSL_BN_ASM_MONT5 -DOPENSSL_BN_ASM_GF2m -DRC4_ASM -DSHA1_ASM -DSHA256_ASM -DSHA512_ASM -DMD5_ASM -DAES_ASM -DVPAES_ASM -DBSAES_ASM -DWHIRLPOOL_ASM -DGHASH_ASM -DECP_NISTZ256_ASM
OPENSSLDIR: "/usr/local/ssl"
openssl版本升级成功。
升级openresty中openssl
1.查看当前openresty中nginx的编译信息
[root@openssl nginx]# sbin/nginx -V
nginx version: openresty/1.11.2.3
built by gcc 4.4.7 20120313 (Red Hat 4.4.7-11) (GCC)
built with OpenSSL 1.0.1e-fips 11 Feb 2013           #openssl版本是之前的版本
TLS SNI support enabled
configure arguments: --prefix=/usr/local/openresty/nginx --with-cc-opt=-O2 --add-module=../ngx_devel_kit-0.3.0 --add-module=../echo-nginx-module-0.60 --add-module=../xss-nginx-module-0.05 --add-module=../ngx_coolkit-0.2rc3 --add-module=../set-misc-nginx-module-0.31 --add-module=../form-input-nginx-module-0.12 --add-module=../encrypted-session-nginx-module-0.06 --add-module=../srcache-nginx-module-0.31 --add-module=../ngx_lua-0.10.8 --add-module=../ngx_lua_upstream-0.06 --add-module=../headers-more-nginx-module-0.32 --add-module=../array-var-nginx-module-0.05 --add-module=../memc-nginx-module-0.18 --add-module=../redis2-nginx-module-0.14 --add-module=../redis-nginx-module-0.3.7 --add-module=../rds-json-nginx-module-0.14 --add-module=../rds-csv-nginx-module-0.07 --with-ld-opt=-Wl,-rpath,/usr/local/openresty/luajit/lib --with-http_ssl_module
2.重新对openresty进行编译
[root@openssl openresty-1.11.2.3]# ./configure --with-openssl=/usr/local/ssl/
编译时报错:
cd /root/openresty-1.11.2.3/build/nginx-1.11.2 && make
make[1]: Entering directory `/root/openresty-1.11.2.3/build/nginx-1.11.2'
make -f objs/Makefile
make[2]: Entering directory `/root/openresty-1.11.2.3/build/nginx-1.11.2'
cd /usr/local/ssl \
    && if [ -f Makefile ]; then make clean; fi \
    && ./config --prefix=/usr/local/ssl/.openssl no-shared  \
    && make \
    && make install_sw LIBDIR=lib
/bin/sh: line 2: ./config: No such file or directory
make[2]: *** [/usr/local/ssl/.openssl/include/openssl/ssl.h] Error 127
make[2]: Leaving directory `/root/openresty-1.11.2.3/build/nginx-1.11.2'
make[1]: *** [build] Error 2
make[1]: Leaving directory `/root/openresty-1.11.2.3/build/nginx-1.11.2'
make: *** [all] Error 2
解决该问题,修改配置文件/bundle/nginx-1.11.2/auto/lib/openssl/conf
[root@openssl openssl]# pwd
/root/openresty-1.11.2.3/bundle/nginx-1.11.2/auto/lib/openssl
[root@openssl openssl]# ls -l
total 16
-rw-rw-r--. 1 1000 1000 3587 Jul 18  2016 conf
-rw-rw-r--. 1 1000 1000 1480 Jul 18  2016 make
-rw-rw-r--. 1 1000 1000  365 Jul 18  2016 makefile.bcc
-rw-rw-r--. 1 1000 1000  211 Jul 18  2016 makefile.msvc
修改之后,如下(将/.openssl删除掉,也就是避免了找路径的时候找.openssl这个路径):

3.重新编译、安装
[root@openssl openresty-1.11.2.3]# make clean
rm -rf build
[root@openssl openresty-1.11.2.3]# ./configure --with-openssl=/usr/local/ssl/
[root@openssl openresty-1.11.2.3]# make && make install
4.查看编译后的nginx信息
[root@openssl nginx]# sbin/nginx -V
nginx version: openresty/1.11.2.3
built by gcc 4.4.7 20120313 (Red Hat 4.4.7-11) (GCC)
built with OpenSSL 1.0.2s  28 May 2019
TLS SNI support enabled
configure arguments: --prefix=/usr/local/openresty/nginx --with-cc-opt=-O2 --add-module=../ngx_devel_kit-0.3.0 --add-module=../echo-nginx-module-0.60 --add-module=../xss-nginx-module-0.05 --add-module=../ngx_coolkit-0.2rc3 --add-module=../set-misc-nginx-module-0.31 --add-module=../form-input-nginx-module-0.12 --add-module=../encrypted-session-nginx-module-0.06 --add-module=../srcache-nginx-module-0.31 --add-module=../ngx_lua-0.10.8 --add-module=../ngx_lua_upstream-0.06 --add-module=../headers-more-nginx-module-0.32 --add-module=../array-var-nginx-module-0.05 --add-module=../memc-nginx-module-0.18 --add-module=../redis2-nginx-module-0.14 --add-module=../redis-nginx-module-0.3.7 --add-module=../rds-json-nginx-module-0.14 --add-module=../rds-csv-nginx-module-0.07 --with-ld-opt=-Wl,-rpath,/usr/local/openresty/luajit/lib --with-openssl=/usr/local/ssl --with-http_ssl_module
openssl升级成功。
备注:如果在生产环境操作,必须在升级之前进行备份。
文档创建时间:2019年5月30日18:46:58


 944
944

 被折叠的 条评论
为什么被折叠?
被折叠的 条评论
为什么被折叠?
 到【灌水乐园】发言


