RAID stands for Redundant Array of Inexpensive (Independent) Disks.
On most situations you will be using one of the following four levels of RAIDs.
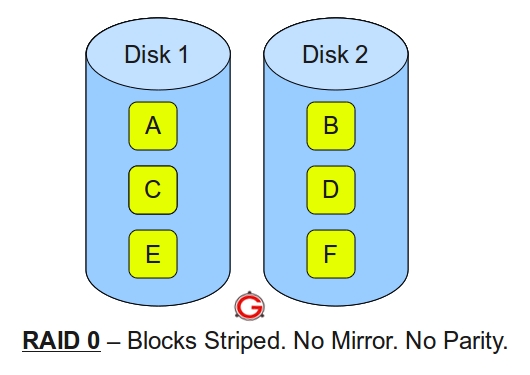
RAID 0
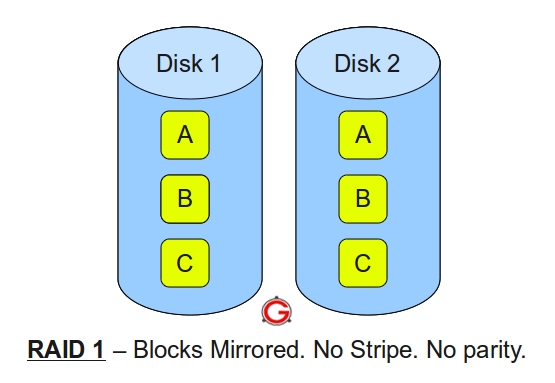
RAID 1
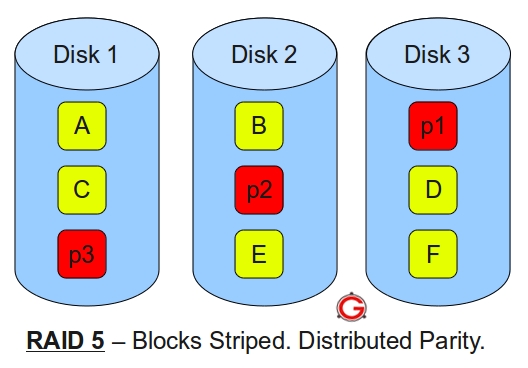
RAID 5
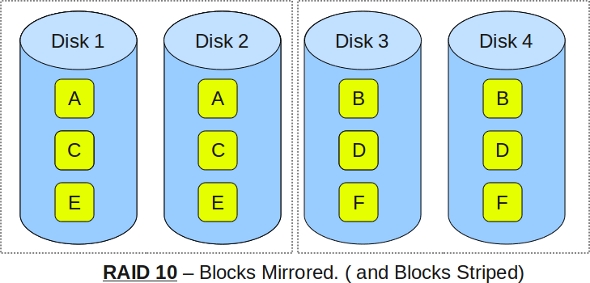
RAID 10 (also known as RAID 1+0)
This article explains the main difference between these raid levels along with an easy to understand diagram.
In all the diagrams mentioned below:
A, B, C, D, E and F – represents blocks
p1, p2, and p3 – represents parity
RAID LEVEL 0
Following are the key points to remember for RAID level 0.
Minimum 2 disks.
Excellent performance ( as blocks are striped ).
No redundancy ( no mirror, no parity ).
Don’t use this for any critical system.
RAID LEVEL 1
Following are the key points to remember for RAID level 1.
Minimum 2 disks.
Good performance ( no striping. no parity ).
Excellent redundancy ( as blocks are mirrored ).
Following are the key points to remember for RAID level 1.
Minimum 2 disks.
Good performance ( no striping. no parity ).
Excellent redundancy ( as blocks are mirrored ).
RAID LEVEL 5
Following are the key points to remember for RAID level 5.
Minimum 3 disks.
Good performance ( as blocks are striped ).
Good redundancy ( distributed parity ).
Best cost effective option providing both performance and redundancy. Use this for DB that is heavily read oriented. Write operations will be slow.
RAID LEVEL 10
Following are the key points to remember for RAID level 10.
Minimum 4 disks.
This is also called as “stripe of mirrors”
Excellent redundancy ( as blocks are mirrored )
Excellent performance ( as blocks are striped )
If you can afford the dollar, this is the BEST option for any mission critical applications (especially databases).
转载于:https://blog.51cto.com/xiaoxiaoniao/1404176


 本文介绍了四种常见的RAID级别:RAID0、RAID1、RAID5和RAID10(也称为RAID1+0),并通过易于理解的图表解释了它们之间的主要区别。文章详细阐述了每种级别的特点,包括所需的最小磁盘数量、性能表现、冗余能力及适用场景。


 被折叠的 条评论
为什么被折叠?


