Reflection,中文翻译为反射。这是.Net中获取运行时类型信息的方式,.Net的应用程序由几个部分:‘程序集(Assembly)’、‘模块(Module)’、‘类型(class)’组成,而反射提供一种编程的方式,让程序员可以在程序运行期获得这几个组成部分的相关信息,例如:Assembly类可以获得正在运行的装配件信息,也可以动态的加载装配件,以及在装配件中查找类型信息,并创建该类型的实例。Type类可以获得对象的类型信息,此信息包含对象的所有要素:方法、构造器、属性等等,通过Type类可以得到这些要素的信息,并且调用之。MethodInfo包含方法的信息,通过这个类可以得到方法的名称、参数、返回值等,并且可以调用之。诸如此类,还有FieldInfo、EventInfo等等,这些类都包含在System.Reflection命名空间下。
一、Type类于获取类型信息
System.Type 类对于反射起着核心的作用。当反射请求加载的类型时,公共语言运行库将为它创建一个 Type。您可以使用 Type 对象的方法、字段、属性和嵌套类来查找有关该类型的所有信息。
大家运行一下下面的代码根据结果分析一下就能比较清楚的理解Type了
namespace ConsoleApplication2
{
class Program
{
static void Main(string[] args)
{
MyClass m = new MyClass();
Type type = m.GetType();
Console.WriteLine("类型名:" + type.Name);
Console.WriteLine("类全名:"+type.FullName);
Console.WriteLine("命名空间名:"+type.Namespace);
Console.WriteLine("程序集名:"+type.Assembly);
Console.WriteLine("模块名:"+type.Module);
Console.WriteLine("基类名:"+type.BaseType);
Console.WriteLine("是否类:"+type.IsClass);
Console.WriteLine("类的公共成员:");
MemberInfo[] memberInfos = type.GetMembers();//得到所有公共成员
foreach (var item in memberInfos)
{
Console.WriteLine("{0}:{1}",item.MemberType,item);
}
}
}
class MyClass
{
public string m;
public void test()
{ }
public int MyProperty { get; set; }
}
}
二、获取程序集元数据
Assembly类定义了一个程序集,它是一个可重用、无版本冲突并且可自我描述的公共语言运行库应用程序构造块。因为程序集中是使用元数据进行自我描述的,所以我们就能通过其元数据得到程序集内部的构成。结合Assembly和反射能够获取程序集的元数据,但是首先要将程序集装入内存中。可以使用Assembly类的多种静态Load方法加载程序集。
下面的程序显示程序集的信息
public static void Main()
{
//获取当前执行代码的程序集
Assembly assem = Assembly.GetExecutingAssembly();
Console.WriteLine("程序集全名:"+assem.FullName);
Console.WriteLine("程序集的版本:"+assem.GetName().Version);
Console.WriteLine("程序集初始位置:"+assem.CodeBase);
Console.WriteLine("程序集位置:"+assem.Location);
Console.WriteLine("程序集入口:"+assem.EntryPoint);
Type[] types = assem.GetTypes();
Console.WriteLine("程序集下包含的类型:");
foreach (var item in types)
{
Console.WriteLine("类:"+item.Name);
}
}
三、动态加载类型
早绑定是在编译时绑定对象类型,而晚绑定是在运行时才绑定对象的类型。利用反射可以实现晚绑定,即动态加载类型,并调用他们的方法,下边是MSDN中的一个例子,详细的解释信息见注释
namespace ConsoleApplication2
{
public class Example
{
private int factor;
public Example(int f)
{
factor = f;
}
public int SampleMethod(int x)
{
Console.WriteLine("\nExample.SampleMethod({0}) executes.", x);
return x * factor;
}
public static void Main()
{
//获取当前执行代码的程序集
Assembly assem = Assembly.GetExecutingAssembly();
Console.WriteLine("Assembly Full Name:");
Console.WriteLine(assem.FullName);
// The AssemblyName type can be used to parse the full name.
AssemblyName assemName = assem.GetName();
Console.WriteLine("\nName: {0}", assemName.Name);
Console.WriteLine("Version: {0}.{1}",
assemName.Version.Major, assemName.Version.Minor);
Console.WriteLine("\nAssembly CodeBase:");
Console.WriteLine(assem.CodeBase);
// 从程序集众创建一个Example实例并且用object类型的引用o指向它,同时调用一个输入参数的构造函数
Object o = assem.CreateInstance("ConsoleApplication2.Example", false,
BindingFlags.ExactBinding,
null, new Object[] { 2 }, null, null);
//构造Example类的一个晚绑定的方法SampleMethod
MethodInfo m = assem.GetType("ConsoleApplication2.Example").GetMethod("SampleMethod");
//调用刚才实例化好的Example对象o中的SampleMethod方法,传入的参数为42
Object ret = m.Invoke(o, new Object[] { 42 });
Console.WriteLine("SampleMethod returned {0}.", ret);
Console.WriteLine("\nAssembly entry point:");
Console.WriteLine(assem.EntryPoint);
}
}
反射特性:
[Table(Name="dbo.[User]")]
public partial class User
{
当C#编译器发现这个属性有一个特性Table时,首先会把字符串Attribute添加到这个名称的后面,形成一个组合名称TableAttribute,然后在其搜索路径的所有命名空间中搜索有相同类名的类。但要注意,如果该特性名结尾是Attribute,编译器就不会把该字符串加到组合名称中。所有的特性都是从System.Attribute类型上面派生的。
接着我们来看一下Table特性的定制格式
[AttributeUsageAttribute(AttributeTargets.Class, Inherited=true,AllowMultiple=false)]
public class TalbeAttribute:Attribute
{
在定义类型时使用System.AttributeUsage特性来表明这个自定义特性的使用范围,这里使用了Class样式,表示TableAttribute特性只能用在其它的Class类型前面,若放置在Interface或Struct类型前面,或者放在对象成员的前面则会出现编译错误。这里还是用语句 AllowMultiple=false 语句来表明对于一个类型,该特性只能用一次,若一个Class类型前面出现多个TableAttribute,则会出现编译错误。若设置AllowMultiple=true,则该特性可以多次定义,也就是一个Class类型前面可以出现多个相同类型的特性。不过这里我们假设一个对象只能映射到一个数据表上,没有多重映射,因此就指明对同一个类型该特性不能多次使用。Inherited参数设定为true,就表示应用到类或接口上的特性也可以自动应用到所派生的类或接口上。
我们再看一下定制TalbeAttribute特性的完整例子:
public class TableAttribute : Attribute
{
//保存表名的字段
private string _tableName;
public TableAttribute()
{
}
public TableAttribute(string tableName)
{
this._tableName = tableName;
}
/// <summary>
/// 映射的表名(表的全名:模式名.表名)
/// </summary>
public string TableName
{
set
{
this._tableName = value;
}
get
{
return this ._tableName;
}
}
}
特性也是一个Class类型,可以有多个构造函数,就像C#的new语句一样,我们向类型附加特性时可以使用不同的初始化参数来指明使用特性的那个构造函数。我们附加特性时还可以使用“属性名=属性值”的方法来直接指明特性的属性值。该特性中定义了一个TableName属性,该属性就是被修饰的对象所映射的数据库表的名称。
下面我们举一个使用特性来进行O/RMapping的例子,也就是将对象转化成Sql语句
用户类:
[Table("User")]
public class User
{
[Colum("userID", DbType = DbType.Int32)]
public int UserID { get; set; }
[Colum("UserName", DbType = DbType.String)]
public string UserName { get; set; }
}
表特性
[AttributeUsageAttribute(AttributeTargets.Class, Inherited = false, AllowMultiple = false)]
public class TableAttribute : Attribute
{
//保存表名的字段
private string _tableName;
public TableAttribute()
{
}
public TableAttribute(string tableName)
{
this._tableName = tableName;
}
/// <summary>
/// 映射的表名(表的全名:模式名.表名)
/// </summary>
public string TableName
{
set
{
this._tableName = value;
}
get
{
return this._tableName;
}
}
}
列特性:
[AttributeUsageAttribute(AttributeTargets.Property, Inherited = false, AllowMultiple = false)]
public class ColumAttribute : Attribute
{
private string _columName;
private DbType _dbType ;
public ColumAttribute()
{
}
public ColumAttribute(string columName)
: this()
{
this._columName = columName;
}
public ColumAttribute(string columName, DbType dbType)
: this(columName)
{
this._dbType = dbType;
}
//列名
public virtual string ColumName
{
set
{
this._columName = value;
}
get
{
return this._columName;
}
}
//描述一些特殊的数据库类型
public DbType DbType
{
get { return _dbType; }
set { _dbType = value; }
}
}
public class ORMHelp
{
public void Insert(object table)
{
Type type = table.GetType();
//定义一个字典来存放表中字段和值的对应序列
Dictionary<string, string> columValue = new Dictionary<string, string>();
StringBuilder SqlStr=new StringBuilder();
SqlStr.Append("insert into ");
//得到表名子
TableAttribute temp = (TalbeAttribute)type.GetCustomAttributes(typeof(TalbeAttribute), false).First();
SqlStr.Append(temp.TableName);
SqlStr.Append("(");
PropertyInfo[] Propertys=type.GetProperties();
foreach (var item in Propertys)
{
object[] attributes = item.GetCustomAttributes(false);
foreach (var item1 in attributes)
{
//获得相应属性的值
string value= table.GetType().InvokeMember(item.Name, System.Reflection.BindingFlags.GetProperty, null, table, null).ToString();
ColumAttribute colum = item1 as ColumAttribute;
if (colum != null)
{
columValue.Add(colum.ColumName,value);
}
}
}
//拼插入操作字符串
foreach (var item in columValue)
{
SqlStr.Append(item.Key);
SqlStr.Append(",");
}
SqlStr.Remove(SqlStr.Length-1, 1);
SqlStr.Append(") values('");
foreach (var item in columValue)
{
SqlStr.Append(item.Value);
SqlStr.Append("','");
}
SqlStr.Remove(SqlStr.Length - 2, 2);
SqlStr.Append(")");
Console.WriteLine(SqlStr.ToString());
}
}
SqlStr中的内容为insert into User(userID,UserName) values('1','lfm')
前端使用代码:
static void Main(string[] args)
{
ORMHelp o = new ORMHelp();
User u = new User() { UserID=1,UserName="lfm"};
o.Insert(u);
}
应用
例子这个东西其实挺难弄得,弄个简单的,虽然能说明问题但却容易让人觉得没实用价值,弄个有实用价值却又往往牵扯很多别的技术甚至牵扯很多业务逻辑,看起来很复杂很难懂。在这里我尽量追求几个有实用价值又不复杂的例子。
1、使用反射通过读取配置文件来动态的创建相关类的对象
我们先来看看Main函数和需要动态加载的对象在同一个程序集的情况
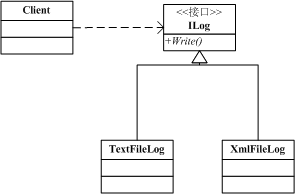
结构图:

接口
interface ILog
{
bool Write(string message);
bool Write(Exception ex);
}
class TextFileLog : ILog
{
public bool Write(string message)
{
string fileDir = ConfigurationManager.AppSettings["LogTarget"].ToString();
using (StreamWriter w = File.AppendText(fileDir))
{
// w.Write(" Log Entry : ");
w.WriteLine("发生时间{0}", DateTime.Now.ToLocalTime().ToString());
w.WriteLine("日志内容为:{0}", message);
w.WriteLine("-------------------------------");
// Update the underlying file.
w.Flush();
w.Close();
}
return true;
}
public bool Write(Exception ex)
{
Write(ex.Message);
return true;
}
}
class XmlFileLog : ILog
{
public bool Write(string message)
{
string xmlFilePath = ConfigurationManager.AppSettings["LogTarget"].ToString();
if (File.Exists(xmlFilePath))
{
XmlDocument doc = new XmlDocument();
doc.Load(xmlFilePath);
XmlDocumentFragment docFrag = doc.CreateDocumentFragment();
XmlNode nod = doc.SelectSingleNode("Logs");
docFrag.InnerXml = "<Log><Time>" + DateTime.Now.ToLocalTime().ToString()
+ "</Time><Message>" + message + "</Message></Log>";
nod.AppendChild(docFrag);
doc.Save(xmlFilePath);
return true;
}
else
{
XmlWriterSettings settings = new XmlWriterSettings();
settings.Indent = true; //设置缩进
settings.ConformanceLevel = ConformanceLevel.Auto;
settings.IndentChars = " ";
settings.OmitXmlDeclaration = false;
using (XmlWriter writer = XmlWriter.Create(xmlFilePath, settings))
{
//Start writing the XML document
writer.WriteStartDocument(false);
//Start with the root element
writer.WriteStartElement("Logs");
writer.WriteStartElement("Log");
writer.WriteStartElement("Time");
writer.WriteString(DateTime.Now.ToLocalTime().ToString());
writer.WriteEndElement();
writer.WriteStartElement("Message");
writer.WriteString(message);
writer.WriteEndElement();
writer.WriteEndElement();
writer.WriteEndDocument();
//Flush the object and write the XML data to the file
writer.Flush();
return true;
}
}
}
public bool Write(Exception ex)
{
Write(ex.Message);
return true;
}
}
<?xml version="1.0" encoding="utf-8" ?>
<configuration>
<appSettings>
<add key="LogType" value="LogClassLibrary.TextFileLog"/>
<!--
本程序集配置
<add key="LogType" value="ConsoleApplication2.Log例子.TextFileLog"/>
-->
<!-- XmlFileLog TextFileLog-->
<add key="LogTarget" value="c:\log.txt"/>
</appSettings>
</configuration>
public static void Main()
{
#region 同程序集下
System.Type type = System.Type.GetType(ConfigurationManager.AppSettings["LogType"].ToString());
ILog log = (ILog)Activator.CreateInstance(type);
log.Write(new Exception("异常测试"));
#endregion
}
如果在不同的程序集下,那主函数和配置会略有不同
public static void Main()
{
#region 不同程序集
string assemblyPath = Path.Combine(Environment.CurrentDirectory, "LogClassLibrary.dll");
Assembly a = Assembly.LoadFrom(assemblyPath);
Type type = a.GetType(ConfigurationManager.AppSettings["LogType"].ToString());
LogClassLibrary.ILog log = (LogClassLibrary.ILog)type.InvokeMember(null,BindingFlags.CreateInstance,null,null,null);
log.Write(new Exception("异常测试"));
#endregion
}
这部分源码下载
2、插件编程技术
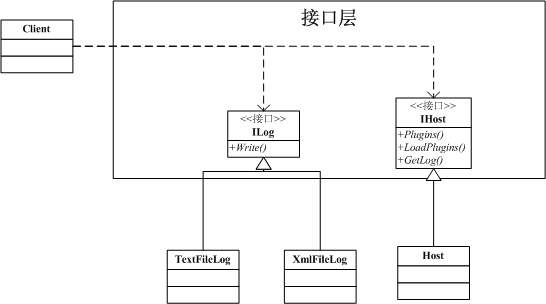
插件是指遵循一定的接口规范、可以动态加载和运行的程序模块。从上面的例子可以看出,通过反射可以非常方便的动态加载程序集。因此,利用反射的动态加载代码能力,可以很容易的实现插件。插件编程的要点是使用接口来定义插件的功能特征。插件的宿主程序通过接口来确认、装载和执行插件的功能,实现插件功能的所有类都必须实现定义插件的接口。
这里只是选贴一部分代码,详细分析请看源码
结构图

接口部分
public interface IHost
{
List<ILog> Plugins { get; }
int LoadPlugins(string path);
ILog GetLog(string name);
}
public interface ILog
{
bool Write(string message);
bool Write(Exception ex);
}
宿主实现
public class Host : IHost
{
private List<ILog> plugins = new List<ILog>();
#region IHost 成员
public List<ILog> Plugins
{
get { return plugins; }
}
public int LoadPlugins(string path)
{
string[] assemblyFiles = Directory.GetFiles(path, "*.dll");
foreach (var file in assemblyFiles)
{
Assembly assembly = Assembly.LoadFrom(file);
foreach (var type in assembly.GetExportedTypes())
{
if (type.IsClass && typeof(ILog).IsAssignableFrom(type))
{
ILog plugin = Activator.CreateInstance(type) as ILog;
plugins.Add(plugin);
}
}
}
return plugins.Count;
}
public ILog GetLog(string name)
{
foreach (var item in plugins)
{
if (item.GetType().ToString()==name)
{
return item;
}
}
return null;
}
#endregion
}
ILog的实现和上例基本一样,请参考
主程序代码
static void Main(string[] args)
{
Host.Host host = new Host.Host();
host.LoadPlugins(".");
InterfaceLayer.ILog log = host.GetLog(ConfigurationManager.AppSettings["LogType"].ToString());
log.Write(new Exception("异常测试"));
}
插件编程源码下载
3、分析对象,得到对象中的属性值
大家使用应都用过asp.net中的DropdownList,在绑定其值的时候绝大多数情况下我们做的都是同样的事情,获得数据源,根据数据源中的某些列绑定控件,下边我们来说说通用情况的处理方式。我们只需要提供数据集合,以及需要绑定到控件的两个属性(text,value)名即可。
public class DDlControl
{
private ListControl underlyingList;
public DDlControl(ListControl underlyingList)
{
this.underlyingList = underlyingList;
}
public void Add(IDDL ddl)
{
underlyingList.Items.Add(new ListItem(ddl.Name, ddl.Value));
}
public void Add<T>(T t, string nameStr, string valueStr)
{
string name = Convert.ToString(t.GetType().InvokeMember
(nameStr, System.Reflection.BindingFlags.GetProperty, null, t, null));
string value = Convert.ToString(t.GetType().InvokeMember
(valueStr, System.Reflection.BindingFlags.GetProperty, null, t, null));
Add(new DDLStruct(name,value));
}
public void Clear()
{
underlyingList.Items.Clear();
}
public IDDL SelectedItem
{
get
{
ListItem item = underlyingList.SelectedItem;
return new DDLStruct(item.Text, item.Value);
}
}
public void BindTo<T>(IEnumerable<T> list, string nameStr, string valueStr)
{
Clear();
foreach (var item in list)
{
Add<T>(item, nameStr, valueStr);
}
}
public string SelectValue
{
get
{
return underlyingList.SelectedValue;
}
set
{
underlyingList.SelectedValue=value;
}
}
}
public struct DDLStruct
{
public DDLStruct(string name, string value)
{
this.name = name;
this.value = value;
}
private string name;
private string value;
public string Name
{
get { return name; }
}
public string Value
{
get { return value; }
}
}


 本文深入探讨了C#中的反射技术,包括如何使用Type类获取类型信息、如何动态加载类型并调用方法,以及如何利用反射特性进行ORM映射。此外,还提供了使用反射动态加载配置文件中的类和实现插件编程技术的具体示例。


 768
768

 被折叠的 条评论
为什么被折叠?


